2020 HYUNDAI VELOSTER oil temperature
[x] Cancel search: oil temperaturePage 107 of 480
3-107
Convenient features of your vehicle
3
Air conditioning system operation tips
If the vehicle has been parked in
direct sunlight during hot weather,
open the windows for a short time
to let the hot air inside the vehicle
escape.
After sufficient cooling has been
achieved, switch back from the
recirculated air to the fresh outside
air position.
To help reduce moisture inside of
the windows on rainy or humid
days, decrease the humidity inside
the vehicle by operating the air con-
ditioning system with the windows
and sunroof closed.
Use the air conditioning system
every month only for a few minutes
to ensure maximum system per-
formance.
If you operate air conditioner exces-
sively, the difference between the
temperature of the outside air and
that of the windshield could cause
the outer surface of the windshield
to fog up, causing loss of visibility.
In this case, set the mode selection
knob or button to the position
and fan speed control to the lower
speed.
System Maintenance
Cabin air filter
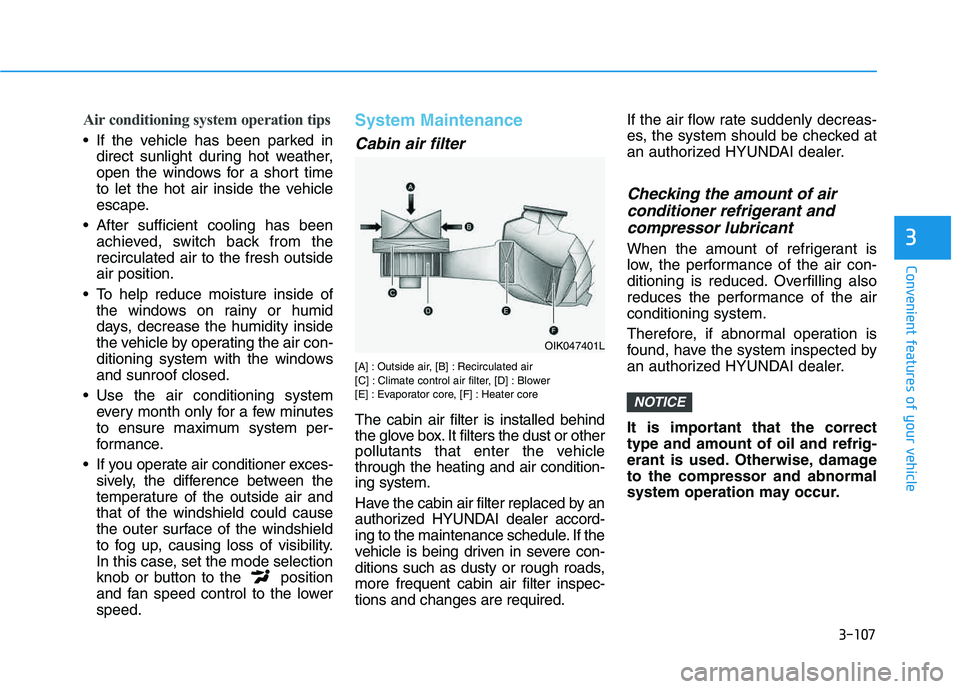
[A] : Outside air, [B] : Recirculated air
[C] : Climate control air filter, [D] : Blower
[E] : Evaporator core, [F] : Heater core
The cabin air filter is installed behind
the glove box. It filters the dust or other
pollutants that enter the vehicle
through the heating and air condition-
ing system.
Have the cabin air filter replaced by an
authorized HYUNDAI dealer accord-
ing to the maintenance schedule. If the
vehicle is being driven in severe con-
ditions such as dusty or rough roads,
more frequent cabin air filter inspec-
tions and changes are required.If the air flow rate suddenly decreas-
es, the system should be checked at
an authorized HYUNDAI dealer.
Checking the amount of air
conditioner refrigerant and
compressor lubricant
When the amount of refrigerant is
low, the performance of the air con-
ditioning is reduced. Overfilling also
reduces the performance of the air
conditioning system.
Therefore, if abnormal operation is
found, have the system inspected by
an authorized HYUNDAI dealer.
It is important that the correct
type and amount of oil and refrig-
erant is used. Otherwise, damage
to the compressor and abnormal
system operation may occur.
NOTICE
OIK047401L
Page 116 of 480
3-116
Convenient features of your vehicle
To help reduce moisture inside of
the windows on rainy or humid
days, decrease the humidity inside
the vehicle by operating the air
conditioning system with the win-
dows and sunroof closed.
Use the air conditioning system
every month only for a few minutes
to ensure maximum system per-
formance.
If you operate air conditioner
excessively, the difference between
the temperature of the outside air
and that of the windshield could
cause the outer surface of the
windshield to fog up, causing loss
of visibility. In this case, set the
mode selection knob or button to
the position and fan speed
control to the lower speed.
System Maintenance
Cabin air filter
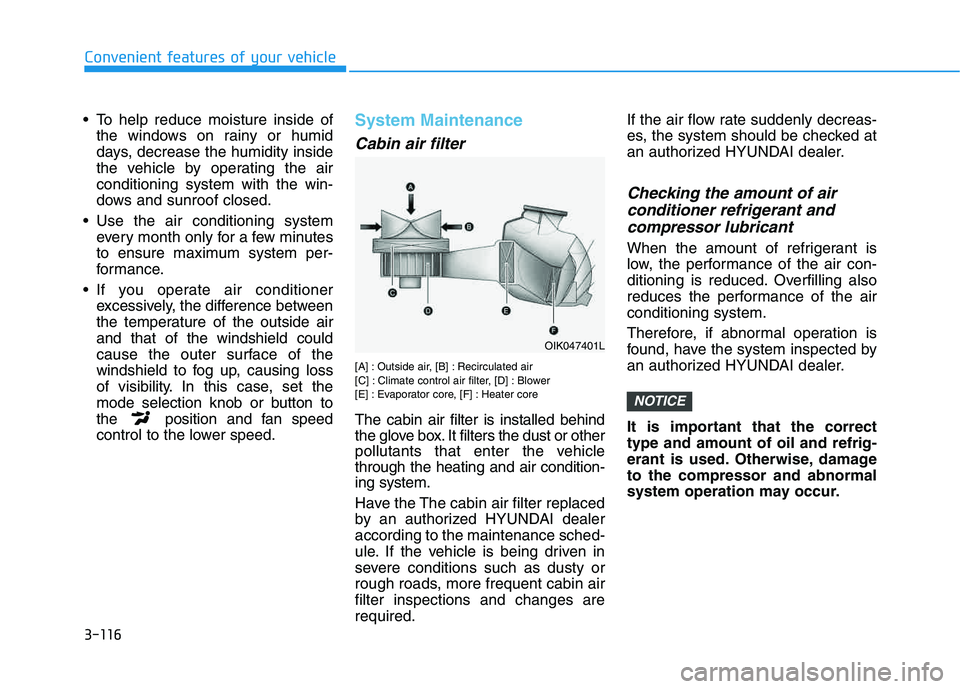
[A] : Outside air, [B] : Recirculated air
[C] : Climate control air filter, [D] : Blower
[E] : Evaporator core, [F] : Heater core
The cabin air filter is installed behind
the glove box. It filters the dust or other
pollutants that enter the vehicle
through the heating and air condition-
ing system.
Have the The cabin air filter replaced
by an authorized HYUNDAI dealer
according to the maintenance sched-
ule. If the vehicle is being driven in
severe conditions such as dusty or
rough roads, more frequent cabin air
filter inspections and changes are
required.If the air flow rate suddenly decreas-
es, the system should be checked at
an authorized HYUNDAI dealer.
Checking the amount of air
conditioner refrigerant and
compressor lubricant
When the amount of refrigerant is
low, the performance of the air con-
ditioning is reduced. Overfilling also
reduces the performance of the air
conditioning system.
Therefore, if abnormal operation is
found, have the system inspected by
an authorized HYUNDAI dealer.
It is important that the correct
type and amount of oil and refrig-
erant is used. Otherwise, damage
to the compressor and abnormal
system operation may occur.
NOTICE
OIK047401L
Page 272 of 480
5-54
The driving mode automatically
changes to SMART SPORT, when
you abruptly accelerate the vehicle
or repetitively operate the steering
wheel (Your driving is categorized
to be sporty.). In this mode, your
vehicle drives in a lower gear for
abrupt accelerating/decelerating
and increases the engine brake
performance.
You may still sense the engine
braking performance, even when
you release the accelerator pedal
in SMART SPORT mode. It is
because your vehicle remains in
lower gear over a certain period of
time for next acceleration. Thus, it
is a normal driving situation, not
indicating any malfunction.
The driving mode automatically
changes to SMART SPORT mode
only in harsh driving situations. In
most of the normal driving situa-
tions, the driving mode sets to be
either in SMART ECO mode or in
SMART NORMAL mode.Limitation of SMART mode
The SMART mode may be limited in
following situations. (The OFF indica-
tor illuminates in those situations.)
The driver manually moves the
shift lever :
It deactivates SMART mode. The
vehicle drives, as the driver manu-
ally moves the shift lever.
The cruise control is activated :
The cruise control system may
deactivate the SMART mode when
the vehicle is controlled by the set
speed of the smart cruise control
system. (SMART mode is not
deactivated just by activating the
cruise control system.) The transmission oil temperature is
either extremely low or extremely
high :
The SMART mode can be active in
most of the normal driving situa-
tions. However, an extremely high/
low transmission oil temperature
may temporarily deactivate the
SMART mode, because the trans-
mission condition is out of normal
operation condition.
Driving your vehicle
Page 390 of 480
7-21
7
Maintenance
E EN
NG
GI
IN
NE
E
O
OI
IL
L
Checking the Engine Oil Level
1. Follow all of the oil manufacturer's
precautions.
2. Be sure the vehicle is on the level
ground in P (Park) with the park-
ing brake set. If possible, block the
wheels.
3. Turn the engine on and allow the
engine to reach normal operating
temperature.
4. Turn the engine off and wait about
five minutes for the oil to return to
the oil pan.
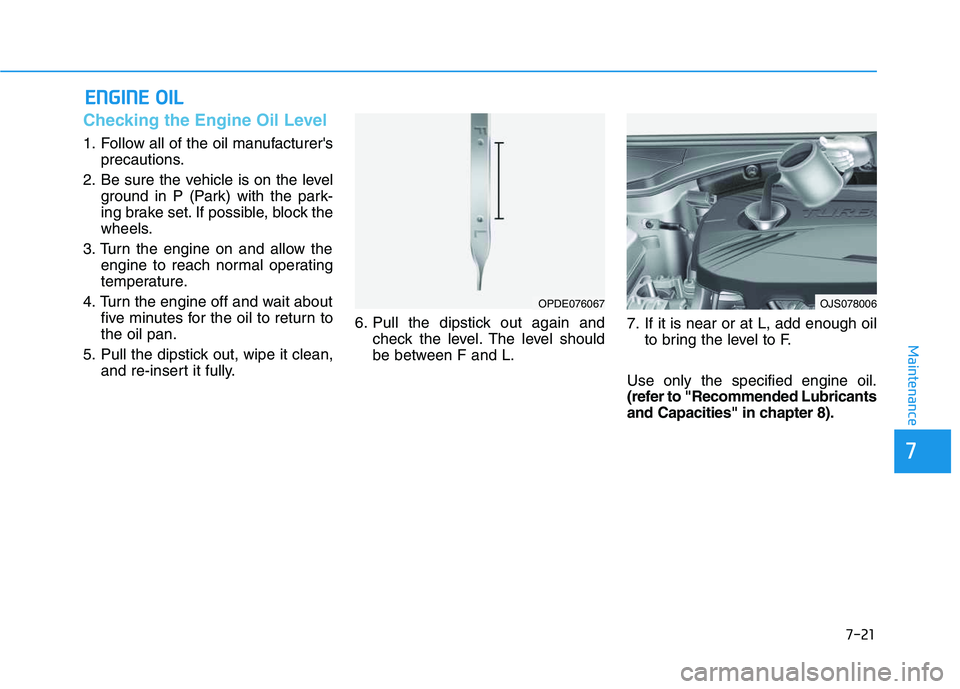
5. Pull the dipstick out, wipe it clean,
and re-insert it fully.6. Pull the dipstick out again and
check the level. The level should
be between F and L.7. If it is near or at L, add enough oil
to bring the level to F.
Use only the specified engine oil.
(refer to "Recommended Lubricants
and Capacities" in chapter 8).
OPDE076067OJS078006
Page 448 of 480
7-79
7
Maintenance
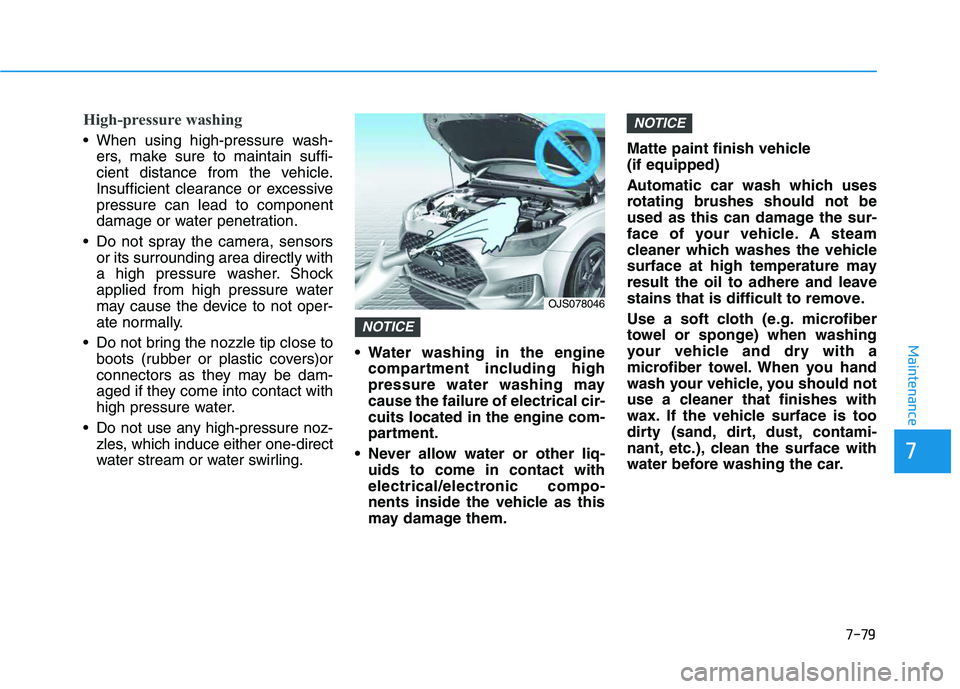
High-pressure washing
When using high-pressure wash-
ers, make sure to maintain suffi-
cient distance from the vehicle.
Insufficient clearance or excessive
pressure can lead to component
damage or water penetration.
Do not spray the camera, sensors
or its surrounding area directly with
a high pressure washer. Shock
applied from high pressure water
may cause the device to not oper-
ate normally.
Do not bring the nozzle tip close to
boots (rubber or plastic covers)or
connectors as they may be dam-
aged if they come into contact with
high pressure water.
Do not use any high-pressure noz-
zles, which induce either one-direct
water stream or water swirling. Water washing in the engine
compartment including high
pressure water washing may
cause the failure of electrical cir-
cuits located in the engine com-
partment.
Never allow water or other liq-
uids to come in contact with
electrical/electronic compo-
nents inside the vehicle as this
may damage them.Matte paint finish vehicle
(if equipped)
Automatic car wash which uses
rotating brushes should not be
used as this can damage the sur-
face of your vehicle. A steam
cleaner which washes the vehicle
surface at high temperature may
result the oil to adhere and leave
stains that is difficult to remove.
Use a soft cloth (e.g. microfiber
towel or sponge) when washing
your vehicle and dry with a
microfiber towel. When you hand
wash your vehicle, you should not
use a cleaner that finishes with
wax. If the vehicle surface is too
dirty (sand, dirt, dust, contami-
nant, etc.), clean the surface with
water before washing the car.
NOTICE
NOTICE
OJS078046
Page 467 of 480
8-9
88
Specifications
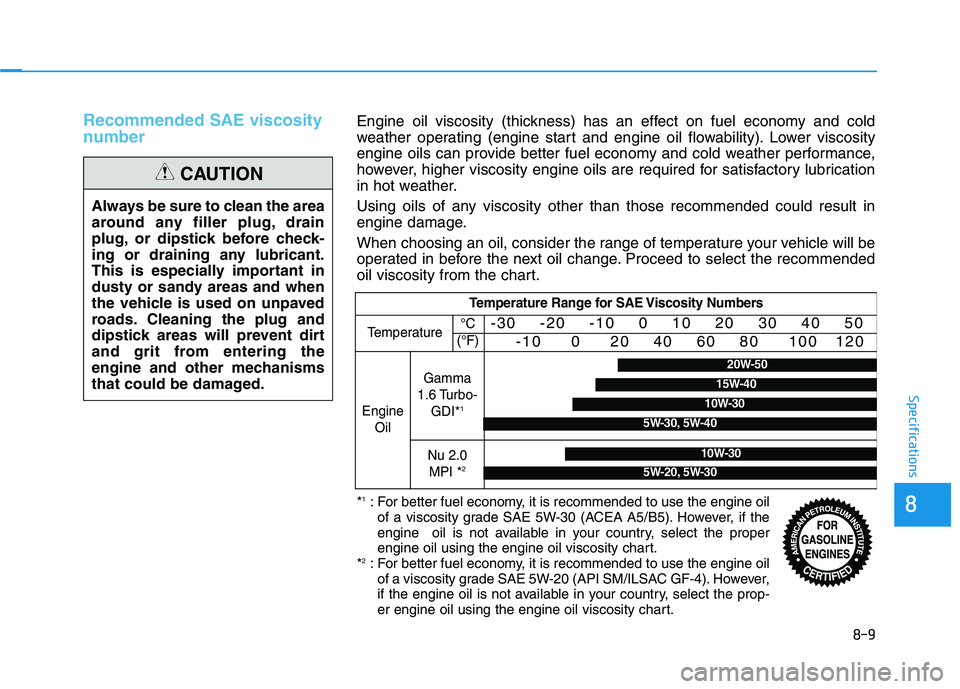
Recommended SAE viscosity
number
Always be sure to clean the area
around any filler plug, drain
plug, or dipstick before check-
ing or draining any lubricant.
This is especially important in
dusty or sandy areas and when
the vehicle is used on unpaved
roads. Cleaning the plug and
dipstick areas will prevent dirt
and grit from entering the
engine and other mechanisms
that could be damaged.
CAUTION
Temperature Range for SAE Viscosity Numbers
Temperature -30 -20 -10 0 10 20 30 40 50
-10 0 20 40 60 80 100 120
Engine
Oil
Gamma
1.6 Turbo-
GDI*
1
Nu 2.0
MPI *2
°C
(°F)
*1: For better fuel economy, it is recommended to use the engine oil
of a viscosity grade SAE 5W-30 (ACEA A5/B5). However, if the
engine oil is not available in your country, select the proper
engine oil using the engine oil viscosity chart.
*
2: For better fuel economy, it is recommended to use the engine oil
of a viscosity grade SAE 5W-20 (API SM/ILSAC GF-4). However,
if the engine oil is not available in your country, select the prop-
er engine oil using the engine oil viscosity chart.
5W-30, 5W-40
10W-30
15W-40
20W-50
10W-30
5W-20, 5W-30
Engine oil viscosity (thickness) has an effect on fuel economy and cold
weather operating (engine start and engine oil flowability). Lower viscosity
engine oils can provide better fuel economy and cold weather performance,
however, higher viscosity engine oils are required for satisfactory lubrication
in hot weather.
Using oils of any viscosity other than those recommended could result in
engine damage.
When choosing an oil, consider the range of temperature your vehicle will be
operated in before the next oil change. Proceed to select the recommended
oil viscosity from the chart.
Page 473 of 480
I-4
Daytime Running Light ..................................................7-68
Dimensions .......................................................................8-2
Disc Brakes Wear Indicator ............................................5-41
Door Locks .....................................................................3-15
Automatic Door Lock and Unlock Features ..............3-19
Child-Protector Rear Door Locks ..............................3-19
Operating Door Locks from Inside the Vehicle .........3-16
Operating Door Locks from Outside the Vehicle ......3-15
Drive Mode Integrated Control System .........................5-51
DRIVE MODE (with Automatic Transmission/
Dual Clutch Transmission) .....................................5-51
SPORT MODE (with Manual Transmission) ............5-55
Driver Assist System.......................................................3-96
Parking Distance Warning (Reverse) system .............3-97
Parking Distance Warning (Reverse) system
Precautions ............................................................3-100
Rear view monitor ......................................................3-96
Driver Attention Warning (DAW) System......................5-96
Resetting the System ..................................................5-97
System Malfunction ...................................................5-98
System Setting and Activation ...................................5-96
System Standby ..........................................................5-98
Dual Clutch Transmission...............................................5-29
Dual Clutch Transmission Operation .........................5-29
Good Driving Practices ..............................................5-38
LCD display for transmission temperature and
warning message .....................................................5-31Electric Power Steering (EPS) ........................................3-21
Electronic Stability Control (ESC) .................................5-45
Emission Control System ...............................................7-86
Crankcase Emission Control System .........................7-86
Evaporative Emission Control System Including
Onboard Refueling Vapor Recovery (ORVR) ........7-86
Exhaust Emission Control System .............................7-87
Engine ...............................................................................8-2
Engine Compartment.................................................1-6, 7-3
Engine Coolant ...............................................................7-23
Changing Engine Coolant ..........................................7-26
Checking the Engine Coolant Level ..........................7-23
Engine Number ...............................................................8-11
Engine Oil .......................................................................7-21
Checking the Engine Oil and Filter ...........................7-22
Checking the Engine Oil Level ..................................7-21
Engine Start/Stop Button ..................................................5-9
Explanation of Scheduled Maintenance Items ...............7-18
Exterior Care ...................................................................7-78
Exterior Features .............................................................3-35
Fuel Filler Door ..........................................................3-38
Hood ...........................................................................3-35
Tailgate .......................................................................3-36
Index
DE