2020 HYUNDAI VELOSTER window
[x] Cancel search: windowPage 13 of 480
1-2
E EX
XT
TE
ER
RI
IO
OR
R
O
OV
VE
ER
RV
VI
IE
EW
W
Your vehicle at a glance
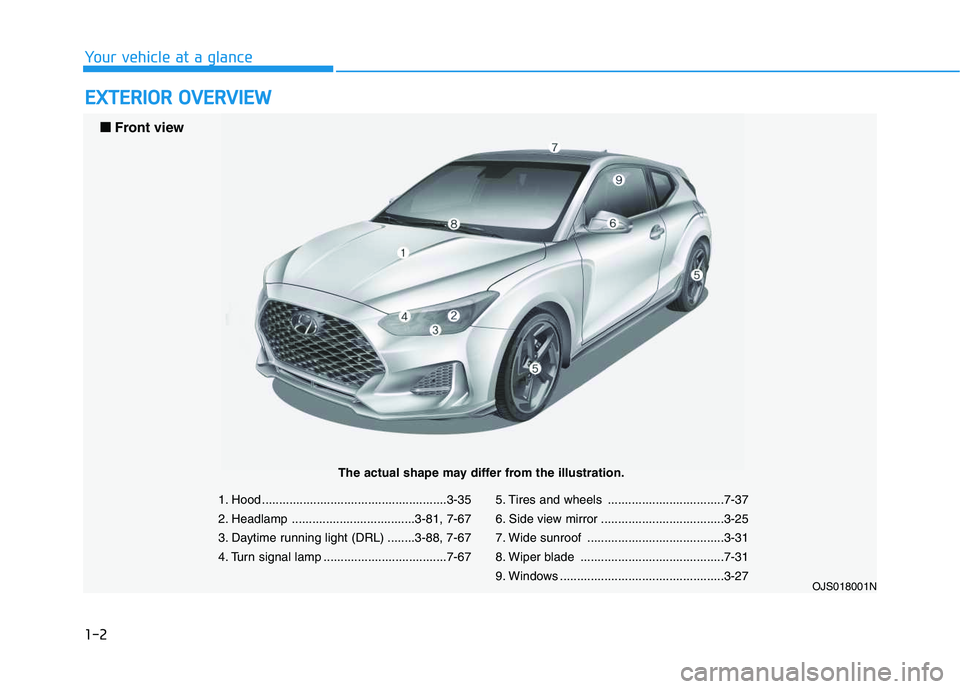
1. Hood ......................................................3-35
2. Headlamp ....................................3-81, 7-67
3. Daytime running light (DRL) ........3-88, 7-67
4. Turn signal lamp ....................................7-675. Tires and wheels ..................................7-37
6. Side view mirror ....................................3-25
7. Wide sunroof ........................................3-31
8. Wiper blade ..........................................7-31
9. Windows ................................................3-27
OJS018001N
■ ■
Front view
The actual shape may differ from the illustration.
Page 15 of 480
1-4
Your vehicle at a glance
I
IN
N T
TE
ER
R I
IO
O R
R
O
O V
VE
ER
R V
V I
IE
E W
W
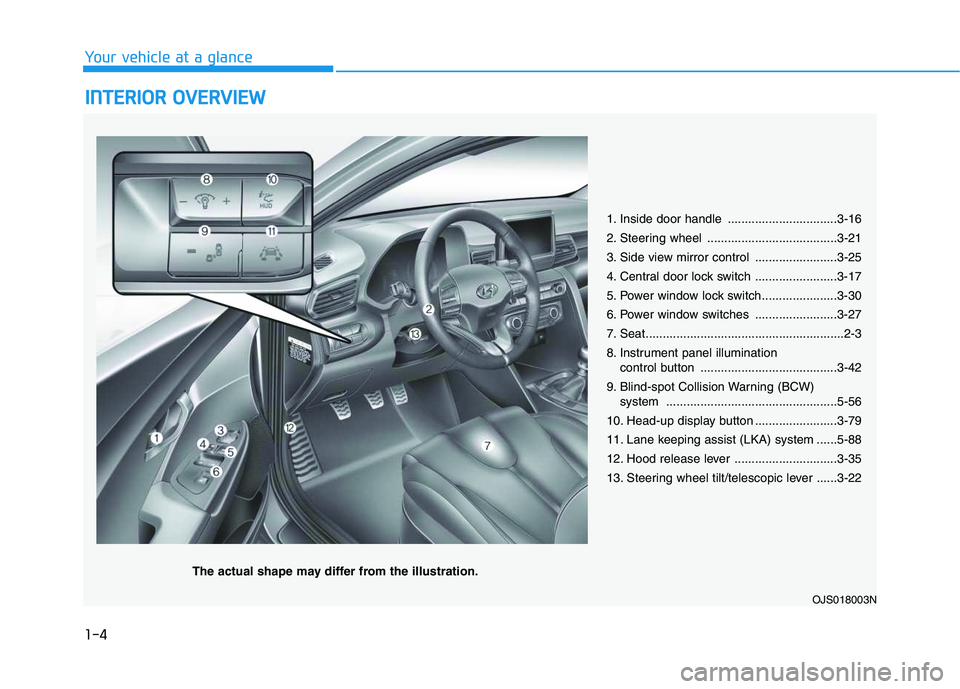
1. Inside door handle ................................3-16
2. Steering wheel ......................................3-21
3. Side view mirror control ........................3-25
4. Central door lock switch ........................3-17
5. Power window lock switch......................3-30
6. Power window switches ........................3-27
7. Seat..........................................................2-3
8. Instrument panel illumination
control button ........................................3-42
9. Blind-spot Collision Warning (BCW) system ..................................................5-56
10. Head-up display button ........................3-79
11. Lane keeping assist (LKA) system ......5-88
12. Hood release lever ..............................3-35
13. Steering wheel tilt/telescopic lever ......3-22
OJS018003N
The actual shape may differ from the illustration.
Page 62 of 480
2-45
Safety system of your vehicle
2
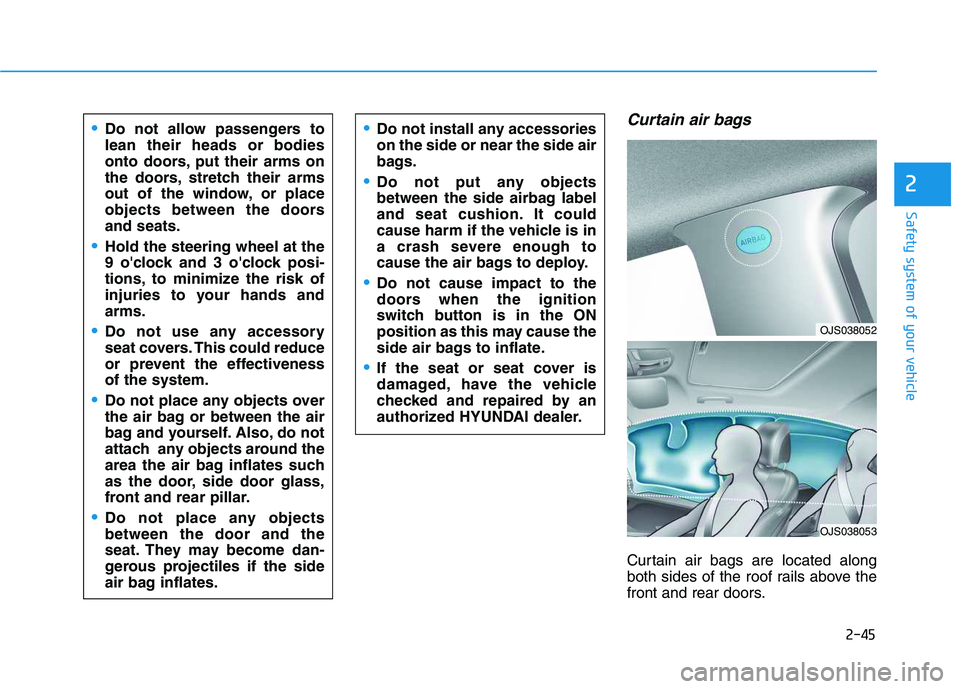
Curtain air bags
Curtain air bags are located along
both sides of the roof rails above the
front and rear doors.
Do not allow passengers to
lean their heads or bodies
onto doors, put their arms on
the doors, stretch their arms
out of the window, or place
objects between the doors
and seats.
Hold the steering wheel at the
9 o'clock and 3 o'clock posi-
tions, to minimize the risk of
injuries to your hands and
arms.
Do not use any accessory
seat covers. This could reduce
or prevent the effectiveness
of the system.
Do not place any objects over
the air bag or between the air
bag and yourself. Also, do not
attach any objects around the
area the air bag inflates such
as the door, side door glass,
front and rear pillar.
Do not place any objects
between the door and the
seat. They may become dan-
gerous projectiles if the side
air bag inflates.
Do not install any accessories
on the side or near the side air
bags.
Do not put any objects
between the side airbag label
and seat cushion. It could
cause harm if the vehicle is in
a crash severe enough to
cause the air bags to deploy.
Do not cause impact to the
doors when the ignition
switch button is in the ON
position as this may cause the
side air bags to inflate.
If the seat or seat cover is
damaged, have the vehicle
checked and repaired by an
authorized HYUNDAI dealer.
OJS038052
OJS038053
Page 63 of 480
2-46
Safety system of your vehicle
They are designed to help protect the
heads of the front seat occupants
and the rear outboard seat occupants
in certain side impact collisions.
The curtain air bags are designed to
deploy during certain side impact
collisions, depending on the crash
severity.
The side and curtain air bags on
both sides of the vehicle may deploy
if a rollover or possible rollover is
detected.
The curtain air bags are not designed
to deploy in all side impact or rollover
situations.
How Does the Air Bag System
Operate?
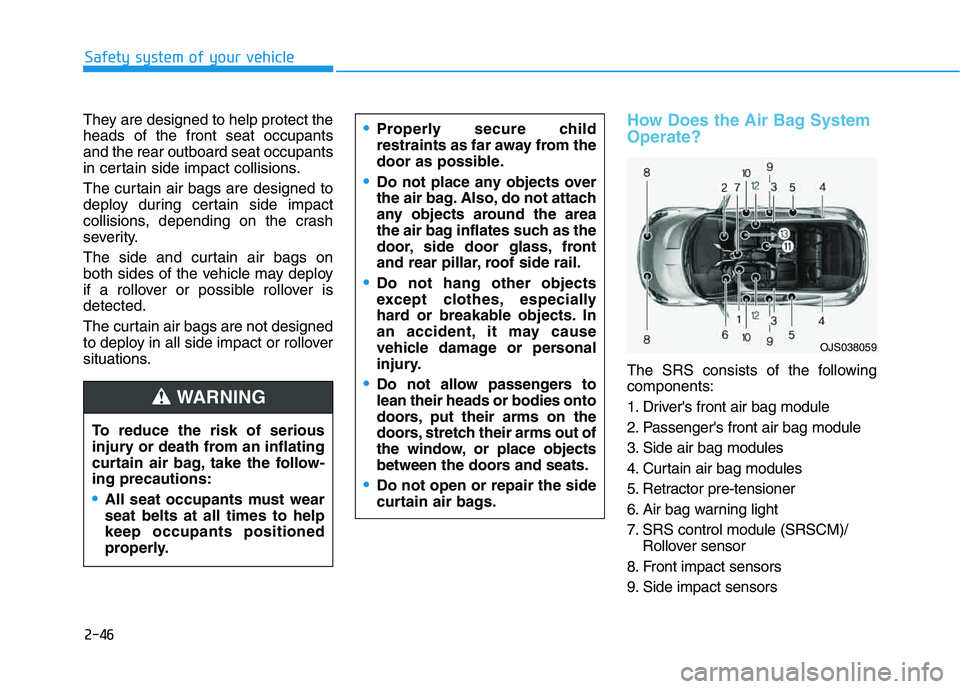
The SRS consists of the following
components:
1. Driver's front air bag module
2. Passenger's front air bag module
3. Side air bag modules
4. Curtain air bag modules
5. Retractor pre-tensioner
6. Air bag warning light
7. SRS control module (SRSCM)/
Rollover sensor
8. Front impact sensors
9. Side impact sensors To reduce the risk of serious
injury or death from an inflating
curtain air bag, take the follow-
ing precautions:
All seat occupants must wear
seat belts at all times to help
keep occupants positioned
properly.
Properly secure child
restraints as far away from the
door as possible.
Do not place any objects over
the air bag. Also, do not attach
any objects around the area
the air bag inflates such as the
door, side door glass, front
and rear pillar, roof side rail.
Do not hang other objects
except clothes, especially
hard or breakable objects. In
an accident, it may cause
vehicle damage or personal
injury.
Do not allow passengers to
lean their heads or bodies onto
doors, put their arms on the
doors, stretch their arms out of
the window, or place objects
between the doors and seats.
Do not open or repair the side
curtain air bags.
WARNING
OJS038059
Page 68 of 480
2-51
Safety system of your vehicle
2
What to Expect After an Air
Bag Inflates
After a frontal or side air bag inflates,
it will deflate very quickly. Air bag
inflation will not prevent the driver
from seeing out of the windshield or
being able to steer. Curtain air bags
may remain partially inflated for
some time after they deploy.
Noise and smoke from inflating
air bag
When the air bags inflate, they make
a loud noise and may produce
smoke and powder in the air inside of
the vehicle. This is normal and is a
result of the ignition of the air bag
inflator. After the air bag inflates, you
may feel substantial discomfort in
breathing because of the contact of
your chest with both the seat belt and
the air bag, as well as from breathing
the smoke and powder. The powder
may aggravate asthma for some
people. If you experience breathing
problems after an air bag deploy-
ment, seek medical attention imme-
diately.
Though the smoke and powder are
nontoxic, they may cause irritation to
the skin, eyes, nose, throat, etc. If
this is the case, wash and rinse with
cold water immediately and seek
medical attention if the symptoms
persist.
Always wash exposed skin
areas thoroughly with cold
and mild soap.
Always have an authorized
HYUNDAI dealer replace the
air bag immediately after
deployment. Air bags are
designed to be used only
once.
After an air bag inflates, take
the following precautions:
Open your windows and doors
as soon as possible after
impact to reduce prolonged
exposure to the smoke and
powder released by the inflat-
ing air bag.
Do not touch the air bag stor-
age area's internal compo-
nents immediately after an air
bag has inflated. The parts
that come into contact with an
inflating air bag may be very
hot.
WARNING
Page 81 of 480
3-81
Convenient features of your vehicle
3
L LI
IG
GH
HT
TI
IN
NG
G
Exterior Lights
Lighting control
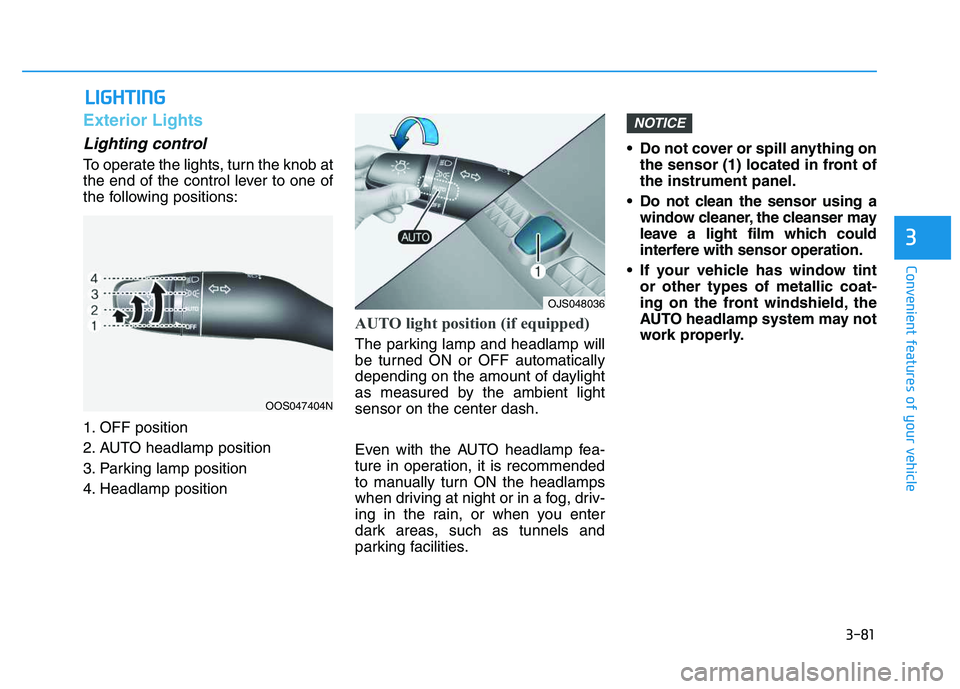
To operate the lights, turn the knob at
the end of the control lever to one of
the following positions:
1. OFF position
2. AUTO headlamp position
3. Parking lamp position
4. Headlamp position
AUTO light position (if equipped)
The parking lamp and headlamp will
be turned ON or OFF automatically
depending on the amount of daylight
as measured by the ambient light
sensor on the center dash.
Even with the AUTO headlamp fea-
ture in operation, it is recommended
to manually turn ON the headlamps
when driving at night or in a fog, driv-
ing in the rain, or when you enter
dark areas, such as tunnels and
parking facilities.• Do not cover or spill anything on
the sensor (1) located in front of
the instrument panel.
Do not clean the sensor using a
window cleaner, the cleanser may
leave a light film which could
interfere with sensor operation.
If your vehicle has window tint
or other types of metallic coat-
ing on the front windshield, the
AUTO headlamp system may not
work properly.
NOTICE
OOS047404N
OJS048036
Page 85 of 480
3-85
Convenient features of your vehicle
3
Do not attempt to disassem-
ble the front view camera
without the assistance of an
authorized HYUNDAI dealer
technician. If camera is
removed for any reason, the
system may need to be re-cal-
ibrated. Have the system
inspected by an authorized
HYUNDAI dealer.
If the windshield of your vehi-
cle is replaced, most likely the
front view camera will need to
be re-calibrated. If this
occurs, have your vehicle
inspected and have the sys-
tem re-calibrated by an
authorized HYUNDAI dealer.
Be careful that water doesn’t
get into the High Beam Assist
(HBA) unit and do not remove
or damage related parts of the
High Beam Assist (HBA) sys-
tem.
WARNING When the vehicle is driven on
a narrow curved road or rough
road
When the vehicle is driven on
an uphill road or downhill
road
When only part of the vehicle in
front is visible on a crossroad
or curved road
When there is a traffic light,
reflecting sign, flashing sign or
mirror
When the road conditions are
bad such as being wet or cov-
ered with snow
When a vehicle suddenly
appears from a curve
When the vehicle is tilted from
a flat tire or being towed
When the Lane Keeping Assist
(LKA) system warning light
illuminates
When the light from the on-
coming or front vehicle is not
detected because of exhaust
fume, smoke, fog, snow, etc.
When the front window is cov-
ered with foreign matters such
as ice, dust, fog, or is damaged
3) When the forward visibility is
poor. Such examples may
include:
When the headlamps of an on-
coming vehicle or a vehicle in
front is not detected due to
poor outside visibility (smog,
smoke, dust, fog, heavy rain,
snow, etc.)
When the windshield visibility
is poor
Page 95 of 480
3-95
Convenient features of your vehicle
3
To prevent possible damage to
the washer pump, do not oper-
ate the washer when the fluid
reservoir is empty.
To prevent possible damage to
the wipers or windshield, do not
operate the wipers when the
windshield is dry.
To prevent damage to the wiper
arms and other components, do
not attempt to move the wipers
manually.
To prevent possible damage to
the wipers and washer system,
use anti-freezing washer fluids
in the winter season or cold
weather.
Rear Window Wiper and Washer
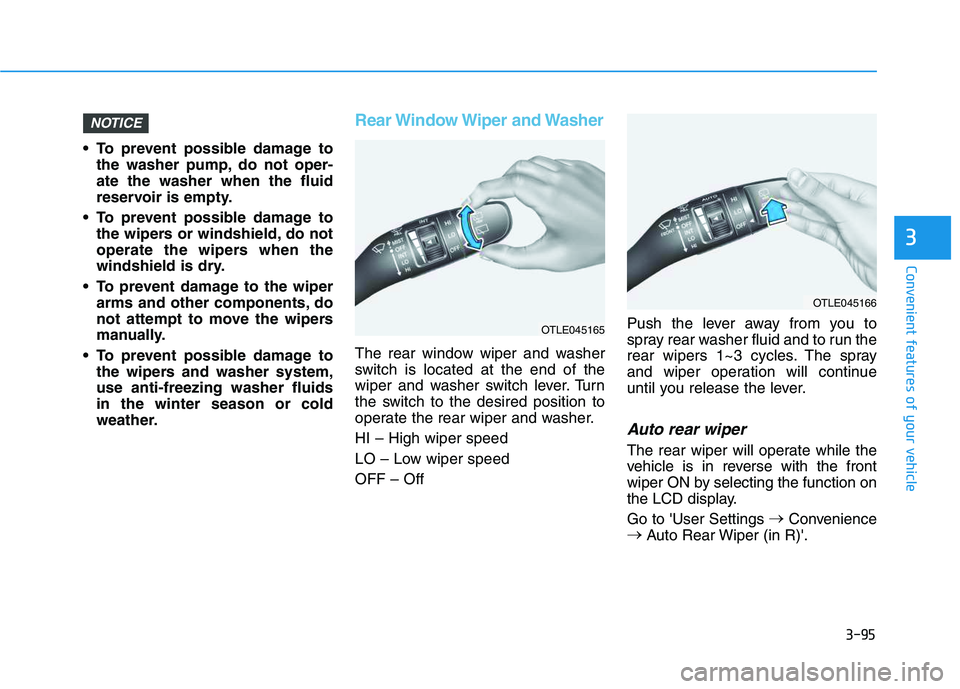
The rear window wiper and washer
switch is located at the end of the
wiper and washer switch lever. Turn
the switch to the desired position to
operate the rear wiper and washer.
HI – High wiper speed
LO – Low wiper speed
OFF – OffPush the lever away from you to
spray rear washer fluid and to run the
rear wipers 1~3 cycles. The spray
and wiper operation will continue
until you release the lever.
Auto rear wiper
The rear wiper will operate while the
vehicle is in reverse with the front
wiper ON by selecting the function on
the LCD display.
Go to 'User Settings →
Convenience
→
Auto Rear Wiper (in R)'.
NOTICE
OTLE045166
OTLE045165