2020 HYUNDAI TUCSON ULTIMATE turn signal bulb
[x] Cancel search: turn signal bulbPage 204 of 546
3-113
Convenient features of your vehicle
3
Turn signals and lane change
signals
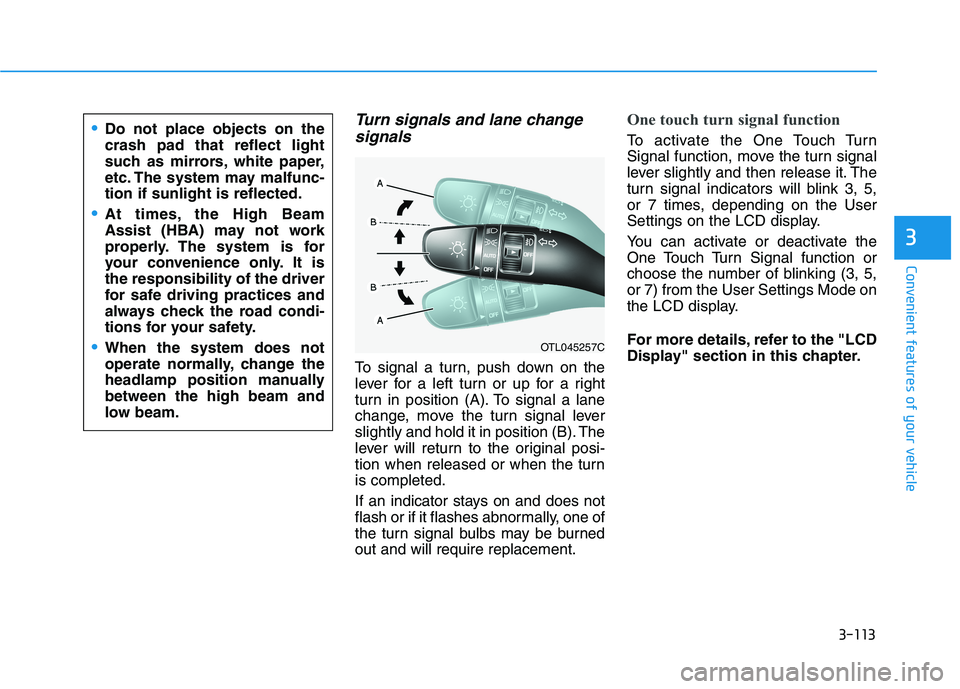
To signal a turn, push down on the
lever for a left turn or up for a right
turn in position (A). To signal a lane
change, move the turn signal lever
slightly and hold it in position (B). The
lever will return to the original posi-
tion when released or when the turn
is completed.
If an indicator stays on and does not
flash or if it flashes abnormally, one of
the turn signal bulbs may be burned
out and will require replacement.
One touch turn signal function
To activate the One Touch Turn
Signal function, move the turn signal
lever slightly and then release it. The
turn signal indicators will blink 3, 5,
or 7 times, depending on the User
Settings on the LCD display.
You can activate or deactivate the
One Touch Turn Signal function or
choose the number of blinking (3, 5,
or 7) from the User Settings Mode on
the LCD display.
For more details, refer to the "LCD
Display" section in this chapter.
OTL045257C
Do not place objects on the
crash pad that reflect light
such as mirrors, white paper,
etc. The system may malfunc-
tion if sunlight is reflected.
At times, the High Beam
Assist (HBA) may not work
properly. The system is for
your convenience only. It is
the responsibility of the driver
for safe driving practices and
always check the road condi-
tions for your safety.
When the system does not
operate normally, change the
headlamp position manually
between the high beam and
low beam.
Page 400 of 546
5-134
Driving your vehicle
Distance
Stay at least twice as far behind the
vehicle ahead as you would when
driving your vehicle without a trailer.
This can help you avoid situations
that require heavy braking and sud-
den turns.
Passing
You will need more passing distance
up ahead when you’re towing a trail-
er. And, because of the increased
vehicle length, you’ll need to go
much farther beyond the passed
vehicle before you can return to your
lane.
Backing up
Hold the bottom of the steering
wheel with one hand. Then, to move
the trailer to the left, move your hand
to the left. To move the trailer to the
right, move your hand to the right.
Always back up slowly and, if possi-
ble, have someone guide you.
Making turns
When you’re turning with a trailer,
make wider turns than normal. Do
this so your trailer won't strike soft
shoulders, curbs, road signs, trees, or
other objects. Avoid jerky or sudden
maneuvers. Signal well in advance.
Turn signals
When you tow a trailer, your vehicle
has to have a different turn signal
flasher and extra wiring. The green
arrows on your instrument panel will
flash whenever you signal a turn or
lane change. Properly connected,
the trailer lights will also flash to alert
other drivers you're about to turn,
change lanes, or stop.
When towing a trailer, the green
arrows on your instrument panel will
flash for turns even if the bulbs on the
trailer are burned out. Thus, you may
think drivers behind you are seeing
your signals when, in fact, they are
not. It’s important to check occasion-
ally to be sure the trailer bulbs are still
working. You must also check the
lights every time you disconnect and
then reconnect the wires.Do not connect a trailer lighting
system directly to your vehi-
cle's lighting system. Use an
approved trailer wiring harness.
Failure to do so could result in
damage to the vehicle electrical
system and/or personal injury.
Consult an authorized HYUNDAI
dealer for assistance.
WARNING
Page 436 of 546

7
Tire Traction .....................................................................7-41
Tire Maintenance ............................................................7-41
Tire Sidewall Labeling ....................................................7-41
Tire Terminology and Definitions................................7-45
All Season Tires ...............................................................7-48
Summer Tires ...................................................................7-48
Snow Tires ........................................................................7-49
Radial-Ply Tires ...............................................................7-49
Low Aspect Ratio Tires..................................................7-50
Fuses ......................................................................7-51
Instrument Panel Fuse Replacement..........................7-52
Engine Compartment Panel Fuse Replacement.......7-53
Fuse/Relay Panel Description ......................................7-56
Light Bulbs ............................................................7-64
Headlamp, Daytime Running Lamp, Side Marker,
Parking Lamp, Turn Signal Lamp and
Fog Lamp Replacement .................................................7-65
Side Repeater Lamp Replacement ..............................7-69
Rear Combination Light Bulb Replacement ..............7-70
High Mounted Stop Lamp Replacement ....................7-73
License Plate Light Bulb Replacement ......................7-73
Interior Light Bulb Replacement .................................7-73
Appearance Care..................................................7-75
Exterior Care ....................................................................7-75
Interior Care .....................................................................7-80
Emission Control System ....................................7-83
Crankcase Emission Control System ..........................7-83
Evaporative Emission Control System Including
Onboard Refueling Vapor Recovery (ORVR)............7-83
Exhaust Emission Control System ..............................7-84
California Perchlorate Notice.............................7-87
Page 501 of 546
7-67
7
Maintenance
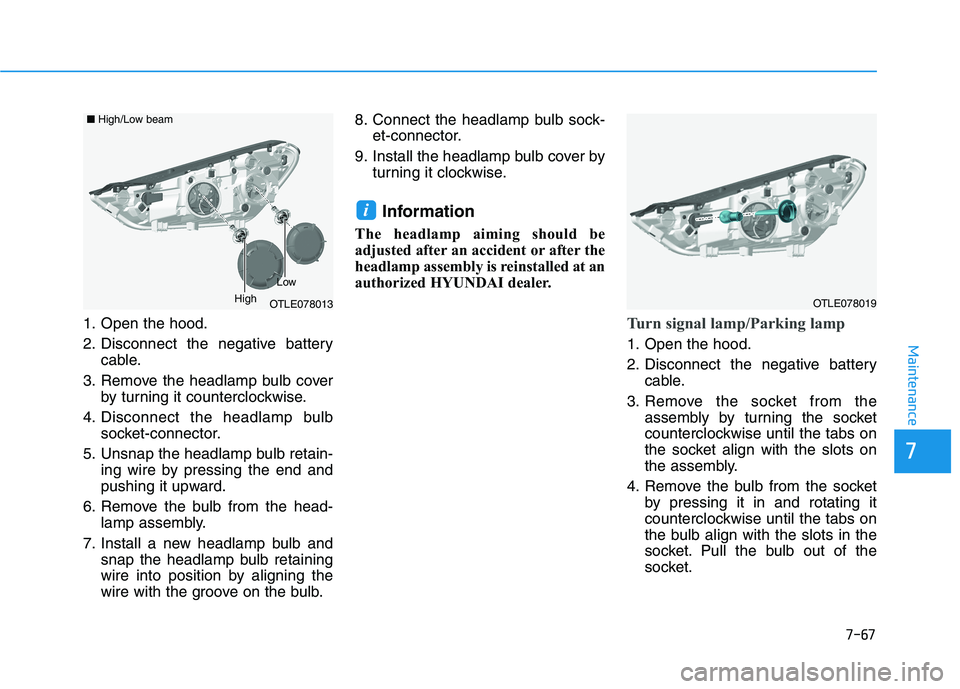
1. Open the hood.
2. Disconnect the negative battery
cable.
3. Remove the headlamp bulb cover
by turning it counterclockwise.
4. Disconnect the headlamp bulb
socket-connector.
5. Unsnap the headlamp bulb retain-
ing wire by pressing the end and
pushing it upward.
6. Remove the bulb from the head-
lamp assembly.
7. Install a new headlamp bulb and
snap the headlamp bulb retaining
wire into position by aligning the
wire with the groove on the bulb.8. Connect the headlamp bulb sock-
et-connector.
9. Install the headlamp bulb cover by
turning it clockwise.
Information
The headlamp aiming should be
adjusted after an accident or after the
headlamp assembly is reinstalled at an
authorized HYUNDAI dealer.
Turn signal lamp/Parking lamp
1. Open the hood.
2. Disconnect the negative battery
cable.
3. Remove the socket from the
assembly by turning the socket
counterclockwise until the tabs on
the socket align with the slots on
the assembly.
4. Remove the bulb from the socket
by pressing it in and rotating it
counterclockwise until the tabs on
the bulb align with the slots in the
socket. Pull the bulb out of the
socket.
i
OTLE078013
■High/Low beam
Low
HighOTLE078019
Page 502 of 546
7-68
Maintenance
5. Install a new bulb by inserting it
into the socket and rotating it until
it locks into place.
6. Install the socket in the assembly
by aligning the tabs on the socket
with the slots in the assembly.
7. Push the socket into the assembly
and turn the socket clockwise.
Daytime running light (DRL),
Parking lamp and Side marker
(LED type, if equipped)
If the LED lamp does not operate,
have the system checked by an
authorized HYUNDAI dealer.
The LED lamps cannot be replaced
as a single unit because it is an inte-
grated unit. The LED lamps has to be
replaced with the unit.
A skilled technician should check or
repair the LED lamp, for it may dam-
age related parts of the vehicle.
Front fog lamp (if equipped)
If the light bulb does not operate,
have the vehicle checked by an
authorized HYUNDAI dealer.
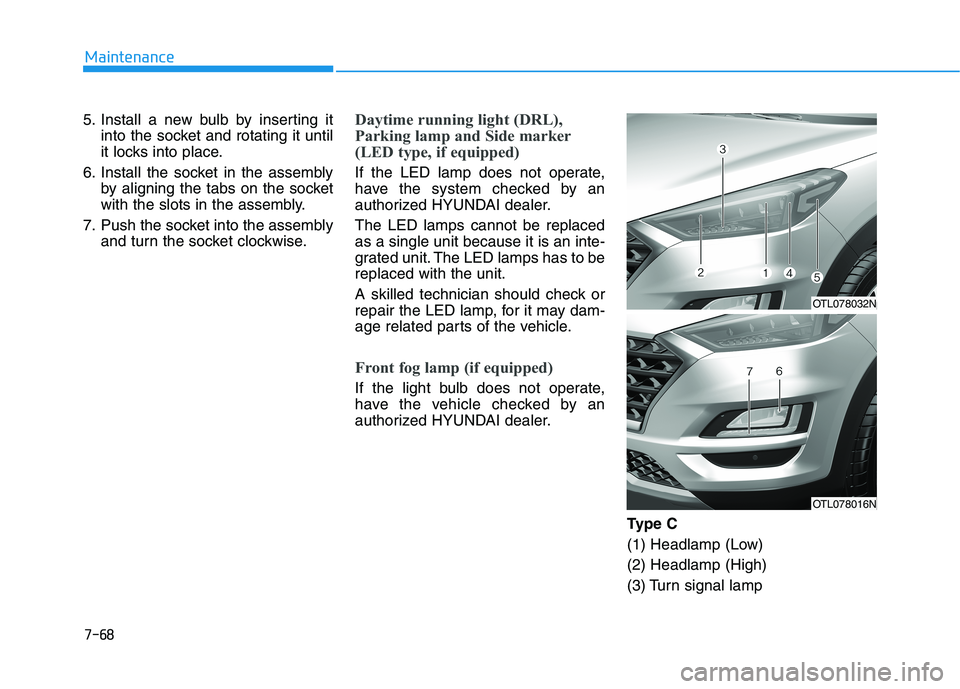
Ty p e C
(1) Headlamp (Low)
(2) Headlamp (High)
(3) Turn signal lamp
OTL078032N
OTL078016N
Page 503 of 546
7-69
Maintenance
(4) Parking lamp
(5) Side Marker
(6) Fog lamp
(7) Daytime running lampHeadlamp, Turn signal lamp,
Parking lamp, Daytime running
light and Side marker (LED type)
If the LED lamp does not operate,
have the system checked by an
authorized HYUNDAI dealer.
The LED lamps cannot be replaced
as a single unit because it is an inte-
grated unit. The LED lamps has to be
replaced with the unit.
A skilled technician should check or
repair the LED lamp, for it may dam-
age related parts of the vehicle.
Front fog lamp
If the light bulb does not operate,
have the vehicle checked by an
authorized HYUNDAI dealer.
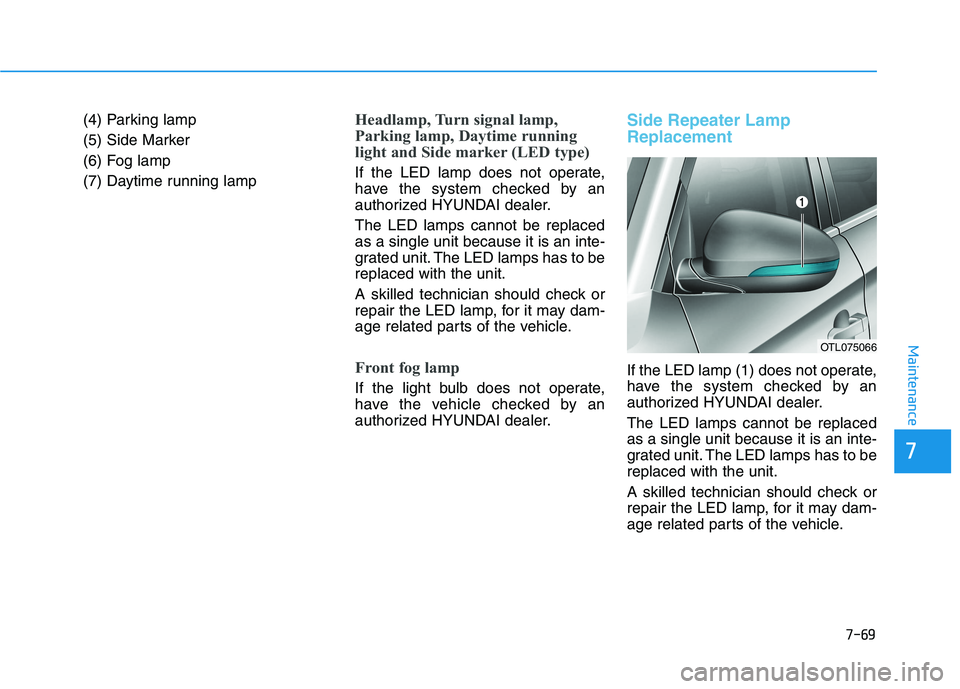
Side Repeater Lamp
Replacement
If the LED lamp (1) does not operate,
have the system checked by an
authorized HYUNDAI dealer.
The LED lamps cannot be replaced
as a single unit because it is an inte-
grated unit. The LED lamps has to be
replaced with the unit.
A skilled technician should check or
repair the LED lamp, for it may dam-
age related parts of the vehicle.
OTL075066
7
Page 504 of 546
7-70
Maintenance
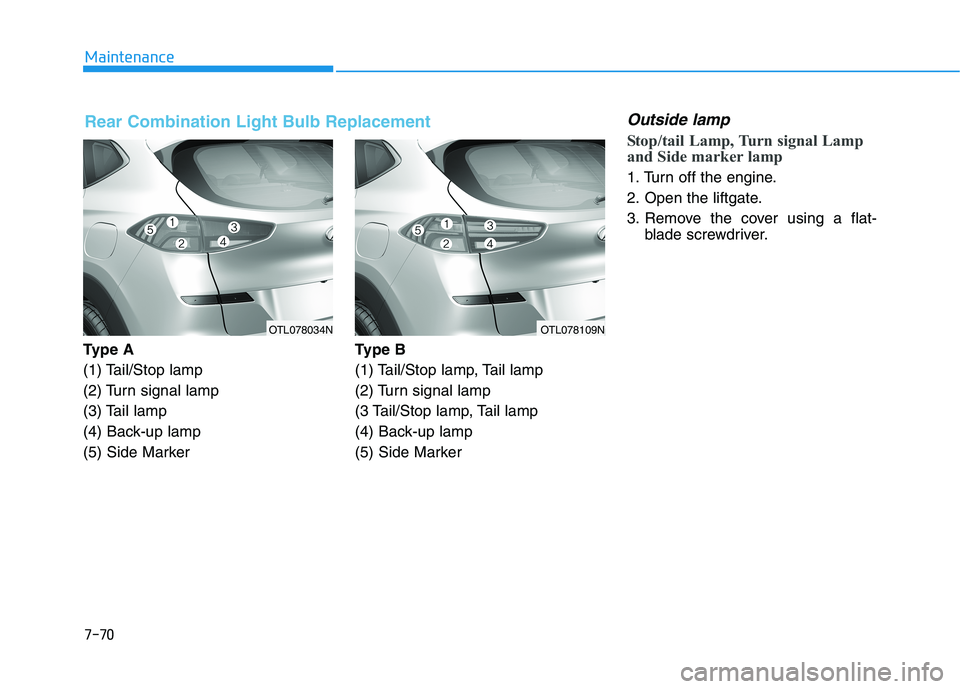
Ty p e A
(1) Tail/Stop lamp
(2) Turn signal lamp
(3) Tail lamp
(4) Back-up lamp
(5) Side MarkerType B
(1) Tail/Stop lamp, Tail lamp
(2) Turn signal lamp
(3 Tail/Stop lamp, Tail lamp
(4) Back-up lamp
(5) Side Marker
Outside lamp
Stop/tail Lamp, Turn signal Lamp
and Side marker lamp
1. Turn off the engine.
2. Open the liftgate.
3. Remove the cover using a flat-
blade screwdriver.
OTL078034N OTL078109N
Rear Combination Light Bulb Replacement
Page 505 of 546
![HYUNDAI TUCSON ULTIMATE 2020 Owners Manual 7-71
7
Maintenance
4. Loosen the lamp assembly retain-
ing screws with a cross-tip screw-
driver.
5. Remove the rear combination
lamp assembly from the body of
the vehicle.
[A] : Tail/Stop lamp, [B] : HYUNDAI TUCSON ULTIMATE 2020 Owners Manual 7-71
7
Maintenance
4. Loosen the lamp assembly retain-
ing screws with a cross-tip screw-
driver.
5. Remove the rear combination
lamp assembly from the body of
the vehicle.
[A] : Tail/Stop lamp, [B] :](/manual-img/35/56196/w960_56196-504.png)
7-71
7
Maintenance
4. Loosen the lamp assembly retain-
ing screws with a cross-tip screw-
driver.
5. Remove the rear combination
lamp assembly from the body of
the vehicle.
[A] : Tail/Stop lamp, [B] : Turn signal lamp,
[C] : Side marker
6. Remove the socket from the
assembly by turning the socket
counterclockwise until the tabs on
the socket align with the slots on
the assembly.
7. Remove the bulb from the socket
by pressing it in and rotating it
counterclockwise until the tabs on
the bulb align with the slots in the
socket. Pull the bulb out of the
socket.
8. Insert a new bulb by inserting it
into the socket and rotating it until
it locks into place.9. Install the socket in the assembly
by aligning the tabs on the socket
with the slots in the assembly.
Push the socket into the assembly
and turn the socket clockwise.
10. Reinstall the lamp assembly to
the body of the vehicle.
Tail lamp, Tail/Stop lamp and Side
marker
If the LED lamp does not operate,
have the system checked by an
authorized HYUNDAI dealer.
The LED lamps cannot replaced as a
single unit because it is an integrated
unit. The LED lamps has to be
replaced with the unit.
A skilled technician should check or
repair the LED lamp, for it may dam-
age related parts of the vehicle.OTL078037NOTL075035
OTL075036