2020 HYUNDAI TUCSON ULTIMATE service
[x] Cancel search: servicePage 445 of 546
7-11
7
Maintenance
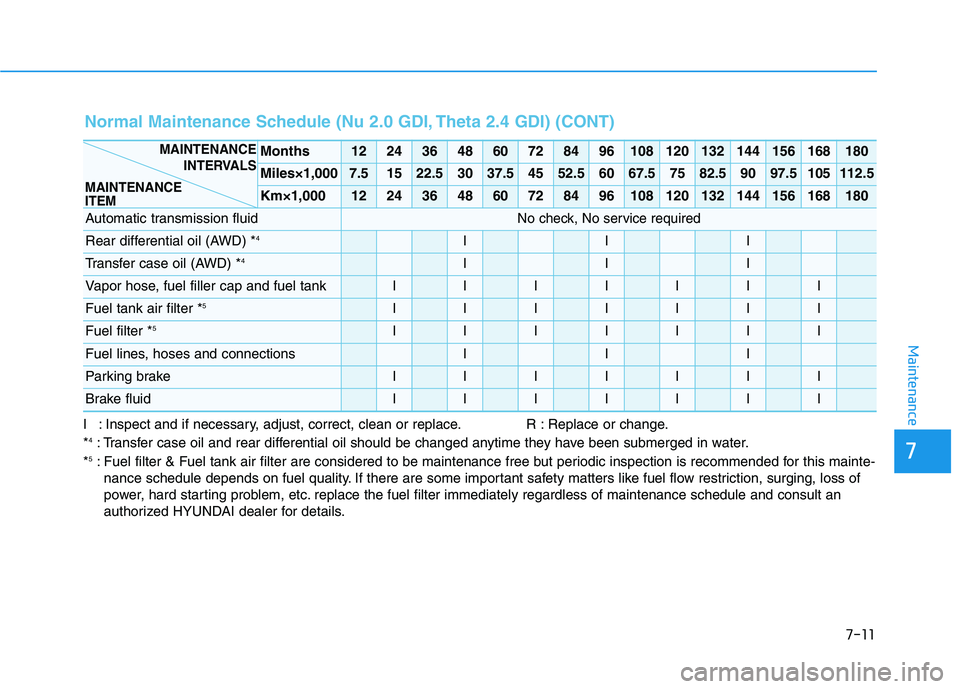
I : Inspect and if necessary, adjust, correct, clean or replace. R : Replace or change.
*4: Transfer case oil and rear differential oil should be changed anytime they have been submerged in water.
*5: Fuel filter & Fuel tank air filter are considered to be maintenance free but periodic inspection is recommended for this mainte-
nance schedule depends on fuel quality. If there are some important safety matters like fuel flow restriction, surging, loss of
power, hard starting problem, etc. replace the fuel filter immediately regardless of maintenance schedule and consult an
authorized HYUNDAI dealer for details.
Months1224364860728496108120132144156168180
Miles×1,0007.51522.53037.54552.56067.57582.59097.5105112.5
Km×1,0001224364860728496108120132144156168180
Automatic transmission fluidNo check, No service required
Rear differential oil (AWD) *4III
Transfer case oil (AWD) *4III
Vapor hose, fuel filler cap and fuel tankIIIIIII
Fuel tank air filter *5IIIIIII
Fuel filter *5IIIIIII
Fuel lines, hoses and connectionsIII
Parking brakeIIIIIII
Brake fluidIIIIIII
MAINTENANCE
INTERVALS
MAINTENANCE
ITEM
Normal Maintenance Schedule (Nu 2.0 GDI, Theta 2.4 GDI) (CONT)
Page 446 of 546

7-12
Maintenance
Maintenance itemMaintenance
operationMaintenance intervalsDriving condition
Engine oil and filterREvery 3,750 miles or 6 monthsA, B, C, D, E, F,
G, H, I, J, K
Air cleaner filterRMore frequentlyC, E
Spark plugsRMore frequentlyA, B, H, I, K
Automatic transmission fluidREvery 60,000 milesA, C, D, E, F, G, I
Front brake disc/pads, calipersIMore frequentlyC, D, G, H
Rear brake disc/padsIMore frequentlyC, D, G, H
Parking brakeIMore frequentlyC, D, G, H
Maintenance Under Severe Usage Conditions (Nu 2.0 GDI, Theta 2.4 GDI)
The following items must be serviced more frequently on cars normally used under severe driving conditions.
Refer to the chart below for the appropriate maintenance intervals.
I : Inspect and if necessary, adjust, correct, clean or replace. R : Replace or change.
Page 464 of 546
7-30
Maintenance
Front windshield wiper blade
replacement
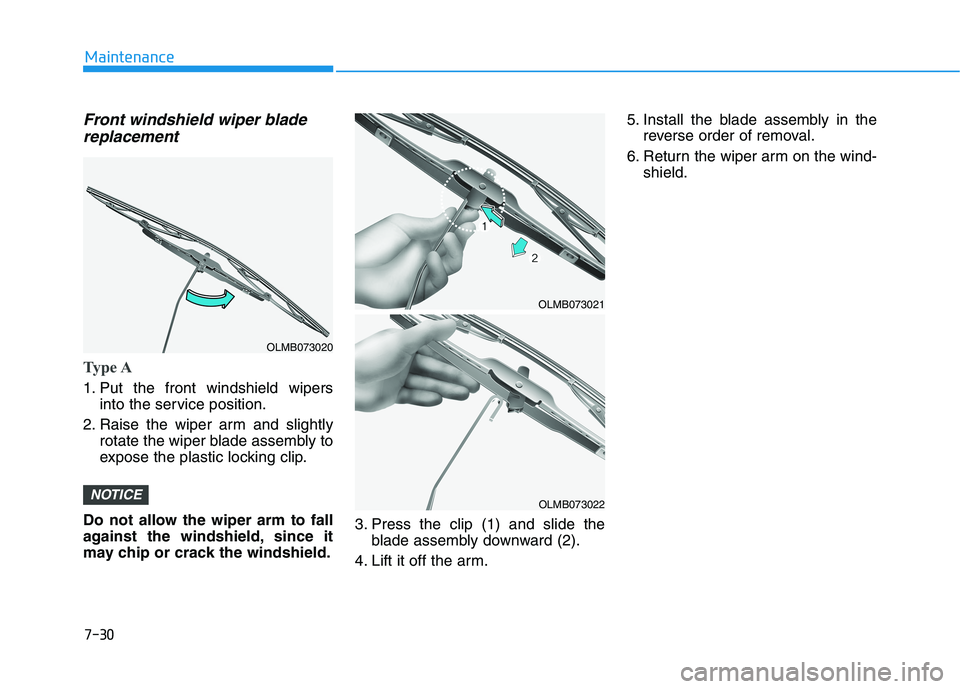
Type A
1. Put the front windshield wipers
into the service position.
2. Raise the wiper arm and slightly
rotate the wiper blade assembly to
expose the plastic locking clip.
Do not allow the wiper arm to fall
against the windshield, since it
may chip or crack the windshield.3. Press the clip (1) and slide the
blade assembly downward (2).
4. Lift it off the arm.5. Install the blade assembly in the
reverse order of removal.
6. Return the wiper arm on the wind-
shield.
NOTICE
OLMB073021
OLMB073022
OLMB073020
Page 468 of 546
7-34
Maintenance
When you do not use the vehicle
for a long time in a low tempera-
ture area, disconnect the battery
and keep it indoors.
Always charge the battery fully
to prevent battery case damage
in low temperature areas.
For Best Battery Service
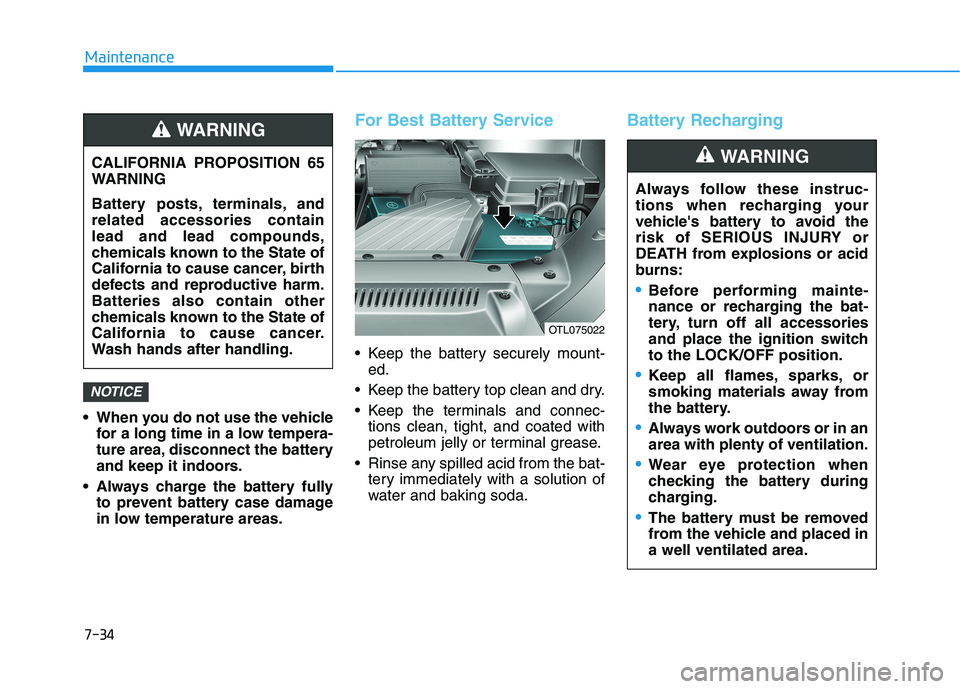
Keep the battery securely mount-
ed.
Keep the battery top clean and dry.
Keep the terminals and connec-
tions clean, tight, and coated with
petroleum jelly or terminal grease.
Rinse any spilled acid from the bat-
tery immediately with a solution of
water and baking soda.
Battery Recharging
NOTICE
CALIFORNIA PROPOSITION 65
WARNING
Battery posts, terminals, and
related accessories contain
lead and lead compounds,
chemicals known to the State of
California to cause cancer, birth
defects and reproductive harm.
Batteries also contain other
chemicals known to the State of
California to cause cancer.
Wash hands after handling.
WARNING
Always follow these instruc-
tions when recharging your
vehicle's battery to avoid the
risk of SERIOUS INJURY or
DEATH from explosions or acid
burns:
Before performing mainte-
nance or recharging the bat-
tery, turn off all accessories
and place the ignition switch
to the LOCK/OFF position.
Keep all flames, sparks, or
smoking materials away from
the battery.
Always work outdoors or in an
area with plenty of ventilation.
Wear eye protection when
checking the battery during
charging.
The battery must be removed
from the vehicle and placed in
a well ventilated area.
WARNING
OTL075022
Page 474 of 546
7-40
Maintenance
Tire Replacement
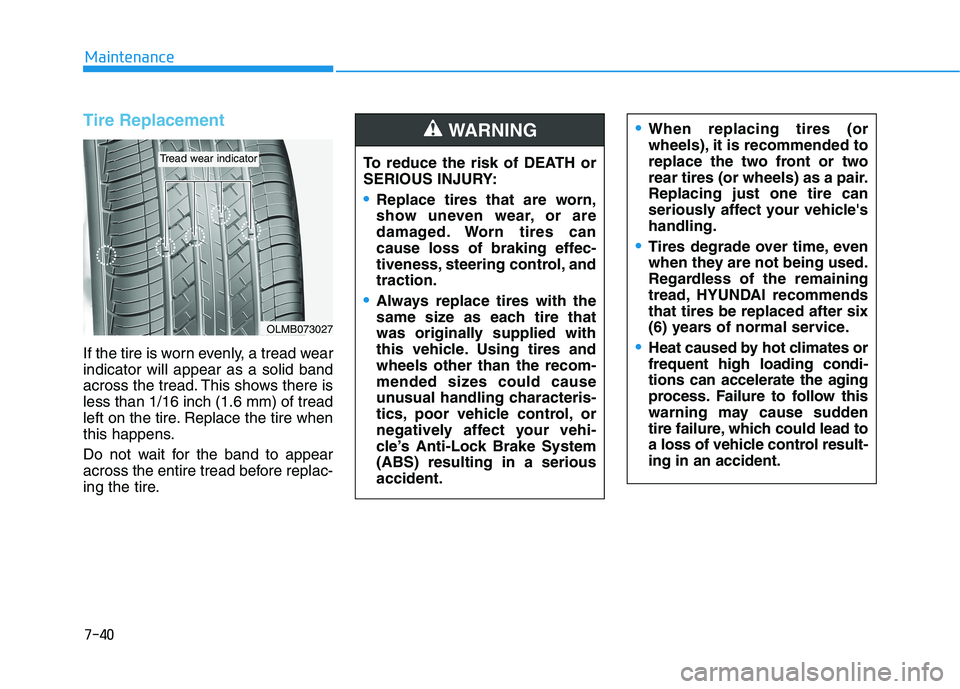
If the tire is worn evenly, a tread wear
indicator will appear as a solid band
across the tread. This shows there is
less than 1/16 inch (1.6 mm) of tread
left on the tire. Replace the tire when
this happens.
Do not wait for the band to appear
across the entire tread before replac-
ing the tire.
OLMB073027
Tread wear indicatorTo reduce the risk of DEATH or
SERIOUS INJURY:
Replace tires that are worn,
show uneven wear, or are
damaged. Worn tires can
cause loss of braking effec-
tiveness, steering control, and
traction.
Always replace tires with the
same size as each tire that
was originally supplied with
this vehicle. Using tires and
wheels other than the recom-
mended sizes could cause
unusual handling characteris-
tics, poor vehicle control, or
negatively affect your vehi-
cle’s Anti-Lock Brake System
(ABS) resulting in a serious
accident.
WARNING When replacing tires (or
wheels), it is recommended to
replace the two front or two
rear tires (or wheels) as a pair.
Replacing just one tire can
seriously affect your vehicle's
handling.
Tires degrade over time, even
when they are not being used.
Regardless of the remaining
tread, HYUNDAI recommends
that tires be replaced after six
(6) years of normal service.
Heat caused by hot climates or
frequent high loading condi-
tions can accelerate the aging
process. Failure to follow this
warning may cause sudden
tire failure, which could lead to
a loss of vehicle control result-
ing in an accident.
Page 478 of 546
7-44
Maintenance
6. Maximum load rating
This number indicates the maximum
load in kilograms and pounds that
can be carried by the tire. When
replacing the tires on the vehicle,
always use a tire that has the same
load rating as the factory installed
tire.
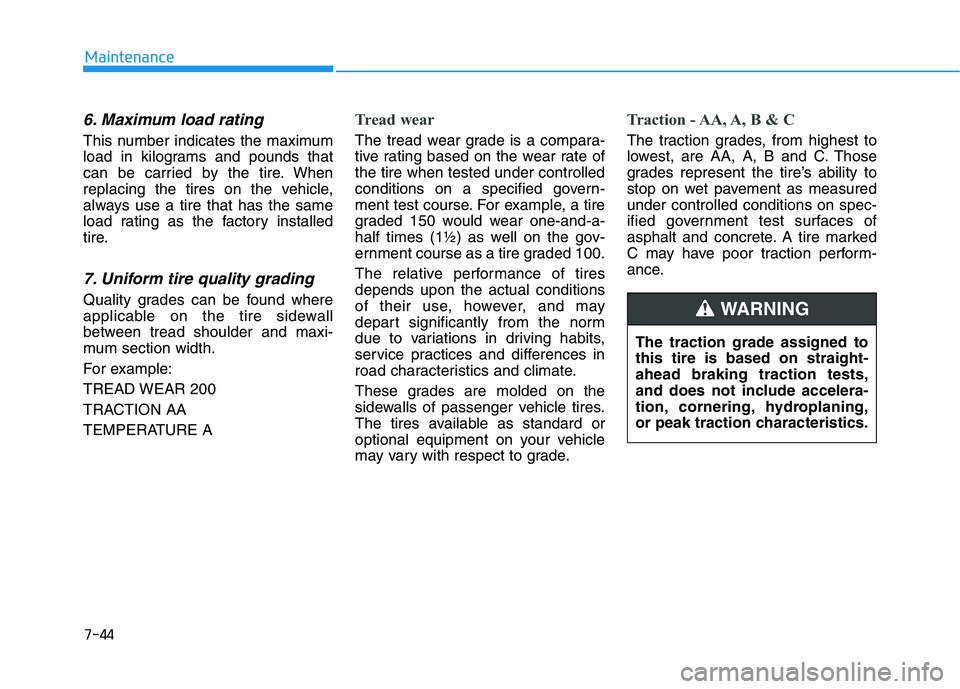
7. Uniform tire quality grading
Quality grades can be found where
applicable on the tire sidewall
between tread shoulder and maxi-
mum section width.
For example:
TREAD WEAR 200
TRACTION AA
TEMPERATURE A
Tread wear
The tread wear grade is a compara-
tive rating based on the wear rate of
the tire when tested under controlled
conditions on a specified govern-
ment test course. For example, a tire
graded 150 would wear one-and-a-
half times (1½) as well on the gov-
ernment course as a tire graded 100.
The relative performance of tires
depends upon the actual conditions
of their use, however, and may
depart significantly from the norm
due to variations in driving habits,
service practices and differences in
road characteristics and climate.
These grades are molded on the
sidewalls of passenger vehicle tires.
The tires available as standard or
optional equipment on your vehicle
may vary with respect to grade.
Traction - AA, A, B & C
The traction grades, from highest to
lowest, are AA, A, B and C. Those
grades represent the tire’s ability to
stop on wet pavement as measured
under controlled conditions on spec-
ified government test surfaces of
asphalt and concrete. A tire marked
C may have poor traction perform-
ance.
The traction grade assigned to
this tire is based on straight-
ahead braking traction tests,
and does not include accelera-
tion, cornering, hydroplaning,
or peak traction characteristics.
WARNING
Page 506 of 546
7-72
Maintenance
Inside lamp
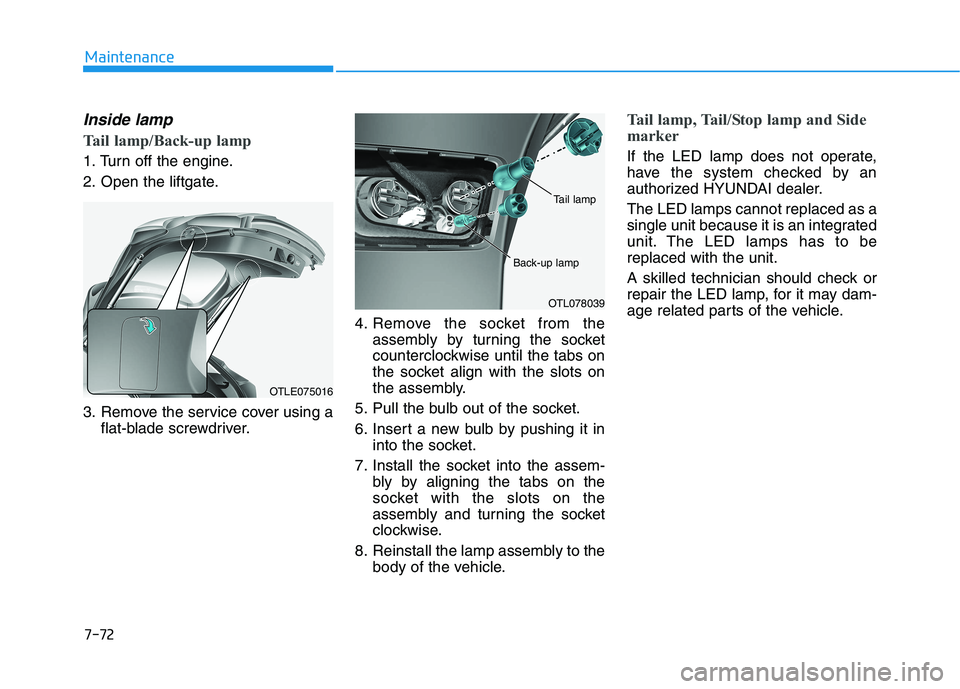
Tail lamp/Back-up lamp
1. Turn off the engine.
2. Open the liftgate.
3. Remove the service cover using a
flat-blade screwdriver.4. Remove the socket from the
assembly by turning the socket
counterclockwise until the tabs on
the socket align with the slots on
the assembly.
5. Pull the bulb out of the socket.
6. Insert a new bulb by pushing it in
into the socket.
7. Install the socket into the assem-
bly by aligning the tabs on the
socket with the slots on the
assembly and turning the socket
clockwise.
8. Reinstall the lamp assembly to the
body of the vehicle.
Tail lamp, Tail/Stop lamp and Side
marker
If the LED lamp does not operate,
have the system checked by an
authorized HYUNDAI dealer.
The LED lamps cannot replaced as a
single unit because it is an integrated
unit. The LED lamps has to be
replaced with the unit.
A skilled technician should check or
repair the LED lamp, for it may dam-
age related parts of the vehicle.
OTLE075016
OTL078039
Tail lamp
Back-up lamp
Page 537 of 546

I-2
Accessing Your Vehicle ....................................................3-4
Immobilizer System ...................................................3-13
Remote Key ..................................................................3-4
Smart Key.....................................................................3-8
Air Bag - Advanced Supplemental Restraint System.....2-48
Additional Safety Precautions ....................................2-72
Air Bag Warning Labels.............................................2-73
Curtain air bags ..........................................................2-53
Driver's front air bag ..................................................2-50
How Does the Air Bag System Operate? ...................2-54
Occupant Classification System (OCS) .....................2-59
Passenger's front air bag.............................................2-50
Side air bags ...............................................................2-51
SRS Care ....................................................................2-71
What to Expect After an Air Bag Inflates ..................2-58
Where Are the Air Bags? ...........................................2-50
Why Didn't My Air Bag Go Off in a Collision?........2-65
Air Cleaner......................................................................7-25
Filter Replacement .....................................................7-25
Air Conditioning System ..................................................8-7
All Wheel Drive (AWD) .................................................5-43
AWD operation...........................................................5-45
Emergency precautions ..............................................5-49
Anti-lock Brake System (ABS) ......................................5-33Appearance Care .............................................................7-75
Exterior Care ..............................................................7-75
Interior Care ...............................................................7-80
Auto Hold .......................................................................5-30
Automatic Climate Control System..............................3-137
Automatic Heating and Air Conditioning ................3-138
Manual Heating and Air Conditioning .....................3-139
System Maintenance ................................................3-148
System Operation .....................................................3-146
Automatic Transmission .................................................5-14
Automatic transmission operation..............................5-14
Good Driving Practices ..............................................5-19
Battery .............................................................................7-33
Battery Recharging .....................................................7-34
For Best Battery Service ............................................7-34
Reset Features ............................................................7-35
Before Driving ..................................................................5-4
Before Entering the Vehicle .........................................5-4
Before Starting .............................................................5-4
Blind-Spot Collision Warning (BCW) System ...............5-52
BCW (Blind-Spot Collision Warning) .......................5-53
Blind-Spot Collision Warning - Sensor Location ......5-57
Limitations of the System ..........................................5-58
RCCW (Rear Cross-Traffic Collision Warning) ........5-55
Index
A
B