2020 Hyundai Tucson length
[x] Cancel search: lengthPage 48 of 637
2-27
Safety system of your vehicle
2
Seat belt restraint system
Lap/shoulder belt
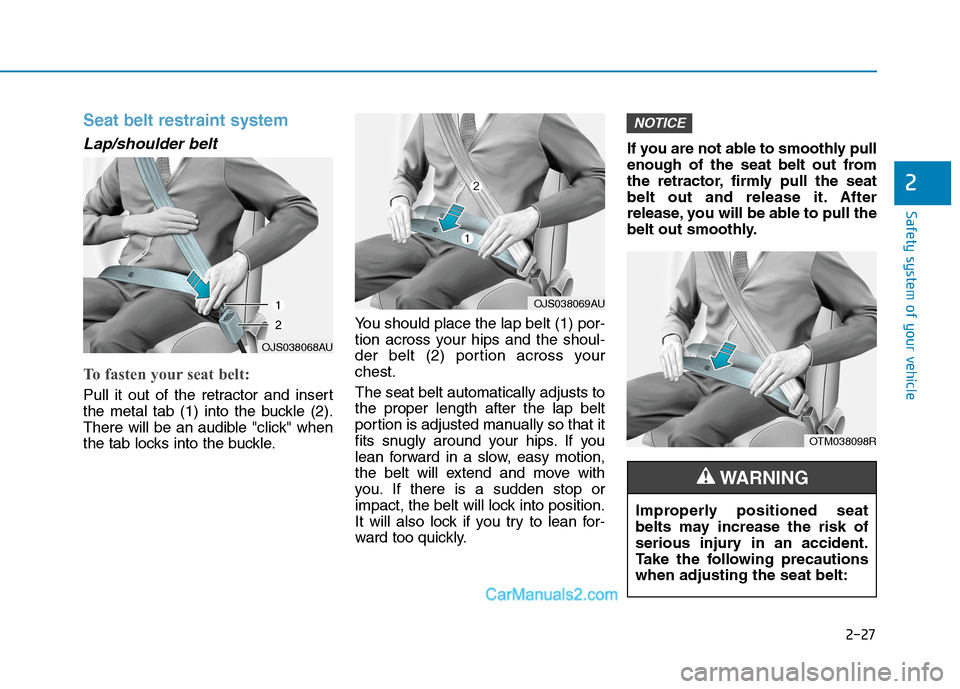
To fasten your seat belt:
Pull it out of the retractor and insert
the metal tab (1) into the buckle (2).
There will be an audible "click" when
the tab locks into the buckle.You should place the lap belt (1) por-
tion across your hips and the shoul-
der belt (2) portion across your
chest.
The seat belt automatically adjusts to
the proper length after the lap belt
portion is adjusted manually so that it
fits snugly around your hips. If you
lean forward in a slow, easy motion,
the belt will extend and move with
you. If there is a sudden stop or
impact, the belt will lock into position.
It will also lock if you try to lean for-
ward too quickly.If you are not able to smoothly pull
enough of the seat belt out from
the retractor, firmly pull the seat
belt out and release it. After
release, you will be able to pull the
belt out smoothly.
NOTICE
OTM038098R
Improperly positioned seat
belts may increase the risk of
serious injury in an accident.
Take the following precautions
when adjusting the seat belt:
WARNING
OJS038068AU
OJS038069AU
Page 67 of 637
2-46
Safety system of your vehicle
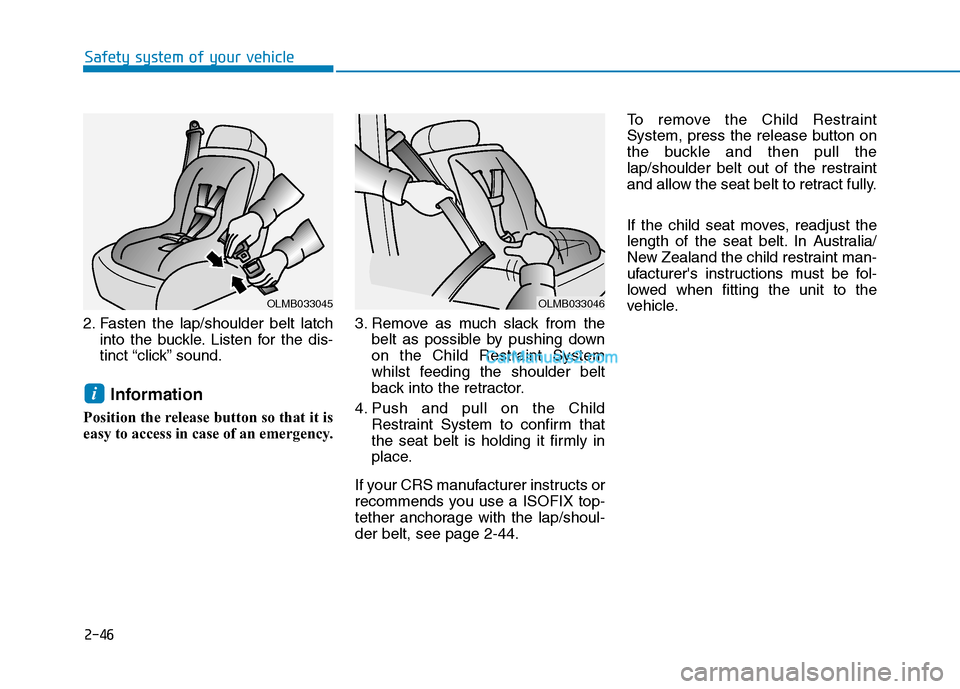
2. Fasten the lap/shoulder belt latch
into the buckle. Listen for the dis-
tinct “click” sound.
Information
Position the release button so that it is
easy to access in case of an emergency.3. Remove as much slack from the
belt as possible by pushing down
on the Child Restraint System
whilst feeding the shoulder belt
back into the retractor.
4. Push and pull on the Child
Restraint System to confirm that
the seat belt is holding it firmly in
place.
If your CRS manufacturer instructs or
recommends you use a ISOFIX top-
tether anchorage with the lap/shoul-
der belt, see page 2-44.To remove the Child Restraint
System, press the release button on
the buckle and then pull the
lap/shoulder belt out of the restraint
and allow the seat belt to retract fully.
If the child seat moves, readjust the
length of the seat belt. In Australia/
New Zealand the child restraint man-
ufacturer's instructions must be fol-
lowed when fitting the unit to the
vehicle.
i
OLMB033045OLMB033046
Page 275 of 637
3-189
Convenient features of your vehicle
3
Roof rack (if equipped)
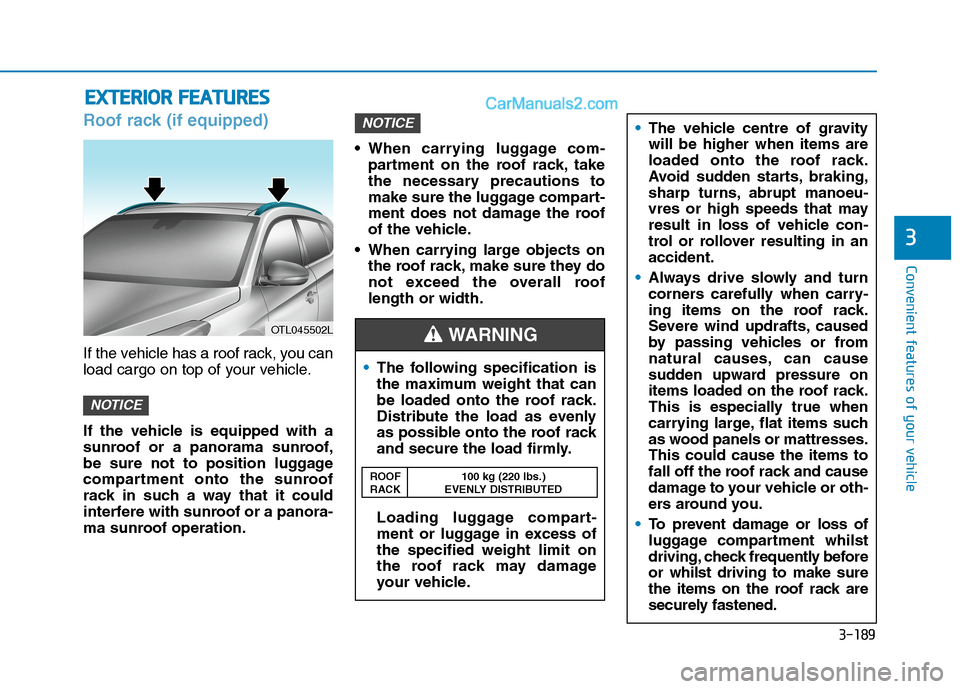
If the vehicle has a roof rack, you can
load cargo on top of your vehicle.
If the vehicle is equipped with a
sunroof or a panorama sunroof,
be sure not to position luggage
compartment onto the sunroof
rack in such a way that it could
interfere with sunroof or a panora-
ma sunroof operation. When carrying luggage com-
partment on the roof rack, take
the necessary precautions to
make sure the luggage compart-
ment does not damage the roof
of the vehicle.
When carrying large objects on
the roof rack, make sure they do
not exceed the overall roof
length or width.
NOTICE
NOTICE
E EX
XT
TE
ER
RI
IO
OR
R
F
FE
EA
AT
TU
UR
RE
ES
S
OTL045502L
The following specification is
the maximum weight that can
be loaded onto the roof rack.
Distribute the load as evenly
as possible onto the roof rack
and secure the load firmly.
Loading luggage compart-
ment or luggage in excess of
the specified weight limit on
the roof rack may damage
your vehicle.
WARNING
ROOF 100 kg (220 lbs.)
RACK EVENLY DISTRIBUTED
The vehicle centre of gravity
will be higher when items are
loaded onto the roof rack.
Avoid sudden starts, braking,
sharp turns, abrupt manoeu-
vres or high speeds that may
result in loss of vehicle con-
trol or rollover resulting in an
accident.
Always drive slowly and turn
corners carefully when carry-
ing items on the roof rack.
Severe wind updrafts, caused
by passing vehicles or from
natural causes, can cause
sudden upward pressure on
items loaded on the roof rack.
This is especially true when
carrying large, flat items such
as wood panels or mattresses.
This could cause the items to
fall off the roof rack and cause
damage to your vehicle or oth-
ers around you.
To prevent damage or loss of
luggage compartment whilst
driving, check frequently before
or whilst driving to make sure
the items on the roof rack are
securely fastened.
Page 299 of 637
4-24
Multimedia System
Notes on connecting Apple devices
Ensure that the iOS and firmware
of your device is up-to-date before
connecting it to your system.
Outdated devices may cause a
system error.
If your device’s battery is low, the
device may not be recognised.
Check the battery level and, if nec-
essary, charge the battery before
connecting the device to your sys-
tem.
Use an Apple-approved cable.
Using an unapproved cable may
cause a distorted noise or an error
during playback.
Use a cable shorter than 1 metre in
length, such as the one originally
supplied with a new Apple device.
Longer cables may lead to the
audio system not recognising the
Apple device.
Fully insert a USB connector into
the USB port. Failure to do so may
cause a communication error. When your device is connected to
the USB port and the AUX port
simultaneously, it is recognised in
the AUX mode. The device stays in
the AUX mode even if the AUX
cable is not connected to the sys-
tem. To play music in iPod mode,
disconnect the AUX cable from the
device or change audio output of
the device to “Dock”.
If you connect your device to the
system whilst playback is in
progress on the device, you may
hear a high pitch sound just after
the connection. Connect the device
after stopping or pausing playback.
Connecting your device during a
download or synchronizing with
iTunes may cause an error.
Connect the device after the down-
load or synchronization is com-
plete.
If you connect an iPod nano
(except for the 6th generation) or
an iPod classic, the brand logo will
be displayed on the device screen.
For an iPhone and an iPod touch,
the logo will not be displayed.
Notes on playing Apple devices
Depending on the model, your
device may not be recognised due
to unsupported communication
protocols.
The order of the songs displayed
or played on the system may differ
from the order of the songs stored
in your device.
Depending on the music player
application you are using, informa-
tion displayed on the system may
differ.
In an iPhone, the audio streaming
function and iPod mode control
may conflict. If an error occurs, dis-
connect and reconnect the USB
cable.
When using an iPhone or an iPod
touch, do not control the device
whilst it is connected to your sys-
tem. An error may occur.
If you make or receive a call during
playback via an iPhone, the music
may remain paused after you end
the call. If you do not hear the
music after ending a call, check the
device to see if the music has
paused.
Page 315 of 637
4-40
Multimedia System
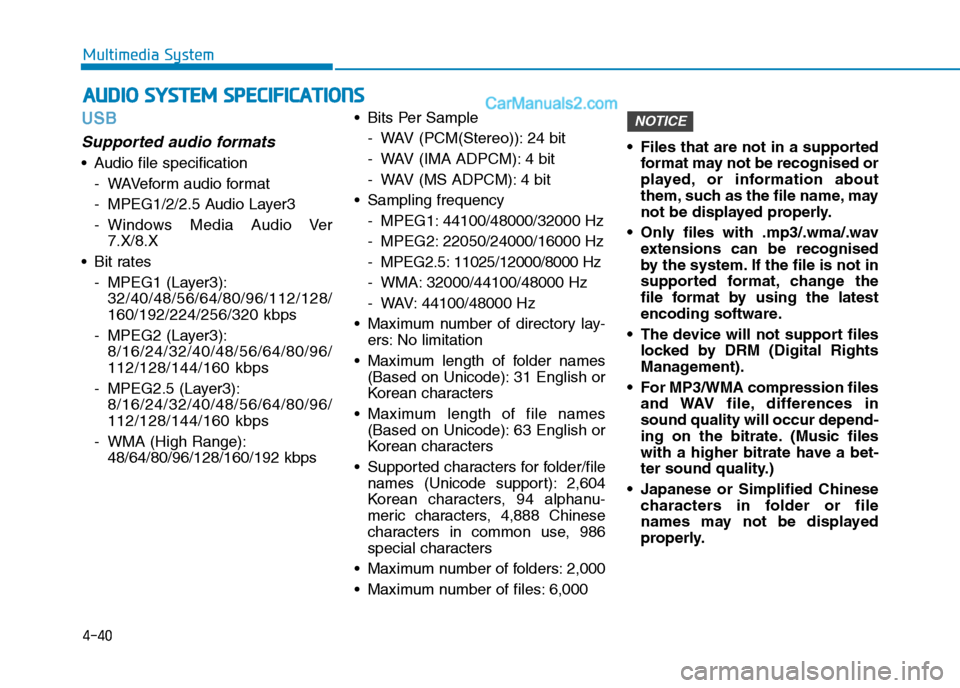
USB
Supported audio formats
Audio file specification
- WAVeform audio format
- MPEG1/2/2.5 Audio Layer3
- Windows Media Audio Ver
7.X/8.X
Bit rates
- MPEG1 (Layer3):
32/40/48/56/64/80/96/112/128/
160/192/224/256/320 kbps
- MPEG2 (Layer3):
8/16/24/32/40/48/56/64/80/96/
112/128/144/160 kbps
- MPEG2.5 (Layer3):
8/16/24/32/40/48/56/64/80/96/
112/128/144/160 kbps
- WMA (High Range):
48/64/80/96/128/160/192 kbps Bits Per Sample
- WAV (PCM(Stereo)): 24 bit
- WAV (IMA ADPCM): 4 bit
- WAV (MS ADPCM): 4 bit
Sampling frequency
- MPEG1: 44100/48000/32000 Hz
- MPEG2: 22050/24000/16000 Hz
- MPEG2.5: 11025/12000/8000 Hz
- WMA: 32000/44100/48000 Hz
- WAV: 44100/48000 Hz
Maximum number of directory lay-
ers: No limitation
Maximum length of folder names
(Based on Unicode): 31 English or
Korean characters
Maximum length of file names
(Based on Unicode): 63 English or
Korean characters
Supported characters for folder/file
names (Unicode support): 2,604
Korean characters, 94 alphanu-
meric characters, 4,888 Chinese
characters in common use, 986
special characters
Maximum number of folders: 2,000
Maximum number of files: 6,000 Files that are not in a supported
format may not be recognised or
played, or information about
them, such as the file name, may
not be displayed properly.
Only files with .mp3/.wma/.wav
extensions can be recognised
by the system. If the file is not in
supported format, change the
file format by using the latest
encoding software.
The device will not support files
locked by DRM (Digital Rights
Management).
For MP3/WMA compression files
and WAV file, differences in
sound quality will occur depend-
ing on the bitrate. (Music files
with a higher bitrate have a bet-
ter sound quality.)
Japanese or Simplified Chinese
characters in folder or file
names may not be displayed
properly.
NOTICE
A AU
UD
DI
IO
O
S
SY
YS
ST
TE
EM
M
S
SP
PE
EC
CI
IF
FI
IC
CA
AT
TI
IO
ON
NS
S
Page 395 of 637
5-78
Driving your vehicle
When the ECO mode is activated:
The acceleration response may be
slightly reduced as the accelerator
pedal is depressed moderately.
The air conditioner performance
may be limited.
The shift pattern of the automatic
transmission or dual clutch trans-
mission may change.
The engine noise may get louder.
The above situations are normal
conditions when the ECO mode is
activated to improve fuel efficiency.Limitation of the ECO mode oper-
ation:
If the following conditions occur
whilst the ECO mode is operating,
the system operation is limited even
though there is no change in the
ECO indicator.
When the coolant temperature is
low:
The system will be limited until
engine performance becomes nor-
mal.
When driving up a hill:
The system will be limited to gain
power when driving uphill because
engine torque is restricted.
When using the automatic trans-
mission or dual clutch transmission
Sports mode:
The system will be limited accord-
ing to the shift location.
When the accelerator pedal is
deeply depressed for a few sec-
onds: The system will be limited,
judging that the driver wants to
speed up.
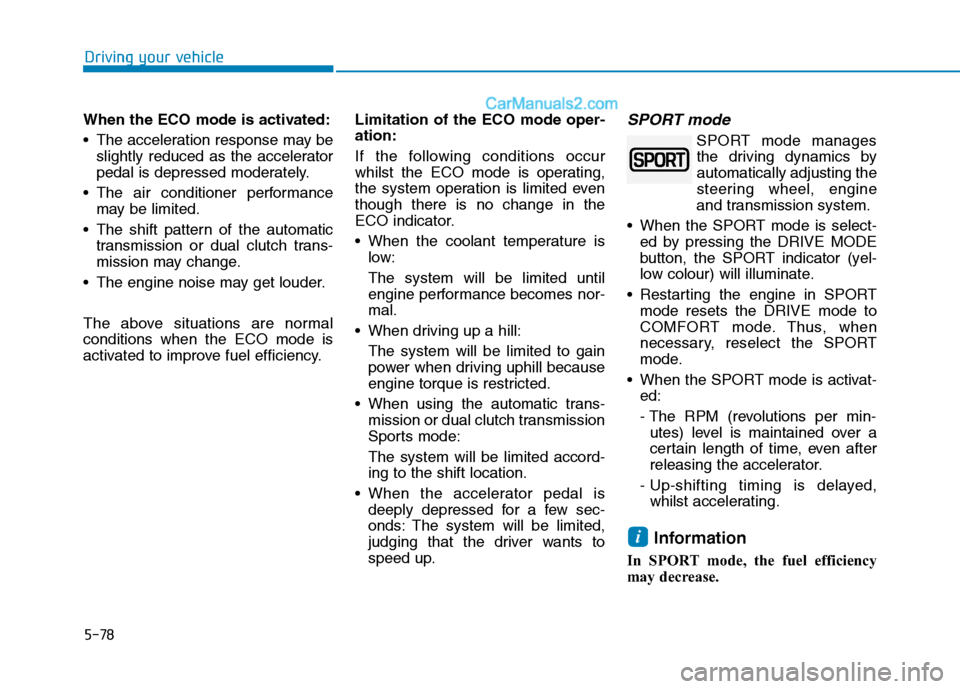
SPORT mode
SPORT mode manages
the driving dynamics by
automatically adjusting the
steering wheel, engine
and transmission system.
When the SPORT mode is select-
ed by pressing the DRIVE MODE
button, the SPORT indicator (yel-
low colour) will illuminate.
Restarting the engine in SPORT
mode resets the DRIVE mode to
COMFORT mode. Thus, when
necessary, reselect the SPORT
mode.
When the SPORT mode is activat-
ed:
- The RPM (revolutions per min-
utes) level is maintained over a
certain length of time, even after
releasing the accelerator.
- Up-shifting timing is delayed,
whilst accelerating.
Information
In SPORT mode, the fuel efficiency
may decrease.
i
Page 484 of 637
5-167
Driving your vehicle
5
Distance
Stay at least twice as far behind the
vehicle ahead as you would when
driving your vehicle without a trailer.
This can help you avoid situations
that require heavy braking and sud-
den turns.
Passing
You will need more passing distance
up ahead when you're towing a trail-
er. And, because of the increased
vehicle length, you'll need to go
much farther beyond the passed
vehicle before you can return to your
lane.
Reversing
Hold the bottom of the steering
wheel with one hand. Then, to move
the trailer to the left, move your hand
to the left. To move the trailer to the
right, move your hand to the right.
Always reverse slowly and, if possi-
ble, have someone guide you.
Making turns
When you are turning with a trailer,
make wider turns than normal. Do
this so your trailer won't strike soft
shoulders, kerbs, road signs, trees,
or other objects. Avoid jerky or sud-
den manoeuvres. Signal well in
advance.
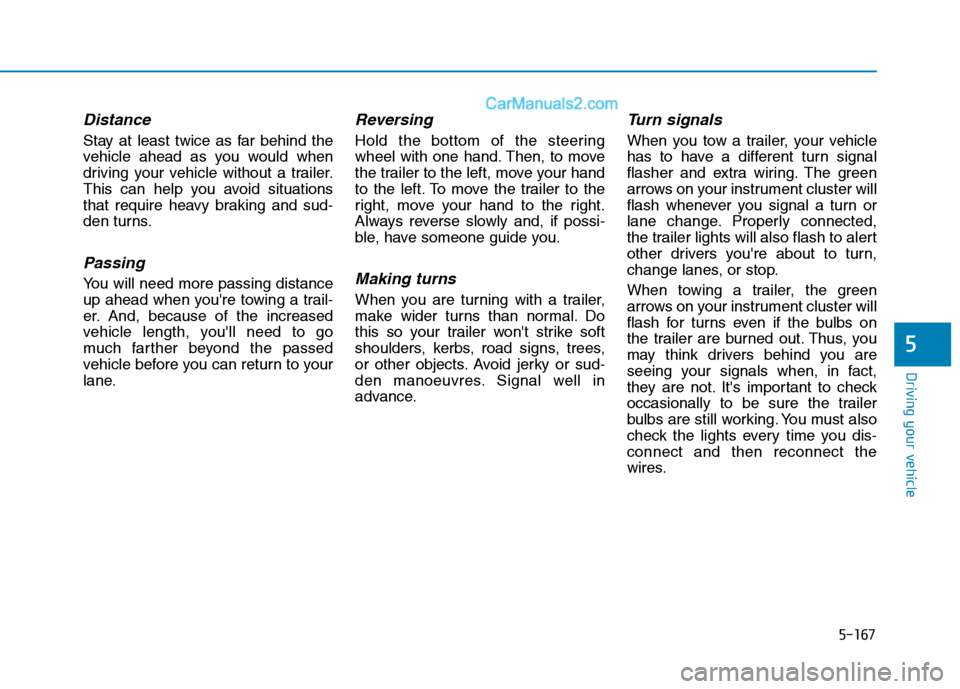
Turn signals
When you tow a trailer, your vehicle
has to have a different turn signal
flasher and extra wiring. The green
arrows on your instrument cluster will
flash whenever you signal a turn or
lane change. Properly connected,
the trailer lights will also flash to alert
other drivers you're about to turn,
change lanes, or stop.
When towing a trailer, the green
arrows on your instrument cluster will
flash for turns even if the bulbs on
the trailer are burned out. Thus, you
may think drivers behind you are
seeing your signals when, in fact,
they are not. It's important to check
occasionally to be sure the trailer
bulbs are still working. You must also
check the lights every time you dis-
connect and then reconnect the
wires.
Page 626 of 637
8-2
Specifications & Consumer information
D DI
IM
ME
EN
NS
SI
IO
ON
NS
S
E EN
NG
GI
IN
NE
E
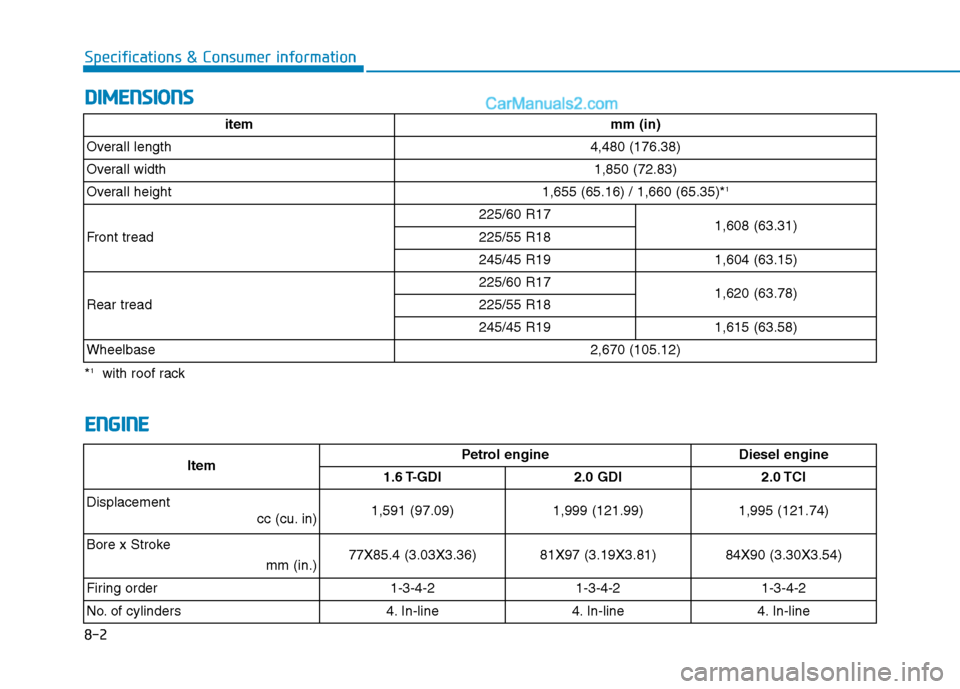
item mm (in)
Overall length 4,480 (176.38)
Overall width 1,850 (72.83)
Overall height 1,655 (65.16) / 1,660 (65.35)*
1
Front tread225/60 R17
1,608 (63.31)
225/55 R18
245/45 R19 1,604 (63.15)
Rear tread225/60 R17
1,620 (63.78)
225/55 R18
245/45 R19 1,615 (63.58)
Wheelbase 2,670 (105.12)
*1with roof rack
ItemPetrol engine
Diesel engine
1.6 T-GDI 2.0 GDI
2.0 TCI
Displacement
cc (cu. in) 1,591 (97.09) 1,999 (121.99)
1,995 (121.74)
Bore x Stroke
mm (in.)77X85.4 (3.03X3.36) 81X97 (3.19X3.81)
84X90 (3.30X3.54)
Firing order 1-3-4-2 1-3-4-2
1-3-4-2
No. of cylinders 4. In-line 4. In-line
4. In-line