2020 Hyundai Sonata instrument cluster
[x] Cancel search: instrument clusterPage 154 of 537
![Hyundai Sonata 2020 Owners Manual Convenient Features5-24
3. Register the NFC card key on the User’s Settings menu after turning on
the vehicle.
With Navigation screen : From the
infotainment screen menu, go to
[Setup] - Hyundai Sonata 2020 Owners Manual Convenient Features5-24
3. Register the NFC card key on the User’s Settings menu after turning on
the vehicle.
With Navigation screen : From the
infotainment screen menu, go to
[Setup] -](/manual-img/35/16773/w960_16773-153.png)
Convenient Features5-24
3. Register the NFC card key on the User’s Settings menu after turning on
the vehicle.
With Navigation screen : From the
infotainment screen menu, go to
[Setup] - [Vehicle] - [Digital Key] -
[Card Key] then select the [Save] from
submenu.
Without navigation screen : From
cluster menu, go to [Digital Key] -
[Card Key] and select [Save].
The [Save] button will be disabled if
the digital key (Card key) is already
saved.
Please refer to “Digital Key Delete” in
this manual and follow the digital key
delete procedure in your car before
Digital key save.
4. Place the NFC card key onto the interior authentication pad (wireless
charger). The saving process will
begin automatically.
5. If the key is enrolled, the message will be displayed on the infotainment
screen or instrument cluster.
• Once the card key registration mode is activated, the process should be
completed within 5 minutes. After
then, you should reactivate once
again for registration.
• For the digital key(card key) saving, the smart key(fob) must be exist inside
of vehicle.
• Once a Card key is registered, it cannot be reuse onto another vehicle.
ODN8A059243ODN8A059243
ODN8A059132ODN8A059132
Digital key (Card key) deletion
You should have the smart key to delete
the digital k
ey (card key) so please carry
around the key.
1. Get on the vehicle with the smart key.
2. Delete the NFC card key on the User’s Settings menu after turning on the
engine.
With Navigation screen : From the
infotainment screen menu, go to
[Setup] - [Vehicle] - [Digital Key] -
[Card Key] then select the [Delete]
from submenu.
Without navigation screen : From
cluster menu, go to [Digital Key] -
[Card Key] and select [Delete].
If there is no saved digital key(card key),
[Delete] menu will not be activated.
Page 169 of 537

05
5-39
ODN8A059019ODN8A059019
The Driver Position Memory System is
provided to store and recall the following
memory settings with a simple button
operation.
- Driver’s seat position (Power seat)
- Side view mirror position
- Instrument panel illumination intensity
- Head Up Display (HUD) position and brightness (if equipped)
WARNING
Never attempt to operate the driver
position memory system while the
vehicle is moving.
This could result in loss of control, and
an accident causing death, serious
injury, or property damage.
Information
• If the battery is disconnected, the
memory settings will be erased.
• If the Driver Position Memory System
does not operate normally, have the
system checked by an authorized
HYUNDAI dealer.
Storing Positions into Memory
1. Shift to P (Park) while the ignition
switch is in the ON position.
2. Adjust the driver’s seat position, side view mirror position, instrument panel
illumination intensity and head-up
display height/brightness to positions
comfortable for the driver.
3. Press the SET button. The system will beep once and notify you “Press
button to save settings” on the cluster
LCD display.
4. Press one of the memory buttons (1 or 2) within 4 seconds. The system
will beep twice when the memory has
been successfully stored.
5. “Settings 1 (or 2) saved” will appear on the cluster LCD display.
DRIVER POSITION MEMORY SYSTEM (IF EQUIPPED)
Page 170 of 537

Convenient Features5-40
Recalling Positions from Memory
1. Shift to P (Park) while the ignition switch is in the ON position.
2. Press the desired memory button (1 or 2). The system will beep once,
and then the driver’s seat position,
side view mirror position, instrument
panel illumination intensity and
head-up display height/brightness
will automatically adjust to the stored
positions.
3. “Settings 1 (or 2) applied” will appear on the cluster LCD display.
If your vehicle is equipped with
additional navigation, please refer to the
infotainment system manual separately
supplied.
Information
• While recalling the “1” memory
position, pressing the SET or 1 button
temporarily stops the adjustment of
the recalled memory position. Pressing
the 2 button recalls the “2” memory
position.
• While recalling the “2” memory
position, pressing the SET or 2 button
temporarily stops the adjustment of
the recalled memory position. Pressing
the 1 button recalls the “1” memory
position.
• While recalling the stored positions,
pressing one of the control buttons
for the driver’s seat, side view mirror,
instrument panel illumination or head-
up display will cause the movement of
that component to stop and move in
the direction that the control button is
pressed.
Resetting the Driver’s Seat
Memory System
Take the following procedures to reset
the driver’s seat memory system, when it
does not operate properly.
To reset the driver’s seat memory
system
1. Place the ignition switch to the ON
position, shift to P (Park), and open
the driver’s door.
2. Operate the control switch to set the driver’s seat and seatback to the
foremost position.
3. Simultaneously press the SET button and push forward the seat movement
switch over 2 seconds.
While resetting the driver’s seat
memory system
1. It starts with the notification sound.
2. The driver’s seat and seatback is adjusted to the rearward position with
the notification sound.
3. The driver’s seat and seatback is re-adjusted to the default position
(central position) with the notification
sound.
However, in the following cases, the
resetting procedure and the notification
sound may stop.
- The memory button is pressed.
- The control switch is operated.
- The gear is shifted out of P (Park) .
- The driving speed exceeds 2 mph (3 km/h).
- The driver’s door is closed.
Page 172 of 537

Convenient Features5-42
STEERING WHEEL
Electric Power Steering (EPS)
The system assists you with steering the
vehicle. If the vehicle is turned off or
if the power steering system becomes
inoperative, you may still steer the
vehicle, but it will require increased
steering effort.
Also, the steering effort becomes heavier
as the vehicle’s speed increases and
becomes lighter as the vehicle’s speed
decreases for better control of the
steering wheel.
Should you notice any change in the
effort required to steer during normal
vehicle operation, have the system
checked by an authorized HYUNDAI
dealer.
CAUTION
• If the Electric Power Steering System
does not operate normally, the
warning light (
) will illuminate
on the instrument cluster. You may
steer the vehicle, but it will require
increased steering efforts. Take your
vehicle to an authorized HYUNDAI
dealer and have the system checked
as soon as possible.
• When an abnormality is detected
in the electric power steering
system, to prevent a an accident, the
steering assist function may become
inoperative. At this time, the warning
light turns on or blinks on the cluster.
The steering wheel may become
difficult to control or operate. Have
your vehicle checked immediately,
after moving the vehicle to a safe
area.
Information
The following symptoms may occur during
normal vehicle operation:
• The steering effort may be high
immediately after placing the ignition
switch in the ON position.
This happens as the system performs
the EPS system diagnostics. When the
diagnostics are completed, the steering
wheel effort will return to its normal
condition.
• When the battery voltage is low, you
might have to put more steering effort.
However, it is a temporary condition so
that it will return to normal condition
after charging the battery.
• A click noise may be heard from the
EPS relay after the ignition switch is in
the ON or LOCK/OFF position.
• Motor noise may be heard when the
vehicle is at a stop or at a low driving
speed.
• When you operate the steering wheel
in low temperatures, abnormal noise
may occur. If the temperature rises, the
noise will disappear. This is a normal
condition.
• When an error is detected from the
EPS, the steering effort assist function
may become inoperative in order to
prevent fatal accidents. Instrument
cluster warning lights may be on or the
steering effort may be high. If these
symptoms occur, drive the vehicle to
a safe area as soon as it is safe to do
so. Have the system checked by an
authorized HYUNDAI dealer as soon
as possible.
Page 173 of 537

05
5-43
Tilt Steering / Telescope Steering
When adjusting the steering wheel to a
comfortable position, adjust the steering
wheel so that it points toward your chest,
not toward your face. Make sure you can
see the instrument cluster warning lights
and gauges. After locking the lever, push
the steering wheel both up and down to
be certain it is locked in position. Always
adjust the position of the steering wheel
before driving.
WARNING
NEVER adjust the steering wheel while
driving. This may cause loss of vehicle
control resulting in an accident.
ODN8059021ODN8059021
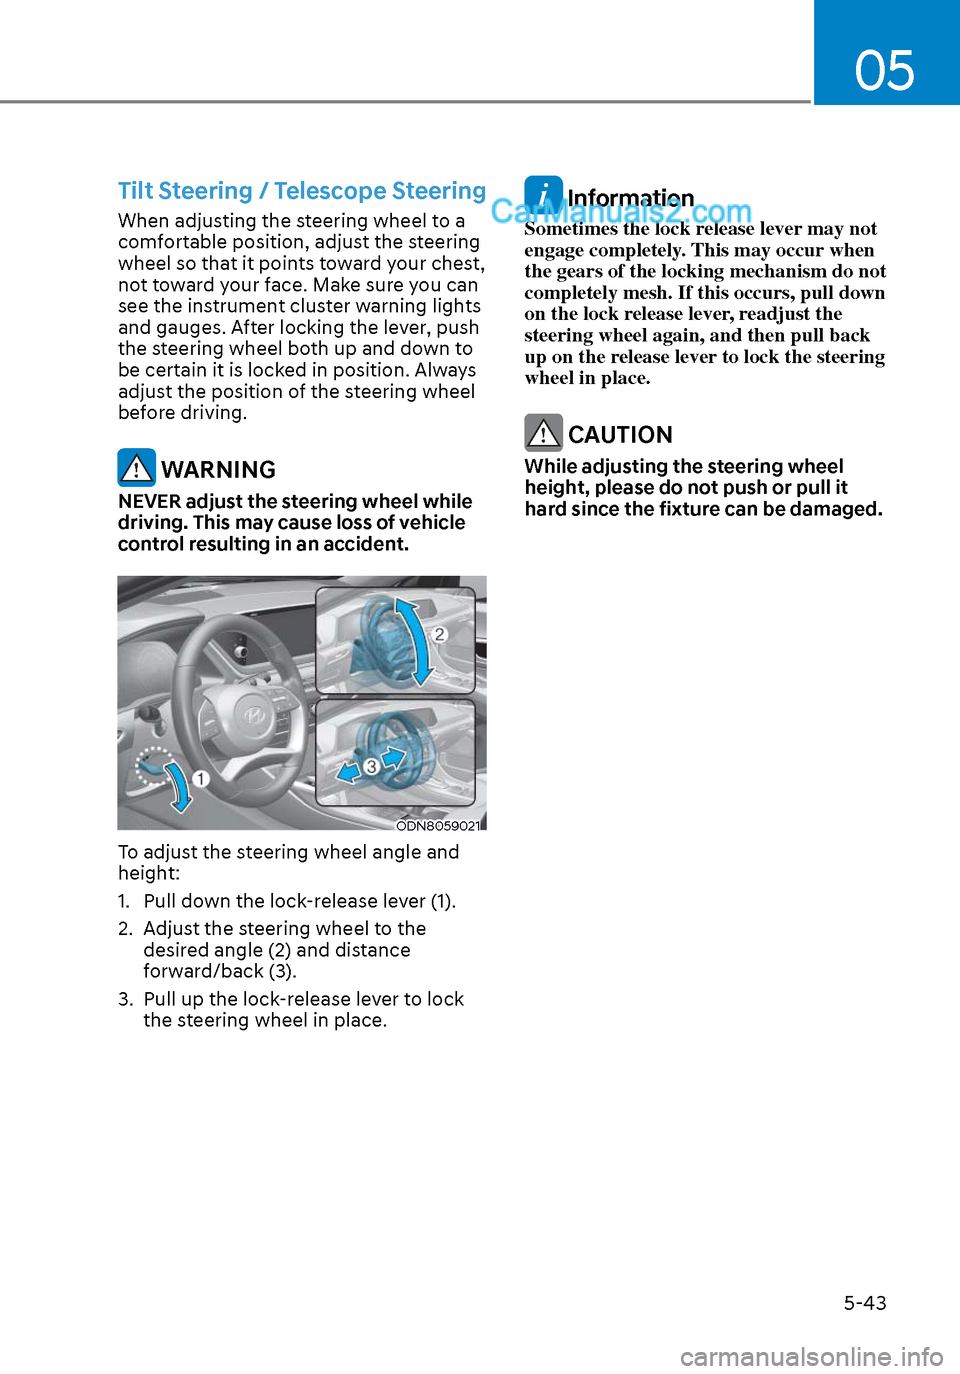
To adjust the steering wheel angle and
height:
1. Pull down the lock-release lever (1).
2. Adjust the steering wheel to the desired angle (2) and distance
forward/back (3).
3. Pull up the lock-release lever to lock the steering wheel in place.
Information
Sometimes the lock release lever may not
engage completely. This may occur when
the gears of the locking mechanism do not
completely mesh. If this occurs, pull down
on the lock release lever, readjust the
steering wheel again, and then pull back
up on the release lever to lock the steering
wheel in place.
CAUTION
While adjusting the steering wheel
height, please do not push or pull it
hard since the fixture can be damaged.
Page 194 of 537

Convenient Features5-64
EXTERIOR FEATURES
Hood
Opening the hood
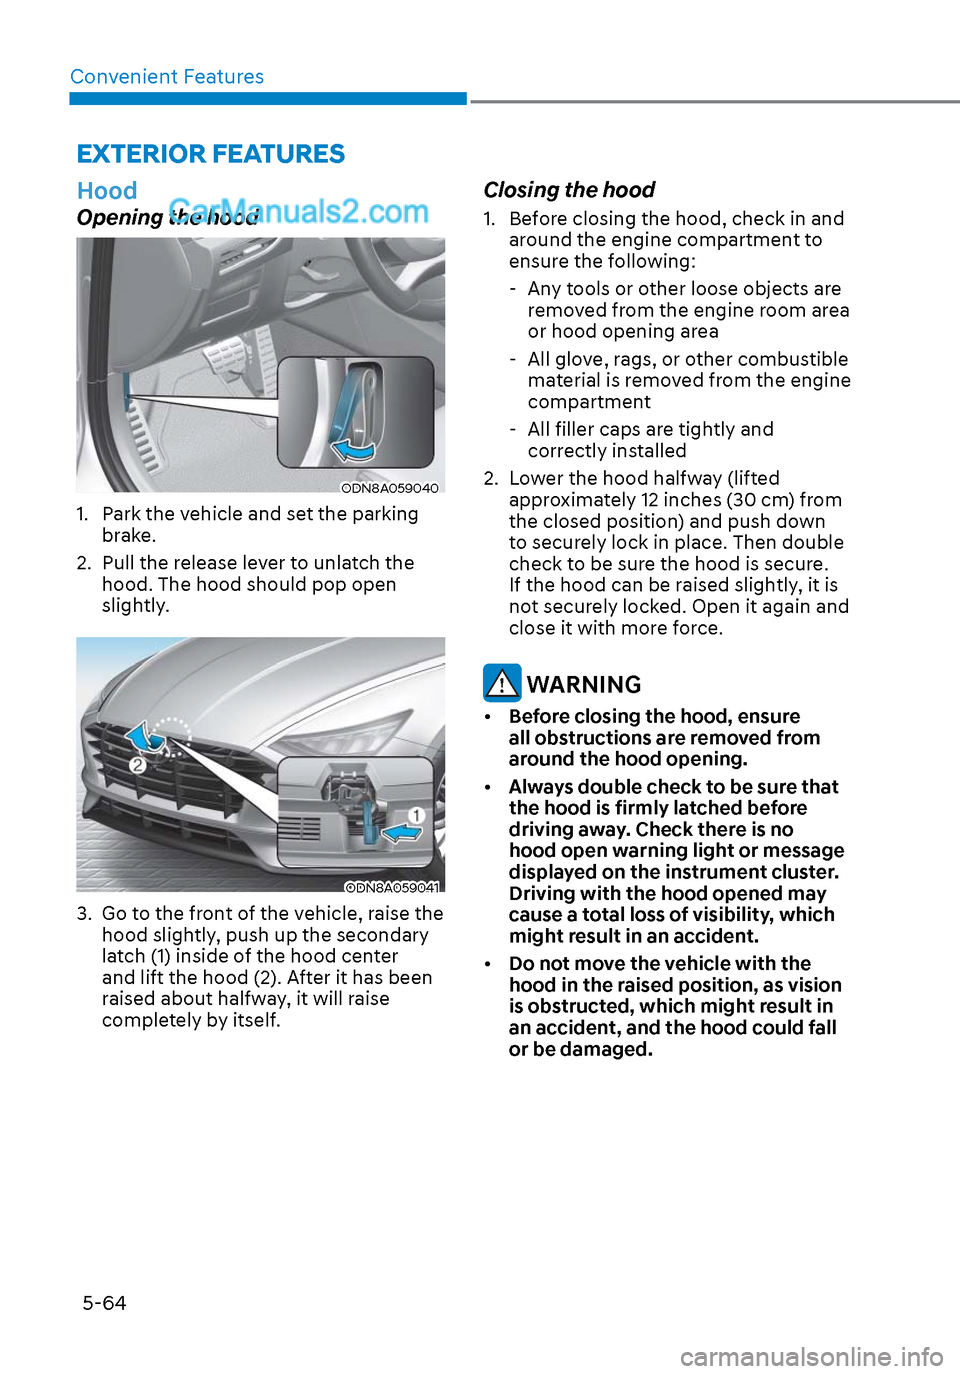
ODN8A059040ODN8A059040
1. Park the vehicle and set the parking brake.
2. Pull the release lever to unlatch the hood. The hood should pop open
slightly.
ODN8A059041ODN8A059041
3. Go to the front of the vehicle, raise the hood slightly, push up the secondary
latch (1) inside of the hood center
and lift the hood (2). After it has been
raised about halfway, it will raise
completely by itself.
Closing the hood
1. Before closing the hood, check in and around the engine compartment to
ensure the following:
- Any tools or other loose objects are removed from the engine room area
or hood opening area
- All glove, rags, or other combustible material is removed from the engine
compartment
- All filler caps are tightly and
correctly installed
2. Lower the hood halfway (lifted approximately 12 inches (30 cm) from
the closed position) and push down
to securely lock in place. Then double
check to be sure the hood is secure.
If the hood can be raised slightly, it is
not securely locked. Open it again and
close it with more force.
WARNING
• Before closing the hood, ensure
all obstructions are removed from
around the hood opening.
• Always double check to be sure that
the hood is firmly latched before
driving away. Check there is no
hood open warning light or message
displayed on the instrument cluster.
Driving with the hood opened may
cause a total loss of visibility, which
might result in an accident.
• Do not move the vehicle with the
hood in the raised position, as vision
is obstructed, which might result in
an accident, and the hood could fall
or be damaged.
Page 202 of 537

Convenient Features5-72
HEAD UP DISPLAY (HUD) (IF EQUIPPED)
ODN8A059054ODN8A059054
The Head-Up Display is an optional
feature that allows the driver to view
information projected onto a transparent
screen while still keeping your eyes
safely on the road ahead while driving.
Precautions while using the head up
display
It may sometimes be difficult to read
information on the head up display in the
following situations.
- The driver is improperly positioned in the driver’s seat.
- The driver wears polarizing-filter sunglasses.
- An object is located above the head up display cover.
- The vehicle is driven on a wet road.
- Any improper lighting accessory is installed inside the vehicle, or there
is incoming light from outside of the
vehicle.
- The driver wears glasses.
- The driver wears contact lenses.
When it is difficult to read the head up
display information, adjust the head
up display angle or the head up display
brightness level in the User Settings
mode. For more information, refer to
“LCD Display” in this chapter.
WARNING
• Do not tint the front windshield glass or add other types of metallic
coating. Otherwise, the head up
display image may be invisible.
• Do not place any accessories on the crash pad or attach any objects on
the windshield glass.
• The Blind-spot Collision Warning system warnings on the head up
display are supplemental. Do not
solely depend on them to change
lanes. Always take a look around
before changing lanes.
NOTICE
When replacing the front windshield
glass of the vehicle equipped with
the head up display, replace it with
a windshield glass designed for the
head up display operation. Otherwise,
duplicated images may be displayed on
the windshield glass.
Head-up display ON/OFF
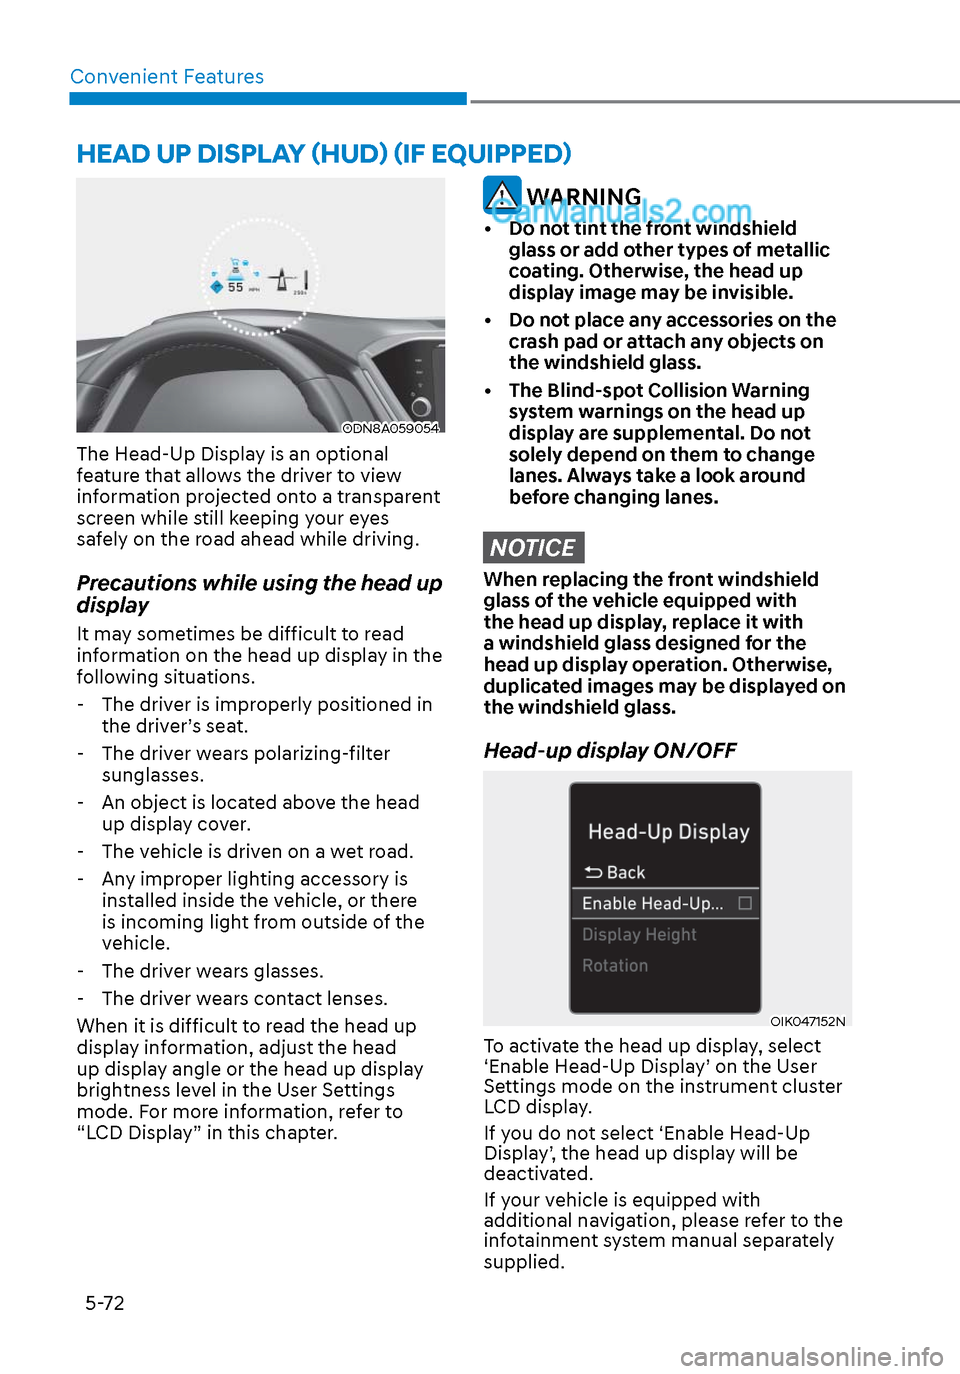
OIK047152NOIK047152N
To activate the head up display, select
‘Enable Head-Up Display’ on the User
Settings mode on the instrument cluster
LCD display.
If you do not select ‘Enable Head-Up
Display’, the head up display will be
deactivated.
If your vehicle is equipped with
additional navigation, please refer to the
infotainment system manual separately
supplied.
Page 203 of 537

05
5-73
Head-up display information
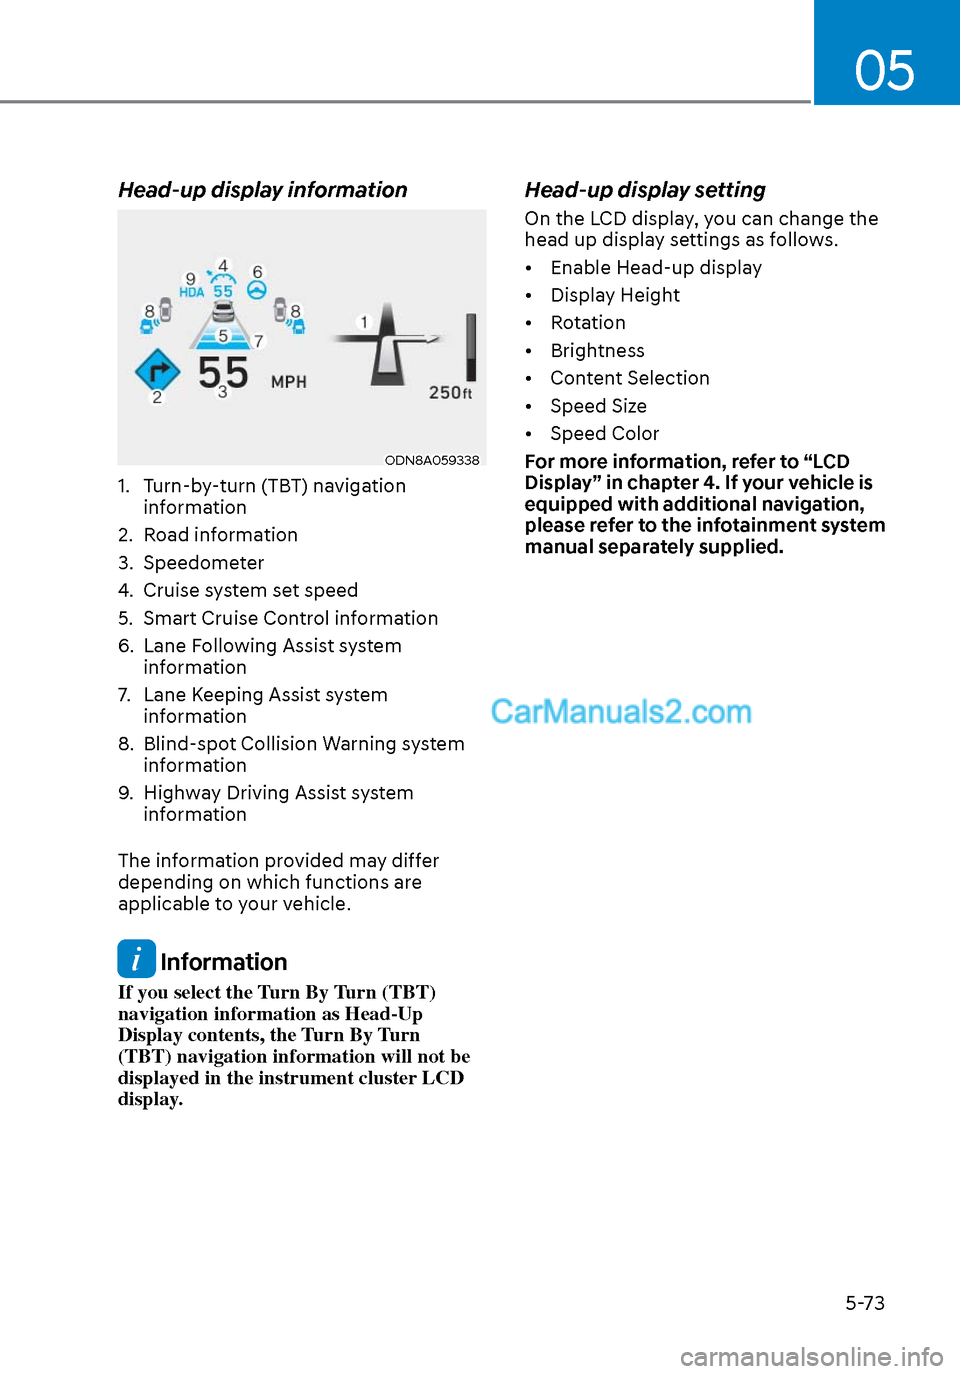
ODN8A059338ODN8A059338
1. Turn-by-turn (TBT) navigation information
2. Road information
3. Speedometer
4. Cruise system set speed
5. Smart Cruise Control information
6. Lane Following Assist system information
7. Lane Keeping Assist system information
8. Blind-spot Collision Warning system information
9. Highway Driving Assist system information
The information provided may differ
depending on which functions are
applicable to your vehicle.
Information
If you select the Turn By Turn (TBT)
navigation information as Head-Up
Display contents, the Turn By Turn
(TBT) navigation information will not be
displayed in the instrument cluster LCD
display.
Head-up display setting
On the LCD display, you can change the
head up display settings as follows.
• Enable Head-up display
• Display Height
• Rotation
• Brightness
• Content Selection
• Speed Size
• Speed Color
For more information, refer to “LCD
Display” in chapter 4. If your vehicle is
equipped with additional navigation,
please refer to the infotainment system
manual separately supplied.