2020 Hyundai Sonata ECO mode
[x] Cancel search: ECO modePage 271 of 537

05
5-141
Auto Defogging System (Only
for Automatic Climate Control
System, if equipped)
ODN8059215ODN8059215
Auto defogging helps reduce the
possibility of fogging up the inside of the
windshield by automatically sensing the
moisture on inside the windshield.
The auto defogging system operates
when the heater or air conditioning is on.
�$�8�7�2
When the Auto Defogging
System operates, the
indicator will illuminate.
If a high amount of humidity is detected
in the vehicle, the Auto Defogging
System will be enabled.
The following steps will be performed
automatically:
Step 1) The A/C button will turn ON.
Step 2) The air intake control will change to Fresh mode under low outside
temperature.
Step 3) The mode will be changed to defrost to direct airflow to the
windshield.
Step 4) The fan speed will be increased.
To cancel or reset the Auto Defogging
System
Press the front windshield defroster
butt
on for 3 seconds when the ignition
switch is in the ON position.
When the Auto Defogging System is
canceled, defrost button indicator will
blink 3 times.
When the Auto Defogging System is
reset, defrost button indicator will blink 6
times without a signal.
Information
• When the air conditioning is turned on by Auto defogging system, if you
try to turn off the air conditioning,
the indicator will blink 3 times and
the air conditioning will not be
turned off.
• To maintain the effectiveness and efficiency of the Auto Defogging
System, do not select Recirculation
mode while the system is operating.
• When the Auto Defogging System is operating, the fan speed adjustment
knob, the temperature adjustment
knob, and the air intake control
button are all disabled.
NOTICE
Do not remove the sensor cover located
on the upper end of the driver side
windshield glass.
Damage to system parts could occur
and may not be covered by your vehicle
warranty.
Page 278 of 537
![Hyundai Sonata 2020 Owners Manual Convenient Features5-148
Wireless Cellular Phone
Charging System (if equipped)
ODN8059223ODN8059223
[A]: Indicator light, [B]: Charging pad
On certain models, the vehicle comes
equipped with a wirel Hyundai Sonata 2020 Owners Manual Convenient Features5-148
Wireless Cellular Phone
Charging System (if equipped)
ODN8059223ODN8059223
[A]: Indicator light, [B]: Charging pad
On certain models, the vehicle comes
equipped with a wirel](/manual-img/35/16773/w960_16773-277.png)
Convenient Features5-148
Wireless Cellular Phone
Charging System (if equipped)
ODN8059223ODN8059223
[A]: Indicator light, [B]: Charging pad
On certain models, the vehicle comes
equipped with a wireless cellular phone
charger.
The system is available when all doors
are closed, and when the ignition switch
is ON.
To charge a cellular phone
The wireless cellular phone charging
system charges only the Qi-enabled
cellular phones. Read the label on the
cellular phone accessory cover or visit
your cellular phone manufacturer’s
website to check whether your cellular
phone supports the Qi technology.
The wireless charging process starts
when you put a Qi-enabled cellular
phone on the wireless charging unit.
1. Remove other items, including the smart key, from the wireless charging
unit. If not, the wireless charging
process may be interrupted. Place
the cellular phone on the center of
the charging pad (
).
2. The indicator light is orange when the cellular phone is charging. The
indicator light turns green when
phone charging is complete.
3. You can turn ON or OFF the wireless charging function in the user settings
mode on the instrument cluster. For
further information, refer to the “LCD
Display Modes” in this chapter.
If your cellular phone is not charging:
- Slightly change the position of the cellular phone on the charging pad.
- Make sure the indicator light is orange.
The indicator light will blink orange for 10
seconds if there is a malfunction in the
wireless charging system.
In this case, temporarily stop the
charging process, and re-attempt to
charge your cellular phone again.
The system warns you with a message
on the LCD display if the cellular phone
is still on the wireless charging unit after
the engine is turned OFF and the front
door is opened.
Information
For some manufacturers’ cellular phones,
the system may not warn you even though
the cellular phone is left on the wireless
charging unit. This is due to the particular
characteristic of the cellular phone and
not a malfunction of the wireless charging.
NOTICE
• The wireless cellular phone charging system may not support certain
cellular phones, which are not
verified for the Qi specification (
).
• When placing your cellular phone on the charging mat, position the
phone in the middle of the mat for
optimal charging performance. If
your cellular phone is off to the side,
the charging rate may be less and in
some cases the cellular phone may
experience higher heat conduction.
• In some cases, the wireless charging may stop temporarily when the
Remote Key or Smart Key is used,
either when starting the vehicle or
locking/unlocking the doors, etc.
• When charging certain cellular phones, the charging indicator
may not change to green when the
cellular phone is fully charged.
Page 283 of 537

05
5-153
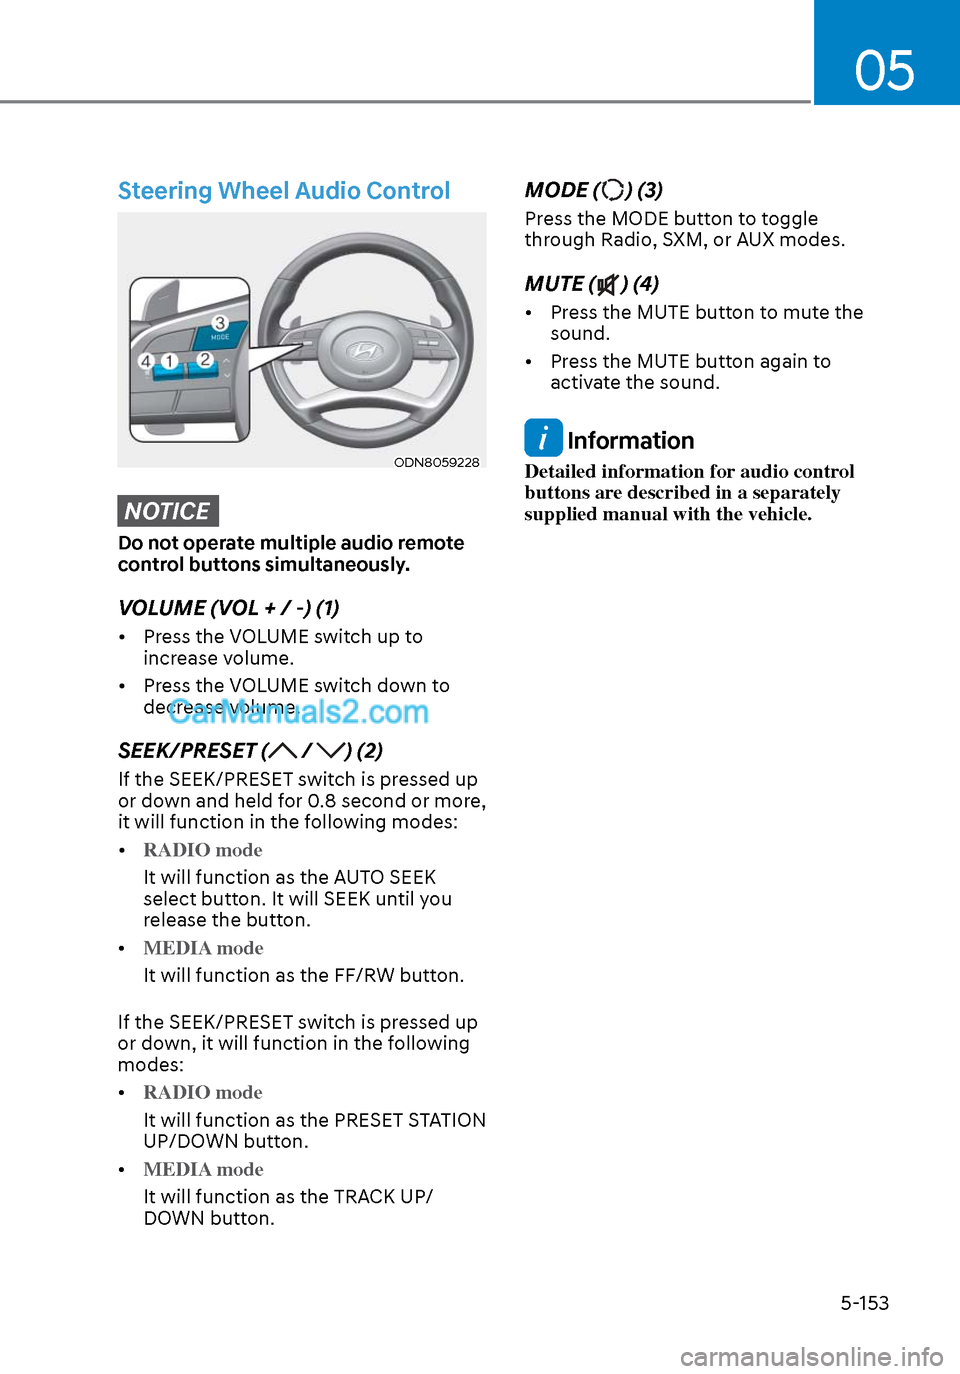
Steering Wheel Audio Control
ODN8059228ODN8059228
NOTICE
Do not operate multiple audio remote
control buttons simultaneously.
VOLUME (VOL + / -) (1)
• Press the VOLUME switch up to increase volume.
• Press the VOLUME switch down to decrease volume.
SEEK/PRESET ( / ) (2)
If the SEEK/PRESET switch is pressed up
or down and held for 0.8 second or more,
it will function in the following modes:
• RADIO mode
It will function as the AUTO SEEK
select butt
on. It will SEEK until you
release the button.
• MEDIA mode
It will function as the FF/RW button.
If the SEEK/PRESET s
witch is pressed up
or down, it will function in the following
modes:
• RADIO mode
It will function as the PRESET STATION
UP/DOWN butt
on.
• MEDIA mode
It will function as the TRACK UP/
DOWN butt
on.
MODE () (3)
Press the MODE button to toggle
through Radio, SXM, or AUX modes.
MUTE () (4)
• Press the MUTE button to mute the sound.
• Press the MUTE button again to activate the sound.
Information
Detailed information for audio control
buttons are described in a separately
supplied manual with the vehicle.
Page 292 of 537

While Driving6-8
Starting the engine
WARNING
Always wear appropriate shoes when
operating your vehicle.
Unsuitable shoes, such as high heels,
ski boots, sandals, flip-flops, etc., may
interfere with your ability to use the
brake and accelerator pedals.
1. Make sure the parking brake is applied.
2. Make sure the gear is in P (Park).
3. Depress the brake pedal.
4. Turn the ignition switch to the START position. Hold the key (maximum of
10 seconds) until the engine starts and
release it.
Information
• It is best to maintain a moderate engine
speed until the vehicle engine comes
up to normal operating temperature.
Avoid harsh or abrupt acceleration or
deceleration while the engine is still
cold.
• Whether the engine is cold or warm,
always start the vehicle with your foot
on the brake pedal. Do not depress the
accelerator while starting the vehicle.
Do not rev the engine while warming
it up.
NOTICE
To prevent damage to the vehicle:
• Do not hold the ignition key in the
START position for more than 10
seconds. Wait 5 to 10 seconds before
trying again.
• Do not push or tow your vehicle to
start the engine.
Turning off the engine
1. Stop the vehicle and depress the
brake pedal fully.
2. Shift the gear to P (Park).
3. Turn the ignition switch to the off position and apply the parking brake.
Page 295 of 537

06
6-11
Starting the engine
WARNING
• Always wear appropriate shoes when
operating your vehicle.
Unsuitable shoes, such as high heels,
ski boots, sandals, flip-flops, etc.,
may interfere with your ability to use
the brake and accelerator pedals.
• Do not start the vehicle with the
accelerator pedal depressed. The
vehicle can move and lead to an
accident.
• Wait until the engine rpm is normal.
The vehicle may suddenly move if
the brake pedal is released when the
rpm is high.
Information
• The engine will start by pressing the
Engine Start/Stop button, only when
the smart key is in the vehicle.
• Even if the smart key is in the vehicle,
if it is far away from the driver, the
engine may not start.
• When the Engine Start/Stop button
is in the ACC or ON position, if any
door is open, the system checks for the
smart key. If the smart key is not in the
vehicle, the “
” indicator will blink
and the warning "Key not in vehicle"
will come on and if all doors are closed,
the chime will also sound for about
5 seconds. Keep the smart key in the
vehicle when using the ACC position or
if the vehicle engine is ON.
1. Always carry the smart key with you.
2. Make sure the parking brake is applied.
3. Make sure the gear is in P (Park).
4. Depress the brake pedal.
5. Press the Engine Start/Stop button.
Information
• Do not wait for the engine to warm up
while the vehicle remains stationary.
Start driving at moderate engine
speeds. (Aggressive accelerating and
decelerating should be avoided.)
• Always start the vehicle with your foot
on the brake pedal. Do not depress the
accelerator while starting the vehicle.
Do not rev the engine while warming
it up.
NOTICE
To prevent damage to the vehicle:
• If the engine stalls while you are in
motion, do not attempt to move the
shift button to the P (Park) position.
If traffic and road conditions permit,
you may put the shift button in the N
(Neutral) position while the vehicle
is still moving and press the Engine
Start/Stop button in an attempt to
restart the engine.
• Do not push or tow your vehicle to
start the engine.
Page 302 of 537

While Driving6-18
Good Driving Practices
• Never shift the gear from P (Park) or N (Neutral) to any other position with
the accelerator pedal depressed.
• Never shift the gear into P (Park) when the vehicle is in motion.
• Be sure the vehicle is completely stopped before you attempt to shift
into R (Reverse) or D (Drive).
• Do not shift the gear to N (Neutral) when driving. Doing so may result
in an accident because of a loss of
engine braking and the transmission
could be damaged.
• Do not drive with your foot resting on the brake pedal. Even light, but
consistent pedal pressure can result
in the brakes overheating, brake wear
and possibly even brake failure.
• When driving in the manual shift mode, slow down before shifting to a
lower gear. Otherwise, the lower gear
may not be engaged if the engine
rpms are outside of the allowable
range.
• Always apply the parking brake when leaving the vehicle. Do not depend on
placing the transmission in P (Park) to
keep the vehicle from moving.
• Exercise extreme caution when driving on a slippery surface. Be
especially careful when braking,
accelerating or shifting gears. On a
slippery surface, an abrupt change
in vehicle speed can cause the drive
wheels to lose traction and may cause
loss of vehicle control resulting in an
accident
• Optimum vehicle performance and economy is obtained by smoothly
depressing and releasing the
accelerator. WARNING
To reduce the risk of SERIOUS INJURY
or DEATH:
• ALWAYS wear your seatbelt. In a
collision, an unbelted occupant
is significantly more likely to be
seriously injured or killed than a
properly belted occupant.
• Avoid high speeds when cornering or
turning.
• Do not make quick steering wheel
movements, such as sharp lane
changes or fast, sharp turns.
• The risk of rollover is greatly
increased if you lose control of your
vehicle at highway speeds.
• Loss of control often occurs if two or
more wheels drop off the roadway
and the driver over steers to reenter
the roadway.
• In the event your vehicle leaves
the roadway, do not steer sharply.
Instead, slow down before pulling
back into the t ravel lanes.
• HYUNDAI recommends you follow all
posted speed limits.
Page 303 of 537
![Hyundai Sonata 2020 Owners Manual 06
6-19
Paddle Shifter
(Manual Shift Mode)
(if equipped)
ODN8069009ODN8069009
The paddle shifter is available when the
gear is in the D (Drive) position.
Pull the [+] or [-] paddle shifter once to Hyundai Sonata 2020 Owners Manual 06
6-19
Paddle Shifter
(Manual Shift Mode)
(if equipped)
ODN8069009ODN8069009
The paddle shifter is available when the
gear is in the D (Drive) position.
Pull the [+] or [-] paddle shifter once to](/manual-img/35/16773/w960_16773-302.png)
06
6-19
Paddle Shifter
(Manual Shift Mode)
(if equipped)
ODN8069009ODN8069009
The paddle shifter is available when the
gear is in the D (Drive) position.
Pull the [+] or [-] paddle shifter once to
shift up or down one gear and the system
changes from automatic shift mode to
manual shift mode.
To change back to the automatic shift
mode from manual shift mode, do one of
the following:
• Gently depress the accelerator pedal for more than 5 seconds.
• Drive the vehicle under 6 mph (10 km/h).
• Pull and hold the right side paddle shifter.
Information
If the [+] and [-] paddle shifters are pulled
at the same time, gear shift may not occur.
Page 312 of 537

While Driving6-28
Using ABS
To obtain the maximum benefit from
your ABS in an emergency situation,
do not attempt to modulate your brake
pressure and do not try to pump your
brakes. Depress your brake pedal as hard
as possible.
When you apply your brakes under
conditions which may lock the wheels,
you may hear sounds from the brakes,
or feel a corresponding sensation in the
brake pedal. This is normal and it means
your ABS is active.
ABS does not reduce the time or distance
it takes to stop the vehicle.
Always maintain a safe distance from the
vehicle in front of you.
ABS will not prevent a skid that results
from sudden changes in direction, such
as trying to take a corner too fast or
making a sudden lane change. Always
drive at a safe speed for the road and
weather conditions.
ABS cannot prevent a loss of stability.
Always steer moderately when braking
hard. Severe or sharp steering wheel
movement can still cause your vehicle to
veer into oncoming traffic or off the road.
On loose or uneven road surfaces,
operation of the anti-lock brake system
may result in a longer stopping distance
than for vehicles equipped with a
conventional brake system.
The ABS warning light (
) will stay on
for several seconds after the ignition
switch is in the ON position. During
that time, the ABS will go through self-
diagnosis and the light will go off if
everything is normal. If the light stays on,
you may have a problem with your ABS.
Contact an authorized HYUNDAI dealer
as soon as possible.
WARNING
If the ABS warning light () is on and
stays on, you may have a problem with
the ABS. Your power brakes will work
normally. To reduce the risk of serious
injury or death, contact your HYUNDAI
dealer as soon as possible.
CAUTION
When you drive on a road having poor
traction, such as an icy road, and apply
your brakes continuously, the ABS will
be active continuously and the ABS
warning light (
) may illuminate. Pull
your car over to a safe place and turn
the engine off.
Restart the engine. If the ABS warning
light is off, then your ABS system is
normal.
Otherwise, you may have a problem
with your ABS system. Contact an
authorized HYUNDAI dealer as soon as
possible.
Information
When you jump start your vehicle because
of a drained battery, the ABS warning
light (
) may turn on at the same
time. This happens because of the low
battery voltage. It does not mean your
ABS is malfunctioning. Have the battery
recharged before driving the vehicle.