2020 Hyundai Sonata ECO mode
[x] Cancel search: ECO modePage 180 of 537
Convenient Features5-50
7. Return to the vehicle and firmly press, hold for two seconds and release the
HomeLink button up to three times.
Do not press the HomeLink button
rapidly. At this point programming
is complete and your device should
operate when the HomeLink button is
pressed and released.
Information
• Some garage door openers require to
press the programmed button on the
mirror up to three times right after
the programming is just completed to
operate the garage door.
• The indicator (4) is turned ON in
Orange and flashes for about 60
seconds, during the programing mode
and if a programing is not succeeded
within the 60 seconds, the programing
mode will be abort.
HomeLink® should now activate your
rolling code equipped device. Gate operator & Canadian programming
During programming, your handheld
transmitter may automatically stop
transmitting. Continue to press the
Integrated HomeLink® Wireless Control
System button while you press and re-
press (“cycle”) your handheld transmitter
every two seconds until the frequency
signal has been learned. The indicator
light will flash slowly and then rapidly
after several seconds upon successful
training.
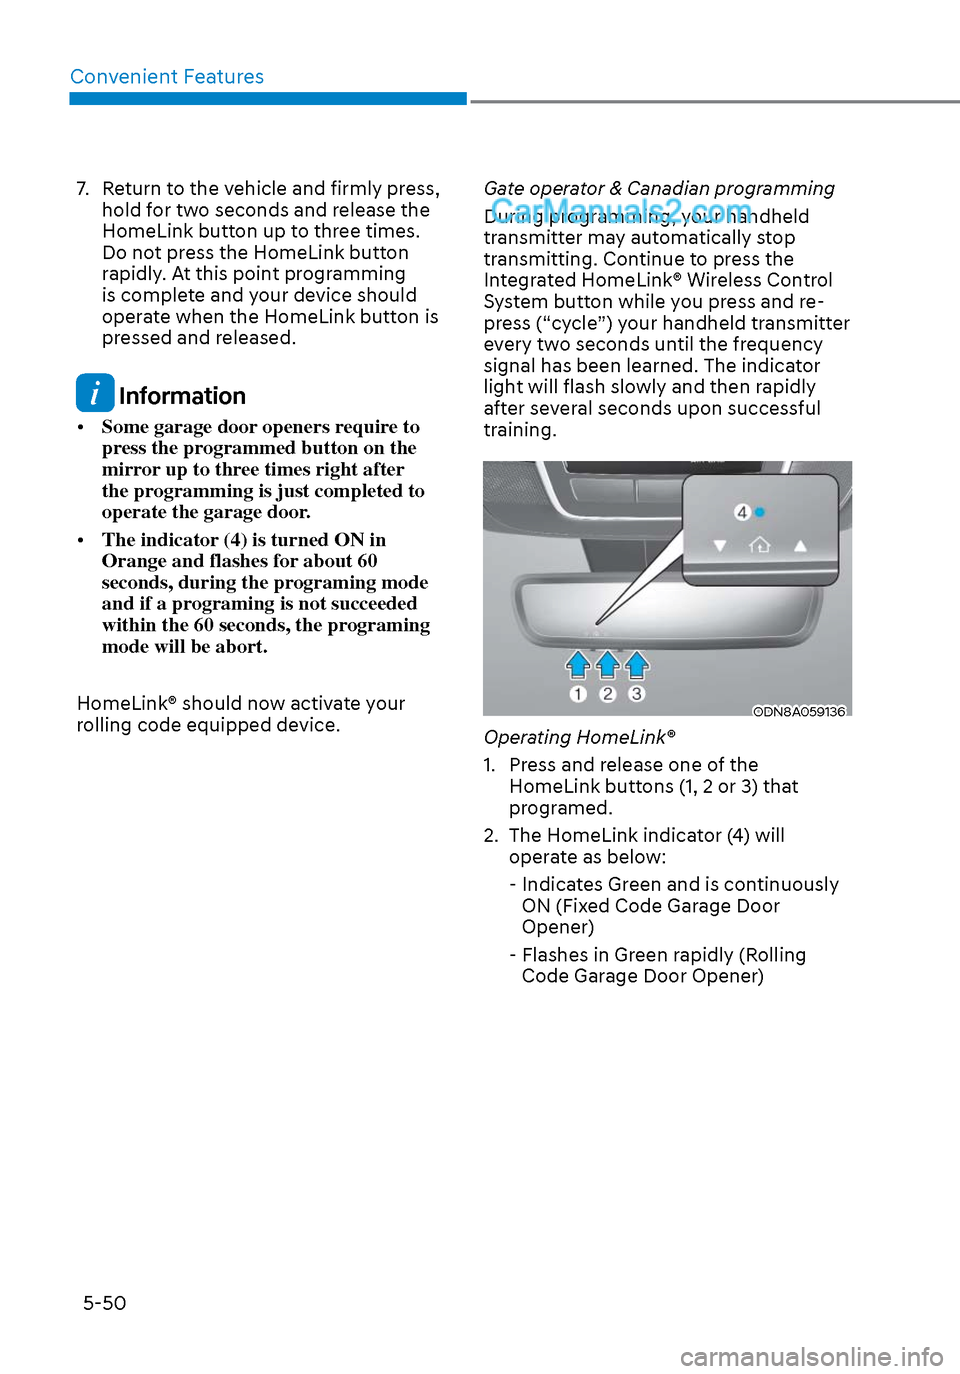
ODN8A059136ODN8A059136
Operating HomeLink®
1. Press and release one of the
HomeLink buttons (1, 2 or 3) that
programed.
2. The HomeLink indicator (4) will operate as below:
- Indicates Green and is continuously ON (Fixed Code Garage Door
Opener)
- Flashes in Green rapidly (Rolling Code Garage Door Opener)
Page 197 of 537
05
5-67
How to use the Smart Trunk with
Auto Open
The trunk can be opened with no-touch
activation satisfying all the conditions
below.
• After 15 seconds when all doors are closed and locked
• Positioned in the detecting area for more than 3 seconds.
Information
• The Smart Trunk with Auto Open does not operate when:
- The smart key is detected within 15 seconds after the doors are closed and
locked, and is continuously detected.
- The smart key is detected within 15 seconds after the doors are closed
and locked, and within 60 inches
(1.5 m) from the front door handles.
(for vehicles equipped with Welcome
Light)
- A door is not locked or closed.
- The smart key is in the vehicle.
1. Setting
To activate the Smart Trunk with Auto
Open, go to User Settings Mode and
select Smart Trunk on the LCD display.
For more information, refer to the “LCD
Display” section in this chapter. If your
vehicle is equipped with additional
navigation, please refer to the
infotainment system manual separately
supplied.
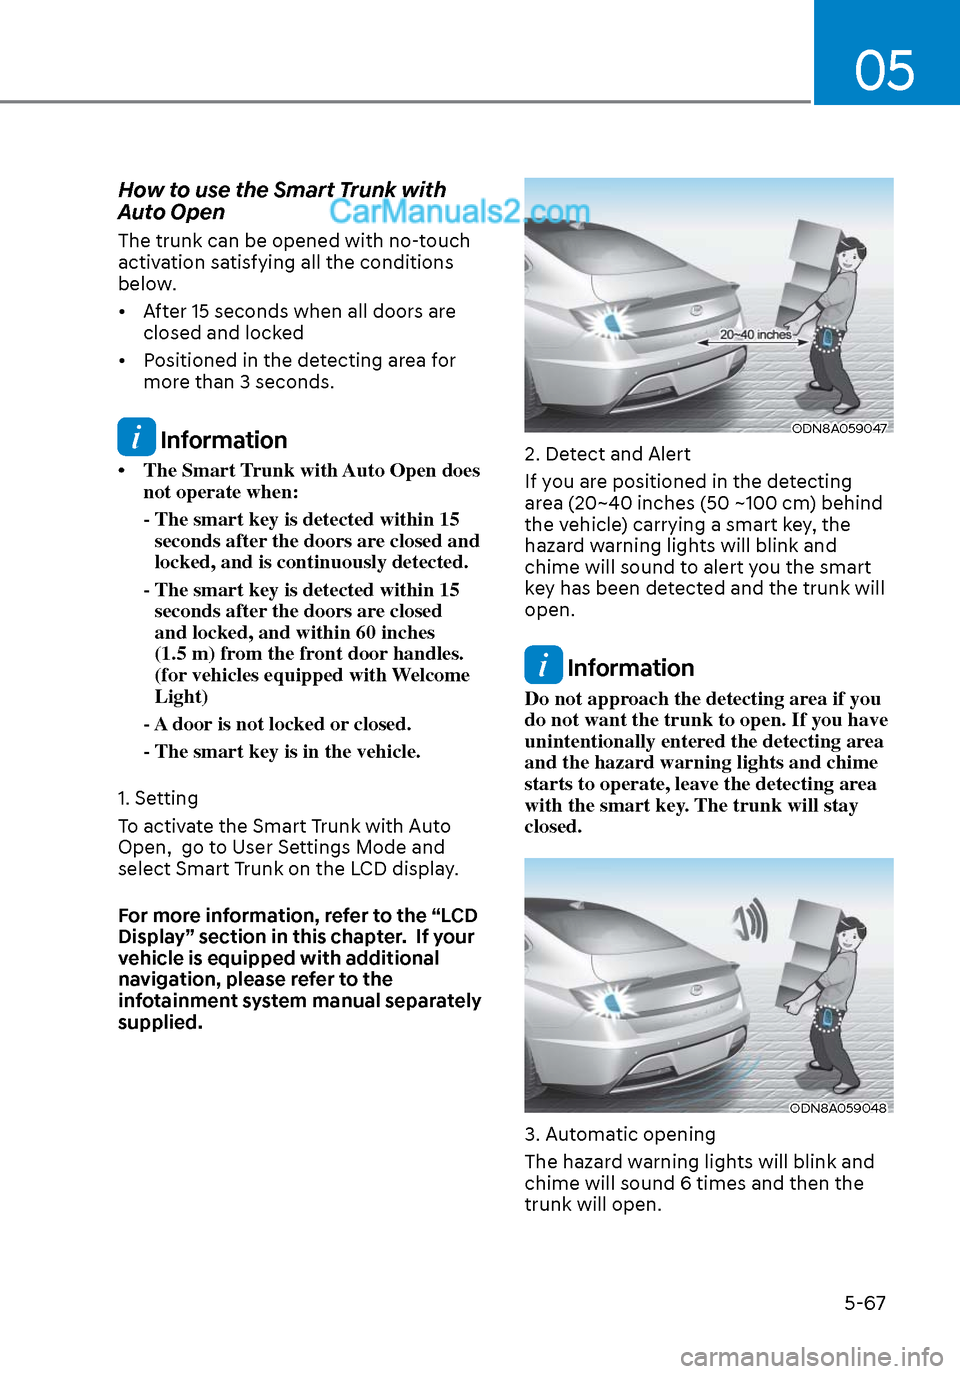
ODN8A059047ODN8A059047
2. Detect and Alert
If you are positioned in the detecting
area (20~40 inches (50 ~100 cm) behind
the vehicle) carrying a smart key, the
hazard warning lights will blink and
chime will sound to alert you the smart
key has been detected and the trunk will
open.
Information
Do not approach the detecting area if you
do not want the trunk to open. If you have
unintentionally entered the detecting area
and the hazard warning lights and chime
starts to operate, leave the detecting area
with the smart key. The trunk will stay
closed.
ODN8A059048ODN8A059048
3. Automatic opening
The hazard warning lights will blink and
chime will sound 6 times and then the
trunk will open.
Page 209 of 537
05
5-79
Turn signals and lane change signals
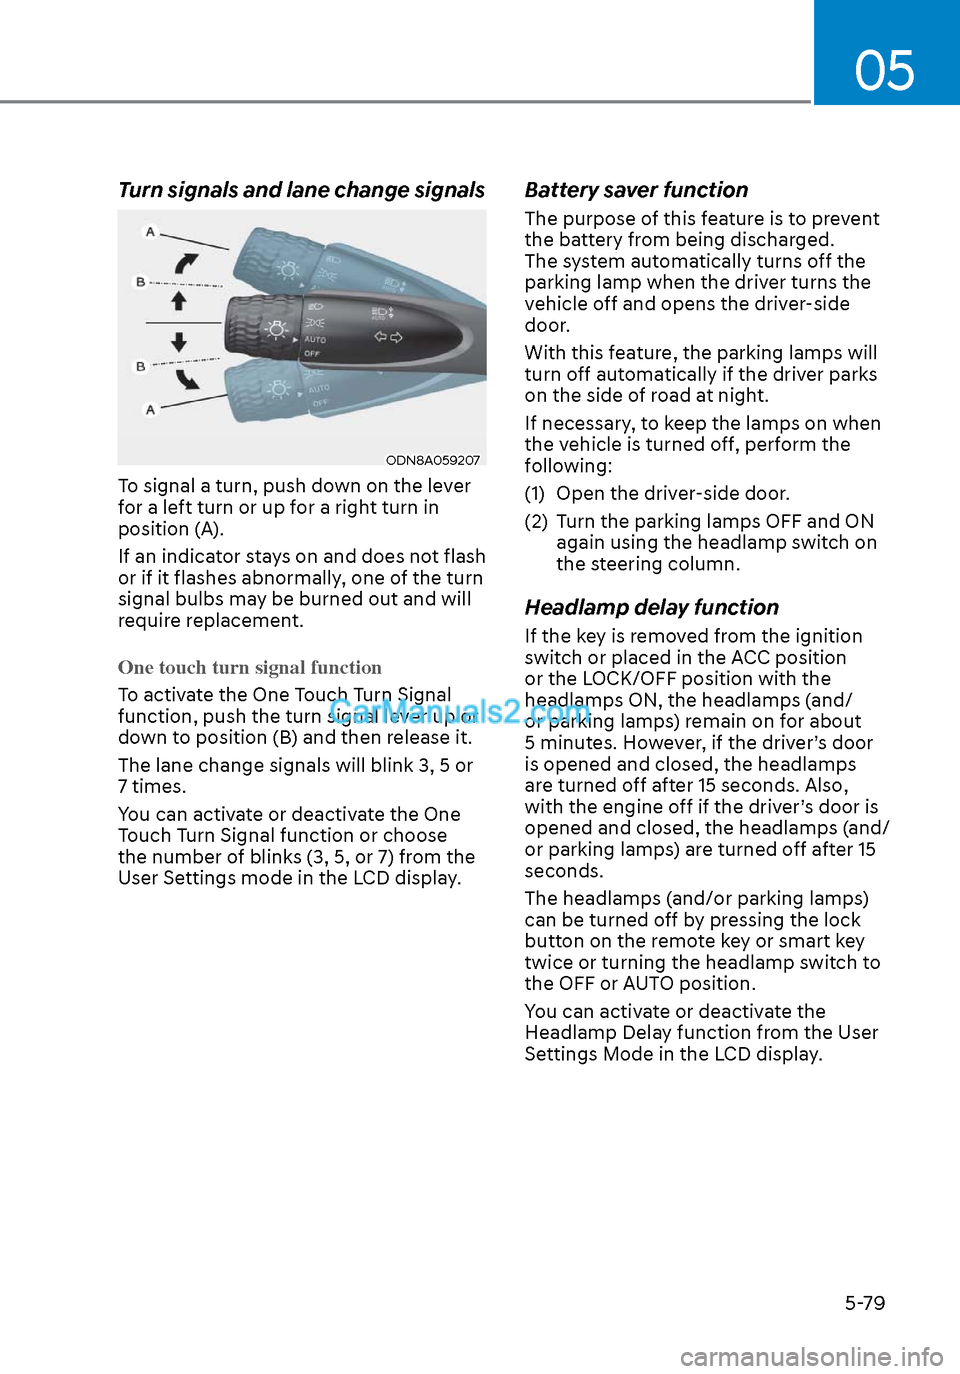
ODN8A059207ODN8A059207
To signal a turn, push down on the lever
for a left turn or up for a right turn in
position (A).
If an indicator stays on and does not flash
or if it flashes abnormally, one of the turn
signal bulbs may be burned out and will
require replacement.
One touch turn signal function
To activate the One Touch Turn Signal
function, push the turn signal le
ver up or
down to position (B) and then release it.
The lane change signals will blink 3, 5 or
7 times.
You can activate or deactivate the One
Touch Turn Signal function or choose
the number of blinks (3, 5, or 7) from the
User Settings mode in the LCD display.
Battery saver function
The purpose of this feature is to prevent
the battery from being discharged.
The system automatically turns off the
parking lamp when the driver turns the
vehicle off and opens the driver-side
door.
With this feature, the parking lamps will
turn off automatically if the driver parks
on the side of road at night.
If necessary, to keep the lamps on when
the vehicle is turned off, perform the
following:
(1) Open the driver-side door.
(2) Turn the parking lamps OFF and ON again using the headlamp switch on
the steering column.
Headlamp delay function
If the key is removed from the ignition
switch or placed in the ACC position
or the LOCK/OFF position with the
headlamps ON, the headlamps (and/
or parking lamps) remain on for about
5 minutes. However, if the driver’s door
is opened and closed, the headlamps
are turned off after 15 seconds. Also,
with the engine off if the driver’s door is
opened and closed, the headlamps (and/
or parking lamps) are turned off after 15
seconds.
The headlamps (and/or parking lamps)
can be turned off by pressing the lock
button on the remote key or smart key
twice or turning the headlamp switch to
the OFF or AUTO position.
You can activate or deactivate the
Headlamp Delay function from the User
Settings Mode in the LCD display.
Page 213 of 537
05
5-83
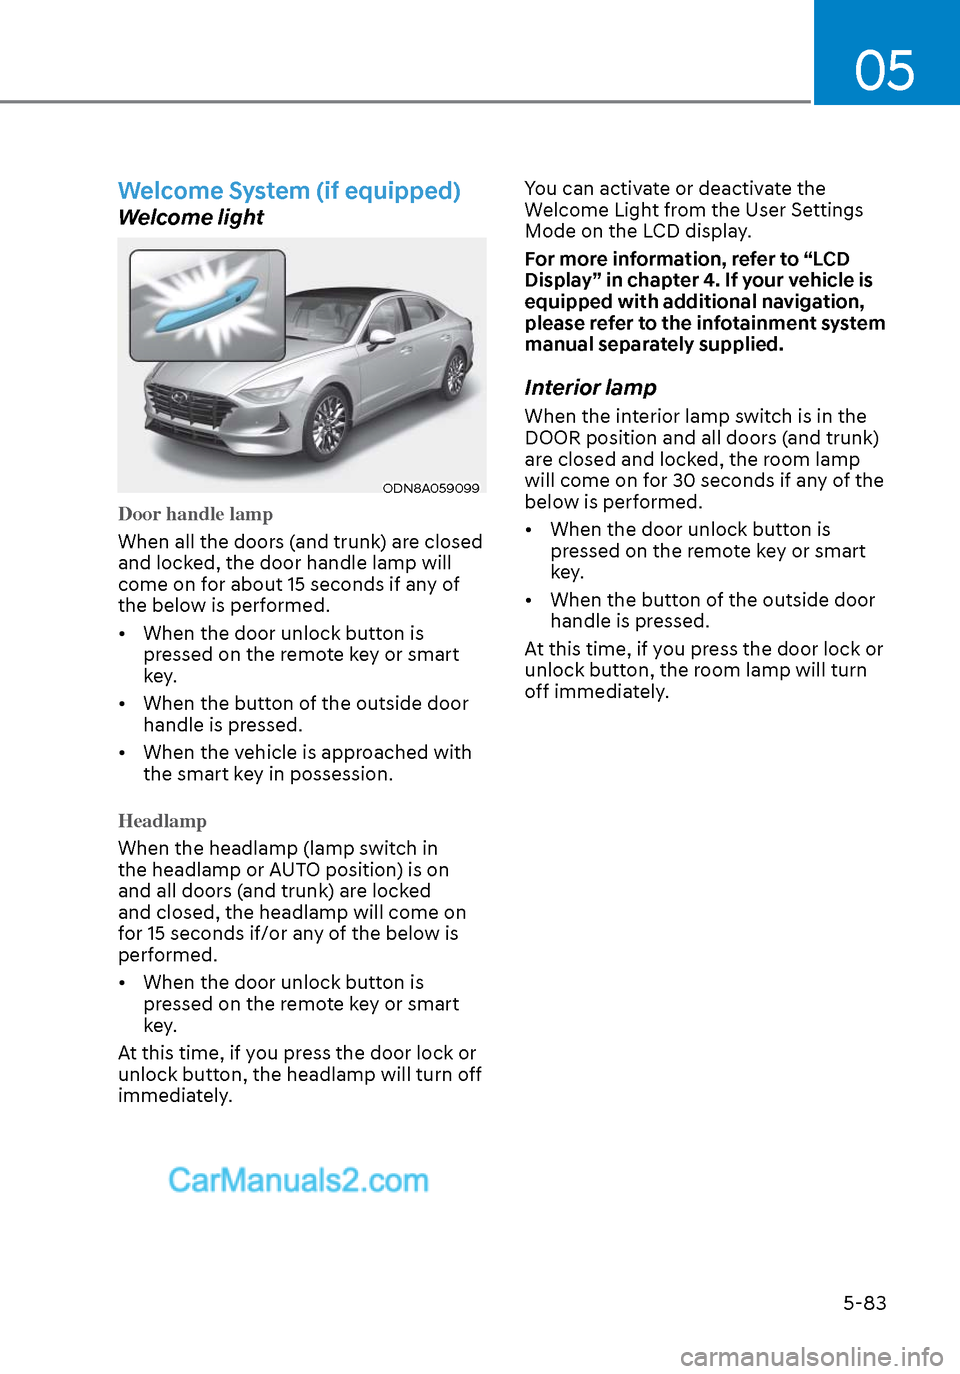
Welcome System (if equipped)
Welcome light
ODN8A059099ODN8A059099
Door handle lamp
When all the doors (and trunk) are closed
and lock
ed, the door handle lamp will
come on for about 15 seconds if any of
the below is performed.
• When the door unlock button is pressed on the remote key or smart
key.
• When the button of the outside door handle is pressed.
• When the vehicle is approached with the smart key in possession.
Headlamp
When the headlamp (lamp switch in
the headlamp or A
UTO position) is on
and all doors (and trunk) are locked
and closed, the headlamp will come on
for 15 seconds if/or any of the below is
performed.
• When the door unlock button is pressed on the remote key or smart
key.
At this time, if you press the door lock or
unlock button, the headlamp will turn off
immediately. You can activate or deactivate the
Welcome Light from the User Settings
Mode on the LCD display.
For more information, refer to “LCD
Display” in chapter 4. If your vehicle is
equipped with additional navigation,
please refer to the infotainment system
manual separately supplied.
Interior lamp
When the interior lamp switch is in the
DOOR position and all doors (and trunk)
are closed and locked, the room lamp
will come on for 30 seconds if any of the
below is performed.
• When the door unlock button is
pressed on the remote key or smart
key.
• When the button of the outside door handle is pressed.
At this time, if you press the door lock or
unlock button, the room lamp will turn
off immediately.
Page 253 of 537
05
5-123
Information
Using the system primarily in Fresh mode
and Recirculation mode only when needed
is recommended for best results.
Prolonged operation of the heater in
Recirculation mode and without the A/C
ON can cause fogging of the windshield.
In addition, prolonged use of the A/C
ON in Recirculation mode may result in
excessively dry, dehumidified air in the
cabin.
WARNING
• Continued use of the climate control
system operation in Recirculation
mode for a prolonged period of
time may cause drowsiness to the
occupants in the cabin. This may lead
to loss of vehicle control which may
lead to an accident.
• Continued use of the climate control
system operation in Recirculation
mode with the A/C OFF may allow
humidity to increase inside the
cabin. This may cause condensation
to accumulate on the windshield and
obscure visibility.
• Do not sleep in your vehicle or
remain parked in your vehicle with
the windows up and either the
heater or the air conditioning ON for
prolonged periods of time. Doing so
may increase the levels of carbon
dioxide in the cabin which may lead
to serious injury or death.
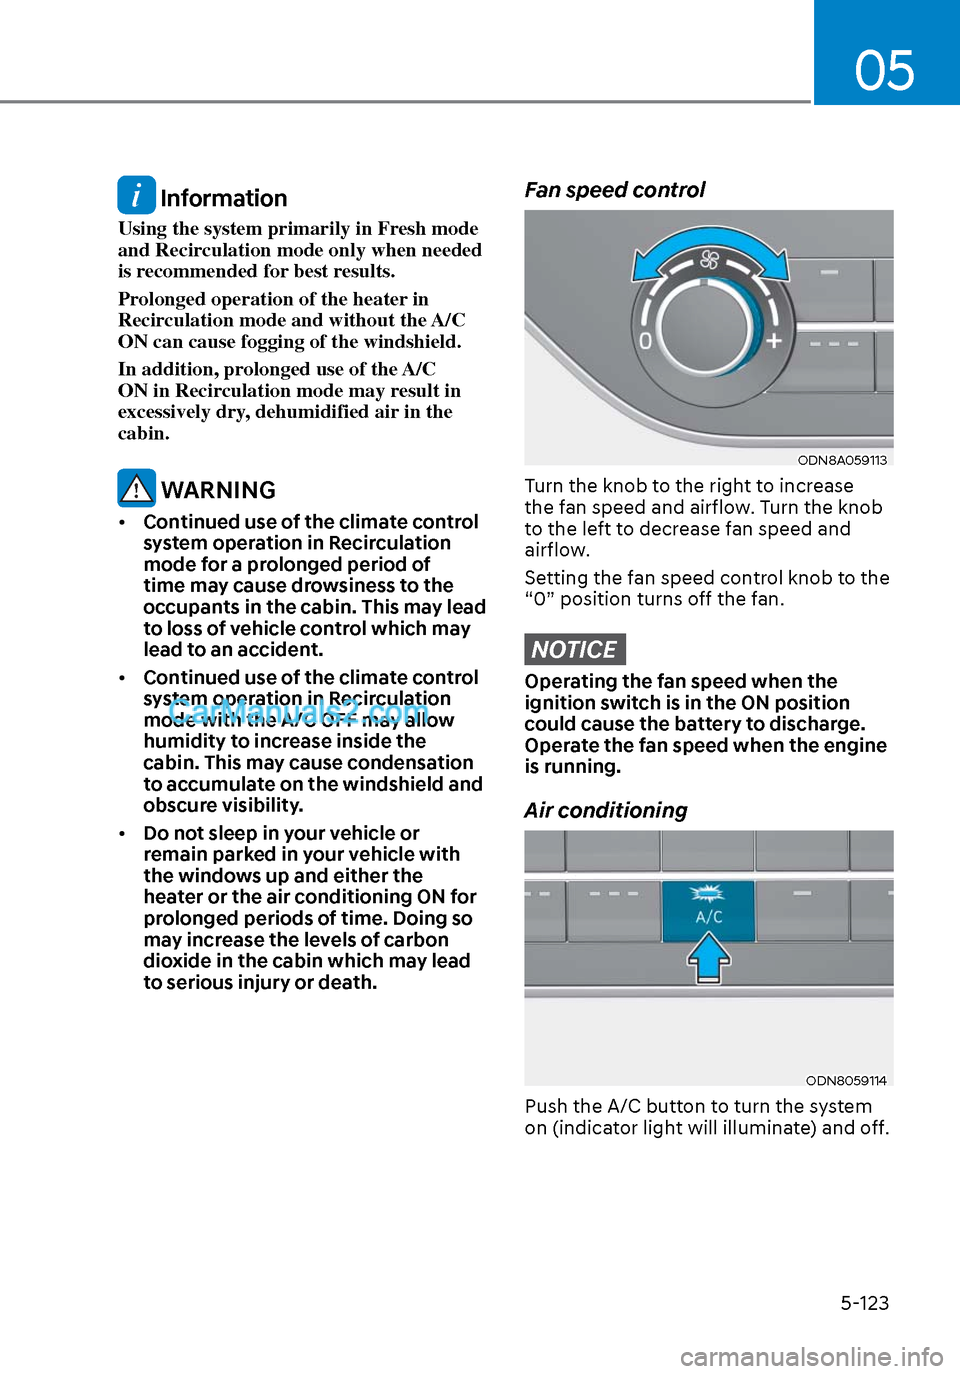
Fan speed control
ODN8A059113ODN8A059113
Turn the knob to the right to increase
the fan speed and airflow. Turn the knob
to the left to decrease fan speed and
airflow.
Setting the fan speed control knob to the
“0” position turns off the fan.
NOTICE
Operating the fan speed when the
ignition switch is in the ON position
could cause the battery to discharge.
Operate the fan speed when the engine
is running.
Air conditioning
ODN8059114ODN8059114
Push the A/C button to turn the system
on (indicator light will illuminate) and off.
Page 263 of 537
05
5-133
Temperature conversion
If the battery has been discharged or
disconnect
ed, the temperature mode
display will reset to Centigrade.
To change the temperature unit from °C
to °F or °F to °C :
- Automatic climate control system
Press the AUTO button for 3 seconds while pressing the OFF button.
- Instrument cluster
Go to User Settings → Other → Temperature Unit.
The temperature unit on both the cluster
LCD display and the climate control
screen will change.
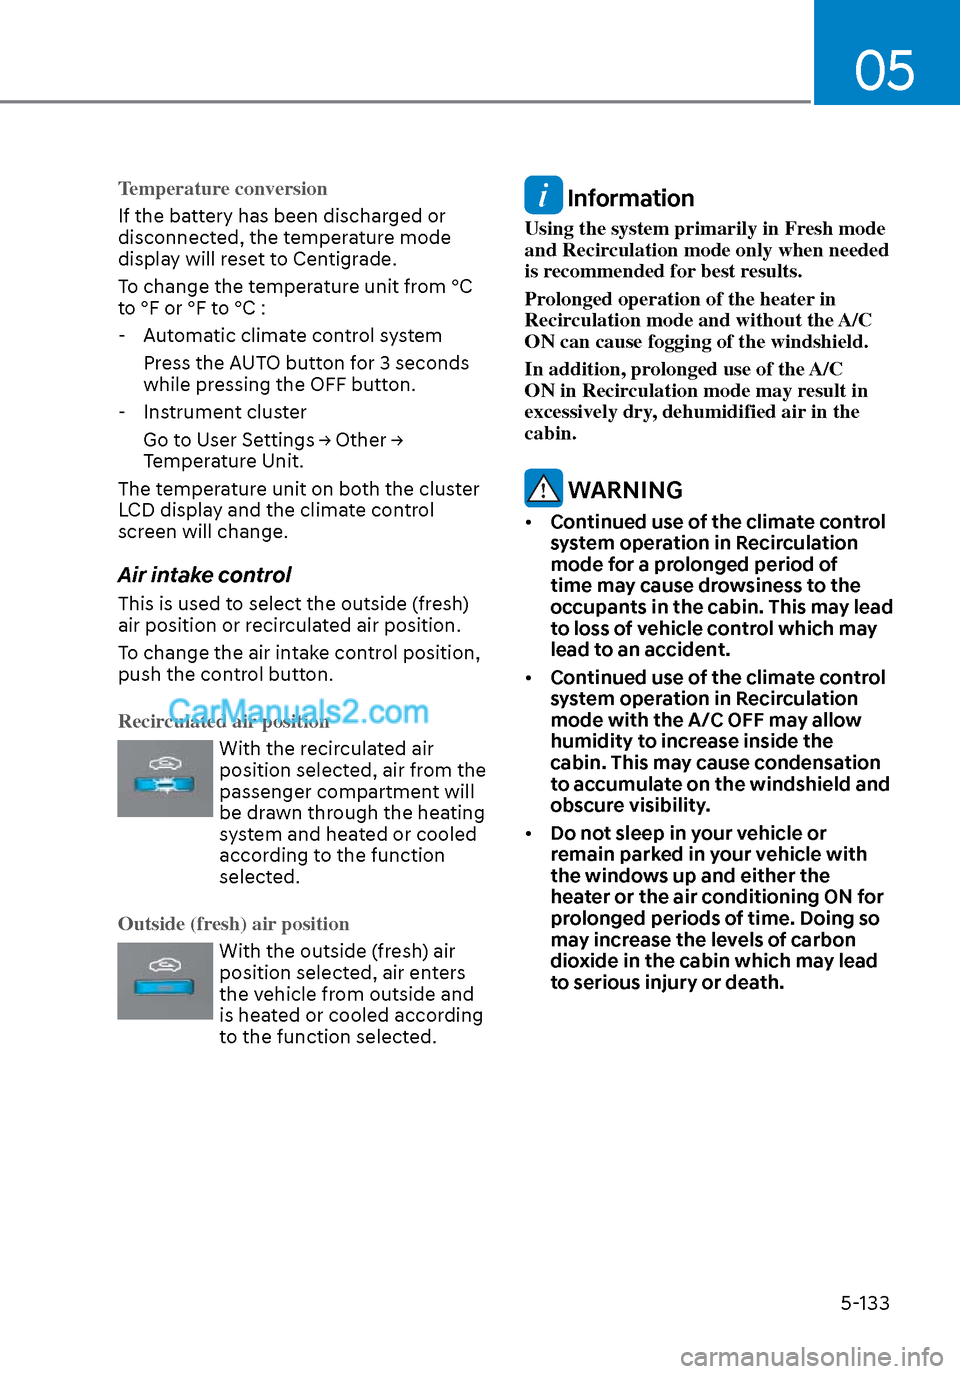
Air intake control
This is used to select the outside (fresh)
air position or recirculated air position.
To change the air intake control position,
push the control button.
Recirculated air position
With the recirculated air
position selected, air from the
passenger compartment will
be drawn through the heating
system and heated or cooled
according to the function
selected.
Outside (fresh) air position
With the outside (fresh) air
position selected, air enters
the vehicle from outside and
is heated or cooled according
to the function selected.
Information
Using the system primarily in Fresh mode
and Recirculation mode only when needed
is recommended for best results.
Prolonged operation of the heater in
Recirculation mode and without the A/C
ON can cause fogging of the windshield.
In addition, prolonged use of the A/C
ON in Recirculation mode may result in
excessively dry, dehumidified air in the
cabin.
WARNING
• Continued use of the climate control
system operation in Recirculation
mode for a prolonged period of
time may cause drowsiness to the
occupants in the cabin. This may lead
to loss of vehicle control which may
lead to an accident.
• Continued use of the climate control
system operation in Recirculation
mode with the A/C OFF may allow
humidity to increase inside the
cabin. This may cause condensation
to accumulate on the windshield and
obscure visibility.
• Do not sleep in your vehicle or
remain parked in your vehicle with
the windows up and either the
heater or the air conditioning ON for
prolonged periods of time. Doing so
may increase the levels of carbon
dioxide in the cabin which may lead
to serious injury or death.
Page 264 of 537
Convenient Features5-134
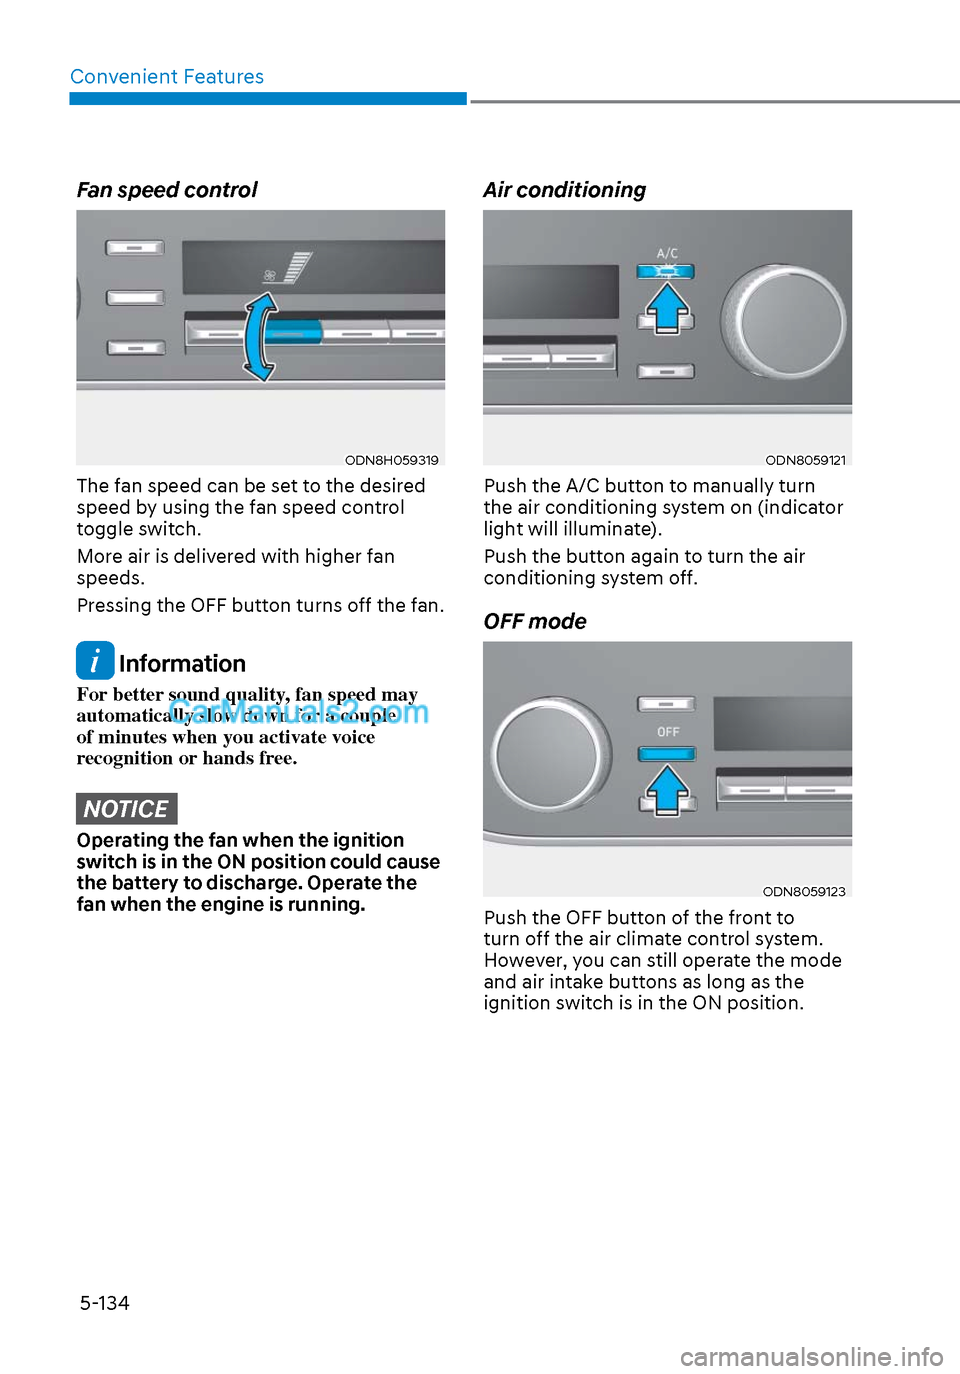
Fan speed control
ODN8H059319ODN8H059319
The fan speed can be set to the desired
speed by using the fan speed control
toggle switch.
More air is delivered with higher fan
speeds.
Pressing the OFF button turns off the fan.
Information
For better sound quality, fan speed may
automatically slow down for a couple
of minutes when you activate voice
recognition or hands free.
NOTICE
Operating the fan when the ignition
switch is in the ON position could cause
the battery to discharge. Operate the
fan when the engine is running.
Air conditioning
ODN8059121ODN8059121
Push the A/C button to manually turn
the air conditioning system on (indicator
light will illuminate).
Push the button again to turn the air
conditioning system off.
OFF mode
ODN8059123ODN8059123
Push the OFF button of the front to
turn off the air climate control system.
However, you can still operate the mode
and air intake buttons as long as the
ignition switch is in the ON position.
Page 270 of 537
Convenient Features5-140
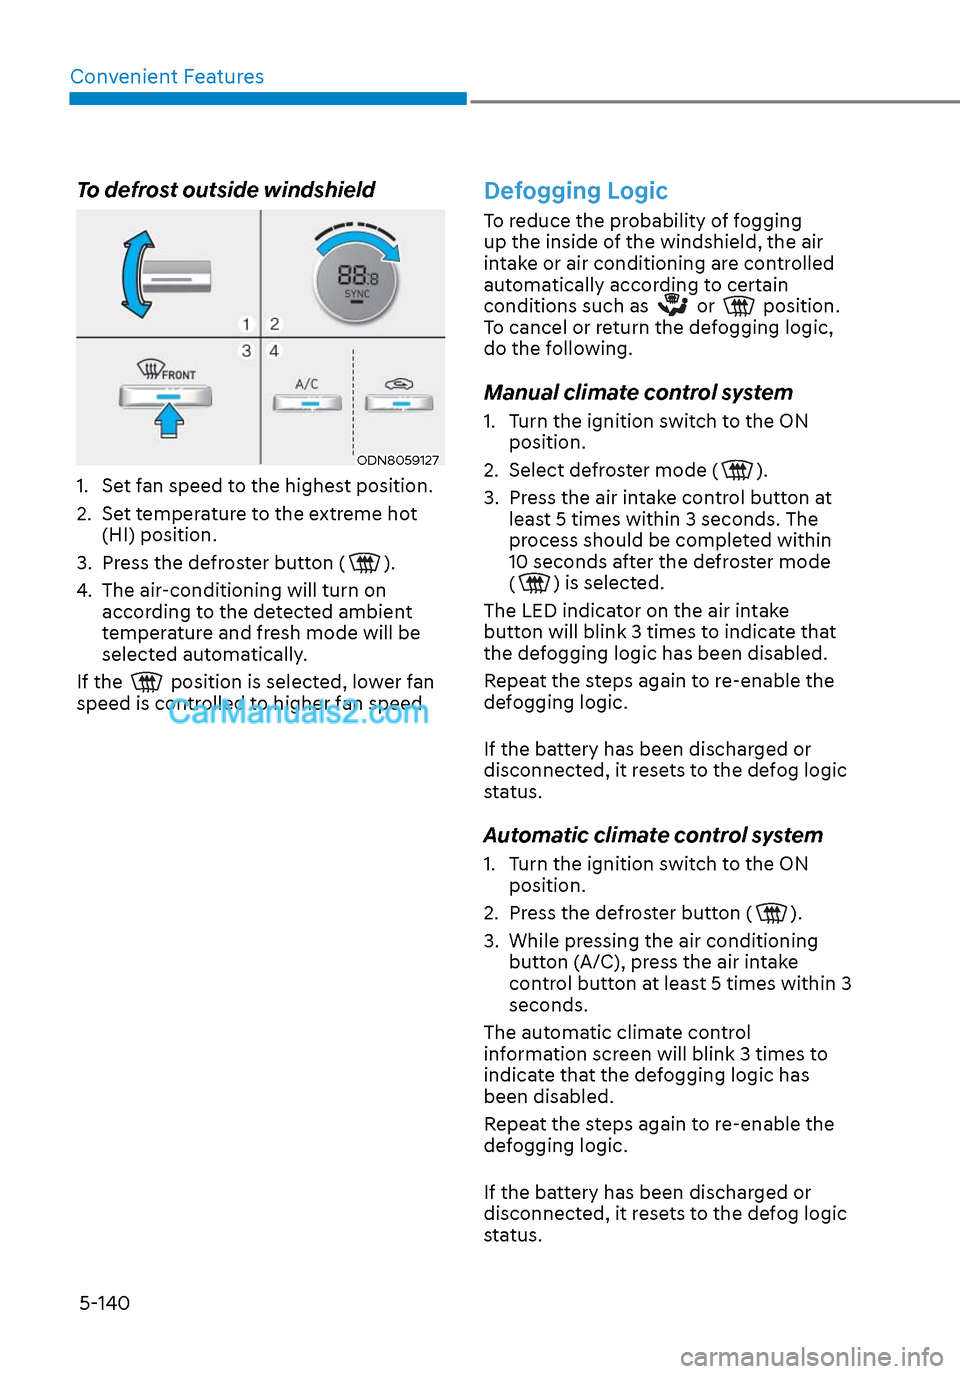
To defrost outside windshield
ODN8059127ODN8059127
1. Set fan speed to the highest position.
2. Set temperature to the extreme hot (HI) position.
3. Press the defroster button (
).
4. The air-conditioning will turn on according to the detected ambient
temperature and fresh mode will be
selected automatically.
If the
position is selected, lower fan
speed is controlled to higher fan speed.
Defogging Logic
To reduce the probability of fogging
up the inside of the windshield, the air
intake or air conditioning are controlled
automatically according to certain
conditions such as
or position.
To cancel or return the defogging logic,
do the following.
Manual climate control system
1. Turn the ignition switch to the ON position.
2. Select defroster mode (
).
3. Press the air intake control button at least 5 times within 3 seconds. The
process should be completed within
10 seconds after the defroster mode
(
) is selected.
The LED indicator on the air intake
button will blink 3 times to indicate that
the defogging logic has been disabled.
Repeat the steps again to re-enable the
defogging logic.
If the battery has been discharged or
disconnected, it resets to the defog logic
status.
Automatic climate control system
1. Turn the ignition switch to the ON position.
2. Press the defroster button (
).
3. While pressing the air conditioning button (A/C), press the air intake
control button at least 5 times within 3
seconds.
The automatic climate control
information screen will blink 3 times to
indicate that the defogging logic has
been disabled.
Repeat the steps again to re-enable the
defogging logic.
If the battery has been discharged or
disconnected, it resets to the defog logic
status.