2020 Hyundai Sonata ESP
[x] Cancel search: ESPPage 181 of 537
05
5-51
ODN8A059138ODN8A059138
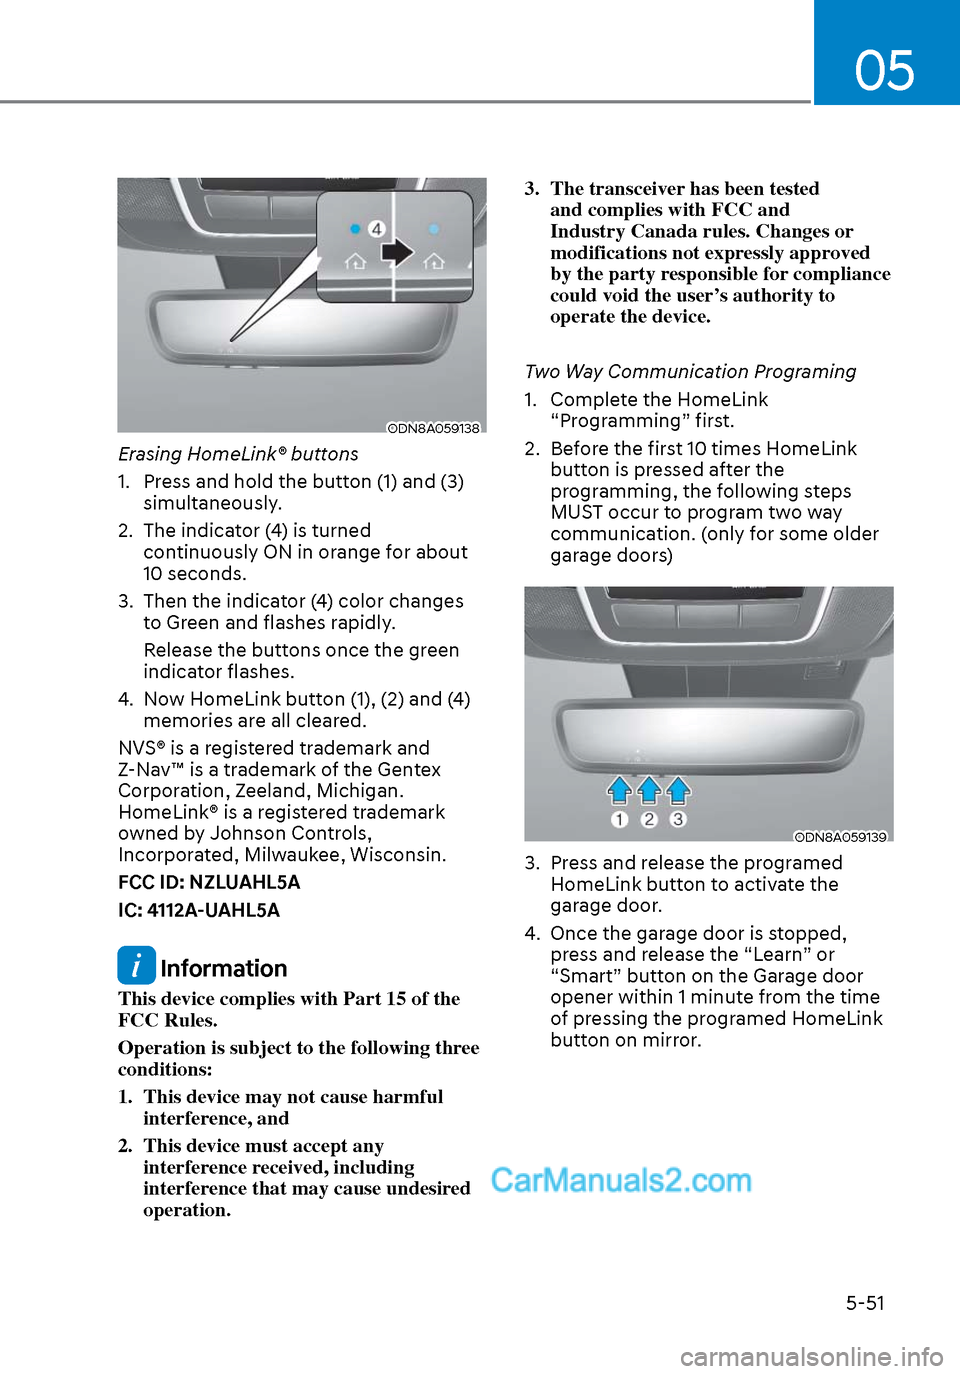
Erasing HomeLink® buttons
1. Press and hold the button (1) and (3) simultaneously.
2. The indicator (4) is turned continuously ON in orange for about
10 seconds.
3. Then the indicator (4) color changes to Green and flashes rapidly.
Release the buttons once the green indicator flashes.
4. Now HomeLink button (1), (2) and (4) memories are all cleared.
NVS® is a registered trademark and
Z-Nav™ is a trademark of the Gentex
Corporation, Zeeland, Michigan.
HomeLink® is a registered trademark
owned by Johnson Controls,
Incorporated, Milwaukee, Wisconsin.
FCC ID: NZLUAHL5A
IC: 4112A-UAHL5A
Information
This device complies with Part 15 of the
FCC Rules.
Operation is subject to the following three
conditions:
1. This device may not cause harmful interference, and
2. This device must accept any interference received, including
interference that may cause undesired
operation. 3. The transceiver has been tested
and complies with FCC and
Industry Canada rules. Changes or
modifications not expressly approved
by the party responsible for compliance
could void the user’s authority to
operate the device.
Two Way Communication Programing
1. Complete the HomeLink “Programming” first.
2. Before the first 10 times HomeLink button is pressed after the
programming, the following steps
MUST occur to program two way
communication. (only for some older
garage doors)
ODN8A059139ODN8A059139
3. Press and release the programed HomeLink button to activate the
garage door.
4. Once the garage door is stopped, press and release the “Learn” or
“Smart” button on the Garage door
opener within 1 minute from the time
of pressing the programed HomeLink
button on mirror.
Page 195 of 537
05
5-65
Trunk
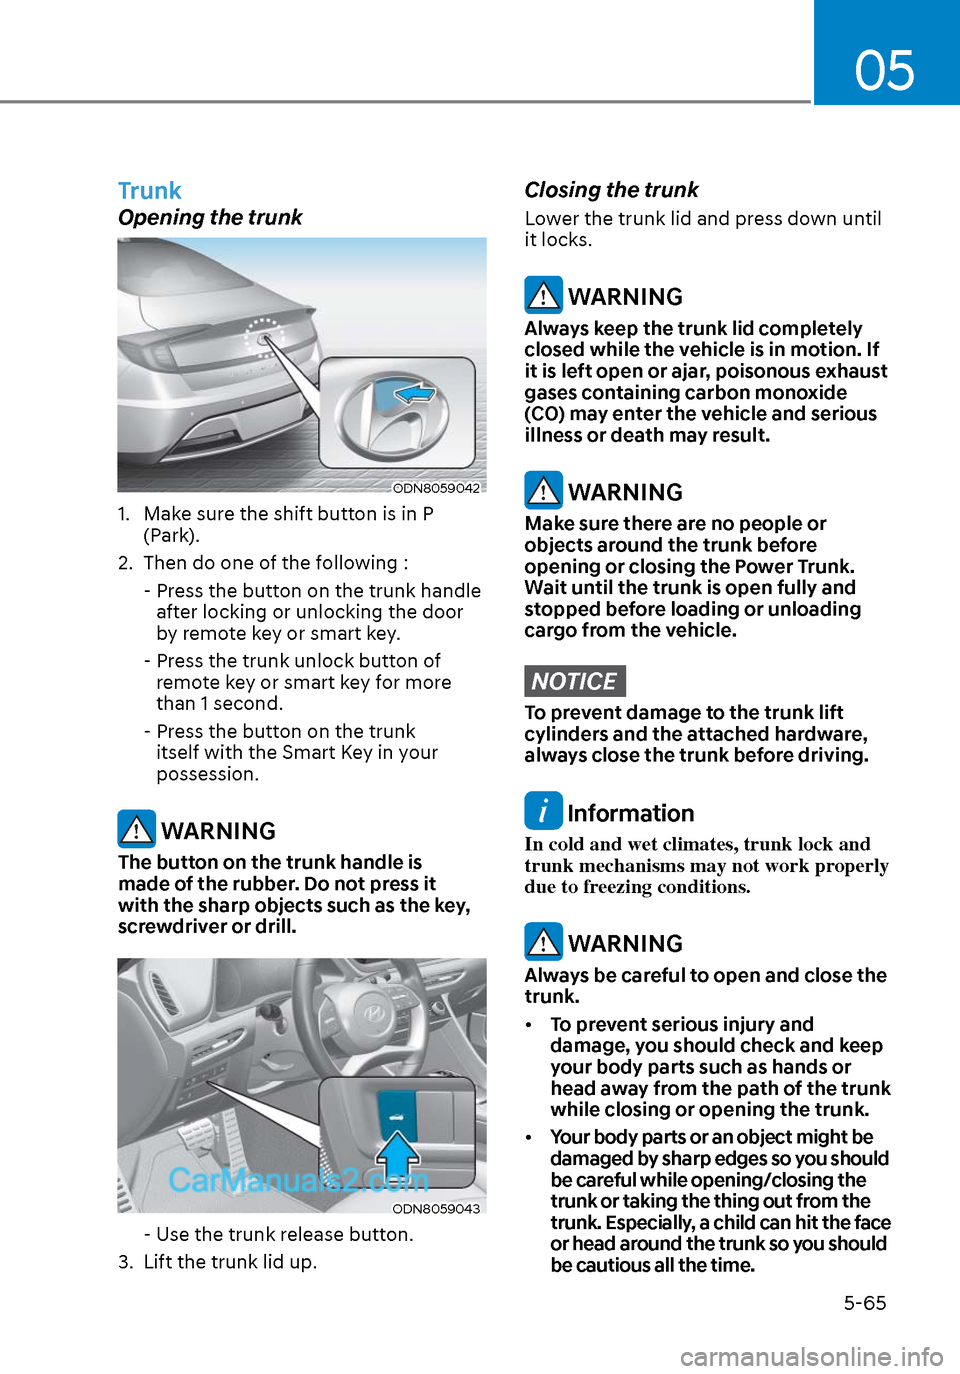
Opening the trunk
ODN8059042ODN8059042
1. Make sure the shift button is in P (Park).
2. Then do one of the following :
- Press the button on the trunk handle after locking or unlocking the door
by remote key or smart key.
- Press the trunk unlock button of remote key or smart key for more
than 1 second.
- Press the button on the trunk itself with the Smart Key in your
possession.
WARNING
The button on the trunk handle is
made of the rubber. Do not press it
with the sharp objects such as the key,
screwdriver or drill.
ODN8059043ODN8059043
- Use the trunk release button.
3. Lift the trunk lid up.
Closing the trunk
Lower the trunk lid and press down until
it locks.
WARNING
Always keep the trunk lid completely
closed while the vehicle is in motion. If
it is left open or ajar, poisonous exhaust
gases containing carbon monoxide
(CO) may enter the vehicle and serious
illness or death may result.
WARNING
Make sure there are no people or
objects around the trunk before
opening or closing the Power Trunk.
Wait until the trunk is open fully and
stopped before loading or unloading
cargo from the vehicle.
NOTICE
To prevent damage to the trunk lift
cylinders and the attached hardware,
always close the trunk before driving.
Information
In cold and wet climates, trunk lock and
trunk mechanisms may not work properly
due to freezing conditions.
WARNING
Always be careful to open and close the
trunk.
• To prevent serious injury and
damage, you should check and keep
your body parts such as hands or
head away from the path of the trunk
while closing or opening the trunk.
• Your body parts or an object might be
damaged by sharp edges so you should
be careful while opening/closing the
trunk or taking the thing out from the
trunk. Especially, a child can hit the face
or head around the trunk so you should
be cautious all the time.
Page 201 of 537
05
5-71
• Do not get back into a vehicle
once you have begun refueling.
You can generate a buildup of
static electricity by touching,
rubbing or sliding against any item
or fabric capable of producing
static electricity. Static electricity
discharge can ignite fuel vapors
causing a fire. If you must re-enter
the vehicle, you should once again
eliminate potentially dangerous
static electricity discharge by
touching a metal part of the vehicle,
away from the fuel filler neck, nozzle
or other gasoline source, with your
bare hand.
• When using an approved portable
fuel container, be sure to place the
container on the ground prior to
refueling. Static electricity discharge
from the container can ignite fuel
vapors causing a fire.
Once refueling has begun, contact
between your bare hand and the
vehicle should be maintained until
the filling is complete.
• Use only approved portable plastic
fuel containers designed to carry and
store gasoline.
• When refueling, always move the
shift button to the P (Park) position,
set the parking brake, and place
the ignition switch to the LOCK/
OFF position. Sparks produced by
electrical components related to the
engine can ignite fuel vapors causing
a fire.
• Do not use matches or a lighter and
do not smoke or leave a lit cigarette
in your vehicle while at a gas station,
especially during refueling.
• Do not over-fill or top-off your
vehicle tank, which can cause
gasoline spillage.• If a fire breaks out during refueling,
leave the vicinity of the vehicle, and
immediately contact the manager
of the gas station and then contact
the local fire department. Follow any
safety instructions they provide.
• If pressurized fuel sprays out, it can
cover your clothes or skin and thus
subject you to the risk of fire and
burns. Always remove the fuel cap
carefully and slowly. If the cap is
venting fuel or if you hear a hissing
sound, wait until the condition stops
before completely removing the cap.
• Always check that the fuel cap is
installed securely to prevent fuel
spillage in the event of an accident.
Information
Make sure to refuel your vehicle according
to the “Fuel Requirements” suggested in
the Introduction chapter.
NOTICE
• Do not spill fuel on the exterior
surfaces of the vehicle. Any type of
fuel spilled on painted surfaces may
damage the paint.
• If the fuel filler cap requires
replacement, use only a genuine
HYUNDAI cap or the equivalent
specified for your vehicle. An
incorrect fuel filler cap can result
in a serious malfunction of the fuel
system or emission control system.
Page 204 of 537
Convenient Features5-74
LIGHTING
Exterior Lights
Lighting control
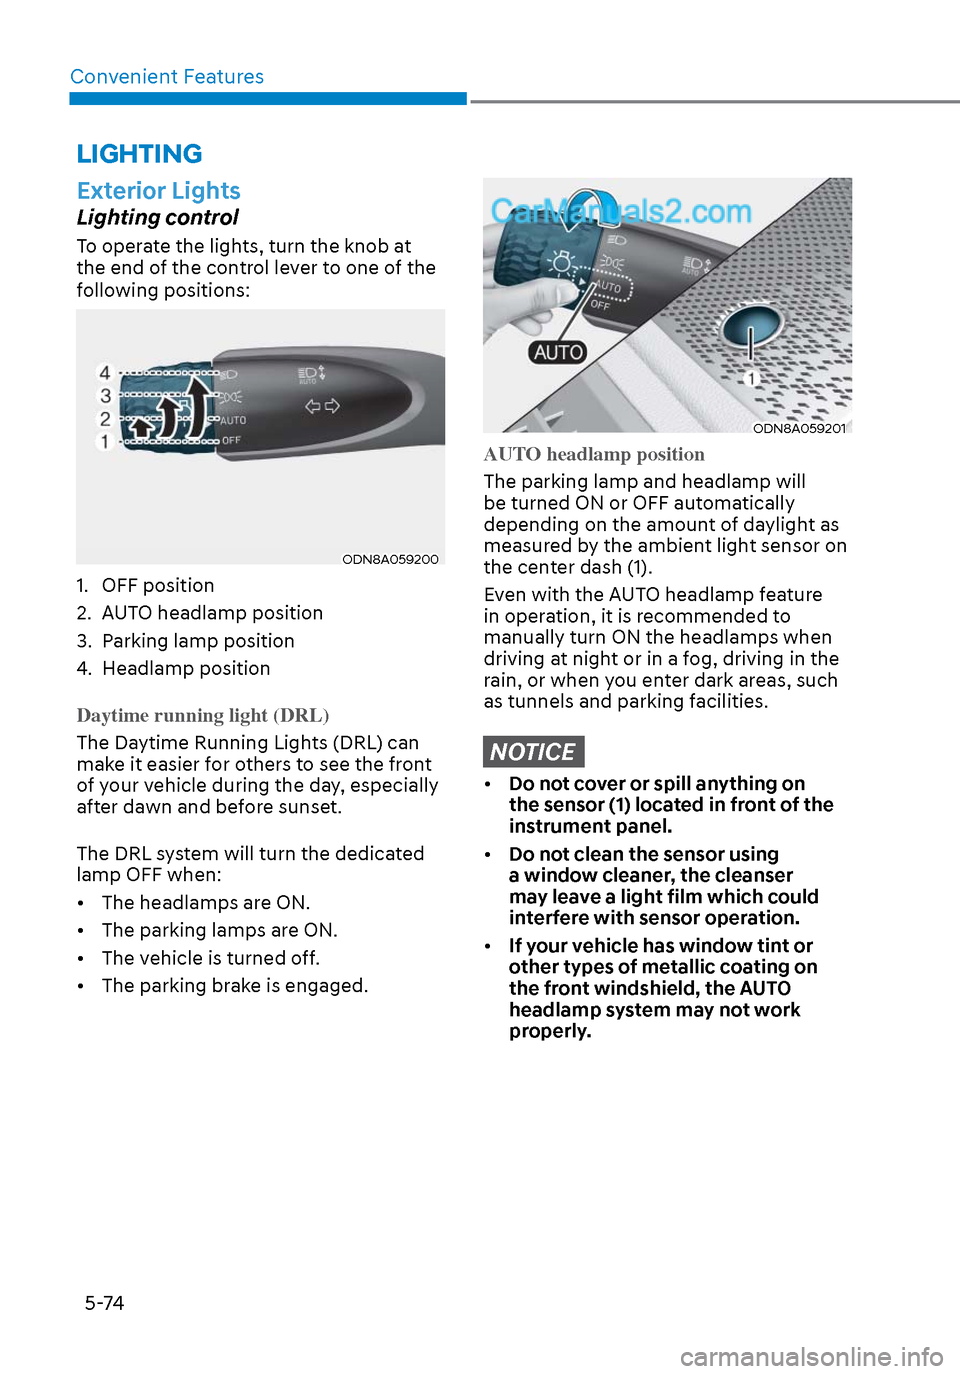
To operate the lights, turn the knob at
the end of the control lever to one of the
following positions:
ODN8A059200ODN8A059200
1. OFF position
2. AUTO headlamp position
3. Parking lamp position
4. Headlamp position
Daytime running light (DRL)
The Daytime Running Lights (DRL) can
mak
e it easier for others to see the front
of your vehicle during the day, especially
after dawn and before sunset.
The DRL system will turn the dedicated
lamp OFF when:
• The headlamps are ON.
• The parking lamps are ON.
• The vehicle is turned off.
• The parking brake is engaged.
ODN8A059201ODN8A059201
AUTO headlamp position
The parking lamp and headlamp will
be turned ON or OFF aut
omatically
depending on the amount of daylight as
measured by the ambient light sensor on
the center dash (1).
Even with the AUTO headlamp feature
in operation, it is recommended to
manually turn ON the headlamps when
driving at night or in a fog, driving in the
rain, or when you enter dark areas, such
as tunnels and parking facilities.
NOTICE
• Do not cover or spill anything on
the sensor (1) located in front of the
instrument panel.
• Do not clean the sensor using
a window cleaner, the cleanser
may leave a light film which could
interfere with sensor operation.
• If your vehicle has window tint or
other types of metallic coating on
the front windshield, the AUTO
headlamp system may not work
properly.
Page 208 of 537
Convenient Features5-78
2. When the High Beam Assist camera is adversely affected by an external
condition. Such examples may
include:
• When the vehicle’s headlamps
have been damaged or not
repaired properly.
• When the vehicle headlamps are
not aimed properly.
• When the vehicle is driven on a
narrow curved road or rough road
• When the vehicle is driven on an
uphill road or downhill road
• When only part of the vehicle in
front is visible on a crossroad or
curved road.
• When there is a traffic light,
reflecting sign, flashing sign or
mirror.
• When the road conditions are bad
such as being wet or covered with
snow.
• When a vehicle suddenly appears
from a curve.
• When the vehicle is tilted from a
flat tire or being towed.
• When Lane Keeping Assist system
warning light illuminates.
• When the light from the on-coming
or front vehicle is not detected
because of exhaust fume, smoke,
fog, snow, etc.
• When the front window is covered
with foreign matters such as ice,
dust, fog, or is damaged.
3. When the forward visibility is poor. Such examples may include:
• When the headlamps of an on-
coming vehicle or a vehicle in front
is not detected due to poor outside
visibility (smog, smoke, dust, fog,
heavy rain, snow, etc.).
• When the windshield visibility is
poor. WARNING
• Do not attempt to disassemble
the front view camera without the
assistance of an authorized HYUNDAI
dealer technician. If the front camera
is removed for any reason, the
system may need to be re-calibrated.
Have the system inspected by an
authorized HYUNDAI dealer.
• If the windshield of your vehicle is
replaced, most likely the front view
camera will need to be re-calibrated.
If this occurs, have your vehicle
inspected and have the system re-
calibrated by an authorized HYUNDAI
dealer.
• Be careful that water doesn’t get into
High Beam Assist unit and do not
remove or damage related parts of
High Beam Assist system.
• Do not place objects on the crash
pad that reflect light such as mirrors,
white paper, etc. The system may
malfunction if sunlight is reflected.
• At times, High Beam Assist system
may not work properly. The system
is for your convenience only. It is the
responsibility of the driver for safe
driving practices and always check
the road conditions for your safety.
• When the system does not operate
normally, change the headlamp
position manually between the high
beam and low beam.
Page 216 of 537
Convenient Features5-86
Rear View Monitor system is a
supplemental system that shows the area
behind the vehicle on the infotainment
system screen to assist you when parking
or driving.
Rear View Monitor with Parking
Guidance
ODN8059058ODN8059058
ODN8059059ODN8059059
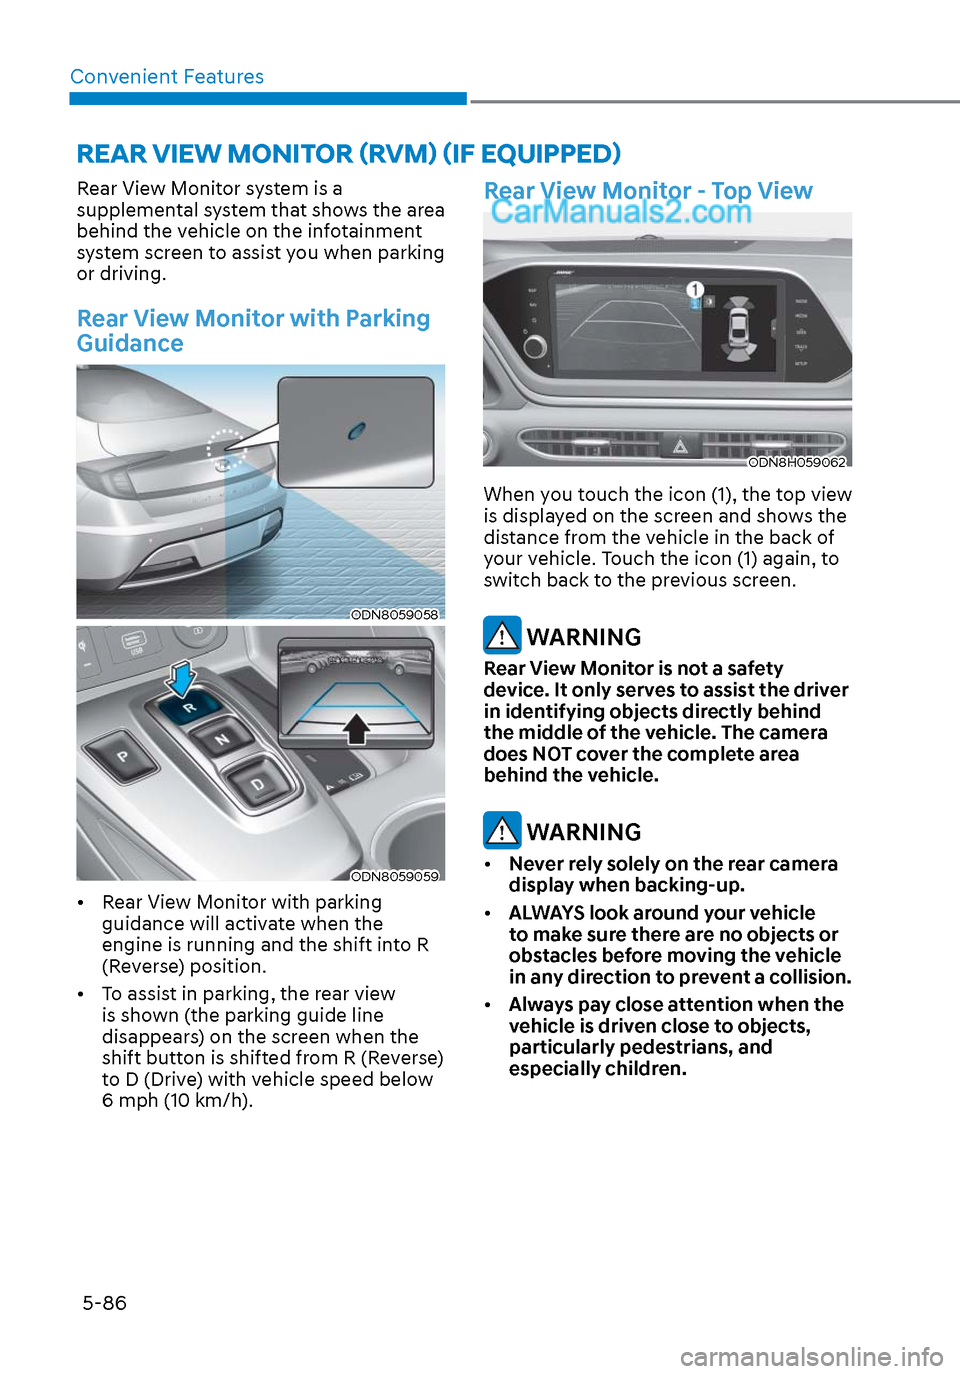
• Rear View Monitor with parking guidance will activate when the
engine is running and the shift into R
(Reverse) position.
• To assist in parking, the rear view is shown (the parking guide line
disappears) on the screen when the
shift button is shifted from R (Reverse)
to D (Drive) with vehicle speed below
6 mph (10 km/h).
Rear View Monitor - Top View
ODN8H059062ODN8H059062
When you touch the icon (1), the top view
is displayed on the screen and shows the
distance from the vehicle in the back of
your vehicle. Touch the icon (1) again, to
switch back to the previous screen.
WARNING
Rear View Monitor is not a safety
device. It only serves to assist the driver
in identifying objects directly behind
the middle of the vehicle. The camera
does NOT cover the complete area
behind the vehicle.
WARNING
• Never rely solely on the rear camera
display when backing-up.
• ALWAYS look around your vehicle
to make sure there are no objects or
obstacles before moving the vehicle
in any direction to prevent a collision.
• Always pay close attention when the
vehicle is driven close to objects,
particularly pedestrians, and
especially children.
REAR VIEW MONITOR (RVM) (IF EQUIPPED)
Page 221 of 537
05
5-91
The brake assist will turn off when: - The driver shifts the gear to P (Park) or D (Drive)
- The driver depresses the brake pedal with sufficient power
- The braking has been assisted for approximately 2 seconds
The warning will turn off when: - The driver shifts the gear to P (Park), N (Neutral), or D (Drive)
The brake control may not operate
properly depending on the status of the
ESC (Electronic Stability Control). There
will only be a warning when: - The ESC (Electronic Stability Control) warning light is on
- The ESC (Electronic Stability Control) is engaged in a different function
Warning only
• If the system detects a risk of collision with a pedestrian or an object, the
system will warn the driver with
audible warning and warnings on the
cluster LCD display or infotainment
system display.
• If ‘Warning Only’ is selected, braking will not be assisted.
The warning will turn off when: - The driver shifts the gear to P (Park), N (Neutral), or D (Drive)
WARNING
• Reverse Parking Collision-
Avoidance Assist system may
not operate properly or may
operate unnecessarily in some
circumstances.
• Always pay extreme caution while
driving. The driver is responsible for
controlling the brake appropriately.
CAUTION
• Always pay attention to road and
traffic conditions while driving,
whether or not there is a warning.
• Playing the vehicle audio system at
high volume may prevent occupants
from hearing Reverse Parking
Collision-Avoidance Assist system
warning sounds.
• If any other warning sound, such as
seat belt warning chime, is already
generated, Reverse Parking Collision-
Avoidance Assist system warning
may not sound.
Information
The system can detect a pedestrian or an
object when:
• A pedestrian is standing behind the
vehicle.
• A large obstacle, such as a vehicle, is
parked in the rear center of the vehicle.
Page 225 of 537
![Hyundai Sonata 2020 Owners Manual 05
5-95
(IF EQUIPPED)
ODN8A059056ODN8A059056[A] : Rear Sensor
Reverse Parking Distance Warning
system assists the driver during reverse
movement of the vehicle by chiming if an
object is sensed wit Hyundai Sonata 2020 Owners Manual 05
5-95
(IF EQUIPPED)
ODN8A059056ODN8A059056[A] : Rear Sensor
Reverse Parking Distance Warning
system assists the driver during reverse
movement of the vehicle by chiming if an
object is sensed wit](/manual-img/35/16773/w960_16773-224.png)
05
5-95
(IF EQUIPPED)
ODN8A059056ODN8A059056[A] : Rear Sensor
Reverse Parking Distance Warning
system assists the driver during reverse
movement of the vehicle by chiming if an
object is sensed within the distance of 48
in (120 cm) behind the vehicle.
This system is a supplemental system
that senses objects within the range and
location of the sensors, it cannot detect
objects in other areas where sensors are
not installed.
WARNING
• ALWAYS look around your vehicle to
make sure there are not any objects
or obstacles before moving the
vehicle in any direction to prevent a
collision.
• Always pay close attention when the
vehicle is driven close to objects,
particularly pedestrians, and
especially children.
• Be aware that some objects may
not be visible on the screen or be
detected by the sensors, due to the
objects distance, size or material, all
of which can limit the effectiveness
of the sensor.
Operation of Reverse Parking
Distance Warning System
Operating condition
• This system will activate when
backing up with the ignition switch in
the ON position. However, if vehicle
speed exceeds 3 mph (5 km/h), the
system may not detect objects.
• If vehicle speed exceeds 6 mph (10 km/h), the system will not warn you
even though objects are detected.
• When more than two objects are sensed at the same time, the closest
one will be recognized first.
REVERSE PARKING DISTANCE WARNING (PDW)