2020 HYUNDAI SONATA HYBRID stop start
[x] Cancel search: stop startPage 423 of 527
07
7-3
If You Have a Flat Tire While
Driving
If a tire goes flat while you are driving:
• Take your foot off the accelerator
pedal and let the vehicle slow down
while driving straight ahead. Do not
apply the brakes immediately or
attempt to pull off the road as this
may cause loss of vehicle control
resulting in an accident. When the
vehicle has slowed to such a speed
that it is safe to do so, brake carefully
and pull off the road. Drive off the
road as far as possible and park on
firm, level ground. If you are on a
divided highway, do not park in the
median area between the two traffic
lanes.
• When the vehicle is stopped, press the
hazard warning flasher button, shift
the gear to P (Park), apply the parking
brake, and press the Engine Start/Stop
button to the OFF position.
• Have all passengers get out of the
vehicle. Be sure they all get out on the
side of the vehicle that is away from
traffic.
• When changing a flat tire, follow the
instructions provided later in this
chapter.
IF THE ENGINE WILL NOT
S TA RT
• Be sure to shift the gear to P (Park).
The vehicle starts only when the gear
is in P (Park).
• This vehicle does not have a regular
12V battery that needs periodic
replacement. It is lithium ion polymer
type integrated into the HEV high
voltage battery. The vehicle has a
12V battery protection system that
cuts 12V battery from vehicle draw
to prevent full discharge. If vehicle
will not start, first try pressing the
12V Battery Reset switch (left side of
the steering wheel near the fuel door
open switch) to reconnect the 12V
battery, but you must start vehicle
within 15 seconds of pressing the 12V
Battery Reset switch. After starting
the vehicle (
indicator ON ),
operate the vehicle safely outdoors in
ready mode stopped and/or drive it
for 30 minutes total to charge the 12V
battery fully.
• Check the fuel level and add fuel if
necessary.
If the vehicle still does not start, call
an authorized HYUNDAI dealer for
assistance.
NOTICE
Push or pull starting the vehicle may
cause the catalytic converter to
overload which can lead to damage to
the emission control system.
Page 424 of 527

Emergency situations
7-4
Before Jump Starting
This vehicle does not have a regular 12V
battery that needs periodic replacement.
It is lithium ion polymer type integrated
into the HEV high voltage battery. The
vehicle has a 12V battery protection
system that cuts 12V battery from vehicle
draw to prevent full discharge.
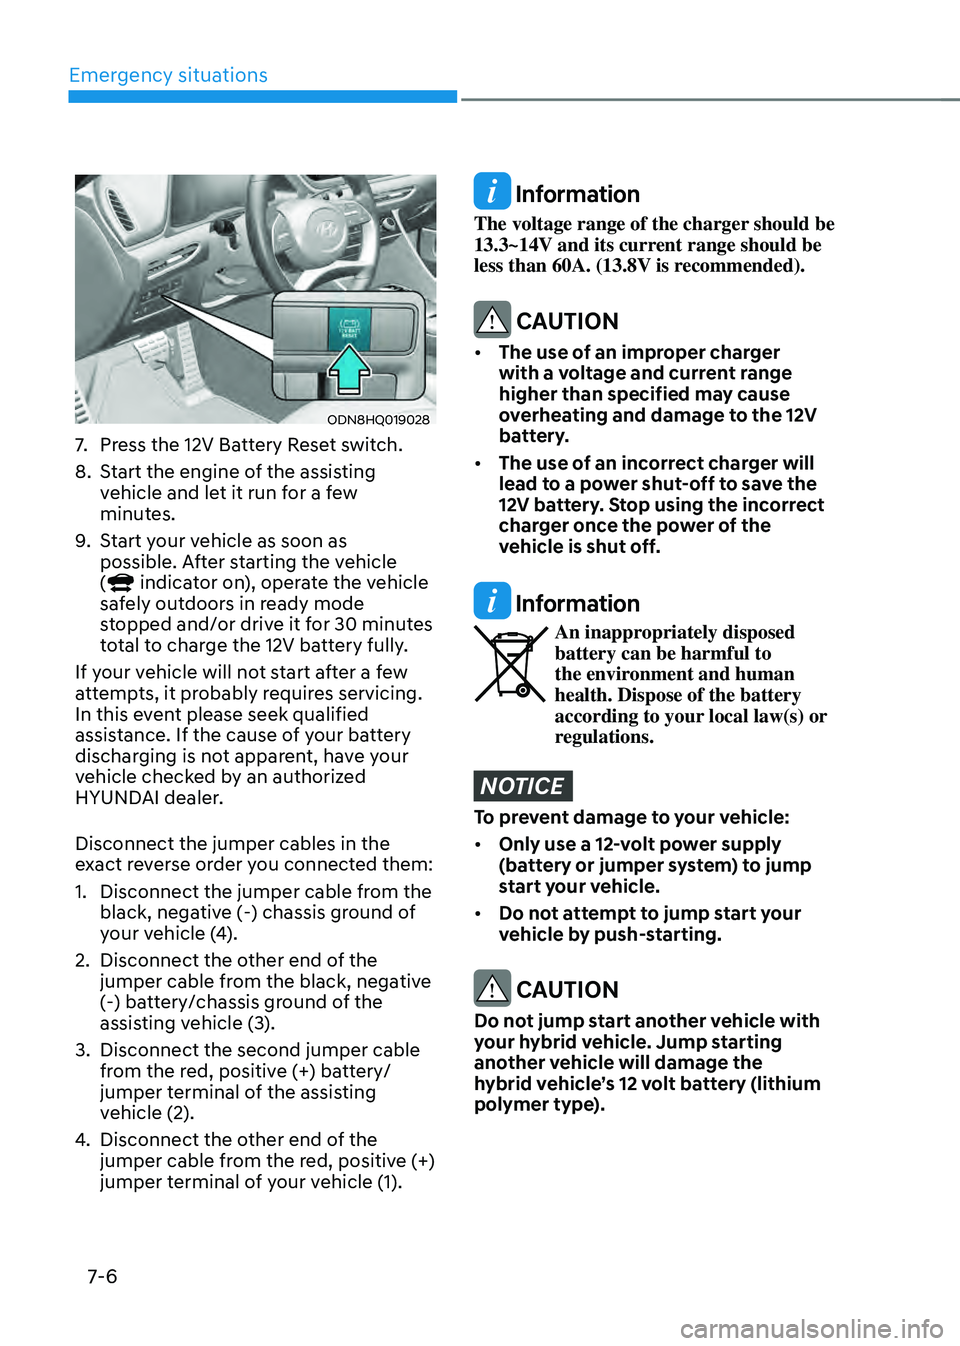
Using the 12V battery reset switch
ODN8HQ019028
1. Press the 12V Battery Reset switch to
reconnect the 12V battery.
2. Start the vehicle within 15 seconds of
pressing the 12V Battery Reset switch.
3. After starting the vehicle
( indicator on), operate the vehicle
safely outdoors in ready mode
stopped and/or drive it for 30 minutes
total to charge the 12V battery fully. If you do not start the vehicle
immediately after pressing the 12V
Battery Reset switch, the power of 12V
battery is automatically disconnected
after few seconds to save the 12V battery
from additional discharge. If the 12V
battery is disconnected prior to starting
the vehicle, press the 12V Battery Reset
switch again and then immediately start
the vehicle as explained.
Repeated use of the 12V Battery Reset
switch without a sufficient engine
ON cycle (30 Min+) may cause over
discharge of the 12V battery, which will
prevent the vehicle from starting. If the
12V battery is over discharged to a point
that the reset does not work, try to jump-
start the vehicle.
Information
After starting the vehicle
( indicator on), the 12V battery is being
charged whether the engine is running or
not. Although there is no engine sound, it
is unnecessary to depress the accelerator
pedal.
The following items may need to be reset
after the battery has been discharged or
the battery has been disconnected.
See chapter 4 and 5 for:
• Power Windows
• Trip Computer
• Climate Control System
• Clock
• Audio System
• Sunroof
IF THE 12 VOLT BATTERY IS DISCHARGED
Page 426 of 527
Emergency situations
7-6
ODN8HQ019028
7. Press the 12V Battery Reset switch.
8. Start the engine of the assisting
vehicle and let it run for a few
minutes.
9. Start your vehicle as soon as
possible. After starting the vehicle
(
indicator on), operate the vehicle
safely outdoors in ready mode
stopped and/or drive it for 30 minutes
total to charge the 12V battery fully.
If your vehicle will not start after a few
attempts, it probably requires servicing.
In this event please seek qualified
assistance. If the cause of your battery
discharging is not apparent, have your
vehicle checked by an authorized
HYUNDAI dealer.
Disconnect the jumper cables in the
exact reverse order you connected them:
1. Disconnect the jumper cable from the
black, negative (-) chassis ground of
your vehicle (4).
2. Disconnect the other end of the
jumper cable from the black, negative
(-) battery/chassis ground of the
assisting vehicle (3).
3. Disconnect the second jumper cable
from the red, positive (+) battery/
jumper terminal of the assisting
vehicle (2).
4. Disconnect the other end of the
jumper cable from the red, positive (+)
jumper terminal of your vehicle (1).
Information
The voltage range of the charger should be
13.3~14V and its current range should be
less than 60A. (13.8V is recommended).
CAUTION
• The use of an improper charger
with a voltage and current range
higher than specified may cause
overheating and damage to the 12V
battery.
• The use of an incorrect charger will
lead to a power shut-off to save the
12V battery. Stop using the incorrect
charger once the power of the
vehicle is shut off.
Information
An inappropriately disposed battery can be harmful to
the environment and human
health. Dispose of the battery
according to your local law(s) or
regulations.
NOTICE
To prevent damage to your vehicle:
• Only use a 12-volt power supply
(battery or jumper system) to jump
start your vehicle.
• Do not attempt to jump start your
vehicle by push-starting.
CAUTION
Do not jump start another vehicle with
your hybrid vehicle. Jump starting
another vehicle will damage the
hybrid vehicle’s 12 volt battery (lithium
polymer type).
Page 429 of 527
07
7-9
ODN8079002
ODN8H070027N
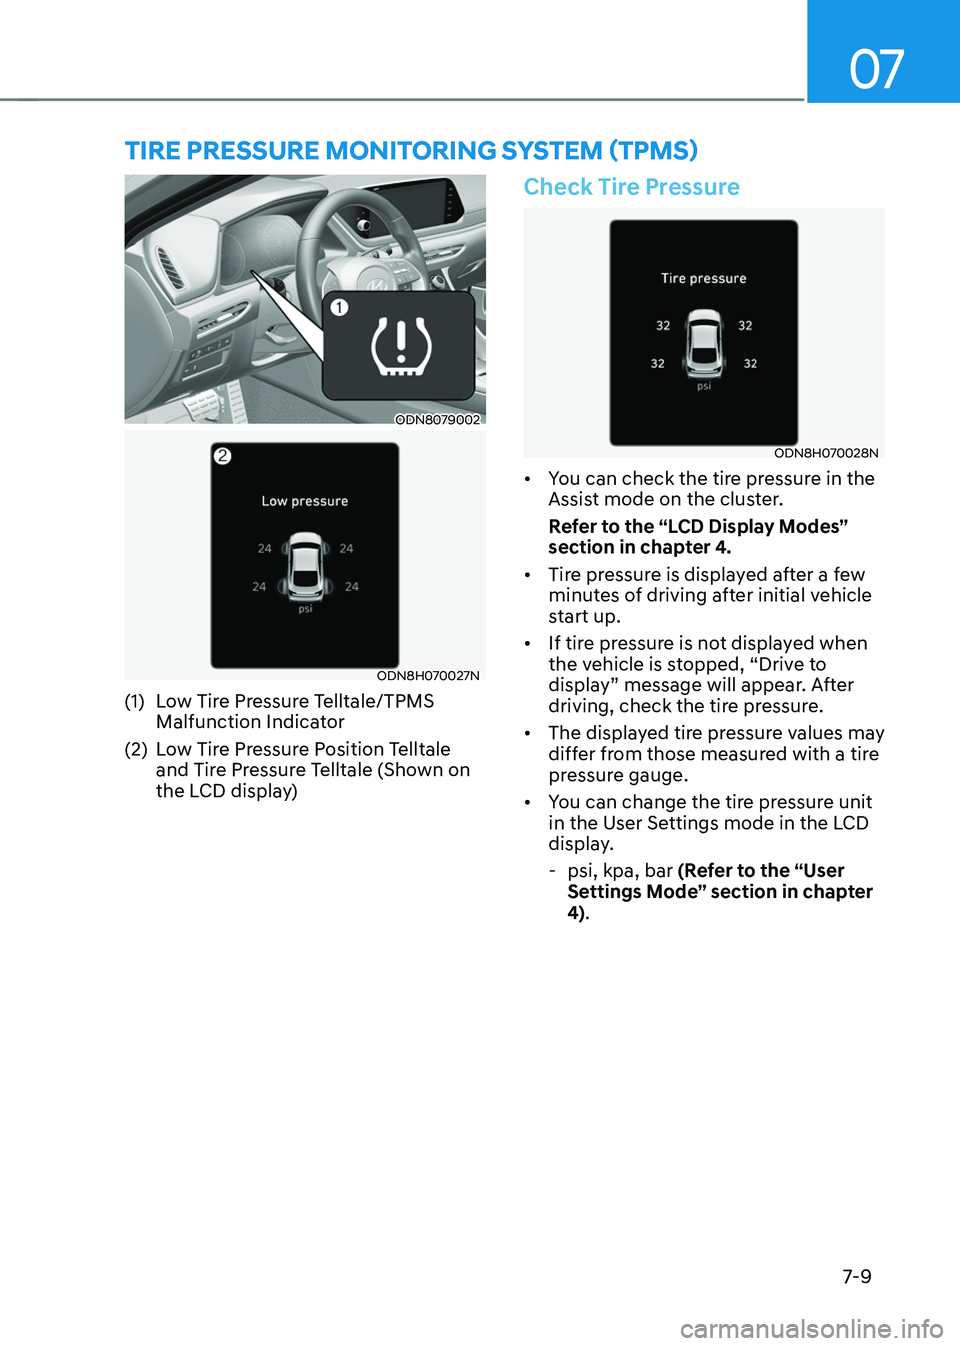
(1) Low Tire Pressure Telltale/TPMS
Malfunction Indicator
(2) Low Tire Pressure Position Telltale
and Tire Pressure Telltale (Shown on
the LCD display)
Check Tire Pressure
ODN8H070028N
• You can check the tire pressure in the
Assist mode on the cluster.
Refer to the “LCD Display Modes”
section in chapter 4.
• Tire pressure is displayed after a few
minutes of driving after initial vehicle
start up.
• If tire pressure is not displayed when
the vehicle is stopped, “Drive to
display” message will appear. After
driving, check the tire pressure.
• The displayed tire pressure values may
differ from those measured with a tire
pressure gauge.
• You can change the tire pressure unit
in the User Settings mode in the LCD
display.
-psi, kpa, bar (Refer to the “User
Settings Mode” section in chapter
4).
TIRE PRESSURE MONITORING SYSTEM (TPMS)
Page 430 of 527
Emergency situations
7-10
Tire Pressure Monitoring System
WARNING
Over-inflation or under-inflation can
reduce tire life, adversely affect vehicle
handling, and lead to sudden tire failure
that may cause loss of vehicle control
resulting in an accident.
Each tire, including the spare (if
provided), should be checked monthly
when cold and inflated to the inflation
pressure recommended by the vehicle
manufacturer on the vehicle placard
or tire inflation pressure label. (If your
vehicle has tires of a different size than
the size indicated on the vehicle placard
or tire inflation pressure label, you should
determine the proper tire inflation
pressure for those tires.)
As an added safety feature, your
vehicle has been equipped with a tire
pressure monitoring system (TPMS)
that illuminates a low tire pressure
telltale when one or more of your tires is
significantly under-inflated. Accordingly,
when the low tire pressure telltale
illuminates, you should stop and check
your tires as soon as possible, and inflate
them to the proper pressure. Driving on
a significantly under-inflated tire causes
the tire to overheat and can lead to tire
failure.
Under-inflation also reduces fuel
efficiency and tire tread life, and may
affect the vehicle’s handling and
stopping ability.
Please note that the TPMS is not a
substitute for proper tire maintenance,
and it is the driver’s responsibility to
maintain correct tire pressure, even if
under-inflation has not reached the level
to trigger illumination of the TPMS low
tire pressure telltale.
Your vehicle has also been equipped with
a TPMS malfunction indicator to indicate
when the system is not operating
properly. The TPMS malfunction
indicator is combined with the low
tire pressure telltale. When the system
detects a malfunction, the telltale will
flash for approximately one minute and
then remain continuously illuminated.
This sequence will continue upon
subsequent vehicle start-ups as long as
the malfunction exists.
When the malfunction indicator is
illuminated, the system may not be able
to detect or signal low tire pressure as
intended. TPMS malfunctions may occur
for a variety of reasons, including the
installation of replacement or alternate
tires or wheels on the vehicle that
prevent the TPMS from functioning
properly.
Always check the TPMS malfunction
telltale after replacing one or more tires
or wheels on your vehicle to ensure that
the replacement or alternate tires and
wheels allow the TPMS to continue to
function properly.
NOTICE
If any of the below happens, have
the system checked by an authorized
HYUNDAI dealer.
1. The Low Tire Pressure Telltale/TPMS
Malfunction Indicator does not
illuminate for 3 seconds when the
Engine Start/Stop button is pressed
to the ON position or the vehicle is in
the ready (
) mode.
2. The TPMS Malfunction Indicator
remains illuminated after blinking for
approximately 1 minute.
3. The Low Tire Pressure Position
Telltale remains illuminated.
Page 435 of 527
07
7-15
Changing Tires
WARNING
A vehicle can slip or roll off of a jack
causing serious injury or death to you or
those nearby. Take the following safety
precautions:
• Do not get under a vehicle that is
supported by a jack.
• NEVER attempt to change a tire in
the lane of traffic. ALWAYS move the
vehicle completely off the road on
level, firm ground away from traffic
before trying to change a tire. If you
cannot find a level, firm place off
the road, call a towing service for
assistance.
• Be sure to use the jack provided with
the vehicle.
• ALWAYS place the jack on the
designated jacking positions on the
vehicle and NEVER on the bumpers
or any other part of the vehicle for
jacking support.
• Do not start or run the engine while
the vehicle is on the jack.
• Do not allow anyone to remain in the
vehicle while it is on the jack.
• Keep children away from the road
and the vehicle. Follow these steps to change your
vehicle’s tire:
1. Park on a level, firm surface.
2. Shift the gear to P (Park), apply the
parking brake, and press the Engine
Start/Stop button to the OFF position.
3. Press the hazard warning flasher
button.
4. Remove the wheel lug nut wrench,
jack, jack handle, and spare tire from
the vehicle.
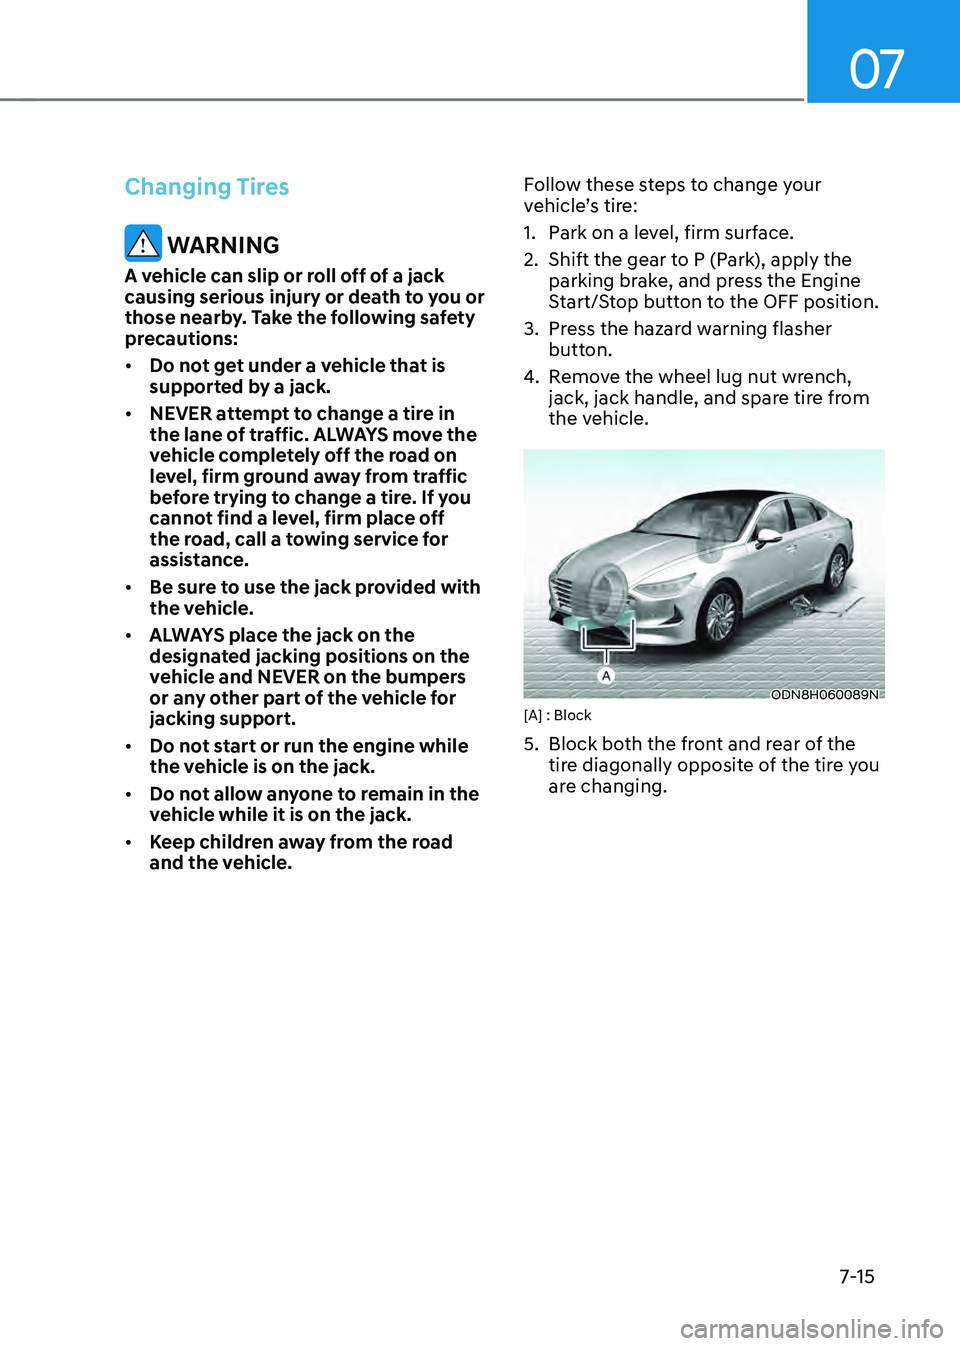
ODN8H060089N[A] : Block
5. Block both the front and rear of the
tire diagonally opposite of the tire you
are changing.
Page 446 of 527
![HYUNDAI SONATA HYBRID 2020 Owners Manual Emergency situations
7-26
Towing Service
ODN8H079010L[A] : Dollies
If emergency towing is necessary,
we recommend having it done by
an authorized HYUNDAI dealer or a
commercial tow-truck service.
P HYUNDAI SONATA HYBRID 2020 Owners Manual Emergency situations
7-26
Towing Service
ODN8H079010L[A] : Dollies
If emergency towing is necessary,
we recommend having it done by
an authorized HYUNDAI dealer or a
commercial tow-truck service.
P](/manual-img/35/56190/w960_56190-445.png)
Emergency situations
7-26
Towing Service
ODN8H079010L[A] : Dollies
If emergency towing is necessary,
we recommend having it done by
an authorized HYUNDAI dealer or a
commercial tow-truck service.
Proper lifting and towing procedures
are necessary to prevent damage to
the vehicle. The use of wheel dollies or
flatbed is recommended.
It is acceptable to tow the vehicle with
the rear wheels on the ground (without
dollies) and the front wheels off the
ground.
If any of the loaded wheels or suspension
components are damaged or the vehicle
is being towed with the front wheels on
the ground, use a towing dolly under the
front wheels.
When being towed by a commercial tow
truck and wheel dollies are not used,
the front of the vehicle should always be
lifted, not the rear.
CAUTION
ODN8H079012
• Do not tow the vehicle with the front
wheels on the ground as this may
cause damage to the vehicle.
ODN8H079011
• Do not tow with sling-type
equipment. Use wheel lift or flatbed
equipment.
When towing your vehicle in an
emergency without wheel dollies:
1. Release EPB before turning off the
engine.
2. Press the Engine Start/Stop button to
the OFF position.
3. Shift the gear to N (Neutral).
For more details, refer to “Automatic
Transmission” section in chapter 6.
CAUTION
Failure to shift the gear to N (Neutral)
may cause internal damage to the
transmission.
TOWING
Page 454 of 527
08
8-5
WARNING
Performing maintenance work on a
vehicle can be dangerous. If you lack
sufficient knowledge and experience or
the proper tools and equipment to do
the work, have it done by an authorized
HYUNDAI dealer.
ALWAYS follow these precautions for
performing maintenance work:
• Park your vehicle on level ground,
shift the gear to P (Park), apply
the parking brake, and press the
Engine Start/Stop button to the OFF
position.
• Block the tires (front and back) to
prevent the vehicle from moving.
Remove loose clothing or jewelry
that can become entangled in
moving parts.
• If you must run the engine during
maintenance, do so out doors or in
an area with plenty of ventilation.
• Keep flames, sparks, or smoking
materials away from the battery and
fuel-related parts. The following lists are vehicle checks and
inspections that should be performed
by the owner or an authorized HYUNDAI
dealer at the frequencies indicated to
help ensure safe, dependable operation
of your vehicle.
Any adverse conditions should be
brought to the attention of your dealer as
soon as possible.
These Owner Maintenance vehicle
checks are generally not covered by
warranties and you may be charged for
labor, parts and lubricants used.
Owner Maintenance Schedule
When you stop for fuel:
•
Check the engine oil level.
• Check the coolant level in the engine
coolant reservoir.
• Check the windshield washer fluid
level.
• Check for low or under-inflated tires.
WARNING
Be careful when checking your engine
coolant/inverter coolant level when the
engine is hot. This may result in coolant
being blown out of the opening and
cause serious burns and other injuries.
OWNER MAINTENANCE