2020 Hyundai Santa Fe Replace tail light
[x] Cancel search: Replace tail lightPage 178 of 557

3-89
Convenient features of your vehicle
3
Check headlight (if equipped)
This warning message is displayed if
the headlights are not operating
properly. A headlight bulb may need
to be replaced.
Information
Make sure to replace the burned out
bulb with a new one of the same
wattage rating.
Check turn signal (if equipped)
This warning message is displayed if
the turn signal lamps are not operat-
ing properly. A lamp may need to be
replaced.
Information
Make sure to replace the burned out
bulb with a new one of the same wattage
rating.
Check High Beam Assist (HBA)system (if equipped)
This warning message is displayed if
there is a problem with the High Beam
Assist (HBA) system. Have the vehi-
cle inspected by an authorized
HYUNDAI dealer.
For more details, refer to "High
Beam Assist (HBA) system" in
chapter 3.
Check headlight LED (if equipped)
This warning message is displayed if
there is a problem with the LED
headlight. Have the vehicle inspected
by an authorized HYUNDAI dealer.
Check Forward CollisionAvoidance Assist system(if equipped)
This warning message is displayed if
there is a problem with the Forward
Collision-Avoidance Assist (FCA)
system. Have the vehicle inspected
by an authorized HYUNDAI dealer.
For more details, refer to "Forward
Collision-Avoidance Assist (FCA)
system" in chapter 5.
Check Blind-Spot CollisionWarning (BCW) system (if equipped)
This warning message is displayed if
there is a problem with the Blind-
Spot Collision Warning system. Have
the vehicle inspected by an author-
ized HYUNDAI dealer.
For more details, refer to "Blind-
Spot Collision Warning (BCW)/
Blind-Spot Collision-Avoidance
Assist (BCA)" or "Rear Cross-
Traffic Collision Warning (RCCW)/
Rear Cross-Traffic Collision-
Avoidance Assist (RCCA)"
System in chapter 5.
i
i
Page 199 of 557

3-110
Convenient features of your vehicle
The Head-Up Display is an optional
feature that allows the driver to view
information projected onto a trans-
parent screen while still keeping your
eyes safely on the road ahead while
driving.
Precautions while using the head up display
It may sometimes be difficult to read
information on the head up display in
the following situations.
- The driver is improperly positioned
in the driver's seat.
- The driver wears polarizing-filter sunglasses.
- An object is located above the head up display cover.
- The vehicle is driven on a wet road.
- Any improper lighting accessory is installed inside the vehicle, or there
is incoming light from outside of
the vehicle.
- The driver wears glasses.
- The driver wears contact lenses.
When it is difficult to read the head
up display information, adjust the
head up display angle or the head up
display brightness level in the User
Settings mode. For more details,
refer to "LCD Display" in this chapter. When replacing the front wind-
shield glass of the vehicle
equipped with the head up dis-
play, replace it with a windshield
glass designed for the head up
display operation. Otherwise,
duplicated images may be dis-
played on the windshield glass.
NOTICE
H H
E
EA
A D
D
U
U P
P
D
D I
IS
S P
P L
LA
A Y
Y
(
( H
H U
U D
D)
)
(
( I
IF
F
E
E Q
Q U
UI
IP
P P
PE
ED
D )
)
OTMA048044
Do not tint the front wind-
shield glass or add other
types of metallic coating.
Otherwise, the head up dis-
play image may be invisible.
Do not place any accessories
on the crash pad or attach any
objects on the windshield
glass.
The Blind-spot Collision
Warning (BCW) system warn-
ings on the head up display
are supplemental. Do not sole-
ly depend on them to change
lanes. Always take a look
around before changing lanes.
WARNING
Page 208 of 557

3-119
Convenient features of your vehicle
3
Headlamp delay function
If the key is removed from the ignition
switch or placed in the ACC position
or the LOCK/OFF position with the
headlamps ON, the headlamps
(and/or parking lamps) remain on for
about 5 minutes. However, if the dri-
ver's door is opened and closed, the
headlights are turned off after 15
seconds. Also, with the engine off if
the driver's door is opened and
closed, the headlamps (and/or park-
ing lamps) are turned off after 15
seconds.
The headlamps (and/or parking
lamps) can be turned off by pressing
the lock button on the remote key or
smart key twice or turning the head-
lamp switch to the OFF or AUTO
position.
You can activate or deactivate the
Headlamp Delay function from the
User Settings mode in the LCD dis-
play.
For more details, refer to the "LCD
Display" section in this chapter.If the driver exits the vehicle
through another door besides the
driver door, the battery saver func-
tion does not operate and the
headlamp delay function does not
turn OFF automatically.
This may cause the battery to dis-
charge. To avoid battery dis-
charge, turn OFF the headlamps
manually from the headlamp
switch before exiting the vehicle.
Headlamp leveling device
(if equipped)
It automatically adjusts the head-
lamp beam level according to the
number of passengers and loading
weight in the luggage area. It also
adjusts to the appropriate headlamp
beam level for various situations.
NOTICE
If the function does not work
properly, have the system
inspected by an authorized
HYUNDAI dealer. Do not attempt
to inspect or replace the wiring
yourself.
WARNING
Page 507 of 557

L
LI
IG
G H
H T
T
B
B U
U L
LB
B S
S
Consult an authorized HYUNDAI
dealer to replace most vehicle light
bulbs. It is difficult to replace vehicle
light bulbs because other parts of the
vehicle must be removed before you
can get to the bulb. This is especially
true for removing the headlamp
assembly to get to the bulb(s).
Removing/installing the headlamp
assembly can result in damage to
the vehicle.
Information
The headlamp and tail lamp lenses
could appear frosty if the vehicle is
washed after driving or the vehicle is
driven at night in wet weather. This
condition is caused by temperature
difference between the lamp inside
and outside and, it does not indicate a
problem with your vehicle. When
moisture condenses in the lamp, it will
be removed after driving with the
headlamp on. The removable level
may differ depending on lamp size,
lamp position and environmental con-
dition. However, if moisture is not
removed, we recommend that your
vehicle is inspected by an authorized
HYUNDAI dealer.
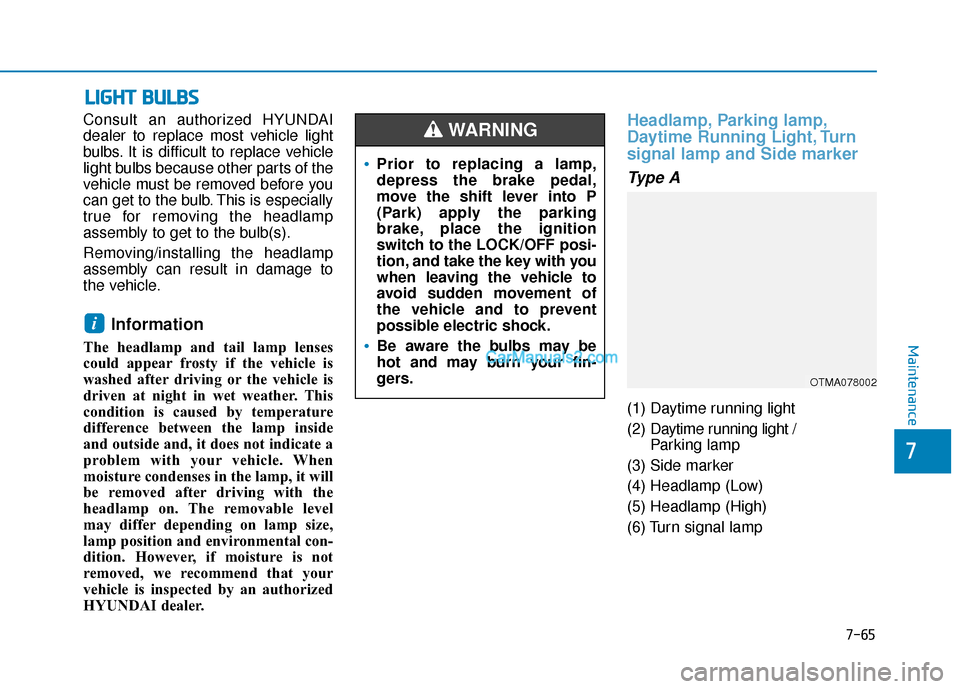
Headlamp, Parking lamp,
Daytime Running Light, Turn
signal lamp and Side marker
Type A
(1) Daytime running light
(2) Daytime running light /
Parking lamp
(3) Side marker
(4) Headlamp (Low)
(5) Headlamp (High)
(6) Turn signal lamp
i
•Prior to replacing a lamp,
depress the brake pedal,
move the shift lever into P
(Park) apply the parking
brake, place the ignition
switch to the LOCK/OFF posi-
tion, and take the key with you
when leaving the vehicle to
avoid sudden movement of
the vehicle and to prevent
possible electric shock.
Be aware the bulbs may be
hot and may burn your fin-
gers.
WARNING
OTMA078002
Maintenance
7-65
7
Page 512 of 557

Rear Combination Light Bulb
Replacement
Type A
(1) Stop/Tail lamp
(2) Tail lamp
(3) Side marker
(4) Turn signal lamp
(5) Backup lamp
Stop/Tail lamp and side marker
lamp
1. Turn off the engine.
2. Open the liftgate.
3. Remove the cover using a flat-blade screwdriver. 4. Loosen the lamp assembly retain-
ing screws with a cross-tip screw-
driver.
5. Remove the rear combination lamp assembly from the body of
the vehicle.
OTM078006
OTMA078004
OTM078005
Maintenance
7-70
Page 515 of 557

Tail lamp, stop lamp and side
marker lamp
If the LED lamp does not operate,
have the system checked by an
authorized HYUNDAI dealer.
The LED lamps cannot replaced as a
single unit because it is an integrated
unit. The LED lamps has to be
replaced with the unit.
A skilled technician should check or
repair the LED lamp, for it may dam-
age related parts of the vehicle.
Turn signal lamp and back up lamp
If the light bulb does not operate,
have the vehicle checked by an
authorized HYUNDI dealer.
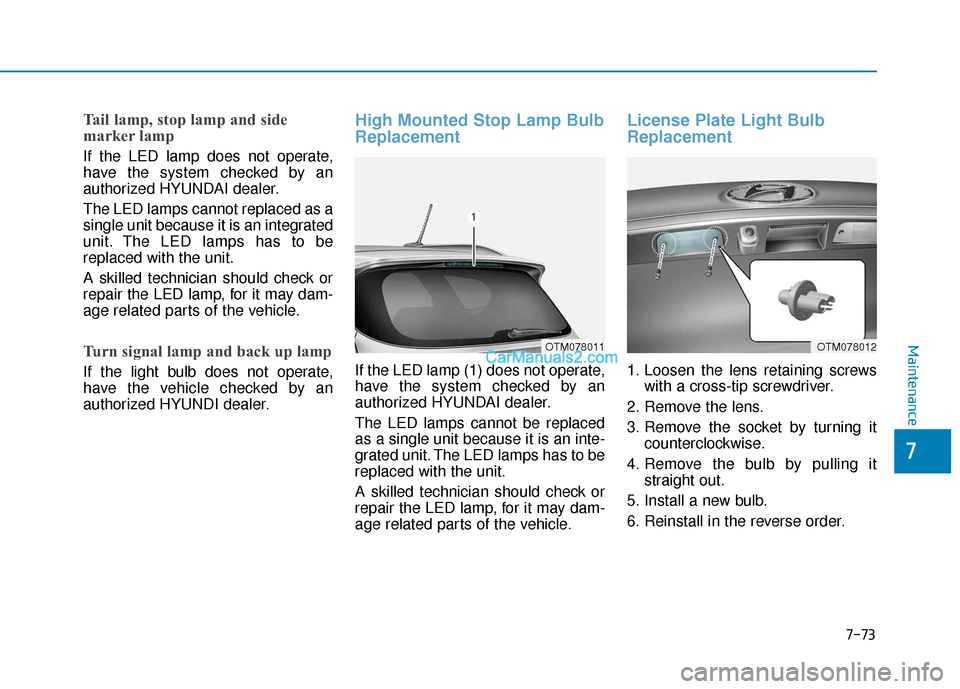
High Mounted Stop Lamp Bulb
Replacement
If the LED lamp (1) does not operate,
have the system checked by an
authorized HYUNDAI dealer.
The LED lamps cannot be replaced
as a single unit because it is an inte-
grated unit. The LED lamps has to be
replaced with the unit.
A skilled technician should check or
repair the LED lamp, for it may dam-
age related parts of the vehicle.
License Plate Light Bulb
Replacement
1. Loosen the lens retaining screwswith a cross-tip screwdriver.
2. Remove the lens.
3. Remove the socket by turning it counterclockwise.
4. Remove the bulb by pulling it straight out.
5. Install a new bulb.
6. Reinstall in the reverse order.
OTM078011OTM078012Maintenance
7-73
7