2020 Hyundai Santa Fe automatic
[x] Cancel search: automaticPage 250 of 557

3-161
Convenient features of your vehicle
3
When the Auto Defogging
System operates, the indi-
cator will illuminate.
If a high amount of humidity is
detected in the vehicle, the Auto
Defogging System will be enabled.
The following steps will be performed
automatically:
Step 1) The A/C button will turn ON.
Step 2) The air intake control will change to Fresh mode.
Step 3) The mode will be changed to defrost to direct airflow to the
windshield.
Step 4) The fan speed will be set to MAX.
If the air conditioning is off or recircu-
lated air position is manually select-
ed while Auto Defogging System is
ON, the Auto Defogging System
Indicator will blink 3 times to signal
that the manual operation has been
canceled.To cancel or reset the
Auto Defogging System
Press the front windshield defroster
button for 3 seconds when the igni-
tion switch is in the ON position.
When the Auto Defogging System is
canceled, the ADS OFF symbol will
blink 3 times and ADS OFF will be
displayed on the climate control
information screen.
When the Auto Defogging System is
reset, the ADS OFF symbol will blink
6 times without a signal.
Information
• When the air conditioning is turned on by Auto defogging system, if you
try to turn off the air conditioning,
the indicator will blink 3 times and
the air conditioning will not be
turned off.
• To maintain the effectiveness and efficiency of the Auto Defogging
System, do not select Recirculation
mode while the system is operating.
• When the Auto Defogging System is operating, the fan speed adjust-
ment button, the temperature
adjustment knob, and the air
intake control button are all dis-
abled.
Do not remove the sensor cover
located on the upper end of the
windshield glass.
Damage to system parts could
occur and may not be covered by
your vehicle warranty.
NOTICE
i
Page 251 of 557
3-162
Convenient features of your vehicle
Rear Window Defroster
To prevent damage to the rear
window defroster conducting ele-
ments bonded to the inside sur-
face of the rear window, never use
sharp instruments or window
cleaners containing abrasives to
clean the window.
If you want to defrost and defog
the front windshield, refer to the
"Windshield Defrosting and
Defogging" section in this chapter.The defroster heats the window to
remove frost, fog and thin ice from
the interior and exterior of the rear
window, while the engine is running.
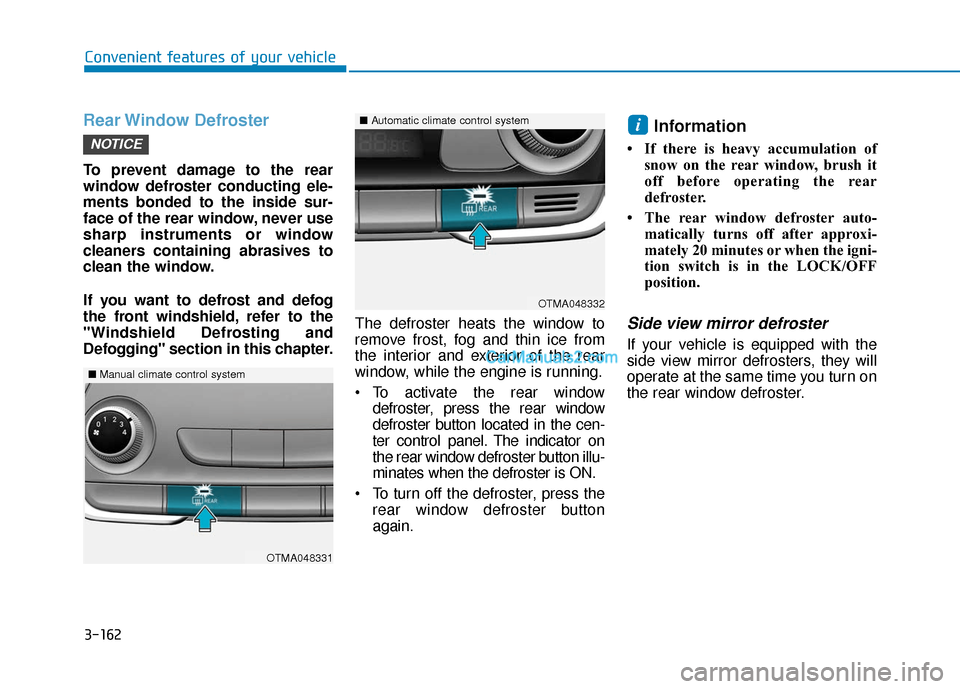
To activate the rear window
defroster, press the rear window
defroster button located in the cen-
ter control panel. The indicator on
the rear window defroster button illu-
minates when the defroster is ON.
To turn off the defroster, press the rear window defroster button
again.
Information
• If there is heavy accumulation ofsnow on the rear window, brush it
off before operating the rear
defroster.
• The rear window defroster auto- matically turns off after approxi-
mately 20 minutes or when the igni-
tion switch is in the LOCK/OFF
position.
Side view mirror defroster
If your vehicle is equipped with the
side view mirror defrosters, they will
operate at the same time you turn on
the rear window defroster.
i
NOTICE
OTMA048332
■Automatic climate control system
OTMA048331
■Manual climate control system
Page 252 of 557
3-163
Convenient features of your vehicle
3
C
CL
LI
IM
M A
AT
TE
E
C
C O
O N
NT
TR
R O
O L
L
A
A D
DD
DI
IT
T I
IO
O N
NA
AL
L
F
F E
E A
A T
TU
U R
RE
ES
S
Cluster ionizer (if equipped)
When the ignition switch is in the ON
position, the clean air function turns
on automatically.
Also, the clean air function turns off
automatically, when the ignition
switch is in the OFF position.
Air recirculation of passenger
compartment while spraying
the washer fluid
While spraying the washer fluid on
the windshield, the air recirculation
mode and the air conditioning sys-
tem are automatically operated
according to the outside temperature
in order to prevent the outside air
intake. If you control the recirculation
mode manually during operation, it
will be controlled but will change
back after a while. (It may not work
under certain circumstances: in case
of the cold weather or the ignition
switch is in the OFF position.) To set up the air recirculation
1. Start the engine.
2. Set the air flow outlet direction to
the Floor Level Mode by
pressing the mode selection but-
ton.
3. While pressing the air condition- ing button, push the recirculation
mode button over 4 times within 2
seconds.
4. If the function is set, the recircula- tion button indicator will blink 6
times.
To release the air recirculation
1. Start the engine.
2. Set the air flow outlet direction to the Floor Level Mode by
pressing the mode selection but-
ton.
3. While pressing the air condition- ing button, push the recirculation
mode button indicator over 4
times within 2 seconds.
4. If the function is released, the recirculation button indicator will
blink 3 times.
Automatic Ventilation
(if equipped)
When the ignition switch is in the ON
position or when the engine is run-
ning and temperature is below 59°F
(15°C) with the recirculation mode
selected more than three to five min-
utes, the air intake position will auto-
matically change to fresh mode.
To cancel or reset the Automatic
Ventilation
When the air conditioning system is
on, select Face Level mode and
press the recirculation mode button
five times within three seconds while
pressing A/C button.
When the Automatic Ventilation fea-
ture is enabled, the recirculation but-
ton LED indicator will blink 6 times.
When the Automatic Ventilation fea-
ture is disabled, the recirculation but-
ton LED indicator will blink 3 times.
Page 253 of 557
3-164
Convenient features of your vehicle
Sunroof Inside Air
Recirculation (if equipped)
When the sunroof is opened, out-
side (fresh) air will be automatically
selected. At this time, if you press the
air intake control button, recirculated
air position will be selected but will
change back to outside (fresh) air
after 3 minutes. When the sunroof is
closed, the air intake position will
return to the original position that
was selected.
Auto comfort control
(for driver's seat) (if equipped)
The temperature of the driver's seat
warmer, seat cooler and heated
steering wheel is automatically con-
trolled depending on the ambient
temperature and the set climate con-
trol temperature of the vehicle when
the engine is running.
To use this function, it must be acti-
vated from the Settings menu in the
AV/AVN system screen. Select:
- All menus →Setup →Vehicle →
Heated/Ventilated Features
For more details on Auto Comfort
Control, refer to "Seat Warmers
and Air ventilation seats" in chap-
ter 2, and "Heated Steering Wheel"
in chapter 3.
Page 261 of 557
3-172
Convenient features of your vehicle
To reduce a risk of serious or
fatal injuries:
Do not use a heated electric
device such as a coffeepot,
toaster, heater, iron, etc.
Do not insert foreign objects
into the outlet and do not
touch the outlet as you may
get shocked.
Do not let children touch the
AC inverter.
WARNING
To prevent the battery from beingdischarged, do not use the AC
inverter while the engine is not
running.
When not using the AC inverter, make sure to close the AC invert-
er cover.
After using an electric accessory or equipment, pull the plug out.
Leaving the accessory or equip-
ment plugged in for a long time
may cause battery discharge.
Do not use an electric accessory or equipment the power con-
sumption of which is greater
than 150W(115V).
Some electric accessories or equipments can cause electron-
ic interference. It may cause
excessive audio noise and mal-
functions in other electric sys-
tems or devices in the vehicle.
Do not use broken electric accessories or equipments,
which may damage the AC
inverter and electrical systems
of the vehicle. Do not use two or more electric
accessories or equipments at
the same time. It may cause
damage to the electrical sys-
tems of the vehicle.
When the input voltage is lower, outlet LED will blink and the AC
inverter will turn off automatical-
ly. If the input voltage goes up to
normal, the AC inverter will turn
on again.
NOTICE
Page 267 of 557
3-178
Convenient features of your vehicle
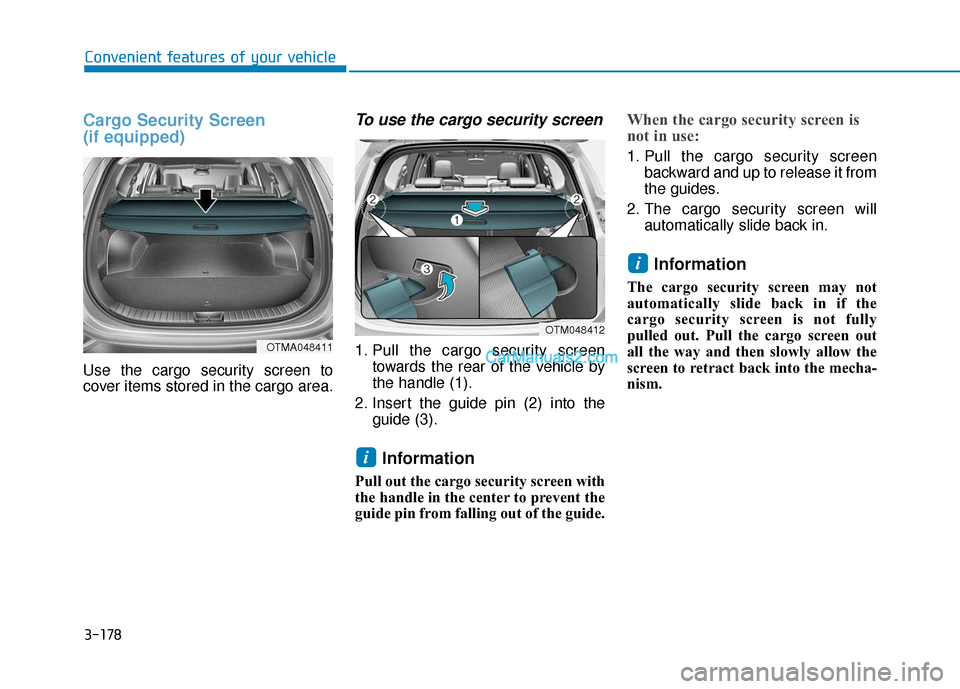
Cargo Security Screen
(if equipped)
Use the cargo security screen to
cover items stored in the cargo area.
To use the cargo security screen
1. Pull the cargo security screentowards the rear of the vehicle by
the handle (1).
2. Insert the guide pin (2) into the guide (3).
Information
Pull out the cargo security screen with
the handle in the center to prevent the
guide pin from falling out of the guide.
When the cargo security screen is
not in use:
1. Pull the cargo security screenbackward and up to release it from
the guides.
2. The cargo security screen will automatically slide back in.
Information
The cargo security screen may not
automatically slide back in if the
cargo security screen is not fully
pulled out. Pull the cargo screen out
all the way and then slowly allow the
screen to retract back into the mecha-
nism.
i
i
OTMA048411
OTM048412
Page 275 of 557

Driving your vehicle
5
Before Driving ........................................................5-4
Before Entering the Vehicle ...........................................5-4
Before Starting ..................................................................5-4
Ignition Switch ........................................................5-6
Key Ignition Switch ...........................................................5-6
Engine Start/Stop Button................................................5-9
Automatic Transmission ......................................5-14
Automatic Transmission Operation .............................5-14
Good Driving Practices ..................................................5-18
Braking System ....................................................5-20
Power Brakes ...................................................................5-20
Disc Brakes Wear Indicator ..........................................5-21
Electronic Parking Brake (EPB)...................................5-21
Auto Hold ........................................................................\
..5-27
Anti-lock Brake System (ABS) ....................................5-30
Electronic Stability Control (ESC)................................5-32
Vehicle Stability Management (VSM).........................5-35
Hill-Start Assist Control (HAC) ....................................5-36
Downhill Brake Control (DBC) ......................................5-36
Good Braking Practices .................................................5-39
All Wheel Drive (AWD) ........................................5-40
AWD operation.................................................................5-41
Emergency precautions .................................................5-44
ISG (Idle Stop and Go) System ..........................5-46
To Activate the ISG System ..........................................5-46
To Deactivate the ISG System......................................5-49
ISG System Malfunction ................................................5-49
Battery Sensor Deactivation ........................................5-50
Drive Mode Integrated Control System ............5-51
Drive Mode .......................................................................5\
-51
Smart shift on trip computer .......................................5-53
Forward Collision-Avoidance
Assist (FCA) System ............................................5-54
System Setting and Activation.....................................5-54
FCA Warning Message and System Control ............5-57
FCA Sensor .......................................................................5\
-59
System Malfunction .......................................................5-61
Limitations of the System .............................................5-62
Blind-Spot Collision Warning/Blind-Spot
Collision-Avoidance Assist .................................5-68
System Description .........................................................5-68
System Setting and Activation.....................................5-69
Warning and System Control .......................................5-72
Detecting Sensor (Camera and Radar) ......................5-74
Limitations of the System .............................................5-77
Page 284 of 557
5-10
Driving your vehicle
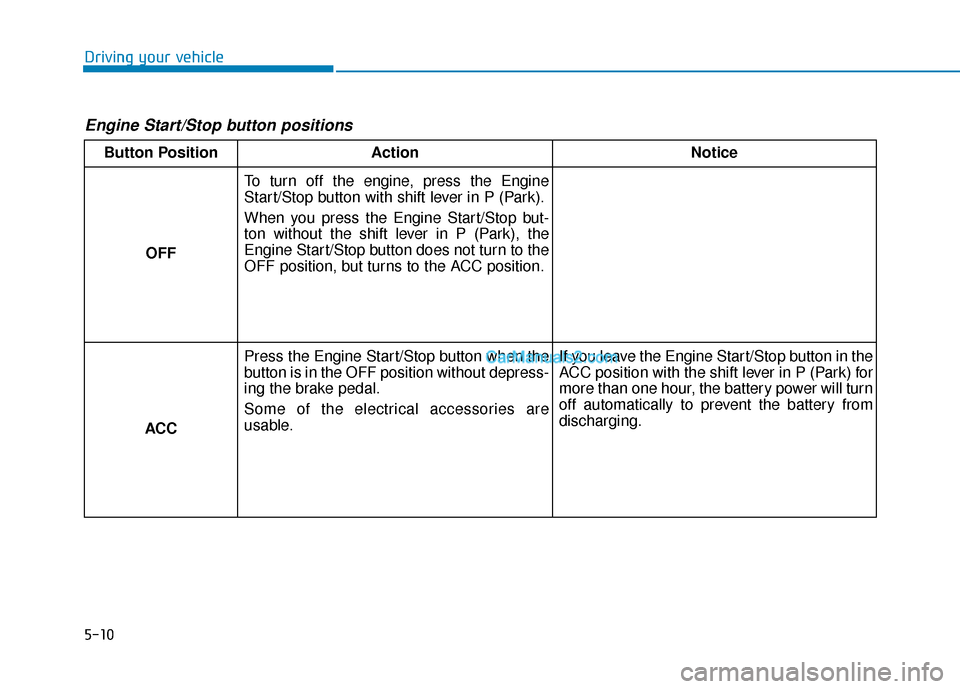
Engine Start/Stop button positions
Button PositionAction Notice
OFF To turn off the engine, press the Engine
Start/Stop button with shift lever in P (Park).
When you press the Engine Start/Stop but-
ton without the shift lever in P (Park), the
Engine Start/Stop button does not turn to the
OFF position, but turns to the ACC position.
ACC Press the Engine Start/Stop button when the
button is in the OFF position without depress-
ing the brake pedal.
Some of the electrical accessories are
usable.
If you leave the Engine Start/Stop button in the
ACC position with the shift lever in P (Park) for
more than one hour, the battery power will turn
off automatically to prevent the battery from
discharging.