2020 Hyundai Santa Fe Stop n go
[x] Cancel search: Stop n goPage 145 of 557

3-56
Convenient features of your vehicle
The power liftgate can be oper- ated when the engine is not run-
ning. However, the power liftgate
operation consumes a large
amount of electic power.
To prevent the battery from
being discharged, do not oper-
ate it excessively (e.g. more than
5 times repeatedly).
To prevent the battery from being discharged, do not leave
the power liftgate in the open
position for a long time.
Do not modify or repair any part of the power liftgate by yourself.
This must be done by an author-
ized HYUNDAI dealer. When jacking up the vehicle to
change a tire or repair the vehi-
cle, do not operate the power
liftgate. This could cause the
power liftgate to operate
improperly.
In cold and wet climates, the power liftgate may not work
properly due to freezing condi-
tions.
Automatic reversal
During power opening and closing if
the power liftgate is blocked by an
object or part of the body, the power
liftgate will detect the resistance.
If resistance is detected while open-
ing or closing the power liftgate, the
liftgate will stop and move in the
opposite direction.
NOTICE
OTMA048037
Page 146 of 557
3-57
Convenient features of your vehicle
3
However, in some instances the
automatic reversal system may not
detect the object if it is too soft or is
very thin, or if the liftgate is almost
fully closed near the latched position.
Caution should be taken to prevent
any objects from obstructing the lift-
gate opeining.
If the automatic reversal feature
operates more than 2 times while
attempting to open or close the lift-
gate, the power liftgate may stop at
that position. If this occurs, carefully
close the liftgate manually, and then
try to operate the power liftgate auto-
matically again.How to reset the power liftgate
If the battery has been discharged or
disconnected, or if the power liftgate
fuse has been replaced or removed,
reset the power liftgate by performing
the following procedure:
1. Put the shift lever in P (Park).
2. Press the power liftgate inner but-ton and the power liftgate outer
handle button simultaneously for
more than 3 seconds. The chime
will sound.
3. Close the liftgate manually.
If the power liftgate does not work
properly after the above procedure,
have the system checked by an
authorized HYUNDAI dealer.
When operating the power liftgate,
the gear shift lever must be in the
(P) park position in order to oper-
ate normally.
NOTICE
Never intentionally place any
object or part of your body in
the path of the power liftgate to
make sure the automatic rever-
sal operates.
WARNING
Do not put heavy objects on the
power liftgate before you oper-
ate the power liftgate feature.
Additional weight may damage
the operation of the system.
CAUTION
Page 147 of 557
3-58
Convenient features of your vehicle
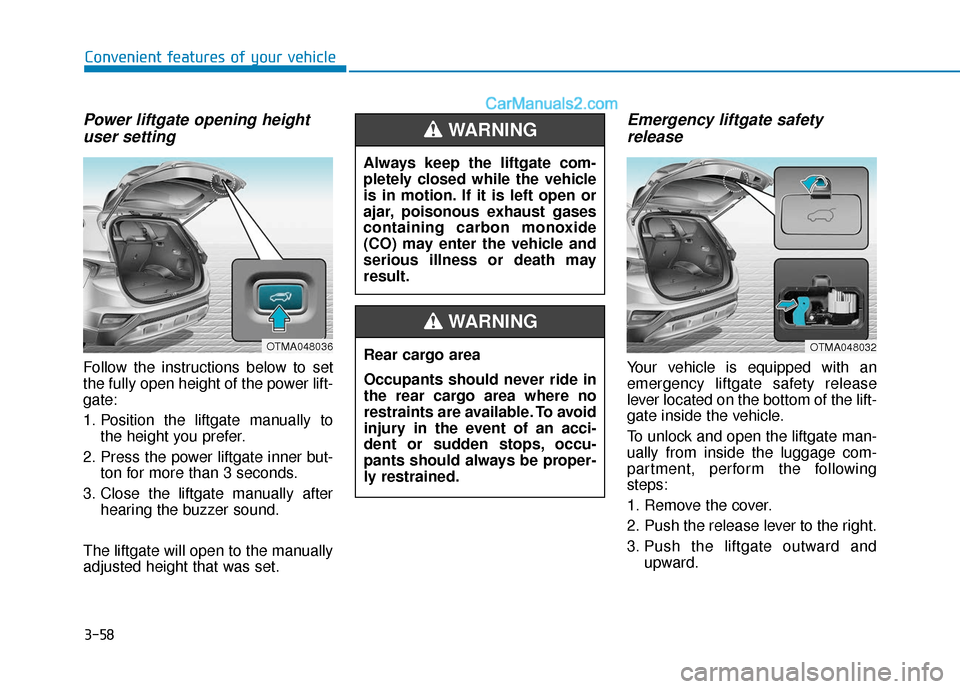
Power liftgate opening heightuser setting
Follow the instructions below to set
the fully open height of the power lift-
gate:
1. Position the liftgate manually to
the height you prefer.
2. Press the power liftgate inner but- ton for more than 3 seconds.
3. Close the liftgate manually after hearing the buzzer sound.
The liftgate will open to the manually
adjusted height that was set.
Emergency liftgate safety release
Your vehicle is equipped with an
emergency liftgate safety release
lever located on the bottom of the lift-
gate inside the vehicle.
To unlock and open the liftgate man-
ually from inside the luggage com-
partment, perform the following
steps:
1. Remove the cover.
2. Push the release lever to the right.
3. Push the liftgate outward and
upward.
OTMA048036
Always keep the liftgate com-
pletely closed while the vehicle
is in motion. If it is left open or
ajar, poisonous exhaust gases
containing carbon monoxide
(CO) may enter the vehicle and
serious illness or death may
result.
WARNING
Rear cargo area
Occupants should never ride in
the rear cargo area where no
restraints are available. To avoid
injury in the event of an acci-
dent or sudden stops, occu-
pants should always be proper-
ly restrained.
WARNING
OTMA048032
Page 151 of 557
3-62
Convenient features of your vehicle
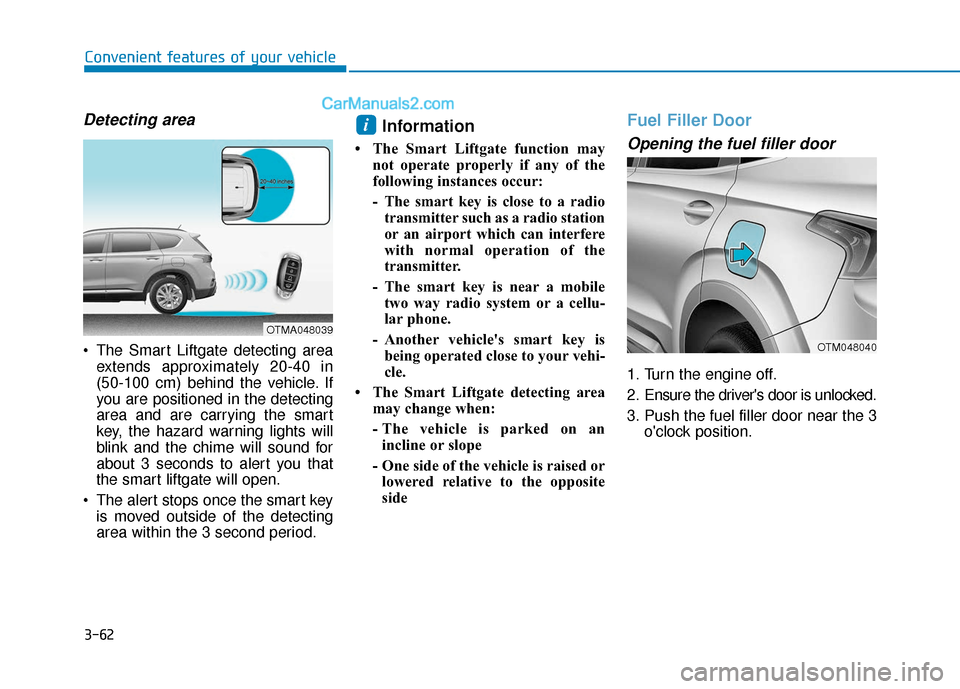
Detecting area
The Smart Liftgate detecting areaextends approximately 20-40 in
(50-100 cm) behind the vehicle. If
you are positioned in the detecting
area and are carrying the smart
key, the hazard warning lights will
blink and the chime will sound for
about 3 seconds to alert you that
the smart liftgate will open.
The alert stops once the smart key is moved outside of the detecting
area within the 3 second period.
Information
• The Smart Liftgate function may not operate properly if any of the
following instances occur:
- The smart key is close to a radiotransmitter such as a radio station
or an airport which can interfere
with normal operation of the
transmitter.
- The smart key is near a mobile two way radio system or a cellu-
lar phone.
- Another vehicle's smart key is being operated close to your vehi-
cle.
• The Smart Liftgate detecting area may change when:
- The vehicle is parked on anincline or slope
- One side of the vehicle is raised or lowered relative to the opposite
side
Fuel Filler Door
Opening the fuel filler door
1. Turn the engine off.
2. Ensure the driver's door is unlocked.
3. Push the fuel filler door near the 3 o'clock position.
i
OTMA048039
OTM048040
Page 153 of 557
3-64
Convenient features of your vehicle
Do not get back into a vehicle
once you have begun refuel-
ing. You can generate a build-
up of static electricity by
touching, rubbing or sliding
against any item or fabric
capable of producing static
electricity. Static electricity
discharge can ignite fuel
vapors causing a fire. If you
must re-enter the vehicle, you
should once again eliminate
potentially dangerous static
electricity discharge by touch-
ing a metal part of the vehicle,
away from the fuel filler neck,
nozzle or other gasoline
source, with your bare hand.
When using an approved
portable fuel container, be
sure to place the container on
the ground prior to refueling.
Static electricity discharge
from the container can ignite
fuel vapors causing a fire.
Do not over-fill or top-off your
vehicle tank, which can cause
gasoline spillage.
If a fire breaks out during refu-
eling, leave the vicinity of the
vehicle, and immediately con-
tact the manager of the gas
station and then contact the
local fire department. Follow
any safety instructions they
provide.
If pressurized fuel sprays out,
it can cover your clothes or
skin and thus subject you to
the risk of fire and burns.
Always remove the fuel cap
carefully and slowly. If the cap
is venting fuel or if you hear a
hissing sound, wait until the
condition stops before com-
pletely removing the cap.
Always check that the fuel cap
is installed securely to pre-
vent fuel spillage in the event
of an accident.
Once refueling has begun,
contact between your bare
hand and the vehicle should
be maintained until the filling
is complete.
Use only approved portable
plastic fuel containers designed
to carry and store gasoline.
When refueling, always move
the shift lever to the P (Park)
position (for automatic trans-
mission/dual clutch transmis-
sion), set the parking brake,
and place the ignition switch
to the LOCK/OFF position.
Sparks produced by electrical
components related to the
engine can ignite fuel vapors
causing a fire.
Do not use matches or a
lighter and do not smoke or
leave a lit cigarette in your
vehicle while at a gas station,
especially during refueling.
Page 158 of 557

3-69
Convenient features of your vehicle
3
Fuel gauge
This gauge indicates the approxi-
mate amount of fuel remaining in the
fuel tank.
Information
• The fuel tank capacity is given inchapter 8.
• The fuel gauge is supplemented by a low fuel warning light, which will
illuminate when the fuel tank is
nearly empty.
• On inclines or curves, the fuel gauge pointer may fluctuate or the
low fuel warning light may come on
earlier than usual due to the move-
ment of fuel in the tank. Avoid driving with an extremely
low fuel level. Running out of fuel
could cause the engine to misfire
damaging the catalytic converter.
NOTICE
i
Never remove the radiator cap or
engine coolant reservoir cap
when the engine is hot. The
engine coolant is under pressure
and could severely burn. Wait
until the engine is cool before
adding coolant to the reservoir.
WARNING
Running out of fuel can expose
vehicle occupants to danger.
You must stop and obtain addi-
tional fuel as soon as possible
after the warning light comes
on or when the gauge indicator
comes close to the "E (Empty)"
level.
WARNING
OTM048110/OTM048111
■
Type A
■Type B
Page 161 of 557

3-72
Convenient features of your vehicle
Shift indicator pop-up (if equipped)
The pop-up indicates the current
gear position displayed in the cluster
for about 2 seconds when shifting
into other positions (P/R/N/D).
The shift indicator pop-up function
can be activated or deactivated from
the User Settings mode in the cluster
LCD display.
Warning and Indicator LightsInformation
Make sure that all warning lights are
OFF after starting the engine. If any
light is still ON, this indicates a situa-
tion that needs attention.
Seat Belt Warning Light
This warning light informs the driver
that the seat belt is not fastened.
For more information, refer to
"Seat Belts" in chapter 2.
Air Bag Warning Light
This warning light illuminates:
When you set the ignition switch orthe Engine Start/Stop button to the
ON position.
- The air bag warning light illumi-nates for about 6 seconds and
then turns off when all checks
have been performed
The air bag warning light will remain illuminated if there is a
malfunction with the Safety
Restraint System (SRS) air bag
operation.
If this occurs, have the vehicle
inspected by an authorized
HYUNDAI dealer.
i
OAD048561N
■
Type A
Page 162 of 557
3-73
Convenient features of your vehicle
3
Parking Brake & BrakeFluid Warning Light
This warning light illuminates:
When you set the ignition switch
or the Engine Start/Stop button to
the ON position.
- The parking brake light illumi-nates for about 3 seconds and
will then turn off once the parking
brake is released.
Whenever the parking brake is applied.
Whenever the brake fluid level in the reservoir is low.
- If the warning light illuminateswith the parking brake released,
it indicates the brake fluid level in
the reservoir is low.
If the brake fluid level in the reser-
voir is low:
1. Drive carefully to the nearest safe location and stop your vehicle.
2. With the engine stopped, check the brake fluid level immediately and
add fluid as required (For more
details, refer to "Brake Fluid" in
chapter 7). After adding brake
fluid, check all brake components
for fluid leaks. If a brake fluid leak is
found, or if the warning light
remains on, or if the brakes do not
operate properly, do not drive the
vehicle. Have the vehicle inspected
by an authorized HYUNDAI dealer.
Dual-diagonal braking system
Your vehicle is equipped with dual-
diagonal braking system. This means
you still have braking on two wheels
even if one of the dual systems
should fail.
With only one of the dual systems
working, more than normal pedal
travel and greater pedal pressure is
required to stop the vehicle. Also, the vehicle will not stop in as
short a distance with only a portion
of the brake system working.
If the brakes fail while you are driv-
ing, shift to a lower gear for addition-
al engine braking and stop the vehi-
cle as soon as it is safe to do so.
Parking Brake & Brake Fluid
Warning Light
Driving the vehicle with a warn-
ing light ON is dangerous. If the
Parking Brake & Brake Fluid
Warning Light illuminates with
the parking brake released, it
indicates that the brake fluid
level is low.
If this occurs, have the vehicle
inspected by an authorized
HYUNDAI dealer.
WARNING