2020 Hyundai Santa Fe Stop n go
[x] Cancel search: Stop n goPage 110 of 557

3-21
Convenient features of your vehicle
3
Rear Occupant Alert (ROA)
System (if equipped)
The Rear Occupant Alert (ROA) sys-
tem is provided to help prevent exit-
ing the vehicle with the rear passen-
ger left in the vehicle.
1st alert- When you open the front doorafter opening and closing the rear
door and turning off the engine,
the “Check rear seats” warning
message appears on the cluster.
2nd alert - After the 1st alert the 2nd alertoperates when any movement is
detected in the vehicle after the
driver’s door is closed and all the
doors are locked. The horn will
activate for about 25 seconds. If
the system continues to detect a
movement the alert operates up
to 8 times.
- Unlock the door with the remote key or smart key to stop the alert.
- The system detects movement in the vehicle for 24 hours after the
door is locked.The Safe Exit Assist (SEA)
system may not operate nor-
mally if there is any vehicle or
obstacle at the rear area of
your vehicle.
The Safe Exit Assist (SEA)
system may not operate nor-
mally when a vehicle is com-
ing rapidly two lanes over
from your vehicle or a vehicle
is approaching at a fast speed
from the rear in the lane next
to your vehicle.
The Safe Exit Assist (SEA)
system may be activated later
than normal or may not oper-
ate normally if a vehicle is
approaching fast from the rear
of your vehicle.
CAUTIONThe Safe Exit Assist (SEA)
system will not operate if
there is a malfunction with the
Blind-Spot Collision Warning
(BCW) system as follows:
- When the BCW warning message appears
When the BCW sensor or
the sensor surrounding is
polluted or covered
- When the BCW does not warn or warns wrongly
For more details, refer to cau-
tions and limitations in "Blind-
Spot Collision Warning (BCW)"
in chapter 5.
The system does not detect
every obstacle approaching
the vehicle exit.
The driver and passenger are
responsible for any obstacles
while exiting the vehicle.
Always check the surrounding
before you exit the vehicle.
WARNING
Page 111 of 557
3-22
Convenient features of your vehicle
Make sure that all the win-
dows are closed. If the win-
dow is open, the alert may
activate by the sensor detect-
ing an unintended movement
(e.g. wind or bugs).
CAUTION
The 2nd alert is activated only afterthe prior activation of the 1st alert.
You can activate or deactivate the Rear Occupant Alert (ROA) sys-
tem from the User Settings mode
in the cluster LCD display. The
option can be found under the fol-
lowing menu:
User Settings → Convenience →
Rear Seat Alert
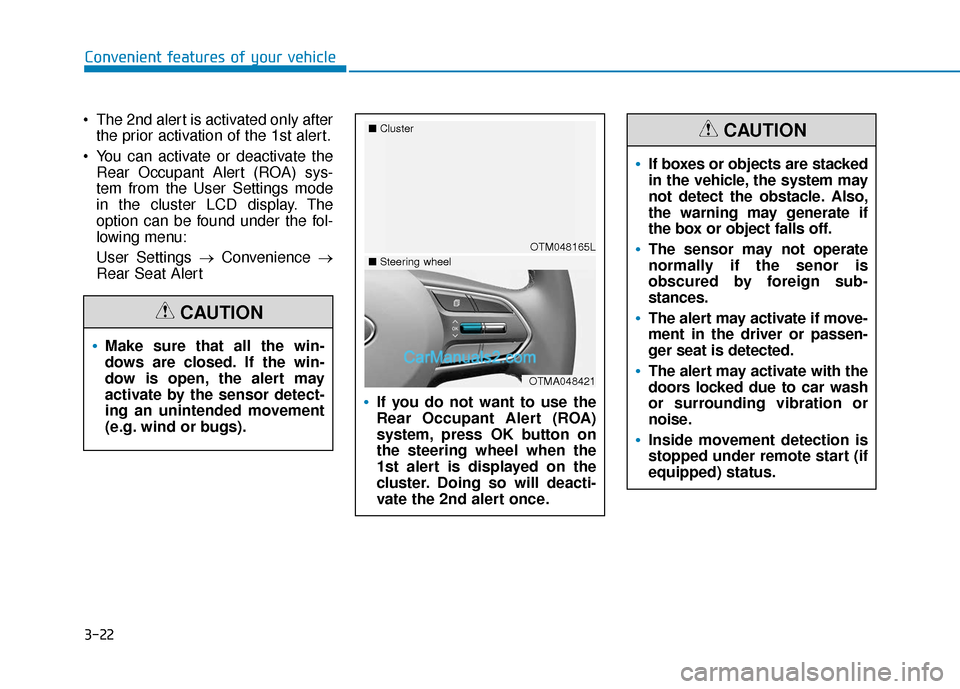
If you do not want to use the
Rear Occupant Alert (ROA)
system, press OK button on
the steering wheel when the
1st alert is displayed on the
cluster. Doing so will deacti-
vate the 2nd alert once.
OTM048165L
■
Cluster
OTMA048421
■Steering wheel
If boxes or objects are stacked
in the vehicle, the system may
not detect the obstacle. Also,
the warning may generate if
the box or object falls off.
The sensor may not operate
normally if the senor is
obscured by foreign sub-
stances.
The alert may activate if move-
ment in the driver or passen-
ger seat is detected.
The alert may activate with the
doors locked due to car wash
or surrounding vibration or
noise.
Inside movement detection is
stopped under remote start (if
equipped) status.
CAUTION
Page 114 of 557

3-25
Convenient features of your vehicle
3
Recalling Positions from
Memory
1. Shift to P (Park) while the ignitionswitch is in the ON position.
2. Press the desired memory button (1 or 2). The system will beep
once, and then the driver's seat
position, side view mirror position,
instrument panel illumination
intensity and head-up display
height/brightness will automatical-
ly adjust to the stored positions.
3. "Driver 1 (or 2) settings applied" will appear on the cluster LCD dis-
play.
Information
• While recalling the "1" memoryposition, pressing the SET or 1 but-
ton temporarily stops the adjust-
ment of the recalled memory posi-
tion. Pressing the 2 button recalls
the "2" memory position. • While recalling the "2" memory
position, pressing the SET or 2 but-
ton temporarily stops the adjust-
ment of the recalled memory posi-
tion. Pressing the 1 button recalls
the "1" memory position.
• While recalling the stored positions, pressing one of the control buttons
for the driver's seat, side view mir-
ror, instrument panel illumination
or head-up display will cause the
movement of that component to stop
and move in the direction that the
control button is pressed.
Resetting the Driver's Seat
Memory System
Take the following procedures to reset
the driver's seat memory system,
when it does not operate properly.
To reset the driver's seat memo-ry system
1. Place the ignition switch to the ON
position, shift to P (Park), and
open the driver's door. 2. Operate the control switch to set
the driver's seat and seatback to
the foremost position.
3. Simultaneously press the SET button and push forward the seat
movement switch over 2 seconds.
While resetting the driver's seatmemory system
1. It starts with the notification sound.
2. The driver's seat and seatback is
adjusted to the rearward position
with the notification sound.
3. The driver's seat and seatback is re-adjusted to the default position
(central position) with the notifica-
tion sound.
However, in the following cases, the
resetting procedure and the notifica-
tion sound may stop.
- The memory button is pressed.
- The control switch is operated.
- The gear is shifted out of P (Park).
- The driving speed exceeds 2 mph (3 km/h).
- The driver's door is closed.
i
Page 115 of 557
3-26
Convenient features of your vehicle
Reattempt to do the resetting procedure again, when the reset-
ting procedure incompletely
stops or the notification sound
do not stop.
Make sure that there is no obsta- cle around the driver's seat in
advance of resetting the driver's
seat memory system.
Easy Access Function
The system will move the driver's
seat automatically as follows:
- It will move the driver’s seat rear- ward when the ignition key is
removed.
- It will move the driver’s seat for- ward when the ignition key is
inserted.
- It will move the driver’s seat rear- ward when the Engine Start/Stop
button is pressed to the OFF posi-
tion. - It will move the driver’s seat for-
ward when the Engine Start/Stop
button is pressed to the ACC or
START position.
You can activate or deactivate the
Easy Access Function from the User
Settings mode in the cluster LCD dis-
play.
'Convenience →Seat Easy Access →
Off/Normal/Extended'.
For more details, refer to "LCD
Display" in this chapter.
NOTICE
Driver should be cautious when
using this function to assure no
injury to passenger or child on
the back seat. In case of emer-
gency the driver has to stop
movement of front seat (when
easy access feature is activat-
ed) by pressing SET button or
any of the driver seat control
switches.
CAUTION
Page 116 of 557
3-27
Convenient features of your vehicle
3
S
ST
T E
EE
ER
R I
IN
N G
G
W
W H
HE
EE
EL
L
Electric Power Steering (EPS)
The system assists you with steering
the vehicle. If the vehicle is turned off
or if the power steering system
becomes inoperative, you may still
steer the vehicle, but it will require
increased steering effort.
Should you notice any change in the
effort required to steer during normal
vehicle operation, have the system
checked by an authorized HYUNDAI
dealer.
If the Electric Power Steering
System does not operate nor-
mally, the warning light ( ) will
illuminate on the instrument
cluster. You may steer the vehi-
cle, but it will require increased
steering efforts. Take your vehi-
cle to an authorized HYUNDAI
dealer and have the system
checked as soon as possible. When abnormality is detected in
the electric power steering sys-
tem, the steering assist function
will stop. At this time, the warn-
ing light turns on or blinks on
the cluster. The steering wheel
may become difficult to control
or operate. Have your vehicle
checked immediately, after mov-
ing the vehicle to a safe zone.
Information
The following symptoms may occur
during normal vehicle operation:
• The steering effort may be high immediately after placing the igni-
tion switch in the ON position.
This happens as the system per-
forms the EPS system diagnostics.
When the diagnostics are complet-
ed, the steering wheel effort will
return to its normal condition.
• A click noise may be heard from the EPS relay after the ignition switch
is in the ON or LOCK/OFF position.
• Motor noise may be heard when the vehicle is at a stop or at a low driv-
ing speed. • When you operate the steering
wheel in low temperatures, abnor-
mal noise may occur. If the temper-
ature rises, the noise will disappear.
This is a normal condition.
• When an error is detected from the EPS, the steering effort assist func-
tion will not be activated.
Instrument cluster warning lights
may be on or the steering effort
may be high. If these symptoms
occur, drive the vehicle to a safe
area as soon as it is safe to do so.
Have the system checked by an
authorized HYUNDAI dealer as
soon as possible.
i
NOTICE
Page 124 of 557
3-35
Convenient features of your vehicle
3
Programming HomeLink®
Please note the following:
When programming a garage dooropener, it is advised to park the
vehicle outside of the garage.
It is recommended that a new bat- tery be placed in the hand-held
transmitter of the device being pro-
grammed to HomeLink
®for quicker
training and accurate transmission
of the radio-frequency signal.
Some vehicles may require the igni- tion switch to be placed in the ACC
(or "Accessories") position for pro-
gramming and/or operation of
HomeLink
®.
In the event that there are still pro- gramming difficulties or questions
after following the programming
steps listed below, contact
HomeLink
®at: www.homelink.com
or by calling 1-800-355-3515.
Programming
To train most devices, follow these
instructions:
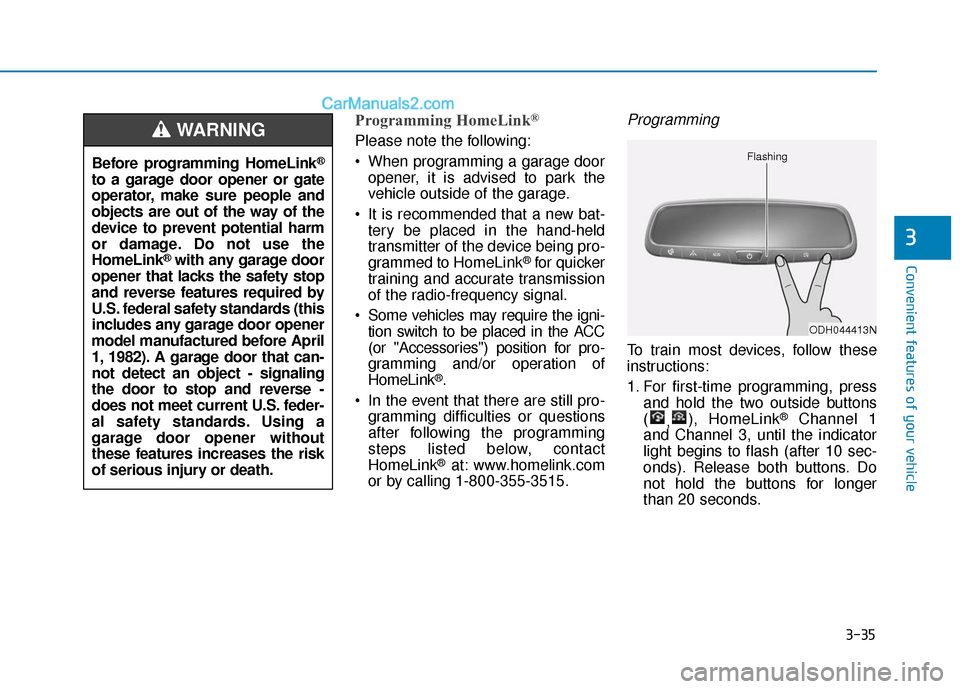
1. For first-time programming, press and hold the two outside buttons
( ,), HomeLink
®Channel 1
and Channel 3, until the indicator
light begins to flash (after 10 sec-
onds). Release both buttons. Do
not hold the buttons for longer
than 20 seconds.
ODH044413N
Flashing
Before programming HomeLink®
to a garage door opener or gate
operator, make sure people and
objects are out of the way of the
device to prevent potential harm
or damage. Do not use the
HomeLink
®with any garage door
opener that lacks the safety stop
and reverse features required by
U.S. federal safety standards (this
includes any garage door opener
model manufactured before April
1, 1982). A garage door that can-
not detect an object - signaling
the door to stop and reverse -
does not meet current U.S. feder-
al safety standards. Using a
garage door opener without
these features increases the risk
of serious injury or death.
WARNING
Page 126 of 557
3-37
Convenient features of your vehicle
3
Gate operator & Canadian program-ming
During programming, your handheld
transmitter may automatically stop
transmitting. Continue to press the
Integrated HomeLink
®Wireless
Control System button (note steps 2
through 3 in the Programming portion
of this document) while you press
and re-press ("cycle") your handheld
transmitter every two seconds until
the frequency signal has been
learned. The indicator light will flash
slowly and then rapidly after several
seconds upon successful training.
Operating HomeLink®
To operate, simply press and release
the programmed HomeLink®button.
Activation will now occur for the
trained device (i.e. garage door
opener, gate operator, security sys-
tem, entry door lock, home/office
lighting, etc.). For convenience, the
hand-held transmitter of the device
may also be used at any time.
Reprogramming a single HomeLink®
button
To program a device to HomeLink®
using a HomeLink®button previously
trained, follow these steps:
1. Press and hold the desired HomeLink
®button. DO NOT
release the button.
2. The indicator light will begin to flash after 20 seconds. Without releasing
the HomeLink
®button, proceed
with "Programming" step 2.
For questions or comments, contact
HomeLink
®at www.homelink.comor
1-800-355-3515.
Erasing HomeLink®buttons
Individual buttons cannot be erased.
However, to erase all three pro-
grammed buttons:
1. Press and hold the two outer HomeLink
®buttons until the indi-
cator light begins to flash after 10
seconds.
2. Release both buttons. Do not hold for longer than 20 seconds.
The Integrated HomeLink
®Wireless
Control System is now in the training
(learn) mode and can be pro-
grammed at any time following the
appropriate steps in the
Programming chapters above.
NVS
®is a registered trademark and
Z-Nav™ is a trademark of the Gentex
Corporation, Zeeland, Michigan.
HomeLink
®is a registered trademark
owned by Johnson Controls,
Incorporated, Milwaukee, Wisconsin.
FCC ID: NZLTLMHL4
IC: 4112A-TLMHL4
Page 128 of 557
3-39
Convenient features of your vehicle
3
Do not clean the mirror with harsh
abrasives, fuel or other petroleum
based cleaning products.
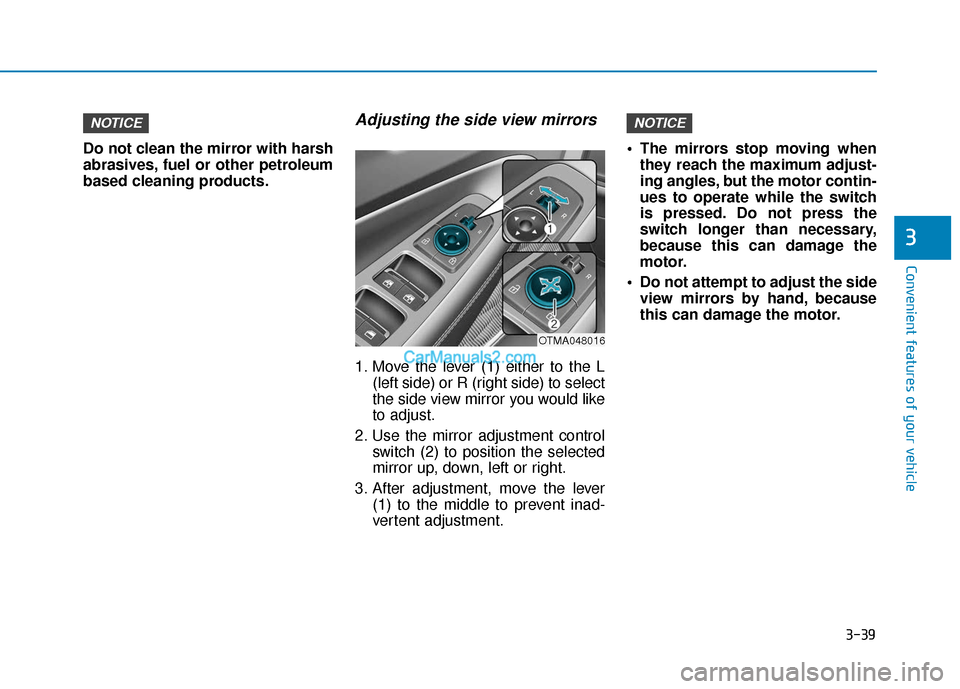
Adjusting the side view mirrors
1. Move the lever (1) either to the L(left side) or R (right side) to select
the side view mirror you would like
to adjust.
2. Use the mirror adjustment control switch (2) to position the selected
mirror up, down, left or right.
3. After adjustment, move the lever (1) to the middle to prevent inad-
vertent adjustment. The mirrors stop moving when
they reach the maximum adjust-
ing angles, but the motor contin-
ues to operate while the switch
is pressed. Do not press the
switch longer than necessary,
because this can damage the
motor.
Do not attempt to adjust the side view mirrors by hand, because
this can damage the motor.
NOTICENOTICE
OTMA048016