2020 Hyundai Santa Fe driver seat
[x] Cancel search: driver seatPage 111 of 557

3-22
Convenient features of your vehicle
Make sure that all the win-
dows are closed. If the win-
dow is open, the alert may
activate by the sensor detect-
ing an unintended movement
(e.g. wind or bugs).
CAUTION
The 2nd alert is activated only afterthe prior activation of the 1st alert.
You can activate or deactivate the Rear Occupant Alert (ROA) sys-
tem from the User Settings mode
in the cluster LCD display. The
option can be found under the fol-
lowing menu:
User Settings → Convenience →
Rear Seat Alert
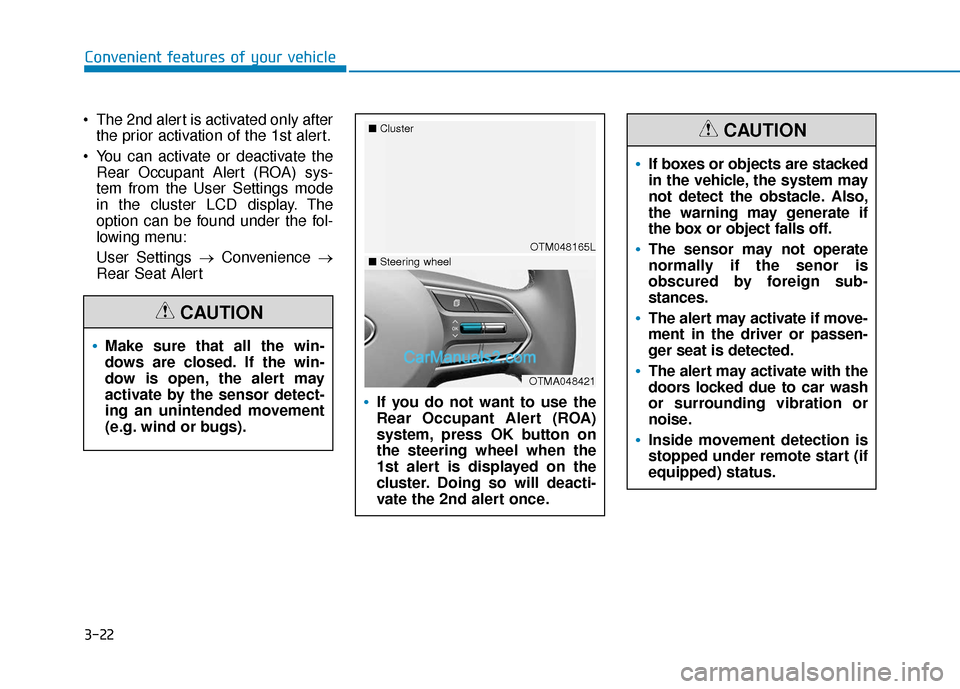
If you do not want to use the
Rear Occupant Alert (ROA)
system, press OK button on
the steering wheel when the
1st alert is displayed on the
cluster. Doing so will deacti-
vate the 2nd alert once.
OTM048165L
■
Cluster
OTMA048421
■Steering wheel
If boxes or objects are stacked
in the vehicle, the system may
not detect the obstacle. Also,
the warning may generate if
the box or object falls off.
The sensor may not operate
normally if the senor is
obscured by foreign sub-
stances.
The alert may activate if move-
ment in the driver or passen-
ger seat is detected.
The alert may activate with the
doors locked due to car wash
or surrounding vibration or
noise.
Inside movement detection is
stopped under remote start (if
equipped) status.
CAUTION
Page 113 of 557

3-24
Convenient features of your vehicle
The Driver Position Memory System
is provided to store and recall the fol-
lowing memory settings with a sim-
ple button operation.
- Driver's seat position (Power seat)
- Side view mirror position
- Instrument panel illumination intensity
- Head Up Display (HUD) position and brightness (if equipped)
Information
• If the battery is disconnected, thememory settings will be erased.
• If the Driver Position Memory System does not operate normally,
have the system checked by an
authorized HYUNDAI dealer.
Storing Positions into Memory
1. Shift to P (Park) while the ignition switch is in the ON position.
2. Adjust the driver's seat position, side view mirror position, instru-
ment panel illumination intensity
and head-up display height/bright-
ness to positions comfortable for
the driver.
3. Press the SET button. The system will beep once and notify you
"Press button to save settings" on
the cluster LCD display.
4. Press one of the memory buttons (1 or 2) within 4 seconds. The sys-
tem will beep twice when the
memory has been successfully
stored.
5. "Driver 1 (or 2) settings saved" will appear on the cluster LCD display.
i
D DR
RI
IV
V E
ER
R
P
P O
O S
SI
IT
T I
IO
O N
N
M
M E
EM
M O
OR
RY
Y
S
S Y
Y S
ST
T E
EM
M
(
( I
IF
F
E
E Q
Q U
UI
IP
P P
PE
ED
D )
)
OTMA048007
Never attempt to operate the
driver position memory system
while the vehicle is moving.
This could result in loss of con-
trol, and an accident causing
death, serious injury, or property
damage.
WARNING
Page 114 of 557

3-25
Convenient features of your vehicle
3
Recalling Positions from
Memory
1. Shift to P (Park) while the ignitionswitch is in the ON position.
2. Press the desired memory button (1 or 2). The system will beep
once, and then the driver's seat
position, side view mirror position,
instrument panel illumination
intensity and head-up display
height/brightness will automatical-
ly adjust to the stored positions.
3. "Driver 1 (or 2) settings applied" will appear on the cluster LCD dis-
play.
Information
• While recalling the "1" memoryposition, pressing the SET or 1 but-
ton temporarily stops the adjust-
ment of the recalled memory posi-
tion. Pressing the 2 button recalls
the "2" memory position. • While recalling the "2" memory
position, pressing the SET or 2 but-
ton temporarily stops the adjust-
ment of the recalled memory posi-
tion. Pressing the 1 button recalls
the "1" memory position.
• While recalling the stored positions, pressing one of the control buttons
for the driver's seat, side view mir-
ror, instrument panel illumination
or head-up display will cause the
movement of that component to stop
and move in the direction that the
control button is pressed.
Resetting the Driver's Seat
Memory System
Take the following procedures to reset
the driver's seat memory system,
when it does not operate properly.
To reset the driver's seat memo-ry system
1. Place the ignition switch to the ON
position, shift to P (Park), and
open the driver's door. 2. Operate the control switch to set
the driver's seat and seatback to
the foremost position.
3. Simultaneously press the SET button and push forward the seat
movement switch over 2 seconds.
While resetting the driver's seatmemory system
1. It starts with the notification sound.
2. The driver's seat and seatback is
adjusted to the rearward position
with the notification sound.
3. The driver's seat and seatback is re-adjusted to the default position
(central position) with the notifica-
tion sound.
However, in the following cases, the
resetting procedure and the notifica-
tion sound may stop.
- The memory button is pressed.
- The control switch is operated.
- The gear is shifted out of P (Park).
- The driving speed exceeds 2 mph (3 km/h).
- The driver's door is closed.
i
Page 115 of 557

3-26
Convenient features of your vehicle
Reattempt to do the resetting procedure again, when the reset-
ting procedure incompletely
stops or the notification sound
do not stop.
Make sure that there is no obsta- cle around the driver's seat in
advance of resetting the driver's
seat memory system.
Easy Access Function
The system will move the driver's
seat automatically as follows:
- It will move the driver’s seat rear- ward when the ignition key is
removed.
- It will move the driver’s seat for- ward when the ignition key is
inserted.
- It will move the driver’s seat rear- ward when the Engine Start/Stop
button is pressed to the OFF posi-
tion. - It will move the driver’s seat for-
ward when the Engine Start/Stop
button is pressed to the ACC or
START position.
You can activate or deactivate the
Easy Access Function from the User
Settings mode in the cluster LCD dis-
play.
'Convenience →Seat Easy Access →
Off/Normal/Extended'.
For more details, refer to "LCD
Display" in this chapter.
NOTICE
Driver should be cautious when
using this function to assure no
injury to passenger or child on
the back seat. In case of emer-
gency the driver has to stop
movement of front seat (when
easy access feature is activat-
ed) by pressing SET button or
any of the driver seat control
switches.
CAUTION
Page 118 of 557

3-29
Convenient features of your vehicle
3
Heated Steering Wheel
(if equipped)
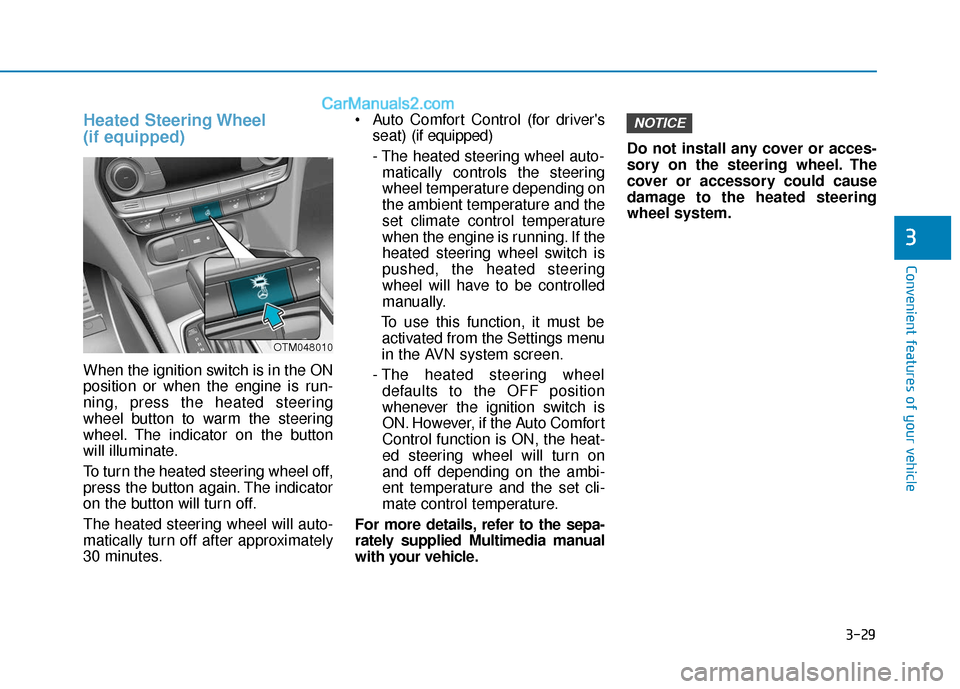
When the ignition switch is in the ON
position or when the engine is run-
ning, press the heated steering
wheel button to warm the steering
wheel. The indicator on the button
will illuminate.
To turn the heated steering wheel off,
press the button again. The indicator
on the button will turn off.
The heated steering wheel will auto-
matically turn off after approximately
30 minutes. Auto Comfort Control (for driver's
seat) (if equipped)
- The heated steering wheel auto- matically controls the steering
wheel temperature depending on
the ambient temperature and the
set climate control temperature
when the engine is running. If the
heated steering wheel switch is
pushed, the heated steering
wheel will have to be controlled
manually.
To use this function, it must be activated from the Settings menu
in the AVN system screen.
- The heated steering wheel defaults to the OFF position
whenever the ignition switch is
ON. However, if the Auto Comfort
Control function is ON, the heat-
ed steering wheel will turn on
and off depending on the ambi-
ent temperature and the set cli-
mate control temperature.
For more details, refer to the sepa-
rately supplied Multimedia manual
with your vehicle. Do not install any cover or acces-
sory on the steering wheel. The
cover or accessory could cause
damage to the heated steering
wheel system.
NOTICE
OTM048010
Page 161 of 557

3-72
Convenient features of your vehicle
Shift indicator pop-up (if equipped)
The pop-up indicates the current
gear position displayed in the cluster
for about 2 seconds when shifting
into other positions (P/R/N/D).
The shift indicator pop-up function
can be activated or deactivated from
the User Settings mode in the cluster
LCD display.
Warning and Indicator LightsInformation
Make sure that all warning lights are
OFF after starting the engine. If any
light is still ON, this indicates a situa-
tion that needs attention.
Seat Belt Warning Light
This warning light informs the driver
that the seat belt is not fastened.
For more information, refer to
"Seat Belts" in chapter 2.
Air Bag Warning Light
This warning light illuminates:
When you set the ignition switch orthe Engine Start/Stop button to the
ON position.
- The air bag warning light illumi-nates for about 6 seconds and
then turns off when all checks
have been performed
The air bag warning light will remain illuminated if there is a
malfunction with the Safety
Restraint System (SRS) air bag
operation.
If this occurs, have the vehicle
inspected by an authorized
HYUNDAI dealer.
i
OAD048561N
■
Type A
Page 192 of 557

3-103
Convenient features of your vehicle
3
ItemsExplanation
Seat Easy Access
The seat easy access function is deactivated.
Normal / Extended: When you turn off the engine, the driver's seat will automatically moverearward short (Normal) or long (Extended) for you to enter or exit the vehicle more comfort-
ably.
For more details, refer to "Driver Position Memory System" in this chapter.
Rear Seat AlertTo activate or deactivate the Rear Seat Alert.
For more details, refer to "Rear Occupant Alert (ROA) system" in this chapter.
Welcome Light
The welcome light turns on automatically when the vehicle is approached with the smart key.
For more details, refer to ''Welcome System'' in this chapter.
Wireless Charging SystemTo activate or deactivate the wireless charging system in the front seat.
For more details, refer to "Wireless Charging System" in this chapter.
Wiper/Lights DisplayTo activate or deactivate the Wiper/Light mode.
When activated, the LCD display shows the selected Wiper/Light mode whenever you change
the mode.
Auto Rear Wiper (in R)To activate or deactivate the rear wiper while the vehicle is in reverse with the front wiper ON.
Gear Position Pop-upTo activate or deactivate the gear position pop-up.
When activated, the gear position will be displayed in the cluster LCD display.
Icy Road WarningTo activate or deactivate the Icy Road Warning function.
6. Convenience
❈ The information provided may differ depending on which functions are applicable to your vehicle.
Page 199 of 557

3-110
Convenient features of your vehicle
The Head-Up Display is an optional
feature that allows the driver to view
information projected onto a trans-
parent screen while still keeping your
eyes safely on the road ahead while
driving.
Precautions while using the head up display
It may sometimes be difficult to read
information on the head up display in
the following situations.
- The driver is improperly positioned
in the driver's seat.
- The driver wears polarizing-filter sunglasses.
- An object is located above the head up display cover.
- The vehicle is driven on a wet road.
- Any improper lighting accessory is installed inside the vehicle, or there
is incoming light from outside of
the vehicle.
- The driver wears glasses.
- The driver wears contact lenses.
When it is difficult to read the head
up display information, adjust the
head up display angle or the head up
display brightness level in the User
Settings mode. For more details,
refer to "LCD Display" in this chapter. When replacing the front wind-
shield glass of the vehicle
equipped with the head up dis-
play, replace it with a windshield
glass designed for the head up
display operation. Otherwise,
duplicated images may be dis-
played on the windshield glass.
NOTICE
H H
E
EA
A D
D
U
U P
P
D
D I
IS
S P
P L
LA
A Y
Y
(
( H
H U
U D
D)
)
(
( I
IF
F
E
E Q
Q U
UI
IP
P P
PE
ED
D )
)
OTMA048044
Do not tint the front wind-
shield glass or add other
types of metallic coating.
Otherwise, the head up dis-
play image may be invisible.
Do not place any accessories
on the crash pad or attach any
objects on the windshield
glass.
The Blind-spot Collision
Warning (BCW) system warn-
ings on the head up display
are supplemental. Do not sole-
ly depend on them to change
lanes. Always take a look
around before changing lanes.
WARNING