2020 Hyundai Santa Fe Warning lights
[x] Cancel search: Warning lightsPage 320 of 557

5-46
The ISG system helps reduce fuel
consumption and exhaust gas emis-
sions by automatically shutting down
the engine, when the vehicle is at a
standstill (i.e. red stop light, stop
sign, and traffic jam).
The engine is automatically started
upon satisfying the starting condi-
tions.
The ISG system is always active,
when the engine is running.
Information
When the engine is automatically
started by the ISG system, some warn-
ing lights (i.e. ABS, ESC, ESC OFF,
EPS, and parking brake warning
light) may illuminate for a few sec-
onds due to the low battery voltage.
However, it does not indicate a mal-
function with the ISG system.
To Activate the ISG System
Prerequisite for activation
The ISG system operates in the fol-
lowing situations.
The driver's seatbelt is fastened
The driver's door and hood areclosed
The brake vacuum pressure is adequate
The battery sensor is activated and the battery is sufficiently
charged
Outside temperature is not too low or too high
The vehicle is driven over a con- stant speed and stops
The climate control system satis- fies the conditions
The vehicle is sufficiently warmed up
The incline is gradual
The steering wheel is turned less than 180 degrees and then the
vehicle stops
Information
The ISG system is
not activated, when
the prerequisites to
activate the ISG sys-
tem are unsatisfied.
In this case, the ISG
OFF button indicator illuminates,
and the auto stop indicator ( )
illuminates in yellow on the instru-
ment cluster.
• When the above indicator remains illuminated on the instrument clus-
ter, we recommend that you have
the ISG system checked by an
authorized HYUNDAI dealer.
i
i
I
IS
S G
G
(
( I
ID
D L
LE
E
S
S T
T O
O P
P
A
A N
N D
D
G
G O
O )
)
S
S Y
Y S
ST
T E
EM
M
(
( I
IF
F
E
E Q
Q U
UI
IP
P P
PE
ED
D )
)
Driving your vehicle
•
Page 410 of 557
5-136
Driving your vehicle
Safety chains
You should always attach chains
between your vehicle and your trail-
er. Cross the safety chains under the
tongue of the trailer so that the
tongue will not drop to the road if it
becomes separated from the hitch.
Instructions about safety chains may
be provided by the hitch manufactur-
er or trailer manufacturer. Follow the
manufacturer’s recommendation for
attaching safety chains. Always leave
just enough slack so you can turn
with your trailer. And, never allow
safety chains to drag on the ground.
Trailer brakes
If your trailer is equipped with a brak-
ing system, make sure it conforms to
federal and/or local regulations and
that it is properly installed and oper-
ating correctly.
If your trailer weighs more than the
maximum trailer weight without trail-
er brakes loaded, then it needs its
own brakes and they must be ade-
quate. Be sure to read and follow the
instructions for the trailer brakes so
you’ll be able to install, adjust and
maintain them properly. Do not tap
into your vehicle's brake system.
Trailer brakes must be applied sepa-
rately from your vehicle's brake sys-
tem.
Driving with a trailer
Towing a trailer requires a certain
amount of experience. Before setting
out for the open road, you must get
to know your trailer. Acquaint your-
self with the feel of handling and
braking with the added weight of the
trailer. And always keep in mind that
the vehicle you are driving is now
longer and not nearly as responsive
as your vehicle is by itself.
Before you start, check the trailer
hitch and platform, safety chains,
electrical connector(s), lights, tires
and brakes.
During your trip, occasionally check
to be sure that the load is secure,
and that the lights and trailer brakes
are still working.
Do not use a trailer with its own
brakes unless you are absolute-
ly certain that you have properly
set up the brake system. Use an
experienced, competent trailer
shop for this work.
WARNING
Page 411 of 557
5-137
Driving your vehicle
5
Distance
Stay at least twice as far behind the
vehicle ahead as you would when
driving your vehicle without a trailer.
This can help you avoid situations
that require heavy braking and sud-
den turns.
Passing
You will need more passing distance
up ahead when you’re towing a trail-
er. And, because of the increased
vehicle length, you’ll need to go
much farther beyond the passed
vehicle before you can return to your
lane.
Backing up
Hold the bottom of the steering
wheel with one hand. Then, to move
the trailer to the left, move your hand
to the left. To move the trailer to the
right, move your hand to the right.
Always back up slowly and, if possi-
ble, have someone guide you.
Making turns
When you’re turning with a trailer,
make wider turns than normal. Do
this so your trailer won't strike soft
shoulders, curbs, road signs, trees, or
other objects. Avoid jerky or sudden
maneuvers. Signal well in advance.
Turn signals
When you tow a trailer, your vehicle
has to have a different turn signal
flasher and extra wiring. The green
arrows on your instrument panel will
flash whenever you signal a turn or
lane change. Properly connected,
the trailer lights will also flash to alert
other drivers you're about to turn,
change lanes, or stop.
When towing a trailer, the green
arrows on your instrument panel will
flash for turns even if the bulbs on the
trailer are burned out. Thus, you may
think drivers behind you are seeing
your signals when, in fact, they are
not. It’s important to check occasion-
ally to be sure the trailer bulbs are still
working. You must also check the
lights every time you disconnect and
then reconnect the wires.Do not connect a trailer lighting
system directly to your vehi-
cle’s lighting system. Use an
approved trailer wiring harness.
Failure to do so could result in
damage to the vehicle electrical
system and/or personal injury.
Consult an authorized HYUNDAI
dealer for assistance.
WARNING
Page 413 of 557
5-139
Driving your vehicle
5
5. Start the vehicle, apply the brakes,shift to neutral, release the park-
ing brake and slowly release the
brakes until the trailer chocks
absorb the load.
6. Reapply the brakes and parking brakes.
7. Move the shift lever to P (Park).
8. Shut off the vehicle and release the vehicle brakes but leave the
parking brake set.Driving the vehicle after it hasbeen parked on a hill
1. With the gear shift lever in P
(Park), apply the brakes and hold
the brake pedal down while per-
forming the following:
and
2. Slowly remove your foot from the brake pedal.
3. Drive slowly until the trailer is clear of the chocks.
4. Stop and have someone pick up and store the chocks.
Maintenance when trailer tow-
ing
Your vehicle will need service more
often when you regularly pull a trail-
er. Important items to pay particular
attention to include engine oil, auto-
matic transmission fluid, axle lubri-
cant and cooling system fluid. Brake
condition is another important item to
frequently check. If you’re trailering,
it’s a good idea to review these items
before you start your trip. Don't forget
to also maintain your trailer and
hitch. Follow the maintenance sched-
ule that accompanied your trailer and
check it periodically. Preferably,
inspect the vehicle and trailer at the
start of each day's driving. Inspect
the hitch mounting to make sure the
hitch is properly secured to the vehi-
cle. Inspect the trailer electrical
wiring to make sure brake lights, turn
signal lights, running lights, and haz-
ard lights are working properly.
Do not get out of the vehicle
without the parking brake
firmly set. If you have left the
engine running, the vehicle
can move suddenly. You and
others could be seriously or
fatally injured.
Do not apply the accelerator
pedal to hold the vehicle on
an uphill.
WARNING
Page 422 of 557
6-2
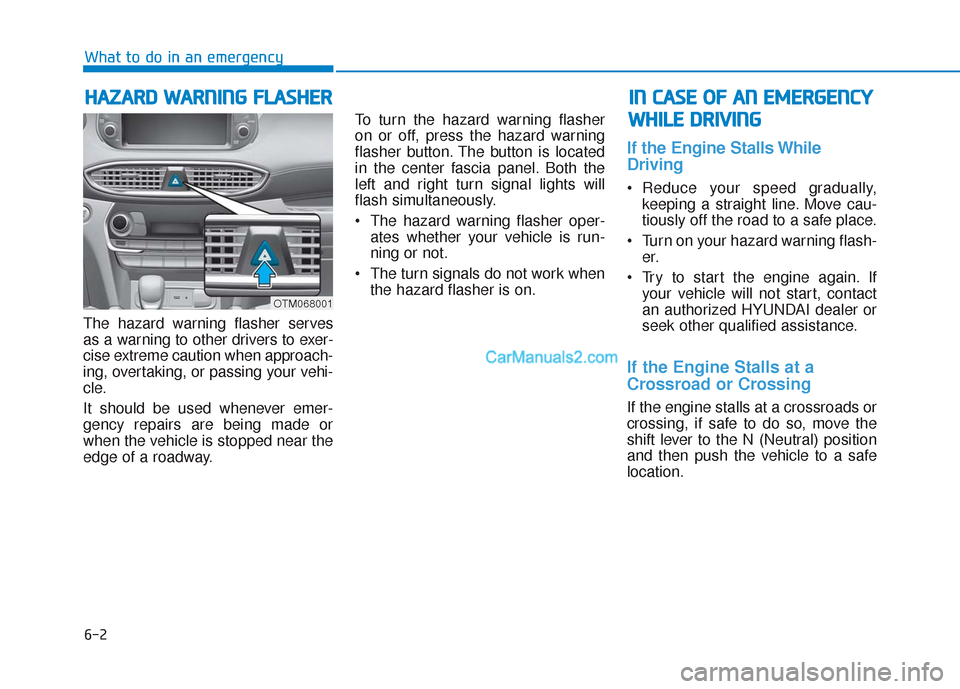
The hazard warning flasher serves
as a warning to other drivers to exer-
cise extreme caution when approach-
ing, overtaking, or passing your vehi-
cle.
It should be used whenever emer-
gency repairs are being made or
when the vehicle is stopped near the
edge of a roadway.To turn the hazard warning flasher
on or off, press the hazard warning
flasher button. The button is located
in the center fascia panel. Both the
left and right turn signal lights will
flash simultaneously.
• The hazard warning flasher oper-
ates whether your vehicle is run-
ning or not.
The turn signals do not work when the hazard flasher is on.
If the Engine Stalls While
Driving
Reduce your speed gradually,keeping a straight line. Move cau-
tiously off the road to a safe place.
Turn on your hazard warning flash- er.
Try to start the engine again. If your vehicle will not start, contact
an authorized HYUNDAI dealer or
seek other qualified assistance.
If the Engine Stalls at a
Crossroad or Crossing
If the engine stalls at a crossroads or
crossing, if safe to do so, move the
shift lever to the N (Neutral) position
and then push the vehicle to a safe
location.
H HA
AZ
ZA
A R
RD
D
W
W A
AR
RN
N I
IN
N G
G
F
F L
LA
A S
SH
H E
ER
R
What to do in an emergency
I
IN
N
C
C A
A S
SE
E
O
O F
F
A
A N
N
E
E M
M E
ER
R G
G E
EN
N C
CY
Y
W
W H
HI
IL
L E
E
D
D R
RI
IV
V I
IN
N G
G
OTM068001
Page 448 of 557
Owner Maintenance Schedule
When you stop for fuel:
• Check the engine oil level.
Check the coolant level in theengine coolant reservoir.
Check the windshield washer fluid level.
Check the tire for low or under- inflated tires.
While operating your vehicle:
Note any changes in the sound ofthe exhaust or any smell of
exhaust fumes in the vehicle.
Check for vibrations in the steer- ing wheel. Notice if there is any
increased steering effort or loose-
ness in the steering wheel, or
change in its straight-ahead posi-
tion.
Notice if your vehicle constantly turns slightly or "pulls" to one side
when traveling on smooth, level
road.
When stopping, listen and check for unusual sounds, pulling to one
side, increased brake pedal travel
or "hard-to-push" brake pedal.
If any slipping or changes in the operation of your transmission
occurs, check the transmission
fluid level.
Check the automatic transmission P (Park) function. Check the parking brake.
Check for fluid leaks under your
vehicle (water dripping from the air
conditioning system during or
after use is normal).
At least monthly:
Check coolant level in the enginecoolant reservoir.
Check the operation of all exterior lights, including the brake lights,
turn signals and hazard warning
flashers.
Check the inflation pressures of all tires including the spare for tires
that are worn, show uneven wear,
or are damaged.
Check for loose wheel lug nuts.
At least twice a year: (i.e., every Spring and Autumn)
Check radiator, heater and air
conditioning hoses for leaks or
damage.
Check windshield washer spray and wiper operation. Clean wiper
blades with a clean cloth damp-
ened with washer a fluid.
Be careful when checking your
engine coolant level when the
engine is hot. This may result in
coolant being blown out of the
opening and cause serious
burns and other injuries.
WARNING
Maintenance
7-6
Page 494 of 557
F
FU
U S
SE
E S
S
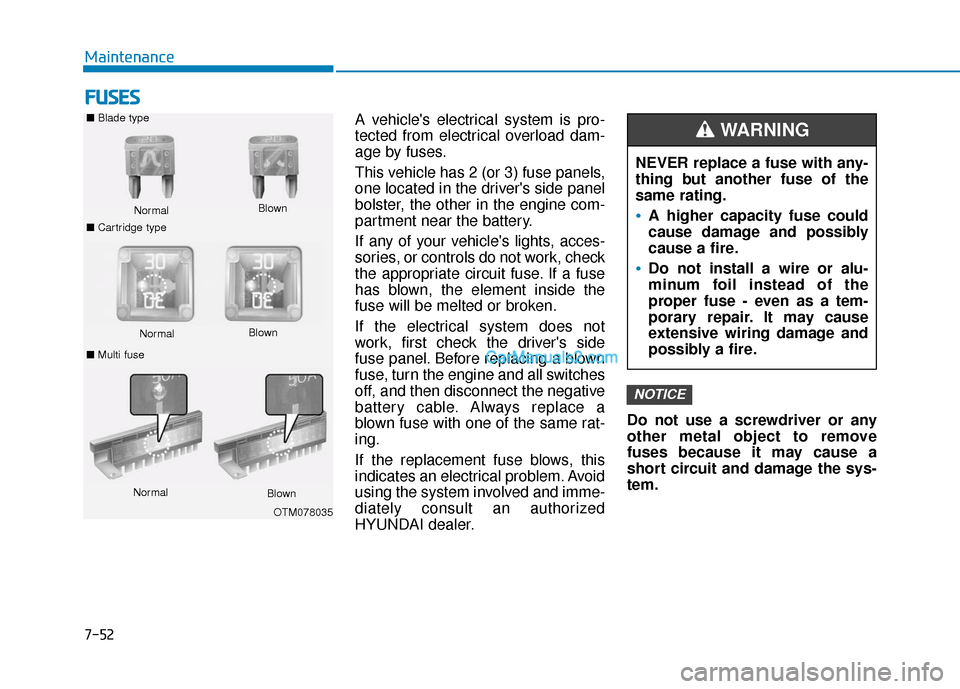
A vehicle's electrical system is pro-
tected from electrical overload dam-
age by fuses.
This vehicle has 2 (or 3) fuse panels,
one located in the driver's side panel
bolster, the other in the engine com-
partment near the battery.
If any of your vehicle's lights, acces-
sories, or controls do not work, check
the appropriate circuit fuse. If a fuse
has blown, the element inside the
fuse will be melted or broken.
If the electrical system does not
work, first check the driver's side
fuse panel. Before replacing a blown
fuse, turn the engine and all switches
off, and then disconnect the negative
battery cable. Always replace a
blown fuse with one of the same rat-
ing.
If the replacement fuse blows, this
indicates an electrical problem. Avoid
using the system involved and imme-
diately consult an authorized
HYUNDAI dealer. Do not use a screwdriver or any
other metal object to remove
fuses because it may cause a
short circuit and damage the sys-
tem.
NOTICE
NEVER replace a fuse with any-
thing but another fuse of the
same rating.
A higher capacity fuse could
cause damage and possibly
cause a fire.
Do not install a wire or alu-
minum foil instead of the
proper fuse - even as a tem-
porary repair. It may cause
extensive wiring damage and
possibly a fire.
WARNING ■
Blade type
Normal
■ Cartridge type Blown
Normal
Blown
■ Multi fuse
Normal Blown
OTM078035
Maintenance
7-52
Page 516 of 557
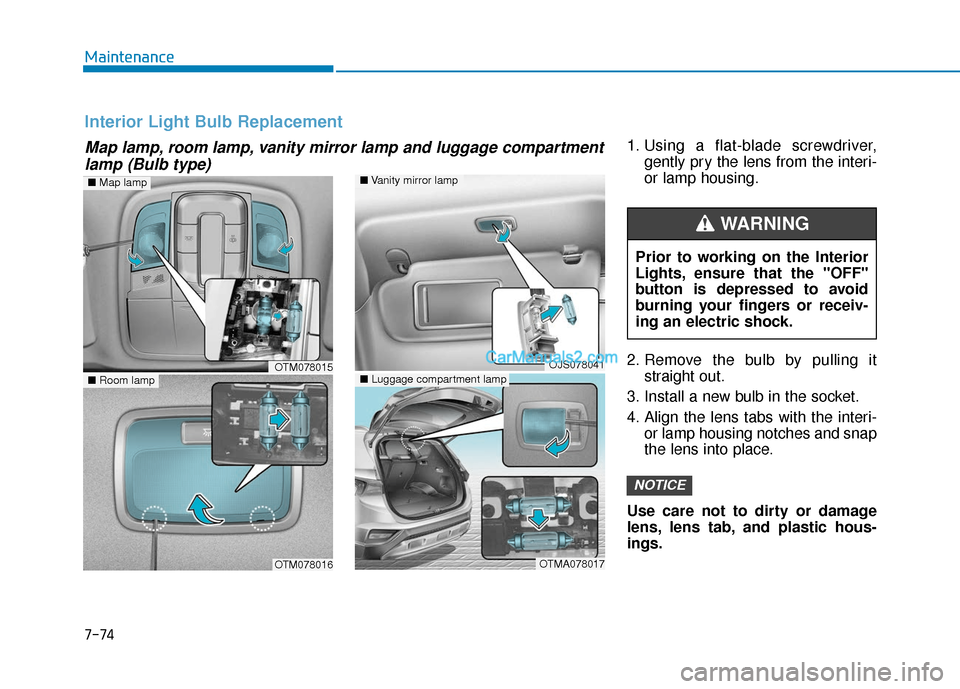
1. Using a flat-blade screwdriver,gently pry the lens from the interi-
or lamp housing.
2. Remove the bulb by pulling it straight out.
3. Install a new bulb in the socket.
4. Align the lens tabs with the interi- or lamp housing notches and snap
the lens into place.
Use care not to dirty or damage
lens, lens tab, and plastic hous-
ings.
NOTICE
Map lamp, room lamp, vanity mirror lamp and luggage compartment lamp (Bulb type)
Interior Light Bulb Replacement
■ Vanity mirror lamp
■ Luggage compartment lampOJS078041
OTMA078017
■Room lamp
OTM078016
OTM078015
■Map lamp
Prior to working on the Interior
Lights, ensure that the "OFF"
button is depressed to avoid
burning your fingers or receiv-
ing an electric shock.
WARNING
Maintenance
7-74