2020 Hyundai Santa Fe Door Lock
[x] Cancel search: Door LockPage 149 of 557

3-60
Convenient features of your vehicle
Information
The Smart Liftgate will NOT operate
when:
• Any door is open, or all doors areclosed but not locked
• The smart key is detected within 15 seconds from when the doors were
closed and locked
• For vehicles equipped with illumi- nated exterior front door handles, if
the smart key is detected within 15
seconds from when the doors were
closed and locked or if the smart
key is within 60 inches (1.5m) from
the front door handles
• The smart key is in the vehicle. 1.Setting
To activate the Smart Liftgate, go to
User Settings mode and select
Smart Liftgate in the cluster LCD dis-
play.
For more details, refer to "LCD
Display" in this chapter.
2.Detect and Alert
The Smart Liftgate detecting area
extends approximately 20-40 in (50-
100 cm) behind the vehicle. If you
are positioned in the detecting area
and are carrying the smart key, the
hazard warning lights will blink and
the chime will sound to alert you that
the smart liftgate will open.
Information
Do not approach the detecting area if
you do not want the liftgate to open. If
you have unintentionally entered the
detecting area and the hazard warn-
ing lights and chime starts to operate,
move away from the area behind the
vehicle with the smart key. The lift-
gate will remain closed.3. Automatic opening
After the hazard warning lights blink
and the chime sounds 6 times, the
power liftgate will open.
i
i
Make certain that you close
the liftgate before driving your
vehicle.
Make sure there are no people
or objects around the liftgate
before opening or closing the
liftgate.
Make sure objects in the rear
cargo area do not come out
when opening the liftgate,
especially if the vehicle is
parked on a grade or incline.
If you keep your vehicle
parked and locked on your
driveway, you may want to
temporarily deactivate the
Smart Liftgate system.
Otherwise, standing at the
rear of the vehicle with the
smart key may cause the lift-
gate to open unintentionally.
WARNING
Page 150 of 557

3-61
Convenient features of your vehicle
3
How to deactivate the SmartLiftgate function using thesmart key
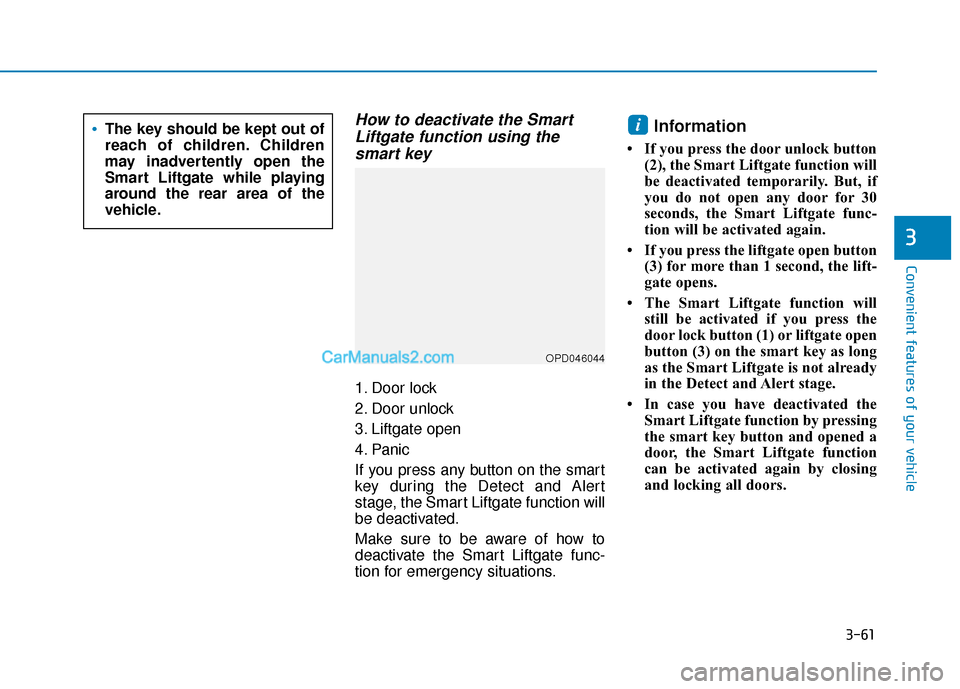
1. Door lock
2. Door unlock
3. Liftgate open
4. Panic
If you press any button on the smart
key during the Detect and Alert
stage, the Smart Liftgate function will
be deactivated.
Make sure to be aware of how to
deactivate the Smart Liftgate func-
tion for emergency situations.
Information
• If you press the door unlock button
(2), the Smart Liftgate function will
be deactivated temporarily. But, if
you do not open any door for 30
seconds, the Smart Liftgate func-
tion will be activated again.
• If you press the liftgate open button (3) for more than 1 second, the lift-
gate opens.
• The Smart Liftgate function will still be activated if you press the
door lock button (1) or liftgate open
button (3) on the smart key as long
as the Smart Liftgate is not already
in the Detect and Alert stage.
• In case you have deactivated the Smart Liftgate function by pressing
the smart key button and opened a
door, the Smart Liftgate function
can be activated again by closing
and locking all doors.
iThe key should be kept out of
reach of children. Children
may inadvertently open the
Smart Liftgate while playing
around the rear area of the
vehicle.
OPD046044
Page 151 of 557

3-62
Convenient features of your vehicle
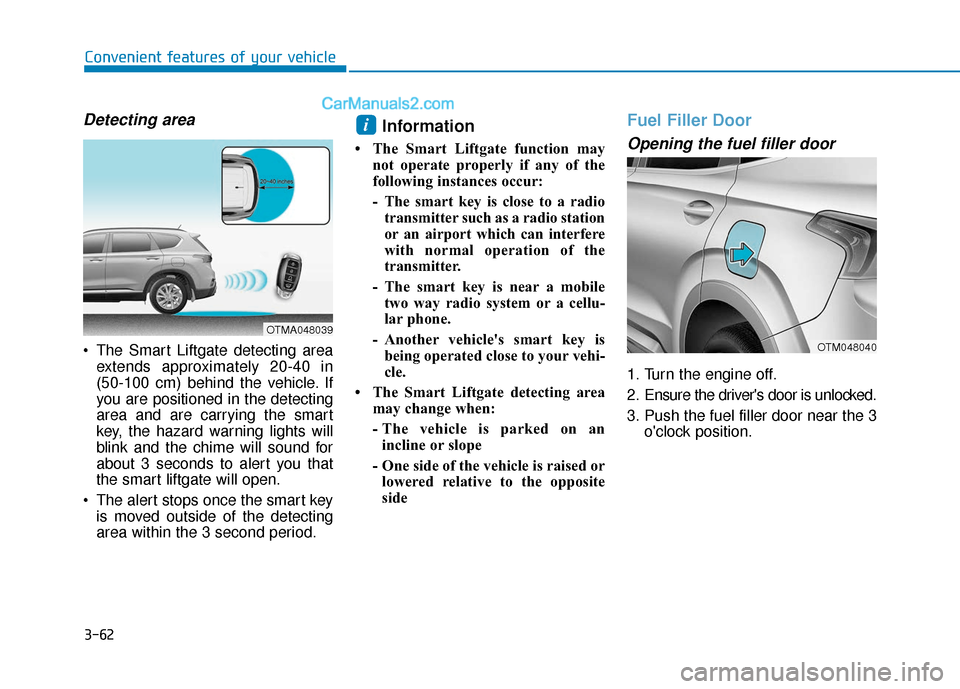
Detecting area
The Smart Liftgate detecting areaextends approximately 20-40 in
(50-100 cm) behind the vehicle. If
you are positioned in the detecting
area and are carrying the smart
key, the hazard warning lights will
blink and the chime will sound for
about 3 seconds to alert you that
the smart liftgate will open.
The alert stops once the smart key is moved outside of the detecting
area within the 3 second period.
Information
• The Smart Liftgate function may not operate properly if any of the
following instances occur:
- The smart key is close to a radiotransmitter such as a radio station
or an airport which can interfere
with normal operation of the
transmitter.
- The smart key is near a mobile two way radio system or a cellu-
lar phone.
- Another vehicle's smart key is being operated close to your vehi-
cle.
• The Smart Liftgate detecting area may change when:
- The vehicle is parked on anincline or slope
- One side of the vehicle is raised or lowered relative to the opposite
side
Fuel Filler Door
Opening the fuel filler door
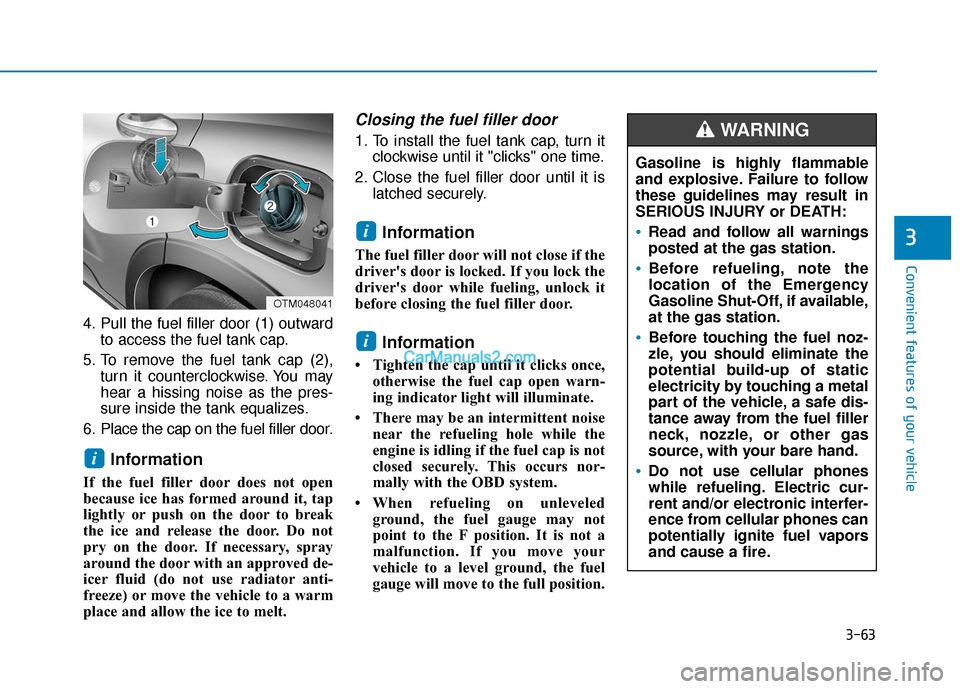
1. Turn the engine off.
2. Ensure the driver's door is unlocked.
3. Push the fuel filler door near the 3 o'clock position.
i
OTMA048039
OTM048040
Page 152 of 557

3-63
Convenient features of your vehicle
3
Gasoline is highly flammable
and explosive. Failure to follow
these guidelines may result in
SERIOUS INJURY or DEATH:
Read and follow all warnings
posted at the gas station.
Before refueling, note the
location of the Emergency
Gasoline Shut-Off, if available,
at the gas station.
Before touching the fuel noz-
zle, you should eliminate the
potential build-up of static
electricity by touching a metal
part of the vehicle, a safe dis-
tance away from the fuel filler
neck, nozzle, or other gas
source, with your bare hand.
Do not use cellular phones
while refueling. Electric cur-
rent and/or electronic interfer-
ence from cellular phones can
potentially ignite fuel vapors
and cause a fire.
WARNING
4. Pull the fuel filler door (1) outwardto access the fuel tank cap.
5. To remove the fuel tank cap (2), turn it counterclockwise. You may
hear a hissing noise as the pres-
sure inside the tank equalizes.
6. Place the cap on the fuel filler door.
Information
If the fuel filler door does not open
because ice has formed around it, tap
lightly or push on the door to break
the ice and release the door. Do not
pry on the door. If necessary, spray
around the door with an approved de-
icer fluid (do not use radiator anti-
freeze) or move the vehicle to a warm
place and allow the ice to melt.
Closing the fuel filler door
1. To install the fuel tank cap, turn it clockwise until it "clicks" one time.
2. Close the fuel filler door until it is latched securely.
Information
The fuel filler door will not close if the
driver's door is locked. If you lock the
driver's door while fueling, unlock it
before closing the fuel filler door.
Information
• Tighten the cap until it clicks once,otherwise the fuel cap open warn-
ing indicator light will illuminate.
• There may be an intermittent noise near the refueling hole while the
engine is idling if the fuel cap is not
closed securely. This occurs nor-
mally with the OBD system.
• When refueling on unleveled ground, the fuel gauge may not
point to the F position. It is not a
malfunction. If you move your
vehicle to a level ground, the fuel
gauge will move to the full position.
i
i
i
OTM048041
Page 181 of 557

3-92
Convenient features of your vehicle
Modes SymbolExplanation
Trip Computer The Trip Computer mode displays driving information such as the tripmeter, fuel economy,
etc.For details, refer to "Trip Computer" in this chapter.
Turn By Turn (TBT)
(if equipped)This mode displays the state of the navigation.
Assist
The Driver Assist mode displays the status of the following features:
- Smart Cruise Control (SCC) system
- Lane Keeping Assist (LKA) system
- Driver Attention Warning (DAW) system
- Tire pressure
- Traction force distribution status of front-wheels and rear-wheels
For more information, refer to "Smart Cruise Control with Stop & Go)", "Lane
Keeping Assist (LKA) system", "Driver Attention Warning (DAW) system",
"Traction force distribution status of front-wheels and rear-wheels" in chapter 5
and "Tire Pressure Monitoring System (TPMS)" in chapter 6.
User SettingsThe User Settings mode provides user options for a variety of settings including door
lock/unlock features, convenience features, driver assistance settings, etc.
Master WarningThe Master Warning mode displays warning messages related to the vehicle when one
or more systems is not operating normally.
The information provided may differ depending on which functions are applicable to your vehicle.
LCD Display Modes
Page 184 of 557

3-95
Convenient features of your vehicle
3
- Smart Cruise Control with Stop &Go radar blocked (if equipped)
- Lamp malfunction
- High Beam Assist malfunction (if equipped)
- Tire Pressure Monitoring System (TPMS) malfunction
The Master Warning Light illumi-
nates if one or more of the above
warning situations occur. At this time,
the LCD Modes Icon will change
from ( ) to ( ).
If the warning situation is solved, the
master warning light will be turned
off and the LCD Modes Icon will be
changed back to its previous icon
().User settings mode
In this mode, you can change the
settings of the instrument cluster,
doors, lamps, etc.
1. Head-up display
2. Driver Assistance
3. Door
4. Lights
5. Sound
6. Convenience
7. Service interval
8. Other
9. Language
10. Reset The information provided may differ
depending on which functions are
applicable to your vehicle.
OIK047148L
Page 189 of 557

3-100
Convenient features of your vehicle
ItemsExplanation
Auto Lock
The auto door lock operation will be canceled.
All doors will be automatically locked when the vehicle speed exceeds 9.3mph (15 km/h).
All doors will be automatically locked if the vehicle is shifted from the P (Park) position to the R (Reverse), N (Neutral), or D (Drive) position.
Auto Unlock
The auto door unlock operation will be canceled.
All doors will be automatically unlocked when the ignition key is removed from thekey ignition switch (if equipped with remote key).
All doors will be automatically unlocked when the Engine Start/Stop button is set to the OFF position. (if equipped with smart key)
All doors will be automatically unlocked if the automatic transmission is shifted to the P (Park) position.
Two Press Unlock
The two press unlock function will be deactivated. Therefore, all doors will unlock if thedoor unlock button is pressed.
Only the driver's door will unlock if the door unlock button is pressed. When the door unlock button is pressed again within 4 seconds, the remaining doors will unlock.
Horn Feedback
To activate or deactivate the horn feedback.
If the horn feedback is activated, after locking the door by pressing the lock button on the remote
key, and pressing it again within 4 seconds, the horn feedback sound will operate once to indi-
cate that all doors are locked (if equipped with remote key).
3. Door
Page 208 of 557

3-119
Convenient features of your vehicle
3
Headlamp delay function
If the key is removed from the ignition
switch or placed in the ACC position
or the LOCK/OFF position with the
headlamps ON, the headlamps
(and/or parking lamps) remain on for
about 5 minutes. However, if the dri-
ver's door is opened and closed, the
headlights are turned off after 15
seconds. Also, with the engine off if
the driver's door is opened and
closed, the headlamps (and/or park-
ing lamps) are turned off after 15
seconds.
The headlamps (and/or parking
lamps) can be turned off by pressing
the lock button on the remote key or
smart key twice or turning the head-
lamp switch to the OFF or AUTO
position.
You can activate or deactivate the
Headlamp Delay function from the
User Settings mode in the LCD dis-
play.
For more details, refer to the "LCD
Display" section in this chapter.If the driver exits the vehicle
through another door besides the
driver door, the battery saver func-
tion does not operate and the
headlamp delay function does not
turn OFF automatically.
This may cause the battery to dis-
charge. To avoid battery dis-
charge, turn OFF the headlamps
manually from the headlamp
switch before exiting the vehicle.
Headlamp leveling device
(if equipped)
It automatically adjusts the head-
lamp beam level according to the
number of passengers and loading
weight in the luggage area. It also
adjusts to the appropriate headlamp
beam level for various situations.
NOTICE
If the function does not work
properly, have the system
inspected by an authorized
HYUNDAI dealer. Do not attempt
to inspect or replace the wiring
yourself.
WARNING