2020 Hyundai Santa Fe Back up
[x] Cancel search: Back upPage 95 of 557
3-6
Convenient features of your vehicle
Mechanical key
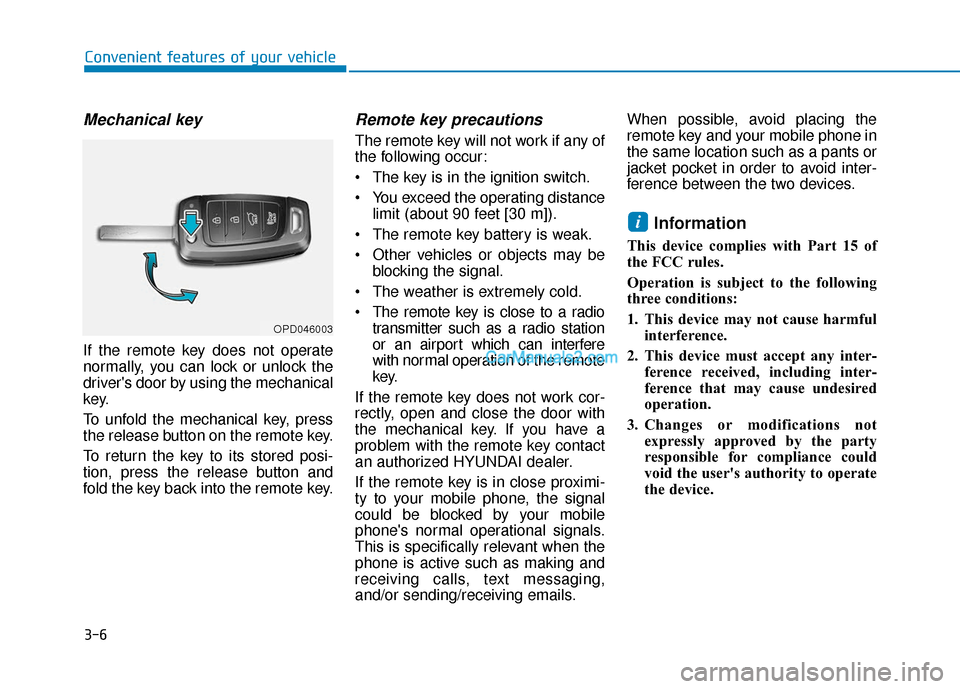
If the remote key does not operate
normally, you can lock or unlock the
driver's door by using the mechanical
key.
To unfold the mechanical key, press
the release button on the remote key.
To return the key to its stored posi-
tion, press the release button and
fold the key back into the remote key.
Remote key precautions
The remote key will not work if any of
the following occur:
• The key is in the ignition switch.
You exceed the operating distancelimit (about 90 feet [30 m]).
The remote key battery is weak.
Other vehicles or objects may be blocking the signal.
The weather is extremely cold.
The remote key is close to a radio transmitter such as a radio station
or an airport which can interfere
with normal operation of the remote
key.
If the remote key does not work cor-
rectly, open and close the door with
the mechanical key. If you have a
problem with the remote key contact
an authorized HYUNDAI dealer.
If the remote key is in close proximi-
ty to your mobile phone, the signal
could be blocked by your mobile
phone's normal operational signals.
This is specifically relevant when the
phone is active such as making and
receiving calls, text messaging,
and/or sending/receiving emails. When possible, avoid placing the
remote key and your mobile phone in
the same location such as a pants or
jacket pocket in order to avoid inter-
ference between the two devices.
Information
This device complies with Part 15 of
the FCC rules.
Operation is subject to the following
three conditions:
1. This device may not cause harmful
interference.
2. This device must accept any inter- ference received, including inter-
ference that may cause undesired
operation.
3. Changes or modifications not expressly approved by the party
responsible for compliance could
void the user's authority to operate
the device.
i
OPD046003
Page 107 of 557

3-18
Convenient features of your vehicle
Auto UNLOCK - Enable on Shift
When this feature is set in the LCD
cluster display, all the doors will be
unlocked automatically when the
vehicle is shifted back into P (Park).
For more information on these
features, refer to the LCD Display
section later in this chapter.
Additional Unlock SafetyFeature - Air Bag Deployment
As an additional safety feature, all
doors will be automatically unlocked
when an impact causes the air bags
to deploy.
Child-Protector Rear Door Locks
(if equipped)
The child safety lock is provided to
help prevent children seated in the
rear from accidentally opening the
rear doors. The rear door safety locks
should be used whenever children
are in the vehicle.
The child safety lock is located on
the edge of each rear door. When the
child safety lock is in the lock posi-
tion, the rear door will not open if the
inner door handle is pulled.
To lock the child safety lock, insert a
small flat blade tool (like a screwdriv-
er or similar) (1) into the slot and turn
it to the lock position as shown. To allow a rear door to be opened
from inside the vehicle, unlock the
child safety lock.
OTM048005
If children accidently open the
rear doors while the vehicle is
in motion, they could fall out of
the vehicle. The rear door safety
locks should always be used
whenever children are in the
vehicle.
WARNING
Page 114 of 557

3-25
Convenient features of your vehicle
3
Recalling Positions from
Memory
1. Shift to P (Park) while the ignitionswitch is in the ON position.
2. Press the desired memory button (1 or 2). The system will beep
once, and then the driver's seat
position, side view mirror position,
instrument panel illumination
intensity and head-up display
height/brightness will automatical-
ly adjust to the stored positions.
3. "Driver 1 (or 2) settings applied" will appear on the cluster LCD dis-
play.
Information
• While recalling the "1" memoryposition, pressing the SET or 1 but-
ton temporarily stops the adjust-
ment of the recalled memory posi-
tion. Pressing the 2 button recalls
the "2" memory position. • While recalling the "2" memory
position, pressing the SET or 2 but-
ton temporarily stops the adjust-
ment of the recalled memory posi-
tion. Pressing the 1 button recalls
the "1" memory position.
• While recalling the stored positions, pressing one of the control buttons
for the driver's seat, side view mir-
ror, instrument panel illumination
or head-up display will cause the
movement of that component to stop
and move in the direction that the
control button is pressed.
Resetting the Driver's Seat
Memory System
Take the following procedures to reset
the driver's seat memory system,
when it does not operate properly.
To reset the driver's seat memo-ry system
1. Place the ignition switch to the ON
position, shift to P (Park), and
open the driver's door. 2. Operate the control switch to set
the driver's seat and seatback to
the foremost position.
3. Simultaneously press the SET button and push forward the seat
movement switch over 2 seconds.
While resetting the driver's seatmemory system
1. It starts with the notification sound.
2. The driver's seat and seatback is
adjusted to the rearward position
with the notification sound.
3. The driver's seat and seatback is re-adjusted to the default position
(central position) with the notifica-
tion sound.
However, in the following cases, the
resetting procedure and the notifica-
tion sound may stop.
- The memory button is pressed.
- The control switch is operated.
- The gear is shifted out of P (Park).
- The driving speed exceeds 2 mph (3 km/h).
- The driver's door is closed.
i
Page 115 of 557
3-26
Convenient features of your vehicle
Reattempt to do the resetting procedure again, when the reset-
ting procedure incompletely
stops or the notification sound
do not stop.
Make sure that there is no obsta- cle around the driver's seat in
advance of resetting the driver's
seat memory system.
Easy Access Function
The system will move the driver's
seat automatically as follows:
- It will move the driver’s seat rear- ward when the ignition key is
removed.
- It will move the driver’s seat for- ward when the ignition key is
inserted.
- It will move the driver’s seat rear- ward when the Engine Start/Stop
button is pressed to the OFF posi-
tion. - It will move the driver’s seat for-
ward when the Engine Start/Stop
button is pressed to the ACC or
START position.
You can activate or deactivate the
Easy Access Function from the User
Settings mode in the cluster LCD dis-
play.
'Convenience →Seat Easy Access →
Off/Normal/Extended'.
For more details, refer to "LCD
Display" in this chapter.
NOTICE
Driver should be cautious when
using this function to assure no
injury to passenger or child on
the back seat. In case of emer-
gency the driver has to stop
movement of front seat (when
easy access feature is activat-
ed) by pressing SET button or
any of the driver seat control
switches.
CAUTION
Page 117 of 557
3-28
Convenient features of your vehicle
Tilt Steering / Telescopic
Steering
When adjusting the steering wheel to
a comfortable position, adjust the
steering wheel so that it points
toward your chest, not toward your
face. Make sure you can see the
instrument cluster warning lights and
gauges. After adjusting, push the
steering wheel both up and down to
be certain it is locked in position.
Always adjust the position of the
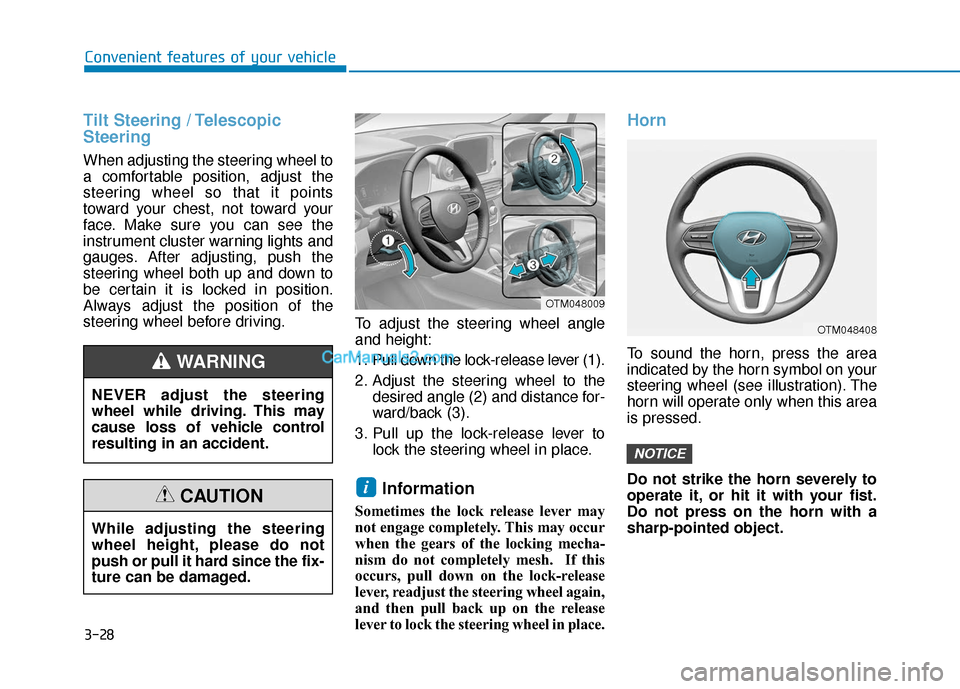
steering wheel before driving.To adjust the steering wheel angle
and height:
1. Pull down the lock-release lever (1).
2. Adjust the steering wheel to the
desired angle (2) and distance for-
ward/back (3).
3. Pull up the lock-release lever to lock the steering wheel in place.
Information
Sometimes the lock release lever may
not engage completely. This may occur
when the gears of the locking mecha-
nism do not completely mesh. If this
occurs, pull down on the lock-release
lever, readjust the steering wheel again,
and then pull back up on the release
lever to lock the steering wheel in place.
Horn
To sound the horn, press the area
indicated by the horn symbol on your
steering wheel (see illustration). The
horn will operate only when this area
is pressed.
Do not strike the horn severely to
operate it, or hit it with your fist.
Do not press on the horn with a
sharp-pointed object.
NOTICE
i
OTM048408
OTM048009
NEVER adjust the steering
wheel while driving. This may
cause loss of vehicle control
resulting in an accident.
WARNING
While adjusting the steering
wheel height, please do not
push or pull it hard since the fix-
ture can be damaged.
CAUTION
Page 122 of 557
3-33
Convenient features of your vehicle
3
Compass function
The Compass can be turned ON and
OFF and will remember the last state
when the ignition is cycled. To turn
the display feature ON/OFF:
1. Press and release the buttonwithin 1 second to turn the display
feature OFF.
2. Press and release the button again within 1 second to turn the
display back ON.
Additional options can be set with
press and hold sequences of the
button and are detailed below.
There is a difference between mag-
netic north and true north. To com-
pensate for this difference you will
need to adjust the Zone setting based
on where you live.
B520C05NF
Page 127 of 557
3-38
Convenient features of your vehicle
Information
This device complies with Part 15 of
the FCC Rules.
Operation is subject to the following
three conditions:
1. This device may not cause harmfulinterference, and
2. This device must accept any inter- ference received, including interfer-
ence that may cause undesired
operation.
3. The transceiver has been tested and complies with FCC and Industry
Canada rules. Changes or modifi-
cations not expressly approved by
the party responsible for compli-
ance could void the user's authority
to operate the device.
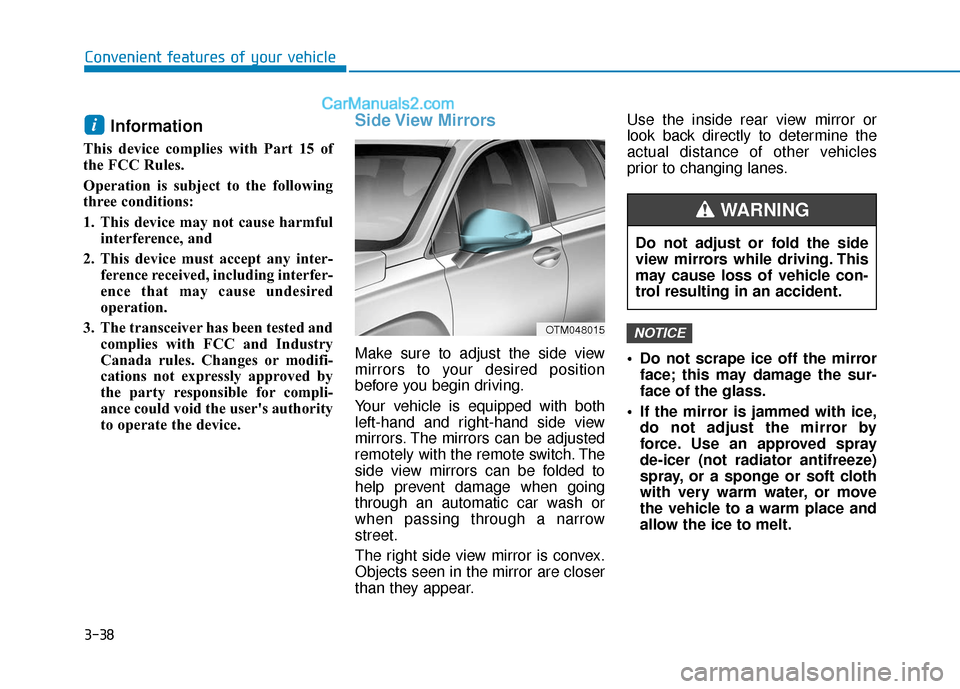
Side View Mirrors
Make sure to adjust the side view
mirrors to your desired position
before you begin driving.
Your vehicle is equipped with both
left-hand and right-hand side view
mirrors. The mirrors can be adjusted
remotely with the remote switch. The
side view mirrors can be folded to
help prevent damage when going
through an automatic car wash or
when passing through a narrow
street.
The right side view mirror is convex.
Objects seen in the mirror are closer
than they appear. Use the inside rear view mirror or
look back directly to determine the
actual distance of other vehicles
prior to changing lanes.
Do not scrape ice off the mirror
face; this may damage the sur-
face of the glass.
If the mirror is jammed with ice, do not adjust the mirror by
force. Use an approved spray
de-icer (not radiator antifreeze)
spray, or a sponge or soft cloth
with very warm water, or move
the vehicle to a warm place and
allow the ice to melt.
NOTICE
i
OTM048015
Do not adjust or fold the side
view mirrors while driving. This
may cause loss of vehicle con-
trol resulting in an accident.
WARNING
Page 135 of 557
3-46
Convenient features of your vehicle
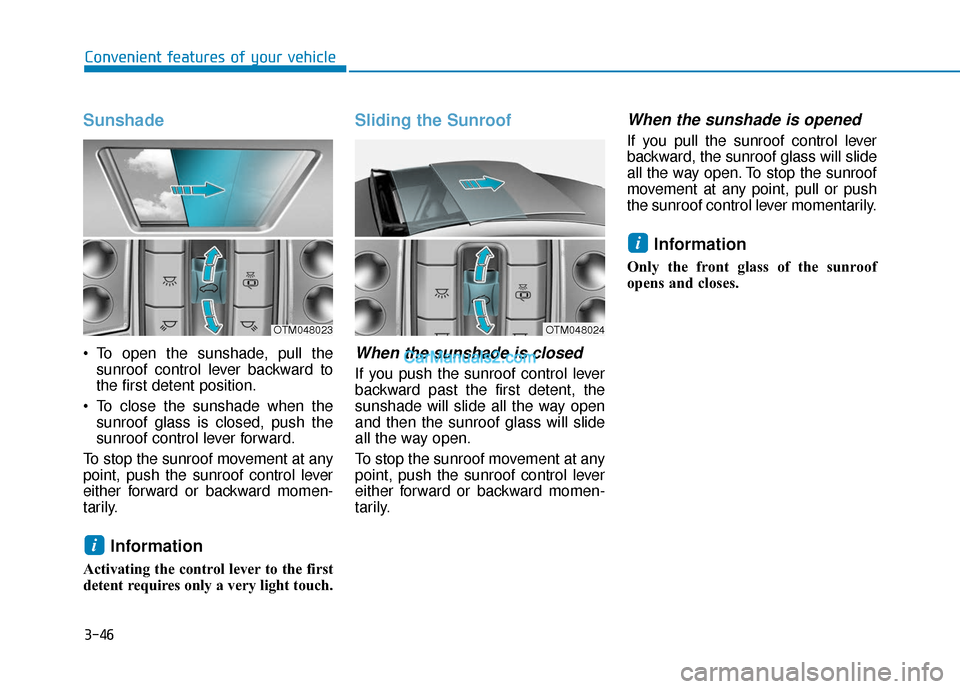
Sunshade
To open the sunshade, pull thesunroof control lever backward to
the first detent position.
To close the sunshade when the sunroof glass is closed, push the
sunroof control lever forward.
To stop the sunroof movement at any
point, push the sunroof control lever
either forward or backward momen-
tarily.
Information
Activating the control lever to the first
detent requires only a very light touch.
Sliding the Sunroof
When the sunshade is closed
If you push the sunroof control lever
backward past the first detent, the
sunshade will slide all the way open
and then the sunroof glass will slide
all the way open.
To stop the sunroof movement at any
point, push the sunroof control lever
either forward or backward momen-
tarily.
When the sunshade is opened
If you pull the sunroof control lever
backward, the sunroof glass will slide
all the way open. To stop the sunroof
movement at any point, pull or push
the sunroof control lever momentarily.
Information
Only the front glass of the sunroof
opens and closes.
i
i
OTM048024OTM048023