2020 Hyundai Santa Fe lamps
[x] Cancel search: lampsPage 449 of 557
Check headlamp alignment.
Check muffler, exhaust pipes,shields and clamps.
Check seat belts for wear and function.
At least once a year:
Clean body and door drain holes.
Lubricate door hinges and hoodhinges.
Lubricate door and hood locks and latches.
Lubricate door rubber weather strips.
Lubricate door checker.
Check the air conditioning system.
Inspect and lubricate automatic transmission linkage and controls.
Clean the battery and terminals.
Check the brake fluid level. Follow Normal Maintenance Schedule
if the vehicle is usually operated where
none of the following conditions apply.
If any of the following conditions apply,
you must follow the Maintenance
Under Severe Usage Conditions.
Repeatedly driving short dis-
tances of less than 5 miles (8 km)
in normal temperature or less than
10 miles (16 km) in freezing tem-
perature
Extensive engine idling or low speed driving for long distances
Driving on rough, dusty, muddy, unpaved, graveled or salt- spread
roads
Driving in areas using salt or other corrosive materials or in very cold
weather
Driving in heavy dust conditions
Driving in heavy traffic area Driving on uphill, downhill, or
mountain road
Towing a trailer, or using a camper, or roof rack
Driving as a patrol car, taxi, other commercial use or vehicle towing
Driving over 106 mph (170 km/h)
Frequently driving in stop-and-go conditions
For additional information or assis-
tance see your authorized HYUNDAI
dealer.
S S C
C H
H E
ED
D U
U L
LE
E D
D
M
M A
AI
IN
N T
TE
EN
N A
AN
N C
CE
E
S
S E
E R
R V
V I
IC
C E
E S
S
Maintenance
7
7-7
Page 460 of 557

E
EX
X P
PL
LA
A N
N A
AT
TI
IO
O N
N
O
O F
F
S
S C
C H
H E
ED
D U
U L
LE
E D
D
M
M A
AI
IN
N T
TE
EN
N A
AN
N C
CE
E
I
IT
T E
EM
M S
S
Engine Oil and Filter
The engine oil and filter should be
changed at the intervals specified in
the maintenance schedule. If the
vehicle is being driven in severe con-
ditions, more frequent oil and filter
changes are required.
Drive Belts
Inspect all drive belts for evidence of
cuts, cracks, excessive wear or oil
saturation and replace if necessary.
Drive belts should be checked peri-
odically for proper tension and
adjusted as necessary.
Fuel Filter
A clogged-up fuel filter may limit the
vehicle driving speed, damage the
emission system, and cause the
hard starting. When a considerable
amount of foreign substances are
accumulated in the fuel tank, the fuel
filter should be replaced.
Upon installing a new fuel filter, oper-
ate the engine for several minutes,
and check the connections for any
leakages. Fuel filters should be
installed by an authorized HYUNDAI
dealer.
Fuel Lines, Fuel Hoses and
Connections
Check the fuel lines, fuel hoses and
connections for leakage and dam-
age. Have an authorized HYUNDAI
dealer replace any damaged or leak-
ing parts immediately.
Vapor Hose and Fuel Filler
Cap
The vapor hose and fuel filler cap
should be inspected at those inter-
vals specified in the maintenance
schedule. Make sure a new vapor
hose or fuel filler cap is correctly
replaced.
Vacuum Crankcase Ventilation
Hoses (if equipped)
Inspect the surface of hoses for evi-
dence of heat and/or mechanical
damage. Hard and brittle rubber,
cracking, tears, cuts, abrasions, and
excessive swelling indicate deterio-
ration. Particular attention should be
paid to examine those hose surfaces
nearest to high heat sources, such
as the exhaust manifold.
Inspect the hose routing to ensure
that the hoses do not come in con-
tact with any heat source, sharp
edges or moving component which
might cause heat damage or
mechanical wear. Inspect all hose
connections, such as clamps and
couplings, to make sure they are
secure, and that no leaks are pres-
ent. Hoses should be replaced
immediately if there is any evidence
of deterioration or damage.
Maintenance
7-18
Page 462 of 557
7-20
Maintenance
Brake Hoses and Lines
Visually check for proper installation,
chafing, cracks, deterioration and
any leakage. Replace any deteriorat-
ed or damaged parts immediately.
Brake Fluid
Check the brake fluid level in the
brake fluid reservoir. The level should
be between the MIN and the MAX
marks on the side of the reservoir.
Use only hydraulic brake fluid con-
forming to DOT 3 or DOT 4 specifi-
cation.
Parking Brake
Inspect the parking brake system
including the parking brake pedal
and cables.
Brake Discs, Pads, Calipers
and Rotors
Check the pads for excessive wear,
discs for run out and wear, and
calipers for fluid leakage.
Exhaust Pipe and Muffler
Visually inspect the exhaust pipes,
muffler and hangers for cracks, dete-
rioration, or damage. Start the engine
and listen carefully for any exhaust
gas leakage. Tighten connections or
replace parts as necessary.
Suspension Mounting Bolts
Check the suspension connections
for looseness or damage. Retighten
to the specified torque.
Steering Gear Box, Linkage &
Boots/Lower Arm Ball Joint
With the vehicle stopped and the
engine off, check for excessive free-
play in the steering wheel. Check the
linkage for bends or damage. Check
the dust boots and ball joints for
deterioration, cracks, or damage.
Replace any damaged parts.
Drive Shafts and Boots
Check the drive shafts, boots and
clamps for cracks, deterioration, or
damage. Replace any damaged
parts and, if necessary, repack the
grease.
Air Conditioning Refrigerant
Check the air conditioning lines and
connections for leakage and dam-
age.
Page 495 of 557
Instrument Panel Fuse
Replacement
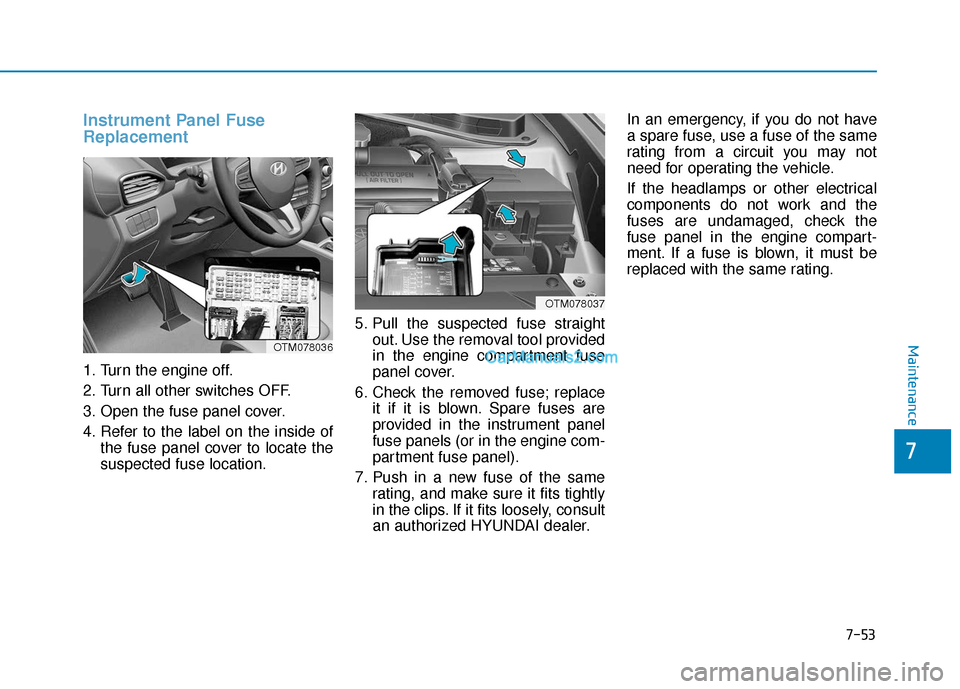
1. Turn the engine off.
2. Turn all other switches OFF.
3. Open the fuse panel cover.
4. Refer to the label on the inside ofthe fuse panel cover to locate the
suspected fuse location. 5. Pull the suspected fuse straight
out. Use the removal tool provided
in the engine compartment fuse
panel cover.
6. Check the removed fuse; replace it if it is blown. Spare fuses are
provided in the instrument panel
fuse panels (or in the engine com-
partment fuse panel).
7. Push in a new fuse of the same rating, and make sure it fits tightly
in the clips. If it fits loosely, consult
an authorized HYUNDAI dealer. In an emergency, if you do not have
a spare fuse, use a fuse of the same
rating from a circuit you may not
need for operating the vehicle.
If the headlamps or other electrical
components do not work and the
fuses are undamaged, check the
fuse panel in the engine compart-
ment. If a fuse is blown, it must be
replaced with the same rating.
OTM078037
OTM078036Maintenance
7
7-53
Page 508 of 557
Daytime running light (DRL),
parking lamp and side marker
lamp
If the LED lamp does not operate,
have the system checked by an
authorized HYUNDAI dealer.
The LED lamps cannot be replaced
as a single unit because it is an inte-
grated unit. The LED lamps has to be
replaced with the unit.
A skilled technician should check or
repair the LED lamp, for it may dam-
age related parts of the vehicle.
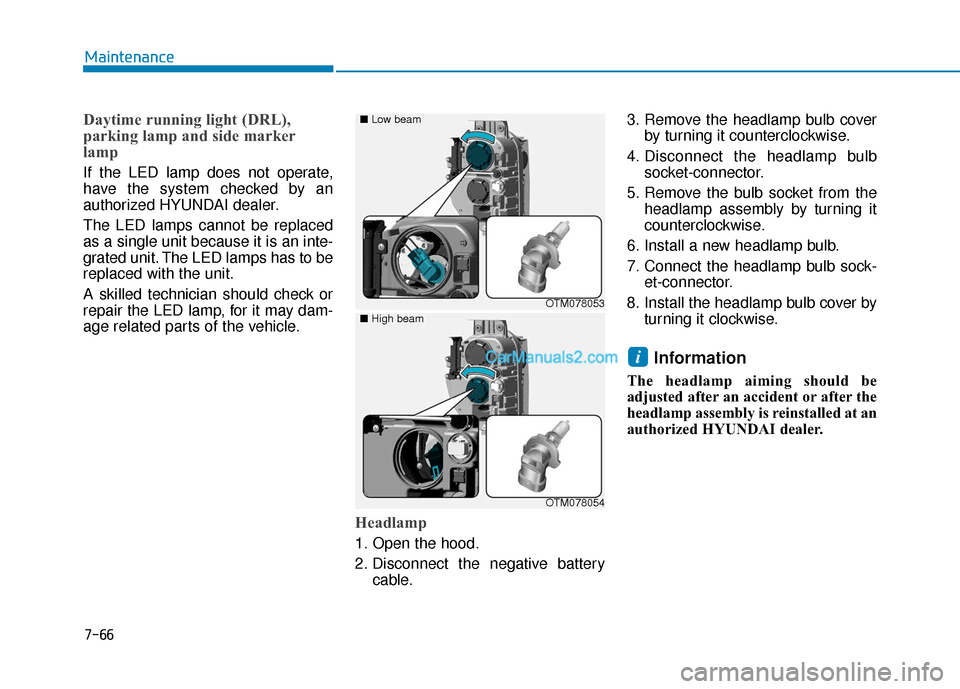
Headlamp
1. Open the hood.
2. Disconnect the negative batterycable. 3. Remove the headlamp bulb cover
by turning it counterclockwise.
4. Disconnect the headlamp bulb socket-connector.
5. Remove the bulb socket from the headlamp assembly by turning it
counterclockwise.
6. Install a new headlamp bulb.
7. Connect the headlamp bulb sock- et-connector.
8. Install the headlamp bulb cover by turning it clockwise.
Information
The headlamp aiming should be
adjusted after an accident or after the
headlamp assembly is reinstalled at an
authorized HYUNDAI dealer.
i
OTM078053
■
Low beam
OTM078054
■
High beam
Maintenance
7-66
Page 510 of 557
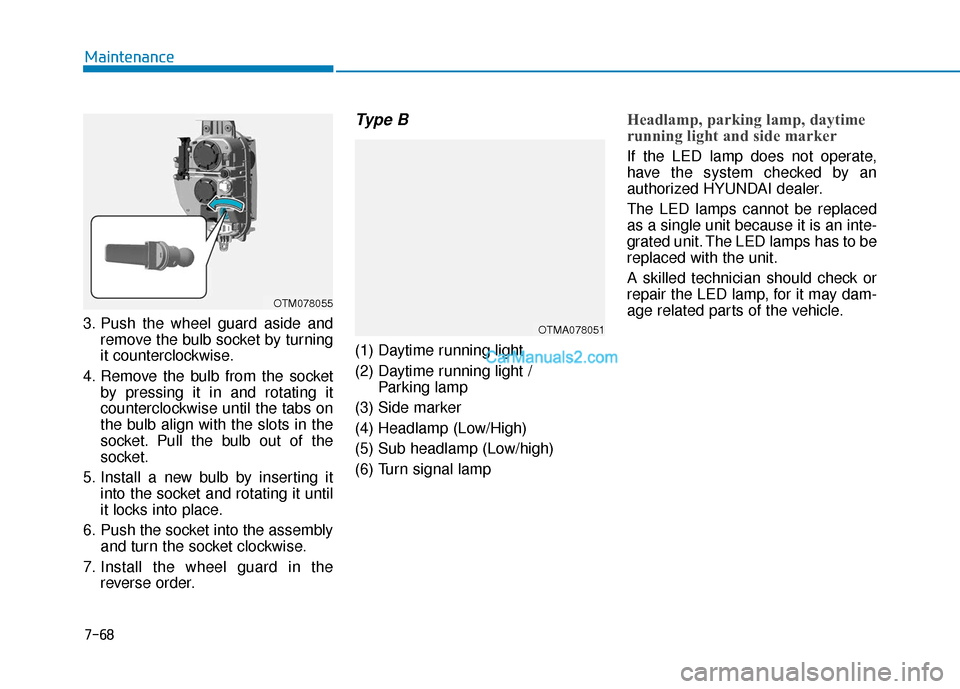
3. Push the wheel guard aside andremove the bulb socket by turning
it counterclockwise.
4. Remove the bulb from the socket by pressing it in and rotating it
counterclockwise until the tabs on
the bulb align with the slots in the
socket. Pull the bulb out of the
socket.
5. Install a new bulb by inserting it into the socket and rotating it until
it locks into place.
6. Push the socket into the assembly and turn the socket clockwise.
7. Install the wheel guard in the reverse order.
Type B
(1) Daytime running light
(2) Daytime running light / Parking lamp
(3) Side marker
(4) Headlamp (Low/High)
(5) Sub headlamp (Low/high)
(6) Turn signal lamp
Headlamp, parking lamp, daytime
running light and side marker
If the LED lamp does not operate,
have the system checked by an
authorized HYUNDAI dealer.
The LED lamps cannot be replaced
as a single unit because it is an inte-
grated unit. The LED lamps has to be
replaced with the unit.
A skilled technician should check or
repair the LED lamp, for it may dam-
age related parts of the vehicle.
7-68
Maintenance
OTM078055
OTMA078051
Page 511 of 557
7-69
7
Maintenance
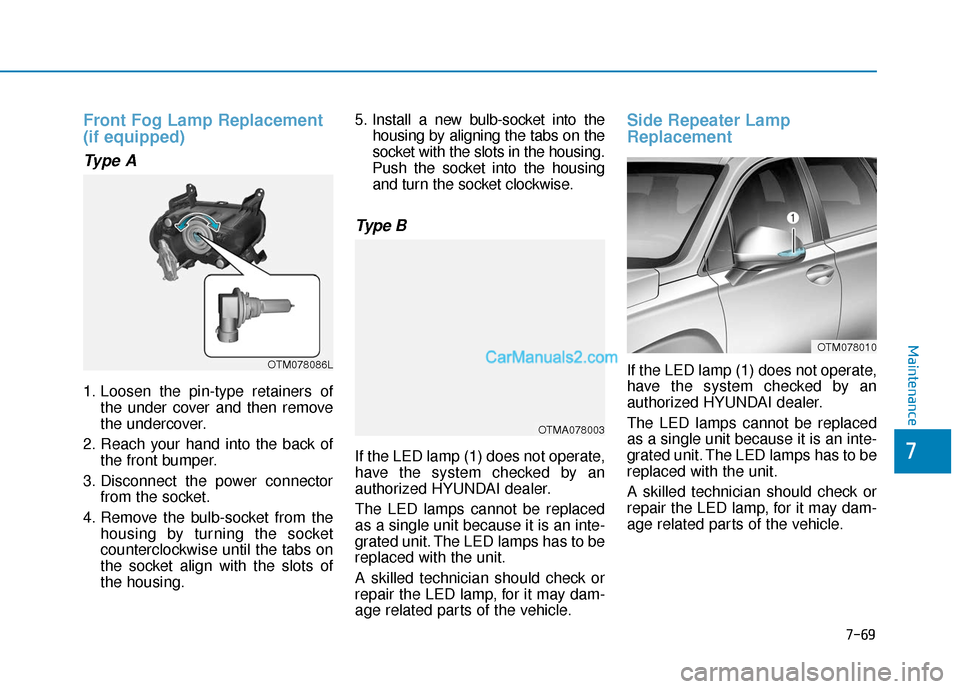
Front Fog Lamp Replacement
(if equipped)
Type A
1. Loosen the pin-type retainers ofthe under cover and then remove
the undercover.
2. Reach your hand into the back of the front bumper.
3. Disconnect the power connector from the socket.
4. Remove the bulb-socket from the housing by turning the socket
counterclockwise until the tabs on
the socket align with the slots of
the housing. 5. Install a new bulb-socket into the
housing by aligning the tabs on the
socket with the slots in the housing.
Push the socket into the housing and turn the socket clockwise.
Type B
If the LED lamp (1) does not operate,
have the system checked by an
authorized HYUNDAI dealer.
The LED lamps cannot be replaced
as a single unit because it is an inte-
grated unit. The LED lamps has to be
replaced with the unit.
A skilled technician should check or
repair the LED lamp, for it may dam-
age related parts of the vehicle.
Side Repeater Lamp
Replacement
If the LED lamp (1) does not operate,
have the system checked by an
authorized HYUNDAI dealer.
The LED lamps cannot be replaced
as a single unit because it is an inte-
grated unit. The LED lamps has to be
replaced with the unit.
A skilled technician should check or
repair the LED lamp, for it may dam-
age related parts of the vehicle.
OTM078010
OTMA078003
OTM078086L
7
Maintenance
Page 515 of 557
Tail lamp, stop lamp and side
marker lamp
If the LED lamp does not operate,
have the system checked by an
authorized HYUNDAI dealer.
The LED lamps cannot replaced as a
single unit because it is an integrated
unit. The LED lamps has to be
replaced with the unit.
A skilled technician should check or
repair the LED lamp, for it may dam-
age related parts of the vehicle.
Turn signal lamp and back up lamp
If the light bulb does not operate,
have the vehicle checked by an
authorized HYUNDI dealer.
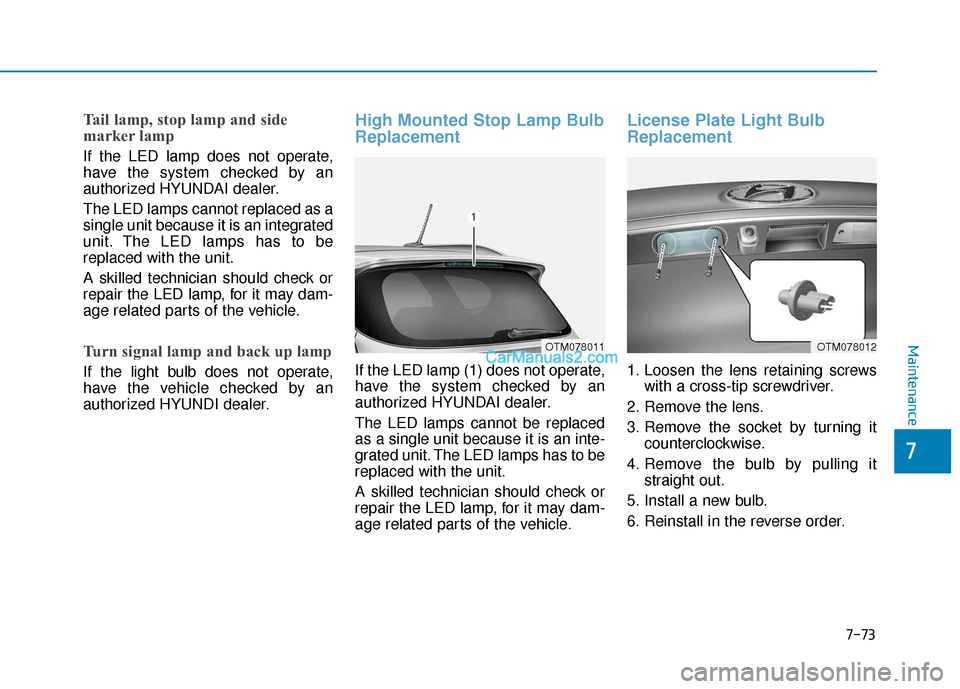
High Mounted Stop Lamp Bulb
Replacement
If the LED lamp (1) does not operate,
have the system checked by an
authorized HYUNDAI dealer.
The LED lamps cannot be replaced
as a single unit because it is an inte-
grated unit. The LED lamps has to be
replaced with the unit.
A skilled technician should check or
repair the LED lamp, for it may dam-
age related parts of the vehicle.
License Plate Light Bulb
Replacement
1. Loosen the lens retaining screwswith a cross-tip screwdriver.
2. Remove the lens.
3. Remove the socket by turning it counterclockwise.
4. Remove the bulb by pulling it straight out.
5. Install a new bulb.
6. Reinstall in the reverse order.
OTM078011OTM078012Maintenance
7-73
7