Page 471 of 557
Information
If the vehicle is operated in extremely
dusty or sandy areas, replace the air
cleaner filter more often than the
usual recommended intervals (refer to
"Maintenance Under Severe Usage
Conditions" in this chapter).
Do not drive with the air cleanerfilter removed. This will result in
excessive engine wear.
When removing the air cleaner filter, be careful that dust or dirt
does not enter the air intake, or
damage may result.
Use HYUNDAI genuine parts. Use of non-genuine parts could
damage the air flow sensor.
Filter Inspection
The climate control air filter should
be replaced according to the
Maintenance Schedule. If the vehicle
is operated in severely air-polluted
cities or on dusty rough roads for a
long period and/or if transporting
pets or occupants smoke inside the
vehicle, then it should be inspected
more frequently and replaced soon-
er. Replace the climate control air fil-
ter by following the procedure below
and be careful to avoid damaging
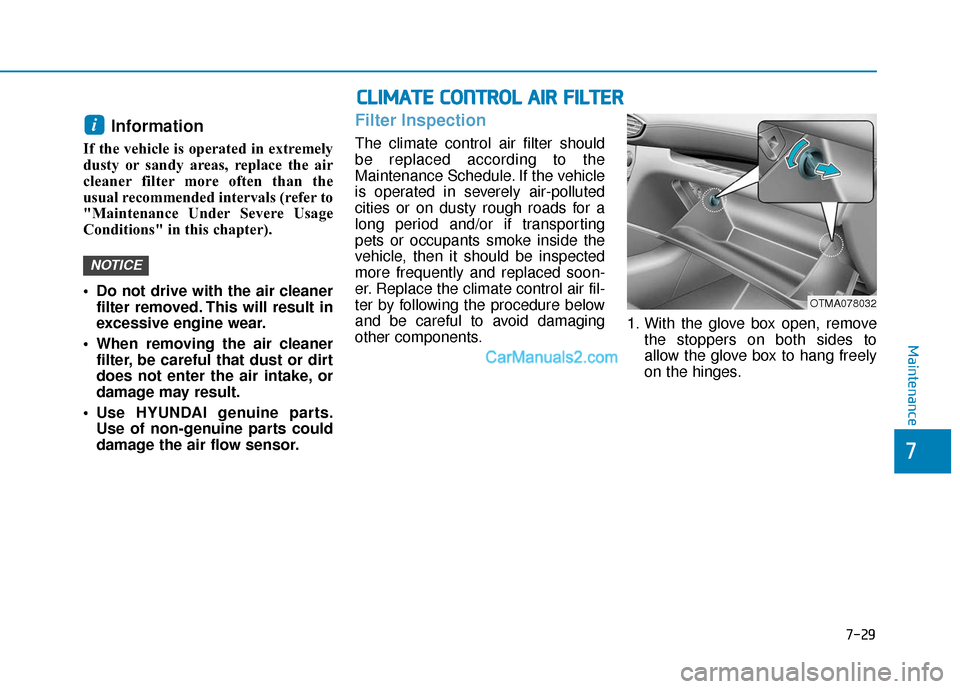
other components. 1. With the glove box open, remove
the stoppers on both sides to
allow the glove box to hang freely
on the hinges.
NOTICE
i
C CL
LI
IM
M A
AT
TE
E
C
C O
O N
NT
TR
R O
O L
L
A
A I
IR
R
F
F I
IL
L T
T E
ER
R
OTMA078032
Maintenance
7
7-29
Page 477 of 557
Battery Recharging
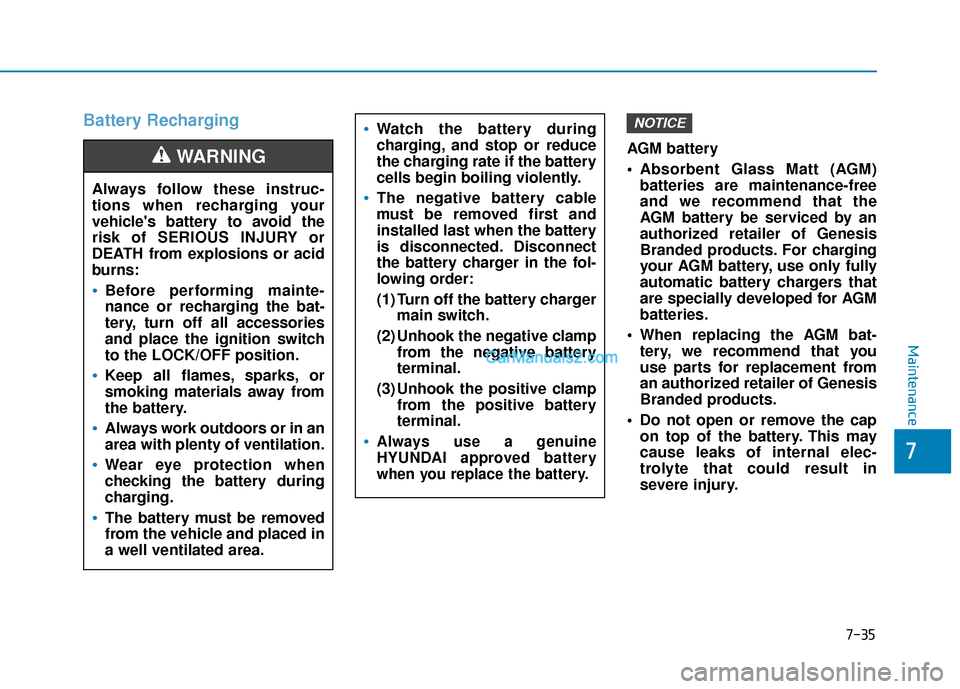
AGM battery
Absorbent Glass Matt (AGM)batteries are maintenance-free
and we recommend that the
AGM battery be serviced by an
authorized retailer of Genesis
Branded products. For charging
your AGM battery, use only fully
automatic battery chargers that
are specially developed for AGM
batteries.
When replacing the AGM bat- tery, we recommend that you
use parts for replacement from
an authorized retailer of Genesis
Branded products.
Do not open or remove the cap on top of the battery. This may
cause leaks of internal elec-
trolyte that could result in
severe injury.
NOTICE
Always follow these instruc-
tions when recharging your
vehicle's battery to avoid the
risk of SERIOUS INJURY or
DEATH from explosions or acid
burns:
Before performing mainte-
nance or recharging the bat-
tery, turn off all accessories
and place the ignition switch
to the LOCK/OFF position.
Keep all flames, sparks, or
smoking materials away from
the battery.
Always work outdoors or in an
area with plenty of ventilation.
Wear eye protection when
checking the battery during
charging.
The battery must be removed
from the vehicle and placed in
a well ventilated area.
WARNING
Watch the battery during
charging, and stop or reduce
the charging rate if the battery
cells begin boiling violently.
The negative battery cable
must be removed first and
installed last when the battery
is disconnected. Disconnect
the battery charger in the fol-
lowing order:
(1) Turn off the battery charger main switch.
(2) Unhook the negative clamp from the negative battery
terminal.
(3) Unhook the positive clamp from the positive battery
terminal.
Always use a genuine
HYUNDAI approved battery
when you replace the battery.
Maintenance
7
7-35
Page 488 of 557
Traction - AA, A, B & C
The traction grades, from highest to
lowest, are AA, A, B and C. Those
grades represent the tire's ability to
stop on wet pavement as measured
under controlled conditions on spec-
ified government test surfaces of
asphalt and concrete. A tire marked
C may have poor traction perform-
ance.
Temperature - A, B & C
The temperature grades are A (the
highest), B and C representing the
tire’s resistance to the generation of
heat and its ability to dissipate heat
when tested under controlled condi-
tions on a specified indoor laboratory
test wheel.
Sustained high temperature can
cause the material of the tire to
degenerate and reduce tire life, and
excessive temperature can lead to
sudden tire failure. Grade C
responds to a level of performance
which all passenger car tires must
meet under the Federal Motor
Vehicle Safety Standard No. 109.
Grades B and A represent higher
levels of performance on the labora-
tory test wheel than the minimum
required by law.The temperature grade for this
tire is established for a tire that
is properly inflated and not
overloaded. Excessive speed,
under-inflation, over-inflation,
or excessive loading, either
separately or in combination,
can cause heat build-up and
possible sudden tire failure.
This may cause loss of vehicle
control resulting in an accident.WARNING
The traction grade assigned to
this tire is based on straight-
ahead braking traction tests,
and does not include accelera-
tion, cornering, hydroplaning,
or peak traction characteristics.
WARNING
Maintenance
7-46
Page 498 of 557
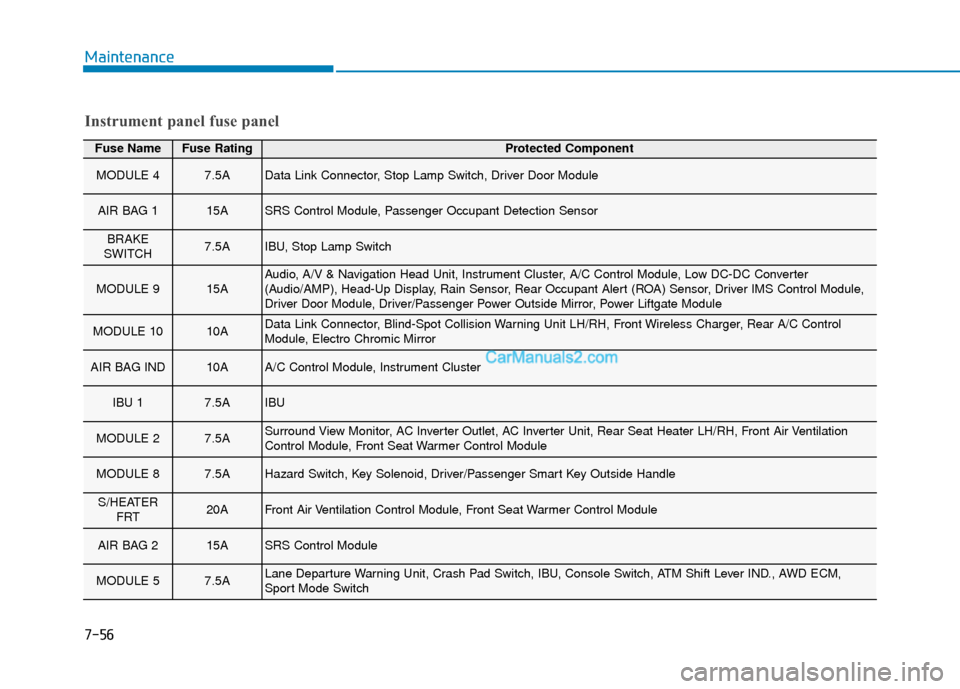
Fuse NameFuse RatingProtected Component
MODULE 47.5AData Link Connector, Stop Lamp Switch, Driver Door Module
AIR BAG 115ASRS Control Module, Passenger Occupant Detection Sensor
BRAKE
SWITCH7.5AIBU, Stop Lamp Switch
MODULE 915AAudio, A/V & Navigation Head Unit, Instrument Cluster, A/C Control Module, Low DC-DC Converter
(Audio/AMP), Head-Up Display, Rain Sensor, Rear Occupant Alert (ROA) Sensor, Driver IMS Control Module,
Driver Door Module, Driver/Passenger Power Outside Mirror, Power Liftgate Module
MODULE 1010AData Link Connector, Blind-Spot Collision Warning Unit LH/RH, Front Wireless Charger, Rear A/C Control
Module, Electro Chromic Mirror
AIR BAG IND10AA/C Control Module, Instrument Cluster
IBU 17.5AIBU
MODULE 27.5ASurround View Monitor, AC Inverter Outlet, AC Inverter Unit, Rear Seat Heater LH/RH, Front Air Ventilation
Control Module, Front Seat Warmer Control Module
MODULE 87.5AHazard Switch, Key Solenoid, Driver/Passenger Smart Key Outside Handle
S/HEATER FRT20AFront Air Ventilation Control Module, Front Seat Warmer Control Module
AIR BAG 215ASRS Control Module
MODULE 57.5ALane Departure Warning Unit, Crash Pad Switch, IBU, Console Switch, ATM Shift Lever IND., AWD ECM,
Sport Mode Switch
Instrument panel fuse panel
Maintenance
7-56
Page 512 of 557
Rear Combination Light Bulb
Replacement
Type A
(1) Stop/Tail lamp
(2) Tail lamp
(3) Side marker
(4) Turn signal lamp
(5) Backup lamp
Stop/Tail lamp and side marker
lamp
1. Turn off the engine.
2. Open the liftgate.
3. Remove the cover using a flat-blade screwdriver. 4. Loosen the lamp assembly retain-
ing screws with a cross-tip screw-
driver.
5. Remove the rear combination lamp assembly from the body of
the vehicle.
OTM078006
OTMA078004
OTM078005
Maintenance
7-70
Page 513 of 557
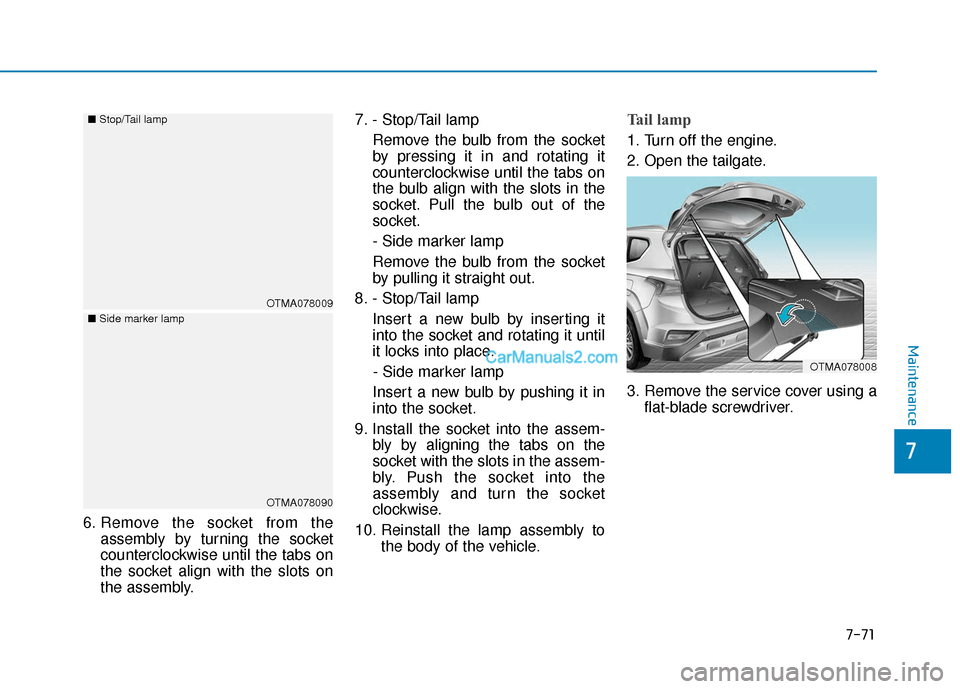
6. Remove the socket from theassembly by turning the socket
counterclockwise until the tabs on
the socket align with the slots on
the assembly. 7. - Stop/Tail lamp
Remove the bulb from the socket
by pressing it in and rotating it
counterclockwise until the tabs on
the bulb align with the slots in the
socket. Pull the bulb out of the
socket.
- Side marker lamp
Remove the bulb from the socket
by pulling it straight out.
8. - Stop/Tail lamp Insert a new bulb by inserting it
into the socket and rotating it until
it locks into place.- Side marker lamp
Insert a new bulb by pushing it in
into the socket.
9. Install the socket into the assem- bly by aligning the tabs on the
socket with the slots in the assem-
bly. Push the socket into the
assembly and turn the socket
clockwise.
10. Reinstall the lamp assembly to the body of the vehicle.
Tail lamp
1. Turn off the engine.
2. Open the tailgate.
3. Remove the service cover using aflat-blade screwdriver.
OTMA078008
OTMA078009
■
Stop/Tail lamp
OTMA078090
■
Side marker lamp
Maintenance
7-71
7
Page 514 of 557
4. Remove the socket from theassembly by turning the socket
counterclockwise until the tabs on
the socket align with the slots on
the assembly.
5. Remove the bulb from the socket by pulling it straight out.
6. Insert a new bulb by pushing it in into the socket.
7. Install the socket into the assem- bly by aligning the tabs on the
socket with the slots in the assem-
bly. Push the socket into the
assembly and turn the socket
clockwise.
8. Reinstall the lamp assembly to the body of the vehicle.
Turn signal lamp and back up lamp
If the light bulb does not operate,
have the vehicle checked by an
authorized HYUNDAI dealer.
Type B
(1) Tail lamp
(2) Stop lamp
(3) Side marker
(4) Turn signal lamp
(5) Back up lamp
OTMA078050
OTM078007
Maintenance
7-72
Page 515 of 557
Tail lamp, stop lamp and side
marker lamp
If the LED lamp does not operate,
have the system checked by an
authorized HYUNDAI dealer.
The LED lamps cannot replaced as a
single unit because it is an integrated
unit. The LED lamps has to be
replaced with the unit.
A skilled technician should check or
repair the LED lamp, for it may dam-
age related parts of the vehicle.
Turn signal lamp and back up lamp
If the light bulb does not operate,
have the vehicle checked by an
authorized HYUNDI dealer.
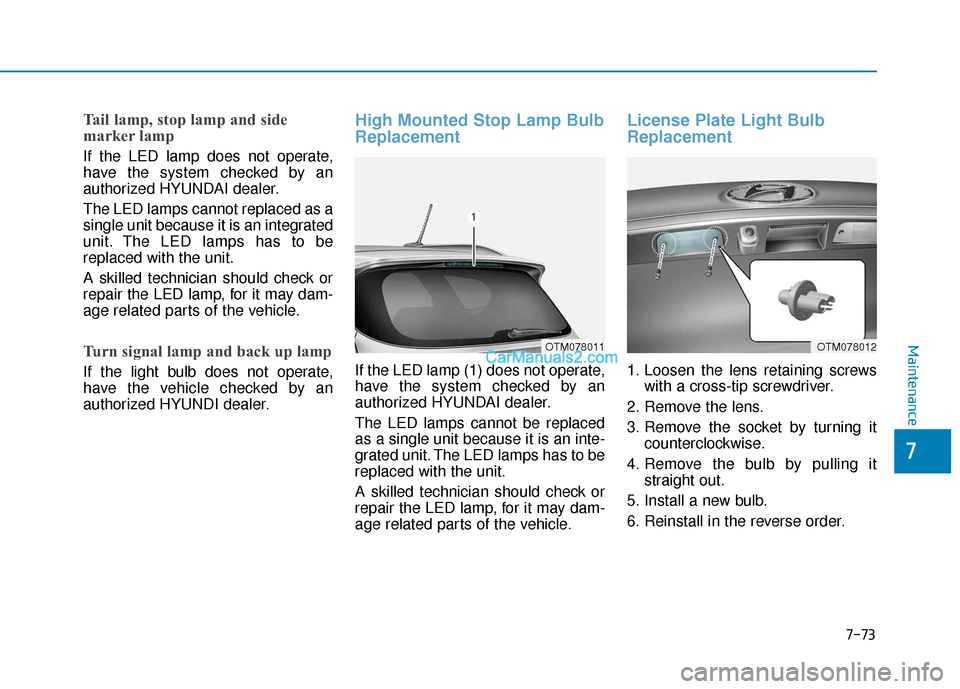
High Mounted Stop Lamp Bulb
Replacement
If the LED lamp (1) does not operate,
have the system checked by an
authorized HYUNDAI dealer.
The LED lamps cannot be replaced
as a single unit because it is an inte-
grated unit. The LED lamps has to be
replaced with the unit.
A skilled technician should check or
repair the LED lamp, for it may dam-
age related parts of the vehicle.
License Plate Light Bulb
Replacement
1. Loosen the lens retaining screwswith a cross-tip screwdriver.
2. Remove the lens.
3. Remove the socket by turning it counterclockwise.
4. Remove the bulb by pulling it straight out.
5. Install a new bulb.
6. Reinstall in the reverse order.
OTM078011OTM078012Maintenance
7-73
7