2020 Hyundai Santa Fe Engine Off
[x] Cancel search: Engine OffPage 372 of 557
5-98
Driving your vehicle
Information
• Even though the steering is assistedby the system, the driver can still
steer to control the steering wheel.
• The steering wheel may feel heavier when the steering wheel is assisted
by the system than when it is not.
Check Lane Keeping Assist(LKA) system
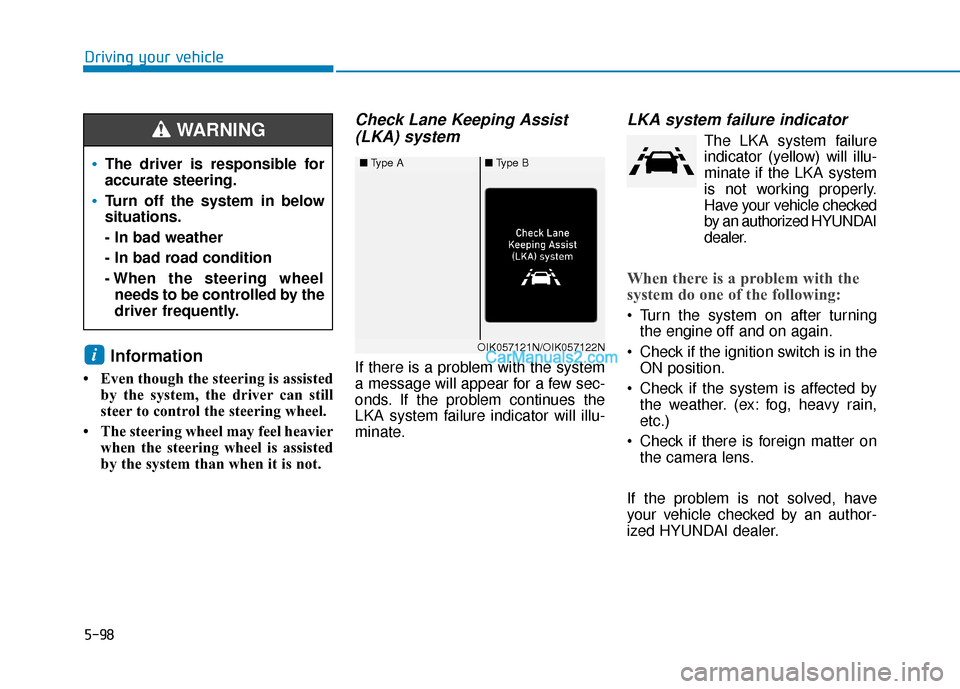
If there is a problem with the system
a message will appear for a few sec-
onds. If the problem continues the
LKA system failure indicator will illu-
minate.
LKA system failure indicator
The LKA system failure
indicator (y ellow) will illu-
minate if the LKA system
is not working properly.
Have your vehicle checked
by an authorized HYUNDAI
dealer.
When there is a problem with the
system do one of the following:
Turn the system on after turning the engine off and on again.
Check if the ignition switch is in the ON position.
Check if the system is affected by the weather. (ex: fog, heavy rain,
etc.)
Check if there is foreign matter on the camera lens.
If the problem is not solved, have
your vehicle checked by an author-
ized HYUNDAI dealer.
i
■ Type A■Type B
OIK057121N/OIK057122N
The driver is responsible for
accurate steering.
Turn off the system in below
situations.
- In bad weather
- In bad road condition
- When the steering wheel
needs to be controlled by the
driver frequently.
WARNING
Page 376 of 557
5-102
Driving your vehicle
The Driver Attention Warning (DAW)
system is designed as a safety fea-
ture to help reduce drowsy or inat-
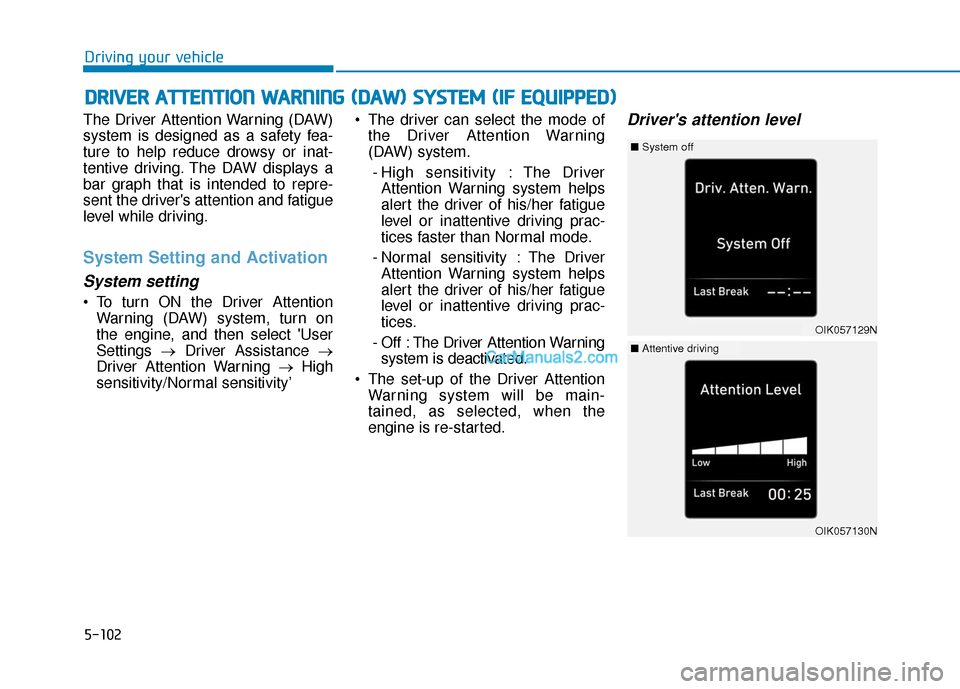
tentive driving. The DAW displays a
bar graph that is intended to repre-
sent the driver's attention and fatigue
level while driving.
System Setting and Activation
System setting
To turn ON the Driver Attention Warning (DAW) system, turn on
the engine, and then select 'User
Settings →Driver Assistance →
Driver Attention Warning →High
sensitivity/Normal sensitivity’ The driver can select the mode of
the Driver Attention Warning
(DAW) system.
- High sensitivity : The Driver Attention Warning system helps
alert the driver of his/her fatigue
level or inattentive driving prac-
tices faster than Normal mode.
- Normal sensitivity : The Driver Attention Warning system helps
alert the driver of his/her fatigue
level or inattentive driving prac-
tices.
- Off : The Driver Attention Warning system is deactivated.
The set-up of the Driver Attention Warning system will be main-
tained, as selected, when the
engine is re-started.
Driver's attention level
D DR
RI
IV
V E
ER
R
A
A T
TT
TE
EN
N T
TI
IO
O N
N
W
W A
AR
RN
N I
IN
N G
G
(
( D
D A
A W
W )
)
S
S Y
Y S
ST
T E
EM
M
(
( I
IF
F
E
E Q
Q U
UI
IP
P P
PE
ED
D )
)
OIK057129N
■ System off
OIK057130N
■Attentive driving
Page 377 of 557

5-103
Driving your vehicle
5
The driver can monitor their drivingconditions on the LCD display.
The DAW screen will appear when
you select the Assist mode tab ( )
on the LCD display if the system is
activated. For more details, refer to
"LCD Display Modes" in chapter 3.
The driver's attention level is dis- played on the scale of 1 to 5. The
lower the number is, the more inat-
tentive the driver is.
The number decreases when the driver does not take a break for a
certain period of time.
The number increases when the driver attentively drives for a cer-
tain period of time. When the driver turns on the sys-
tem while driving, it displays 'Last
Break time' and level.
Take a break
The "Consider taking a break"message appears on the LCD dis-
play and a warning sounds in order
to suggest the driver to take a
break, when the driver’s attention
level is below 1.
The Driver Attention Warning (DAW) system does not suggest
the driver to take a break, when the
total driving time is shorter than 10
minutes.
Resetting the System
The last break time is set to 00:00and the driver's attention level is
set to 5 (very attentive) when the
driver resets the Driver Attention
Warning (DAW) system.
The Driver Attention Warning (DAW) system resets in the follow-
ing situations.
- The engine is turned OFF.
- The driver unfastens the seat belt and then opens the driver's
door.
- The vehicle is stopped for more than 10 minutes.
The Driver Attention Warning (DAW) system operates again,
when the driver restarts driving.
OIK057132L
OIK057131N
Page 383 of 557

5-109
Driving your vehicle
5
To temporarily accelerate withthe Smart Cruise Control on
If you want to speed up temporarily
when the Smart Cruise Control is on,
depress the accelerator pedal.
Increased speed will not interfere
with Smart Cruise Control operation
or change the set speed.
To return to the set speed, take your
foot off the accelerator pedal.
If you push the toggle switch down
(SET-) at increased speed, the cruis-
ing speed will be set again pedal.
Smart Cruise Control set speedwill be temporarily canceledwhen:
Canceled manually
Depressing the brake pedal.
Pushing the CANCEL button locat-
ed on the steering wheel.
The Smart Cruise Control turns off
temporarily when the Set Speed and
Vehicle-to-Vehicle Distance indicator
on the LCD display turns off.
The cruise indicator is illuminated
continuously.
Canceled automatically
The driver's door is opened.
The vehicle is shifted to N (Neutral), R (Reverse) or P (Park).
The EPB (Electronic Parking Brake) is applied.
The vehicle speed is over 105 mph (170 km/h).
The vehicle stops on a steep incline.
The ESC (Electronic Stability Control), TCS (Traction Control
System) or ABS is operating.
The ESC is turned off.
The sensor or the cover is dirty or blocked with foreign matter.
The vehicle is stopped for a certain period of time.
The vehicle stops and goes repeat- edly for a long period of time.
The accelerator pedal is continu- ously depressed for a long period
of time.
The engine performance is abnor- mal.
Engine rpm is in the red zone.
Be careful when accelerating
temporarily, because the speed
is not controlled automatically
at this time even if there is a
vehicle in front of you.
CAUTIONOTM058040
Page 385 of 557
5-111
Driving your vehicle
5
To turn Cruise Control off
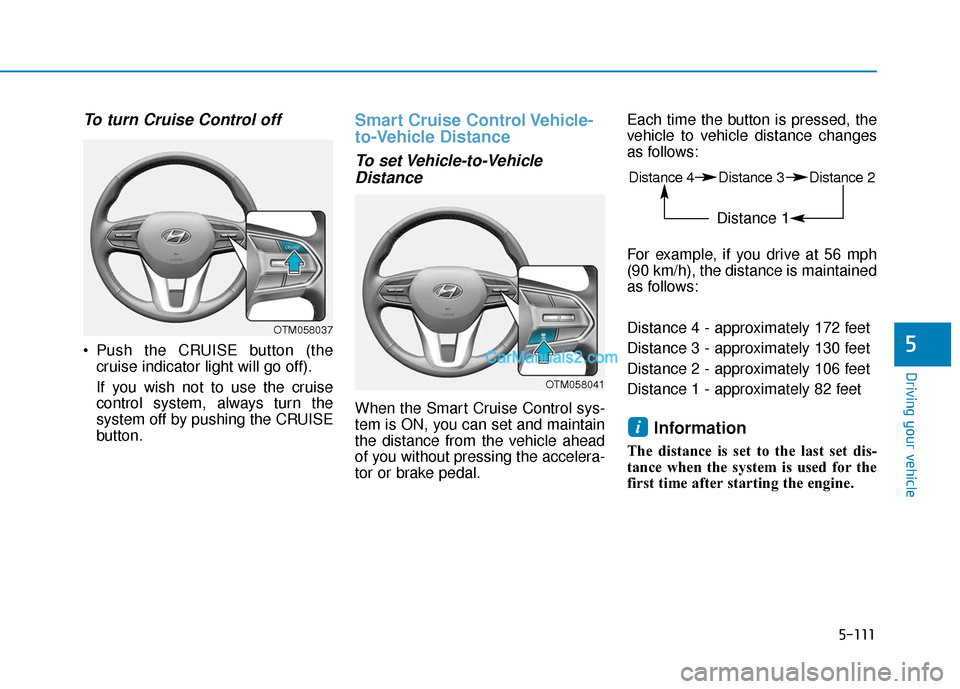
Push the CRUISE button (thecruise indicator light will go off).
If you wish not to use the cruise
control system, always turn the
system off by pushing the CRUISE
button.
Smart Cruise Control Vehicle-
to-Vehicle Distance
To set Vehicle-to-VehicleDistance
When the Smart Cruise Control sys-
tem is ON, you can set and maintain
the distance from the vehicle ahead
of you without pressing the accelera-
tor or brake pedal. Each time the button is pressed, the
vehicle to vehicle distance changes
as follows:
For example, if you drive at 56 mph
(90 km/h), the distance is maintained
as follows:
Distance 4 - approximately 172 feet
Distance 3 - approximately 130 feet
Distance 2 - approximately 106 feet
Distance 1 - approximately 82 feet
Information
The distance is set to the last set dis-
tance when the system is used for the
first time after starting the engine.
i
OTM058037
Distance 4 Distance 3 Distance 2
Distance 1
OTM058041
Page 397 of 557

5-123
Driving your vehicle
5
The Leading Vehicle Departure Alert
system alerts the driver of the depar-
ture of the vehicle in front when the
vehicle is stopped and the Smart
Cruise Control (SCC) system is in
activation.System Setting and Activation
System setting
With the engine ON, the Leading
Vehicle Departure Alert system turns
on and gets ready to be activated
when the 'User Settings →Driver
Assistance →Driving Assist →
Leading vehicle departure alert' is
selected selected in the cluster LCD
display. The system stops operation
when the setting is deactivated.
However, if the engine is turned off
then on again, the system maintains
the previous state.
System standby
While the Smart Cruise Control
(SCC) system is in operation, your
vehicle stops behind the vehicle in
front when it stops. The message is
displayed on the cluster within 3 sec-
onds after the stop and the system
will be in the standby position.
L L E
E A
A D
DI
IN
N G
G
V
V E
EH
H I
IC
C L
LE
E
D
D E
EP
P A
A R
RT
TU
U R
RE
E
A
A L
LE
E R
R T
T
(
( I
IF
F
E
E Q
Q U
UI
IP
P P
PE
ED
D )
)
OIK057107L
Page 400 of 557
5-126
Driving your vehicle
Information
The ESC system must be turned OFF
before rocking the vehicle.
If you are still stuck after rocking
the vehicle a few times, have the
vehicle pulled out by a tow vehicle
to avoid engine overheating, pos-
sible damage to the transmission,
and tire damage. See "Towing" in
chapter 6.
Smooth Cornering
Avoid braking or gear changing in
corners, especially when roads are
wet. Ideally, corners should always
be taken under gentle acceleration.
Driving at Night
Night driving presents more hazards
than driving in the daylight. Here are
some important tips to remember:
Slow down and keep more dis-tance between you and other vehi-
cles, as it may be more difficult to
see at night, especially in areas
where there may not be any street
lights.
Adjust your mirrors to reduce the glare from other driver's head-
lamps.
Keep your headlamps clean and properly aimed. Dirty or improper-
ly aimed headlamps will make it
much more difficult to see at night.
Avoid staring directly at the head- lamps of oncoming vehicles. You
could be temporarily blinded, and
it will take several seconds for your
eyes to readjust to the darkness.
Driving in the Rain
Rain and wet roads can make driving
dangerous. Here are a few things to
consider when driving in the rain or
on slick pavement:
Slow down and allow extra follow-ing distance. A heavy rainfall
makes it harder to see and
increases the distance needed to
stop your vehicle.
Turn OFF your Cruise Control.
Replace your windshield wiper blades when they show signs of
streaking or missing areas on the
windshield.
Tires should be properly main- tained with at least 2/32nds of an
inch of tread depth. If your tires do
not have enough tread, making a
quick stop on wet pavement can
cause a skid and possibly lead to
an accident. See "Tire replace-
ment" in chapter 7 .
Turn on your headlamps to make it easier for others to see you.
NOTICE
i
Page 404 of 557
5-130
Driving your vehicle
Damage to your vehicle caused by
improper tire chain use is not cov-
ered by your vehicle manufacturer’s
warranty.
When using tire chains, attach them
to the drive wheels as follows.
2WD : Front wheels
AWD : All four wheels
If a full set of chains are not available
for an AWD vehicle, chains may be
installed on the front wheels only.
Information
• Install tire chains on both left and right front tires. It should be noted
that installing tire chains on the
tires will provide a greater driving
force, but will not prevent side
skids.
• Do not install studded tires without first checking local, state and
municipal regulations for possible
restrictions against their use.
Chain installation
When installing tire chains, follow the
manufacturer’s instructions and
mount them as tightly possible. Drive
slowly (less than 20 mph (30 km/h))
with chains installed. If you hear the
chains contacting the body or chas-
sis, stop and tighten them. If they still
make contact, slow down until the
noise stops. Remove the tire chains
as soon as you begin driving on
cleared roads.
When mounting snow chains, park
the vehicle on level ground away
from traffic. Turn on the vehicle
Hazard Warning Flasher and place a
triangular emergency warning device
behind the vehicle (if available).
Always place the vehicle in P (Park),
apply the parking brake and turn off
the engine before installing snow
chains.i
The use of tire chains may
adversely affect vehicle han-
dling:
Drive less than 20 mph
(30 km/h) or the chain manu-
facturer's recommended speed
limit, whichever is lower.
Drive carefully and avoid
bumps, holes, sharp turns,
and other road hazards, which
may cause the vehicle to
bounce.
Avoid sharp turns or locked
wheel braking.
WARNING