2020 HYUNDAI NEXO lock
[x] Cancel search: lockPage 195 of 561
3-108
Convenient features of your vehicle
Any non-factory equipment or
accessories have been installed, or
if the vehicle bumper height or sen-
sor installation has been modified.
Detecting range may decrease when:
Outside air temperature is
extremely hot or cold.
Undetectable objects smaller than
40 inches (1 m) and narrower than
6 inches (14 cm) in diameter.
The following objects may not be
recognized by the sensor:
Sharp or slim objects such as
ropes, chains or small poles.
Objects, which tend to absorb sen-
sor frequency such as clothes,
spongy material or snow.
Parking Distance Warning
(Reverse/Forward) system pre-
cautions
The Parking Distance Warning
(Reverse/Forward) system may not
operate consistently in some cir-
cumstances depending on the
speed of the vehicle and the
shapes of the objects detected.
The Parking Distance Warning
(Reverse/Forward) system may
malfunction if the vehicle bumper
height or sensor installation has
been modified or damaged. Any
non-factory installed equipment or
accessories may also interfere with
the sensor performance.
The sensor may not recognize
objects less than 15 in. (40 cm)
from the sensor, or it may sense an
incorrect distance. Use caution.
When the sensor is blocked with
snow, dirt, debris, or ice, the sys-
tem may be inoperative until the
snow or ice melts, or the debris is
removed. Use a soft cloth to wipe
debris away from the sensor. Do not push, scratch or strike the
sensor with any hard objects that
could damage the surface of the
sensor. Sensor damage could occur.
Do not spray the sensors or its sur-
rounding area directly with a high
pressure washer. Doing so may
cause the sensors to fail to operate
normally.
Your new vehicle warranty does
not cover any accidents or dam-
age to the vehicle or injuries to
its occupants related to a
Parking Distance Warning
(Reverse/Forward) system.
Always drive safely and cau-
tiously.
WARNING
Page 216 of 561
3-129
Convenient features of your vehicle
3
If the driver releases the button the
vehicle will stop and the assist will
stop temporarily. Press and hold
the button again to resume the
operation.
❈ You will hear frequent beep
sounds if the driver gets off the
vehicle after setting the Remote
Parking mode.
❈ Press the moving forward or back-
ward button again after checking
the distance (within about 10 ~ 16
ft. (3~5 m)) from the vehicles if the
vehicle didn’t move after pressing
and holding the smart key button
for about 5 seconds.7. Remote smart parking com-
plete
When the parking is complete, the
message is displayed on the AVN
screen and the vehicle is automati-
cally turned off. Drivers always
should check whether the door, win-
dow and sunroof are closed and the
door is locked.
When parking is complete:
- The parking complete sound (fre-
quent beep) is generated.
- The gear P (Park) and Electronic
Parking Brake (EPB) are engaged
automatically.
❈ Release the moving forward/back-
ward button on the smart key.
❈ The parking may complete bump-
ing on the stopper.
❈ When parking is complete, check
the surrounding conditions.Always check for obstacles
around your vehicle before
driving.
The function may be can-
celled if you attach something
(cover, etc.) to the steering
wheel.
Make sure all the passengers
exit the vehicle when the
Remote Smart Parking is
assisted.
Make sure all the smart keys
are outside the vehicle.
The smart key detection
range from the vehicle may
vary depending on the sur-
rounding environment
(indoor/outdoor, strong elec-
tric field area).
The smart key detection
range may change as the
vehicle moves. Maintain an
appropriate distance from the
vehicle.
CAUTION
Page 226 of 561
3-139
Convenient features of your vehicle
3
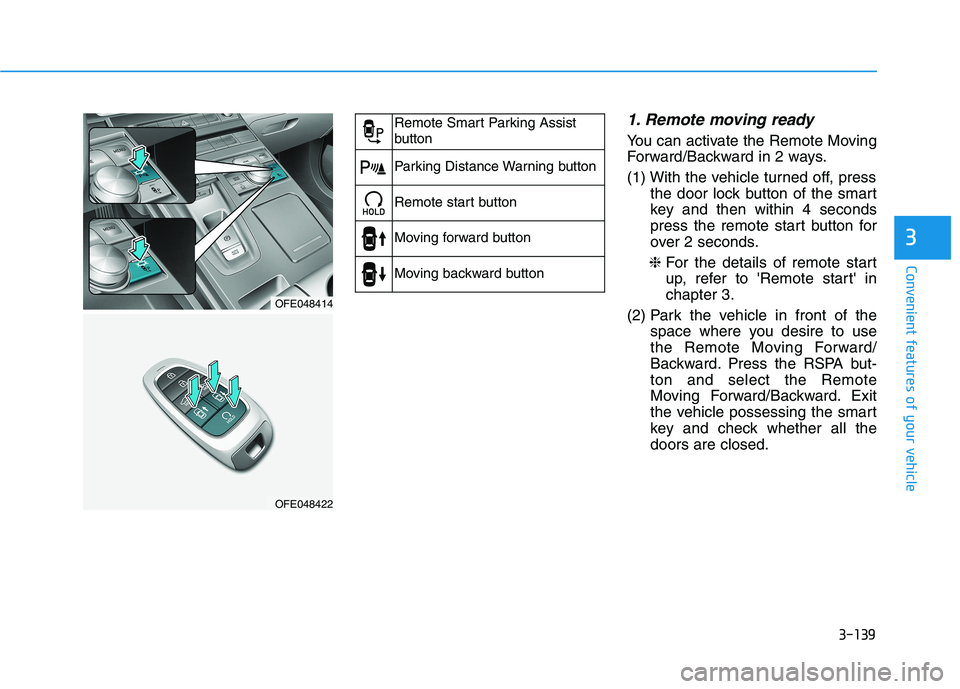
1. Remote moving ready
You can activate the Remote Moving
Forward/Backward in 2 ways.
(1) With the vehicle turned off, press
the door lock button of the smart
key and then within 4 seconds
press the remote start button for
over 2 seconds.
❈For the details of remote start
up, refer to 'Remote start' in
chapter 3.
(2) Park the vehicle in front of the
space where you desire to use
the Remote Moving Forward/
Backward. Press the RSPA but-
ton and select the Remote
Moving Forward/Backward. Exit
the vehicle possessing the smart
key and check whether all the
doors are closed.
OFE048414
OFE048422
Remote Smart Parking Assist
button
Parking Distance Warning button
Remote start button
Moving forward button
Moving backward button
Page 252 of 561
3-165
Convenient features of your vehicle
3
Keep your drinks sealed while
driving to prevent spilling your
drink. If liquid spills, it may get
into the vehicle's electrical/elec-
tronic system and damage elec-
trical/electronic parts.
When cleaning spilled liquids do
not use hot air to blow out or dry
the cup holder. This may dam-
age the interior.
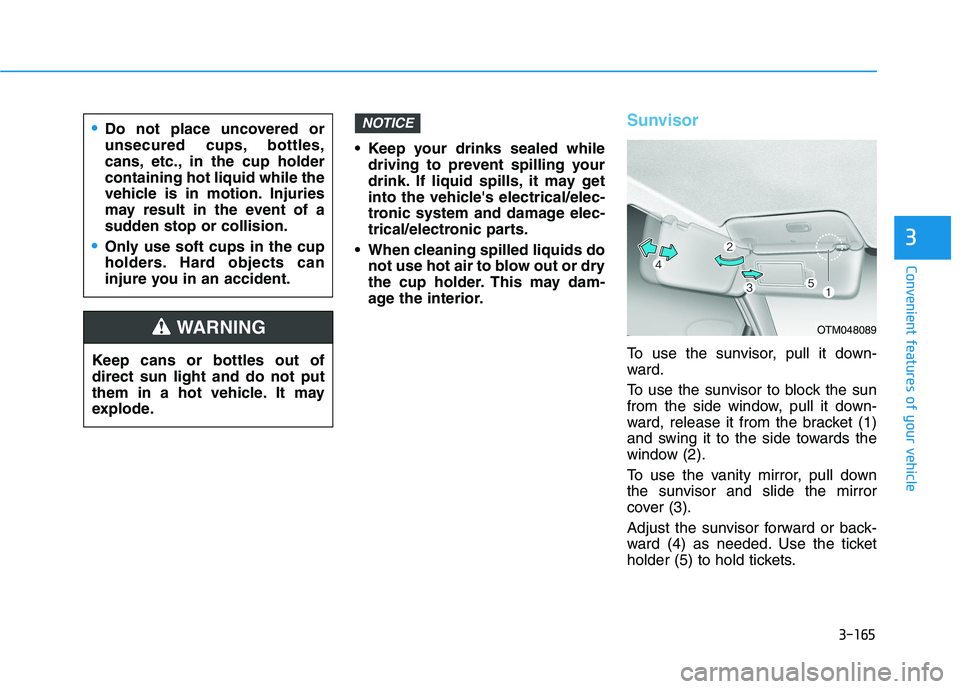
Sunvisor
To use the sunvisor, pull it down-
ward.
To use the sunvisor to block the sun
from the side window, pull it down-
ward, release it from the bracket (1)
and swing it to the side towards the
window (2).
To use the vanity mirror, pull down
the sunvisor and slide the mirror
cover (3).
Adjust the sunvisor forward or back-
ward (4) as needed. Use the ticket
holder (5) to hold tickets.
NOTICE
Keep cans or bottles out of
direct sun light and do not put
them in a hot vehicle. It may
explode.
WARNING
Do not place uncovered or
unsecured cups, bottles,
cans, etc., in the cup holder
containing hot liquid while the
vehicle is in motion. Injuries
may result in the event of a
sudden stop or collision.
Only use soft cups in the cup
holders. Hard objects can
injure you in an accident.
OTM048089
Page 253 of 561
3-166
Convenient features of your vehicle
Close the vanity mirror cover secure-
ly and return the sunvisor to its origi-
nal position after use.
Do not put several tickets in the
ticket holder at one time. This
could cause damage to the ticket
holder.
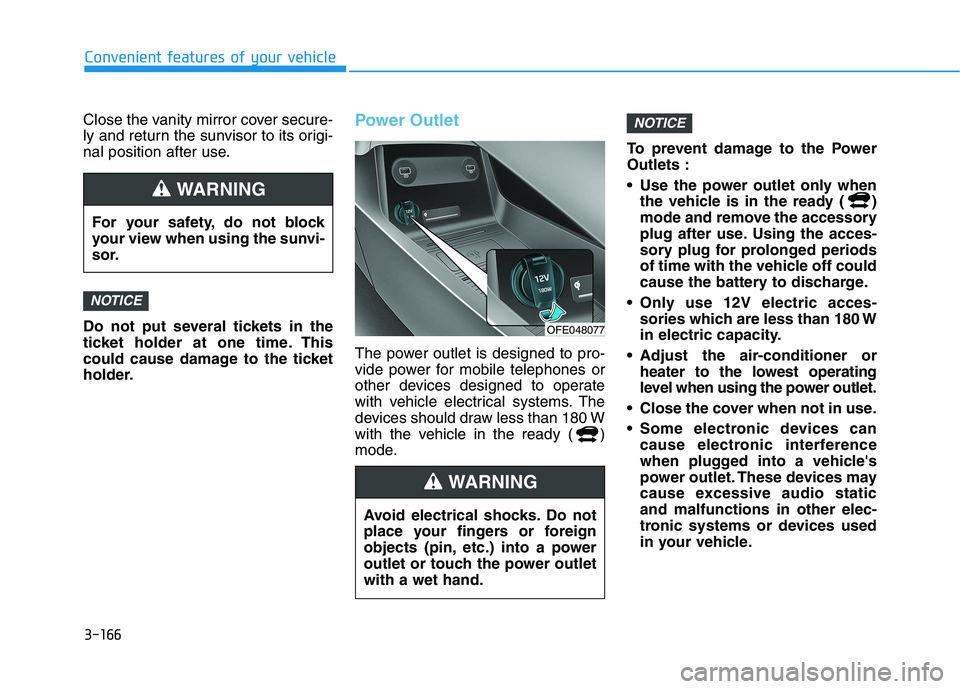
Power Outlet
The power outlet is designed to pro-
vide power for mobile telephones or
other devices designed to operate
with vehicle electrical systems. The
devices should draw less than 180 W
with the vehicle in the ready ( )
mode.To prevent damage to the Power
Outlets :
Use the power outlet only when
the vehicle is in the ready ( )
mode and remove the accessory
plug after use. Using the acces-
sory plug for prolonged periods
of time with the vehicle off could
cause the battery to discharge.
Only use 12V electric acces-
sories which are less than 180 W
in electric capacity.
Adjust the air-conditioner or
heater to the lowest operating
level when using the power outlet.
Close the cover when not in use.
Some electronic devices can
cause electronic interference
when plugged into a vehicle's
power outlet. These devices may
cause excessive audio static
and malfunctions in other elec-
tronic systems or devices used
in your vehicle.
NOTICE
NOTICE
For your safety, do not block
your view when using the sunvi-
sor.
WARNING
Avoid electrical shocks. Do not
place your fingers or foreign
objects (pin, etc.) into a power
outlet or touch the power outlet
with a wet hand.
WARNING
OFE048077
Page 257 of 561

3-170
Convenient features of your vehicle
To charge a cellular phone
The wireless cellular phone charging
system charges only the Qi-enabled
cellular phones ( ). Read the label
on the cellular phone accessory
cover or visit your cellular phone
manufacturer's website to check
whether your cellular phone supports
the Qi technology.
The wireless charging process starts
when you put a Qi-enabled cellular
phone on the wireless charging unit.
1. Remove other items, including the
smart key, from the wireless charg-
ing unit. If not, the wireless charg-
ing process may be interrupted.
Place the cellular phone on the
center of the charging pad ( ).
2. The indicator light is orange when
the cellular phone is charging. The
indicator light turns green when
phone charging is complete.
3. You can turn ON or OFF the wire-
less charging function in the
Vehicle Settings mode on the AVN
screen. For further information,
refer to the separately supplied
"Navigation manual".If your cellular phone is not charging:
- Slightly change the position of the
cellular phone on the charging
pad.
- Make sure the indicator light is
orange.
The indicator light will blink orange for
10 seconds if there is a malfunction in
the wireless charging system.
In this case, temporarily stop the
charging process, and re-attempt to
charge your cellular phone again.
The system warns you with a mes-
sage on the LCD display if the cellular
phone is still on the wireless charging
unit after the POWER button is in the
OFF position and the front door is
opened.
Information
For some manufacturer's cellular
phones, the system may not warn you
even though the cellular phone is left
on the wireless charging unit. This is
due to the particular characteristic of
the cellular phone and not a malfunc-
tion of the wireless charging. The wireless cellular phone
charging system may not sup-
port certain cellular phones,
which are not verified for the Qi
specification ( ).
When placing your cellular
phone on the charging mat,
position the phone in the middle
of the mat for optimal charging
performance. If your cell phone
is off to the side, the charging
rate may be less and in some
cases the cell phone may experi-
ence higher heat conduction.
In some cases, the wireless
charging may stop temporarily
when the Smart Key is used,
either when starting the vehicle or
locking/unlocking the doors, etc.
When charging certain cellular
phones, the charging indicator
may not change to green when
the cell phone is fully charged.
NOTICE
i
Page 258 of 561
3-171
Convenient features of your vehicle
3
The wireless charging process
may temporarily stop, when tem-
perature abnormally increases
inside the wireless cellular phone
charging system. Stop the charg-
ing cellular phone and wait until
temperature falls to a certain level.
The wireless charging process
may temporarily stop when there
is any metallic item, such as a
coin, between the wireless cellular
phone charging system and the
cellular phone.
When charging some cellular
phones with a self-protection fea-
ture, the wireless charging speed
may decrease and the wireless
charging may stop.
If the cellular phone has a thick
cover, the wireless charging may
not be possible.
If the cell phone is not completely
contacting the charging pad, wire-
less charging may not operate
properly.
Some magnetic items like credit
cards, phone cards or rail tickets
may be damaged if left with the
cellular phone during the charging
process. When any cellular phone without a
wireless charging function or a
metallic object is placed on the
charging pad, a small noise may
sound. This small sound is due to
the vehicle discerning compatibil-
ity of the object placed on the
charging pad. It does not affect
your vehicle or the cellular phone
in any way.
Information
If the POWER button is in the OFF
position, the charging also stops.
Information
This device complies with part 15 of
the FCC Rules.
Operation is subject to the following
two conditions:
1. This device may not cause harmful
interference, and
2. This device must accept any inter-
ference received, including interfer-
ence that may cause undesired
operation.
Clock
Select the Vehicle Settings menu on
the AVN screen➟Select [Date/Time].
GPS time: Displays time according
to the received GNSS time.
Daylight saving time : The clock is
adjusted forward one hour.
Time format : Switches to 12 hour
or 24 hour.
For more details, refer to the sepa-
rately supplied Navigation manual.
i
i
Do not attempt to adjust the
clock while driving. Doing so
may result in distracted driving
which may lead to an accident
involving personal injury or
death.
WARNING
Page 268 of 561
Driving your vehicle
5
Before Driving ........................................................5-4
Before Entering the Vehicle ...........................................5-4
Before Starting ..................................................................5-4
Power Button..........................................................5-6
POWER Button Positions.................................................5-7
Starting the Vehicle ..........................................................5-9
Turning Off the Vehicle .................................................5-10
Reduction Gear.....................................................5-11
Reduction Gear Operation ............................................5-11
Parking ...............................................................................5-13
LCD Display Messages ...................................................5-13
Good Driving Practices ..................................................5-16
Paddle Shifter (Regenerative Braking
Control)..................................................................5-17
Braking System ....................................................5-18
Power Brakes ...................................................................5-18
Disc Brake Wear Indicator ............................................5-19
Electronic Parking Brake (EPB)...................................5-19
Auto Hold ..........................................................................5-25
Anti-lock Brake System (ABS) ....................................5-29
Electronic Stability Control (ESC)................................5-31
Vehicle Stability Management (VSM).........................5-34
Hill-Start Assist Control (HAC) ....................................5-36
Good Braking Practices .................................................5-36
Drive Mode Integrated Control System ............5-37
Drive mode change alert ...............................................5-38
ECO mode climate control ............................................5-38
Forward Collision-avoidance Assist (FCA)
System ...................................................................5-39
System Setting and Activation.....................................5-39
FCA Warning Message and System Control ............5-41
FCA Sensor (Front Radar/Front View Camera).......5-44
System Malfunction .......................................................5-46
Limitations of the System .............................................5-47
Blind-Spot Collision Warning/
Blind-Spot Collision-avoidance Assist..............5-53
System Description .........................................................5-53
System Setting and Activation.....................................5-54
Warning and System Control .......................................5-57
Detecting Sensor (Front View Camera and
Rear Corner Radar) ........................................................5-59
Limitations of the System .............................................5-62
Rear Cross-traffic Collision Warning (RCCW)/
Rear Cross-traffic Collision-avoidance Assist
(RCCA) ...................................................................5-67
System Description .........................................................5-67
System Setting and Activation.....................................5-68
Warning and System Control .......................................5-69
Limitations of the System .............................................5-73