2020 HYUNDAI NEXO ECO mode
[x] Cancel search: ECO modePage 239 of 561
3-152
Convenient features of your vehicle
Adjusting the driver and passenger
side temperature equally
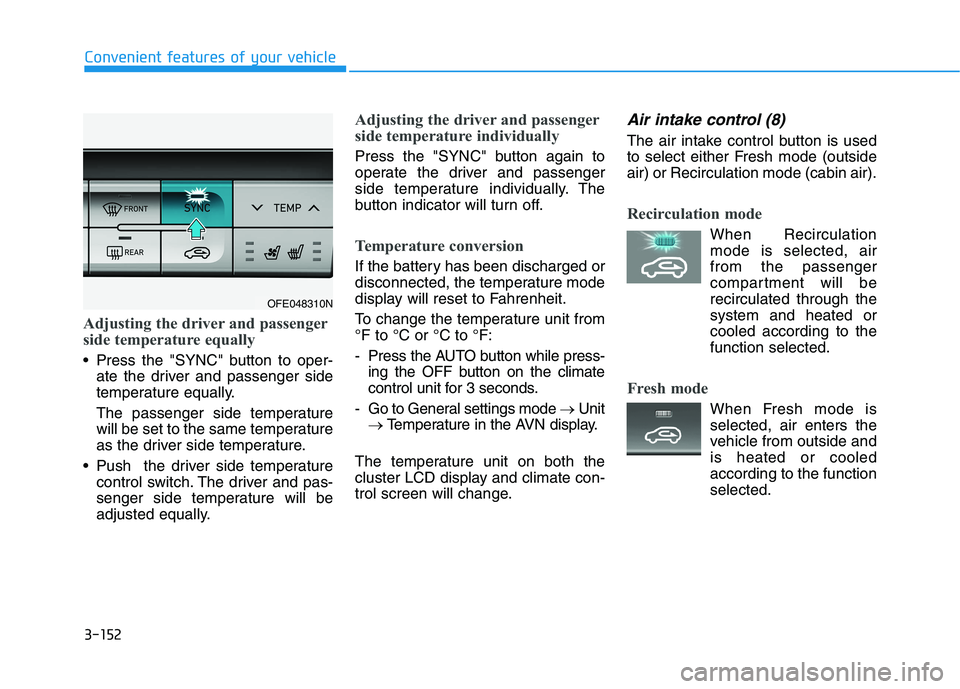
Press the "SYNC" button to oper-
ate the driver and passenger side
temperature equally.
The passenger side temperature
will be set to the same temperature
as the driver side temperature.
Push the driver side temperature
control switch. The driver and pas-
senger side temperature will be
adjusted equally.
Adjusting the driver and passenger
side temperature individually
Press the "SYNC" button again to
operate the driver and passenger
side temperature individually. The
button indicator will turn off.
Temperature conversion
If the battery has been discharged or
disconnected, the temperature mode
display will reset to Fahrenheit.
To change the temperature unit from
°F to °C or °C to °F:
- Press the AUTO button while press-
ing the OFF button on the climate
control unit for 3 seconds.
- Go to General settings mode →Unit
→Temperature in the AVN display.
The temperature unit on both the
cluster LCD display and climate con-
trol screen will change.
Air intake control (8)
The air intake control button is used
to select either Fresh mode (outside
air) or Recirculation mode (cabin air).
Recirculation mode
When Recirculation
mode is selected, air
from the passenger
compartment will be
recirculated through the
system and heated or
cooled according to the
function selected.
Fresh mode
When Fresh mode is
selected, air enters the
vehicle from outside and
is heated or cooled
according to the function
selected.
OFE048310N
Page 240 of 561
3-153
Convenient features of your vehicle
3
Information
Operating the system primarily in
Fresh mode is recommended. Use
Recirculation mode temporarily only
when needed.
Prolonged operation of the heater in
Recirculation mode and without the
A/C ON can cause fogging of the
windshield.
In addition, prolonged use of the A/C
ON in Recirculation mode may result
in excessively dry, dehumidified air in
the cabin and may promote formation
of musty vent odor due to stagnant air.
Fan speed control (5)
The fan speed can be set as desired
by pushing the fan speed control but-
ton.
More air is delivered with higher fan
speeds.
Pressing the OFF button turns off the
fan.
Operating the fan when the
POWER button is in the ON posi-
tion could cause the battery to
discharge. Operate the blower
when the vehicle is in the ready
( ) mode.
Operating the fan when POWER
button is in the ON position could
cause the battery to discharge.
Operate the fan when the vehicle
is in the ready ( ) mode.
NOTICE
NOTICE
i
Continued use of the climate
control system operation in
Recirculation mode for a pro-
longed period of time may
cause drowsiness to the
occupants in the cabin. This
may lead to loss of vehicle
control which may lead to an
accident.
Continued use of the climate
control system operation in
Recirculation mode with the
A/C OFF may allow humidity
to increase inside the cabin.
This may cause condensation
to accumulate on the wind-
shield and obscure visibility.
Do not sleep in your vehicle or
remain parked in your vehicle
with the windows up and
either the heater or the air
conditioning ON for pro-
longed periods of time. Doing
so may increase the levels of
carbon dioxide in the cabin
which may lead to serious
injury or death.
WARNING
Page 247 of 561
3-160
Convenient features of your vehicle
Auto Defogging System
(Additional Feature with
Automatic Temperature
Control System) (if equipped)
Auto defogging helps reduce the pos-
sibility of fogging up the inside of the
windshield by automatically sensing
the moisture on inside the windshield.
The auto defogging system operates
when the heater or air conditioning is
on.
Information
The auto defogging system may not
operate normally, when the outside
temperature is below 14 °F (-10 °C).When the Auto Defogging
System operates, the indi-
cator will illuminate.
If a high amount of humidity is
detected in the vehicle, the Auto
Defogging System will be enabled.
The following steps will be performed
automatically:
Step 1) The A/C button will turn ON.
Step 2) The air intake control will
change to Fresh mode.
Step 3) The mode will be changed to
defrost to direct airflow to the
windshield.
Step 4) The fan speed will be set to
MAX.
If the air conditioning is off or recircu-
lated air position is manually select-
ed while Auto Defogging System is
ON, the Auto Defogging System
Indicator will blink 3 times to signal
that the manual operation has been
canceled.
To cancel or reset the
Auto Defogging System
Press the front windshield defroster
button for 3 seconds when the
POWER button is in the ON position.
When the Auto Defogging System is
canceled, the ADS OFF symbol will
blink 3 times and ADS OFF will be
displayed on the climate control
information screen.
When the Auto Defogging System is
reset, the ADS OFF symbol will blink
6 times without a signal.
i
Page 249 of 561
3-162
Convenient features of your vehicle
Automatic Ventilation
(if equipped)
When the POWER button is in the
ON position or when the vehicle is in
the ready ( ) mode and tempera-
ture is below 59°F (15°C) with the
recirculated air position selected
more than five minutes, the air intake
position will automatically change to
the outside (fresh) air position.
To cancel or reset the Automatic
Ventilation
When the air conditioning system is
on, select Face Level mode and
press the recirculation mode button
five times within three seconds while
pressing A/C button.
When the Automatic Ventilation fea-
ture is enabled, the recirculation but-
ton LED indicator will blink 6 times.
When the Automatic Ventilation fea-
ture is disabled, the recirculation but-
ton LED indicator will blink 3 times.
Sunroof Inside Air
Recirculation (if equipped)
When the heater or air conditioning
system is on with the sunroof
opened, the fresh mode will be auto-
matically selected. If you press the
recirculation mode button with the
sunroof open, recirculation mode
activate but will only remain enabled
for 3 minutes. After 3 minutes the air
intake control will revert back to
Fresh mode.
When the sunroof is closed, the air
intake position will return to the orig-
inal position that was selected.
C CL
LI
IM
MA
AT
TE
E
C
CO
ON
NT
TR
RO
OL
L
A
AD
DD
DI
IT
TI
IO
ON
NA
AL
L
F
FE
EA
AT
TU
UR
RE
ES
S
Page 257 of 561

3-170
Convenient features of your vehicle
To charge a cellular phone
The wireless cellular phone charging
system charges only the Qi-enabled
cellular phones ( ). Read the label
on the cellular phone accessory
cover or visit your cellular phone
manufacturer's website to check
whether your cellular phone supports
the Qi technology.
The wireless charging process starts
when you put a Qi-enabled cellular
phone on the wireless charging unit.
1. Remove other items, including the
smart key, from the wireless charg-
ing unit. If not, the wireless charg-
ing process may be interrupted.
Place the cellular phone on the
center of the charging pad ( ).
2. The indicator light is orange when
the cellular phone is charging. The
indicator light turns green when
phone charging is complete.
3. You can turn ON or OFF the wire-
less charging function in the
Vehicle Settings mode on the AVN
screen. For further information,
refer to the separately supplied
"Navigation manual".If your cellular phone is not charging:
- Slightly change the position of the
cellular phone on the charging
pad.
- Make sure the indicator light is
orange.
The indicator light will blink orange for
10 seconds if there is a malfunction in
the wireless charging system.
In this case, temporarily stop the
charging process, and re-attempt to
charge your cellular phone again.
The system warns you with a mes-
sage on the LCD display if the cellular
phone is still on the wireless charging
unit after the POWER button is in the
OFF position and the front door is
opened.
Information
For some manufacturer's cellular
phones, the system may not warn you
even though the cellular phone is left
on the wireless charging unit. This is
due to the particular characteristic of
the cellular phone and not a malfunc-
tion of the wireless charging. The wireless cellular phone
charging system may not sup-
port certain cellular phones,
which are not verified for the Qi
specification ( ).
When placing your cellular
phone on the charging mat,
position the phone in the middle
of the mat for optimal charging
performance. If your cell phone
is off to the side, the charging
rate may be less and in some
cases the cell phone may experi-
ence higher heat conduction.
In some cases, the wireless
charging may stop temporarily
when the Smart Key is used,
either when starting the vehicle or
locking/unlocking the doors, etc.
When charging certain cellular
phones, the charging indicator
may not change to green when
the cell phone is fully charged.
NOTICE
i
Page 266 of 561
4-3
Multimedia System
4
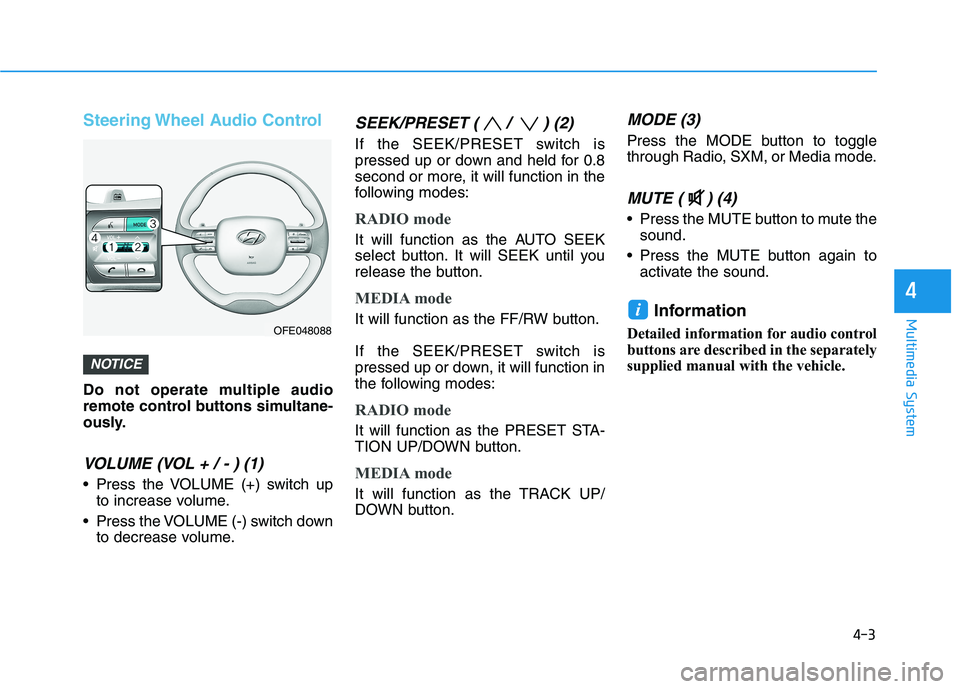
Steering Wheel Audio Control
Do not operate multiple audio
remote control buttons simultane-
ously.
VOLUME (VOL + / - ) (1)
Press the VOLUME (+) switch up
to increase volume.
Press the VOLUME (-) switch down
to decrease volume.
SEEK/PRESET ( / ) (2)
If the SEEK/PRESET switch is
pressed up or down and held for 0.8
second or more, it will function in the
following modes:
RADIO mode
It will function as the AUTO SEEK
select button. It will SEEK until you
release the button.
MEDIA mode
It will function as the FF/RW button.
If the SEEK/PRESET switch is
pressed up or down, it will function in
the following modes:
RADIO mode
It will function as the PRESET STA-
TION UP/DOWN button.
MEDIA mode
It will function as the TRACK UP/
DOWN button.
MODE (3)
Press the MODE button to toggle
through Radio, SXM, or Media mode.
MUTE ( ) (4)
Press the MUTE button to mute the
sound.
Press the MUTE button again to
activate the sound.
Information
Detailed information for audio control
buttons are described in the separately
supplied manual with the vehicle.
i
NOTICE
OFE048088
Page 268 of 561
Driving your vehicle
5
Before Driving ........................................................5-4
Before Entering the Vehicle ...........................................5-4
Before Starting ..................................................................5-4
Power Button..........................................................5-6
POWER Button Positions.................................................5-7
Starting the Vehicle ..........................................................5-9
Turning Off the Vehicle .................................................5-10
Reduction Gear.....................................................5-11
Reduction Gear Operation ............................................5-11
Parking ...............................................................................5-13
LCD Display Messages ...................................................5-13
Good Driving Practices ..................................................5-16
Paddle Shifter (Regenerative Braking
Control)..................................................................5-17
Braking System ....................................................5-18
Power Brakes ...................................................................5-18
Disc Brake Wear Indicator ............................................5-19
Electronic Parking Brake (EPB)...................................5-19
Auto Hold ..........................................................................5-25
Anti-lock Brake System (ABS) ....................................5-29
Electronic Stability Control (ESC)................................5-31
Vehicle Stability Management (VSM).........................5-34
Hill-Start Assist Control (HAC) ....................................5-36
Good Braking Practices .................................................5-36
Drive Mode Integrated Control System ............5-37
Drive mode change alert ...............................................5-38
ECO mode climate control ............................................5-38
Forward Collision-avoidance Assist (FCA)
System ...................................................................5-39
System Setting and Activation.....................................5-39
FCA Warning Message and System Control ............5-41
FCA Sensor (Front Radar/Front View Camera).......5-44
System Malfunction .......................................................5-46
Limitations of the System .............................................5-47
Blind-Spot Collision Warning/
Blind-Spot Collision-avoidance Assist..............5-53
System Description .........................................................5-53
System Setting and Activation.....................................5-54
Warning and System Control .......................................5-57
Detecting Sensor (Front View Camera and
Rear Corner Radar) ........................................................5-59
Limitations of the System .............................................5-62
Rear Cross-traffic Collision Warning (RCCW)/
Rear Cross-traffic Collision-avoidance Assist
(RCCA) ...................................................................5-67
System Description .........................................................5-67
System Setting and Activation.....................................5-68
Warning and System Control .......................................5-69
Limitations of the System .............................................5-73
Page 276 of 561
5-9
Driving your vehicle
5
Starting the Vehicle
Information
• The vehicle will start by pressing the
POWER button, only when the
smart key is in the vehicle.
• Even if the smart key is in the vehi-
cle, and when it is far away from the
driver, the vehicle may not start.
• When the POWER button is in the
ACC or ON position, any door is
open, the system checks for the
smart key. When the smart key is
not in the vehicle, the " " indica-
tor will blink and the warning "Key
not in vehicle" will come on. When
all doors are closed, the chime will
also sound for about 5 seconds.
Keep the smart key in the vehicle
when in the ACC position or if the
vehicle is in the ready ( ) mode.1. Always carry the smart key with
you.
2. Make sure the parking brake is
applied.
3. Make sure the gear is in P (Park).
4. Depress the brake pedal.
5. Press the POWER button. If the
vehicle starts, the " " indicator
will come on.
Information
• Always start the vehicle with your
foot on the brake pedal.
• If ambient temperature is low, the
" " indicator may remain illumi-
nated longer than the normal amount
of time.
i
i
Always wear appropriate shoes
when operating your vehicle.
Unsuitable shoes, such as high
heels, ski boots, sandals, flip-
flops, etc., may interfere with
your ability to use the brake
and accelerator pedals.
Do not start the vehicle with the
accelerator pedal depressed.
The vehicle can move and
lead to an accident.
WARNING