2020 Hyundai Ioniq Hybrid Battery reset
[x] Cancel search: Battery resetPage 248 of 635
3-156
Convenient features of your vehicle
To Defrost Outside Windshield
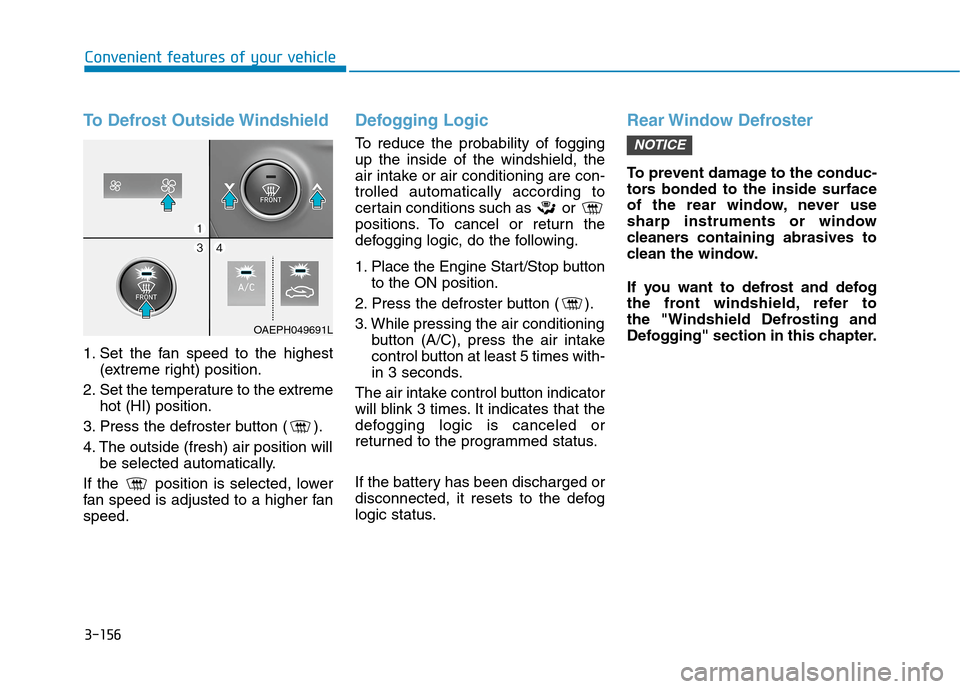
1. Set the fan speed to the highest
(extreme right) position.
2. Set the temperature to the extreme
hot (HI) position.
3. Press the defroster button ( ).
4. The outside (fresh) air position will
be selected automatically.
If the position is selected, lower
fan speed is adjusted to a higher fan
speed.
Defogging Logic
To reduce the probability of fogging
up the inside of the windshield, the
air intake or air conditioning are con-
trolled automatically according to
certain conditions such as or
positions. To cancel or return the
defogging logic, do the following.
1. Place the Engine Start/Stop button
to the ON position.
2. Press the defroster button ( ).
3. While pressing the air conditioning
button (A/C), press the air intake
control button at least 5 times with-
in 3 seconds.
The air intake control button indicator
will blink 3 times. It indicates that the
defogging logic is canceled or
returned to the programmed status.
If the battery has been discharged or
disconnected, it resets to the defog
logic status.
Rear Window Defroster
To prevent damage to the conduc-
tors bonded to the inside surface
of the rear window, never use
sharp instruments or window
cleaners containing abrasives to
clean the window.
If you want to defrost and defog
the front windshield, refer to
the "Windshield Defrosting and
Defogging" section in this chapter.
NOTICE
OAEPH049691L
Page 439 of 635
6-3
What to do in an emergency
If You Have a Flat Tire While
Driving
If a tire goes flat while you are driving:
Take your foot off the accelerator
pedal and let the vehicle slow
down while driving straight ahead.
Do not apply the brakes immedi-
ately or attempt to pull off the road
as this may cause loss of vehicle
control resulting in an accident.
When the vehicle has slowed to
such a speed that it is safe to do
so, brake carefully and pull off the
road. Drive off the road as far as
possible and park on firm, level
ground. If you are on a divided
highway, do not park in the median
area between the two traffic lanes.
When the vehicle is stopped, press
the hazard warning flasher button,
move the shift lever into P (Park),
and apply the parking brake, and
place the Engine Start/Stop button
in the OFF position.
Have all passengers get out of the
vehicle. Be sure they all get out on
the side of the vehicle that is away
from traffic.
When changing a flat tire, follow
the instructions provided later in
this chapter.
Hybrid vehicle
Be sure the shift lever is in P
(Park). The vehicle starts only
when the shift lever is in P (Park).
This vehicle does not have a regu-
lar 12V battery that needs periodic
replacement. It is lithium ion poly-
mer type integrated into the HEV
high voltage battery. The vehicle
has a 12V battery protection sys-
tem that cuts 12V battery from
vehicle draw to prevent full dis-
charge. If vehicle will not start, first
try pressing the 12V Battery Reset
switch (left side of the steering
wheel near the fuel door open
switch) to reconnect the 12V bat-
tery, but you must start vehicle
within 15 seconds of pressing the
12V Battery Reset switch. After
starting vehicle, operate the vehi-
cle safely outdoors in ready mode
stopped and/or drive it for 30 min-
utes total to charge the 12V battery
fully.Push or pull starting the vehicle
may cause the catalytic converter
to overload which can lead to
damage to the emission control
system.
Check the fuel level and add fuel if
necessary.
If the vehicle still does not start, have
your vehicle checked by an author-
ized HYUNDAI dealer.
NOTICE
6
I IF
F
T
TH
HE
E
V
VE
EH
HI
IC
CL
LE
E
W
WI
IL
LL
L
N
NO
OT
T
S
ST
TA
AR
RT
T
Page 441 of 635
6-5
What to do in an emergency
6
Before Jump Starting
This vehicle does not have a regular
12V battery that needs periodic
replacement. It is lithium ion polymer
type integrated into the HEV high
voltage battery. The vehicle has a
12V battery protection system that
cuts 12V battery from vehicle draw to
prevent full discharge.
Using the 12V Battery Reset
Switch
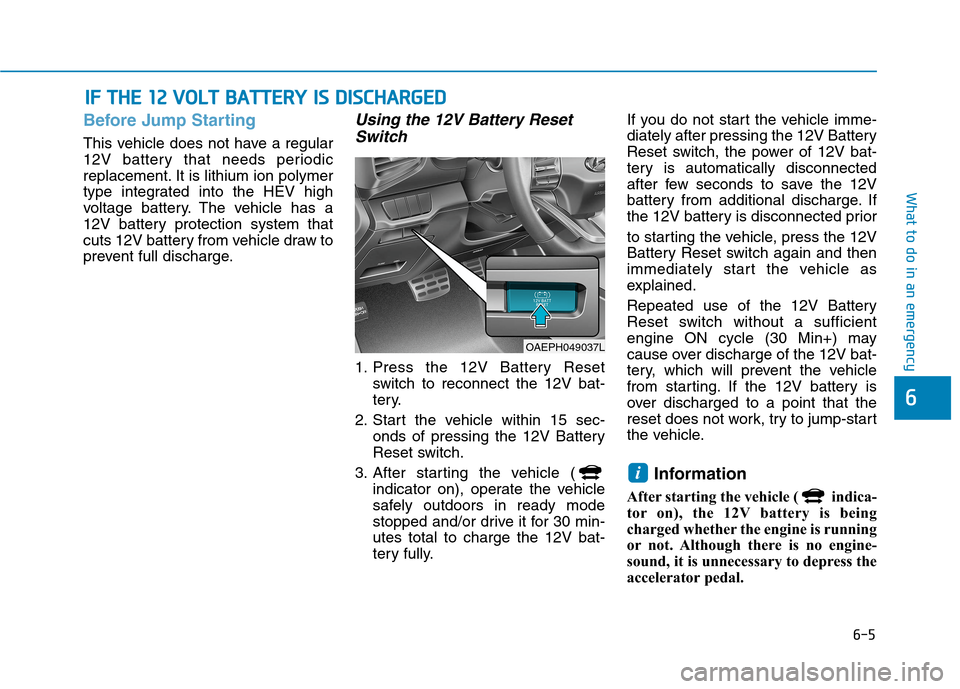
1. Press the 12V Battery Reset
switch to reconnect the 12V bat-
tery.
2. Start the vehicle within 15 sec-
onds of pressing the 12V Battery
Reset switch.
3. After starting the vehicle (
indicator on), operate the vehicle
safely outdoors in ready mode
stopped and/or drive it for 30 min-
utes total to charge the 12V bat-
tery fully.If you do not start the vehicle imme-
diately after pressing the 12V Battery
Reset switch, the power of 12V bat-
tery is automatically disconnected
after few seconds to save the 12V
battery from additional discharge. If
the 12V battery is disconnected prior
to starting the vehicle, press the 12V
Battery Reset switch again and then
immediately start the vehicle as
explained.
Repeated use of the 12V Battery
Reset switch without a sufficient
engine ON cycle (30 Min+) may
cause over discharge of the 12V bat-
tery, which will prevent the vehicle
from starting. If the 12V battery is
over discharged to a point that the
reset does not work, try to jump-start
the vehicle.
Information
After starting the vehicle ( indica-
tor on), the 12V battery is being
charged whether the engine is running
or not. Although there is no engine-
sound, it is unnecessary to depress the
accelerator pedal.
i
I IF
F
T
TH
HE
E
1
12
2
V
VO
OL
LT
T
B
BA
AT
TT
TE
ER
RY
Y
I
IS
S
D
DI
IS
SC
CH
HA
AR
RG
GE
ED
D
OAEPH049037L
Page 442 of 635

6-6
What to do in an emergency
The following items may need to be
reset after the battery has been dis-
charged or the battery has been dis-
connected. See chapter 3 or 4 for:
Power Windows
Trip Computer
Climate Control System
Clock
Audio System
Sunroof
Driver Position Memory System
External power source using 12V
battery
The use of external power acces-
sories may reduce performance
and function of the vehicle.
Especially, the use of dash cam-
eras may shut off the power of the
vehicle prior to the dash camera's
automatic shut-down.
If the power of the vehicle is shut
off, start the vehicle as explained.
(refer to "Using the 12V Battery
Switch")
Jump Starting
In the event vehicle still does not
have a functional 12V battery (check
if interior lights will not turn on) then
you can try a jump start to the engine
compartment jumper terminals using
a 12V booster pack or jumper cables
from another vehicle's 12V battery
according to the following instruc-
tions.1. Position the vehicles close enough
that the jumper cables will reach,
but do not allow the vehicles to
touch.
2. Avoid fans or any moving parts in
the engine compartment at all
times, even when the vehicles are
turned off.
3. Turn off all electrical devices such
as radios, lights, air conditioning,
etc. Put the vehicles in P (Park)
and set the parking brake. Turn
both vehicles OFF.
NOTICEJump starting can be danger-
ous if done incorrectly. Follow
the jump starting procedure in
this section to avoid serious
injury or damage to your vehi-
cle. If in doubt about how to
properly jump start your vehi-
cle, we strongly recommend
that you have a service techni-
cian or towing service do it for
you.
CAUTION
Page 443 of 635
6-7
What to do in an emergency
6
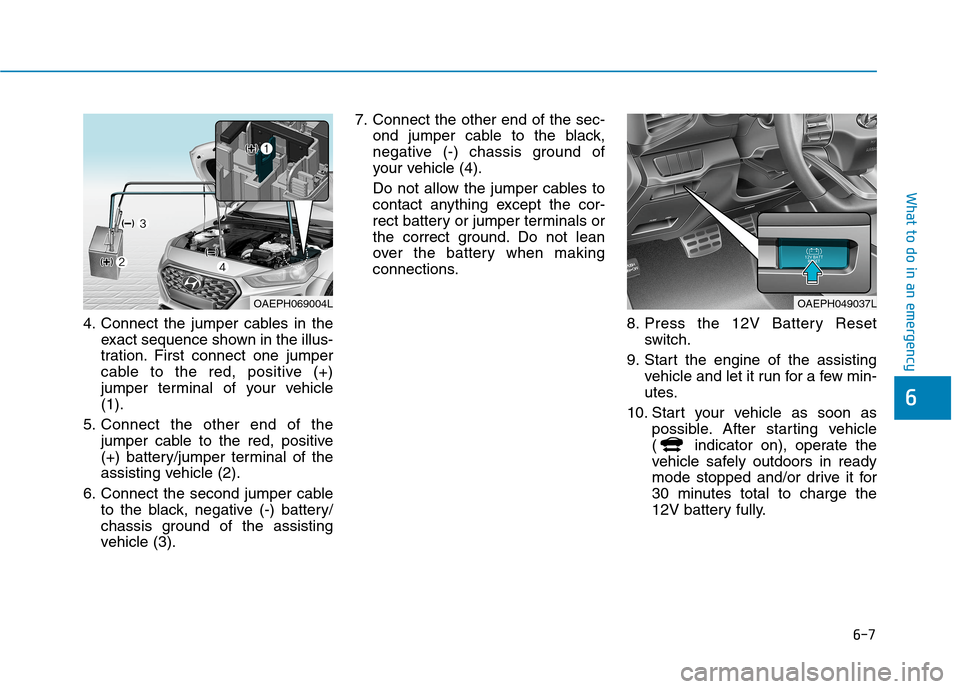
4. Connect the jumper cables in the
exact sequence shown in the illus-
tration. First connect one jumper
cable to the red, positive (+)
jumper terminal of your vehicle
(1).
5. Connect the other end of the
jumper cable to the red, positive
(+) battery/jumper terminal of the
assisting vehicle (2).
6. Connect the second jumper cable
to the black, negative (-) battery/
chassis ground of the assisting
vehicle (3).7. Connect the other end of the sec-
ond jumper cable to the black,
negative (-) chassis ground of
your vehicle (4).
Do not allow the jumper cables to
contact anything except the cor-
rect battery or jumper terminals or
the correct ground. Do not lean
over the battery when making
connections.
8. Press the 12V Battery Reset
switch.
9. Start the engine of the assisting
vehicle and let it run for a few min-
utes.
10. Start your vehicle as soon as
possible. After starting vehicle
( indicator on), operate the
vehicle safely outdoors in ready
mode stopped and/or drive it for
30 minutes total to charge the
12V battery fully.
OAEPH069004LOAEPH049037L
Page 481 of 635

7
Maintenance
7
Maintenance
Engine Compartment .............................................7-3
Maintenance Services ...........................................7-5
Owner's Responsibility .....................................................7-5
Owner Maintenance Precautions..................................7-5
Owner Maintenance ..............................................7-6
How to Disconnect the (-) Cable for Regular
Maintenance (Hybrid vehicle) ........................................7-7
Owner Maintenance Schedule .......................................7-7
Scheduled Maintenance Services........................7-8
Normal Maintenance Schedule ......................................7-9
Maintenance Under Severe Usage Conditions ........7-12
Severe driving conditions..............................................7-13
Explanation of Scheduled Maintenance
Items ......................................................................7-14
Engine Oil ..............................................................7-16
Checking the Engine Oil Level .....................................7-16
Checking the Engine Oil and Filter .............................7-17
Engine Coolant/Inverter Coolant .......................7-18
Checking the Coolant Level ..........................................7-18
Changing Coolant ............................................................7-21
Hybrid Starter & Generator (HSG) Belt ...........7-21
Checking the Hybrid Starter &
Generator (HSG) Belt .....................................................7-21
Brake Fluid ............................................................7-22
Checking the Brake Fluid Level ...................................7-22
Washer Fluid .........................................................7-23
Checking the Washer Fluid Level................................7-23
Parking Brake .......................................................7-23
Checking the Parking Brake .........................................7-23
Air Cleaner ............................................................7-24
Filter Replacement ..........................................................7-24
Climate Control Air Filter ....................................7-26
Filter inspection ...............................................................7-26
Wiper Blades.........................................................7-28
Blade inspection ..............................................................7-28
Blade Replacement .........................................................7-28
Battery (12 Volt, Plug-In Hybrid Vehicle) ........7-31
For Best Battery Service ..............................................7-32
Battery Recharging ........................................................7-32
Reset Features.................................................................7-33
Tires and Wheels .................................................7-34
Tire Care ............................................................................7-34
Recommended Cold Tire Inflation Pressures ...........7-35
Check Tire Inflation Pressure ......................................7-36
Tire Rotation.....................................................................7-377
Page 513 of 635

By jump starting
After a jump start from a good bat-
tery, drive the vehicle for 20-30 min-
utes before it is shutoff. The vehicle
may not restart if you shut it off
before the battery had a chance to
adequately recharge. See "Jump
Starting" in chapter 6 for more infor-
mation on jump starting procedures.
Information
An inappropriately disposed
battery can be harmful to
the environment and human
health. Dispose of the bat-
tery according to your local
law(s) or regulations.
Reset Features
The following items may need to be
reset after the battery has been dis-
charged or the battery has been dis-
connected. See chapter 3 or 4 for:
Power Windows
Trip Computer
Climate Control System
Clock
Audio System
Sunroof
Driver Position Memory System
i
7-33
7
Maintenance
(Continued)
Watch the battery during
charging, and stop or reduce
the charging rate if the battery
cells begin boiling violently.
The negative battery cable
must be removed first and
installed last when the battery
is disconnected. Disconnect
the battery charger in the fol-
lowing order:
(1) Turn off the battery charg-
er main switch.
(2) Unhook the negative
clamp from the negative
battery terminal.
(3) Unhook the positive clamp
from the positive battery
terminal.
Always use a genuine
HYUNDAI approved battery
when you replace the battery.
Page 628 of 635
I-2
Accessing your vehicle .....................................................3-3
Immobilizer System ....................................................3-8
Smart Key.....................................................................3-3
Air bag - advanced supplemental restraint system .........2-47
Additional Safety Precautions ....................................2-69
Air Bag Warning Labels.............................................2-70
How Does the Air Bag System Operate? ...................2-52
Occupant Classification System (OCS) .....................2-58
SRS Care ....................................................................2-68
What to Expect After an Air Bag Inflates ..................2-57
Where Are the Air Bags? ...........................................2-49
Why Didn't My Air Bag Go Off in a Collision?........2-63
Air cleaner.......................................................................7-24
Filter Replacement .....................................................7-24
Air conditioning system....................................................8-6
Appearance care..............................................................7-67
Exterior Care ..............................................................7-67
Interior Care ...............................................................7-73
Automatic climate control system ................................3-143
Automatic Heating and Air Conditioning ................3-144
Manual Heating and Air Conditioning .....................3-145
System Maintenance ................................................3-153
System Operation .....................................................3-152Battery (12 volt, Plug-In Hybrid Vehicle) ......................7-31
Battery Recharging .....................................................7-32
For Best Battery Service ............................................7-32
Reset Features ............................................................7-33
Before driving ...................................................................5-4
Before Entering the Vehicle .........................................5-4
Before Starting .............................................................5-4
Blind-spot Collision Warning (BCW) ...........................5-86
Declaration of conformity .........................................5-97
System description .....................................................5-86
System setting and operation .....................................5-87
Warning message and system control ........................5-89
Brake fluid ......................................................................7-22
Checking the Brake Fluid Level ................................7-22
Braking system ..............................................................5-26
Anti-lock Brake System (ABS)..................................5-39
AUTO HOLD .............................................................5-35
Disc Brake Wear Indicator .........................................5-27
Electronic Parking Brake (EPB) ................................5-29
Electronic Stability Control (ESC).............................5-41
Good Braking Practices ............................................5-46
Hill-Start Assist Control (HAC) .................................5-46
Parking Brake (foot type) ...........................................5-27
Power Brakes..............................................................5-26
Vehicle Stability Management (VSM) .......................5-44
Bulb wattage .....................................................................8-3
Index
AB