2020 Hyundai Ioniq Hybrid spare wheel
[x] Cancel search: spare wheelPage 488 of 613
6-15
What to do in an emergency
Tyre pressure monitoring sys-
tem
Each tyre, including the spare (if pro-
vided), should be checked monthly
when cold and inflated to the inflation
pressure recommended by the vehi-
cle manufacturer on the vehicle plac-
ard or tyre inflation pressure label. (If
your vehicle has tyres of a different
size than the size indicated on the
vehicle placard or tyre inflation pres-
sure label, you should determine the
proper tyre inflation pressure for
those tyres.)As an added safety feature, your
vehicle has been equipped with a
tyre pressure monitoring system
(TPMS) that illuminates a low tyre
pressure telltale when one or more
of your tyres is significantly under-
inflated. Accordingly, when the low
tyre pressure telltale illuminates, you
should stop and check your tyres as
soon as possible, and inflate them to
the proper pressure. Driving on a sig-
nificantly under-inflated tyre causes
the tyre to overheat and can lead to
tyre failure.
Under-inflation also reduces fuel effi-
ciency and tyre tread life, and may
affect the vehicle’s handling and
stopping ability.
Please note that the TPMS is not a
substitute for proper tyre mainte-
nance, and it is the driver’s responsi-
bility to maintain correct tyre pres-
sure, even if under-inflation has not
reached the level to trigger illumina-
tion of the TPMS low tyre pressure
telltale.Your vehicle has also been equipped
with a TPMS malfunction indicator to
indicate when the system is not
operating properly. The TPMS mal-
function indicator is combined with
the low tyre pressure telltale. When
the system detects a malfunction,
the telltale will flash for approximate-
ly one minute and then remain con-
tinuously illuminated. This sequence
will continue upon subsequent vehi-
cle start-ups as long as the malfunc-
tion exists.
When the malfunction indicator is illu-
minated, the system may not be able
to detect or signal low tyre pressure
as intended. TPMS malfunctions may
occur for a variety of reasons, includ-
ing the installation of replacement or
alternate tyres or wheels on the vehi-
cle that prevent the TPMS from func-
tioning properly.
Always check the TPMS malfunction
telltale after replacing one or more
tyres or wheels on your vehicle to
ensure that the replacement or alter-
nate tyres and wheels allow the
TPMS to continue to function proper-
ly.
6
Over-inflation or under-inflation
can reduce tyre life, adversely
affect vehicle handling, and
lead to sudden tyre failure that
may cause loss of vehicle con-
trol resulting in an accident.
WARNING
Page 491 of 613
6-18
The TPMS Malfunction Indicator
may illuminate after blinking for
one minute if the vehicle is near
electric power supply cables or
radio transmitters such as police
stations, government and public
offices, broadcasting stations,
military installations, airports,
transmitting towers, etc.
Additionally, the TPMS Malfunction
Indicator may illuminate if snow
chains are used or electronic
devices such as computers, charg-
ers, remote starters, navigation,
etc. This may interfere with normal
operation of the TPMS.
Changing a tyre with TPMS
If you have a flat tyre, the Low Tyre
Pressure and Position telltales will
come on. We recommend that the
flat tyre be repaired by an authorised
HYUNDAI dealer as soon as possi-
ble or replace the flat tyre with the
spare tyre.The spare tyre (if equipped) does not
come with a tyre pressure monitoring
sensor. When the low pressure tyre
or the flat tyre is replaced with the
spare tyre, the Low Tyre Pressure
Telltale will remain on. Also, the TPMS
Malfunction Indicator will illuminate
after blinking for one minute if the vehi-
cle is driven at speed above 25 km/h
(15.5 mph) for approximately 10 min-
utes.
Once the original tyre equipped with
a tyre pressure monitoring sensor is
reinflated to the recommended pres-
sure and reinstalled on the vehicle,
the Low Tyre Pressure Telltale and
TPMS Malfunction Indicator will go
off within a few minutes of driving.If the indicators do not extinguish
after a few minutes, please visit an
authorised HYUNDAI dealer.
Each wheel is equipped with a tyre
pressure sensor mounted inside the
tyre behind the valve stem (except
for the spare tyre). You must use
TPMS specific wheels. It is recom-
mended that you always have your
tyres serviced by an authorised
HYUNDAI dealer.
You may not be able to identify a tyre
with low pressure by simply looking
at it. Always use a good quality tyre
pressure gauge to measure. Please
note that a tyre that is hot (from
being driven) will have a higher pres-
sure measurement than a tyre that is
cold.
NOTICE
What to do in an emergency
It is recommended that you do
not use a puncture-repairing
agent not approved by a
HYUNDAI dealer to repair and/or
inflate a low pressure tyre. Tyre
sealant not approved by a
HYUNDAI dealer may damage
the tyre pressure sensor.
CAUTION
Page 493 of 613
6-20
What to do in an emergency
Jack and tools
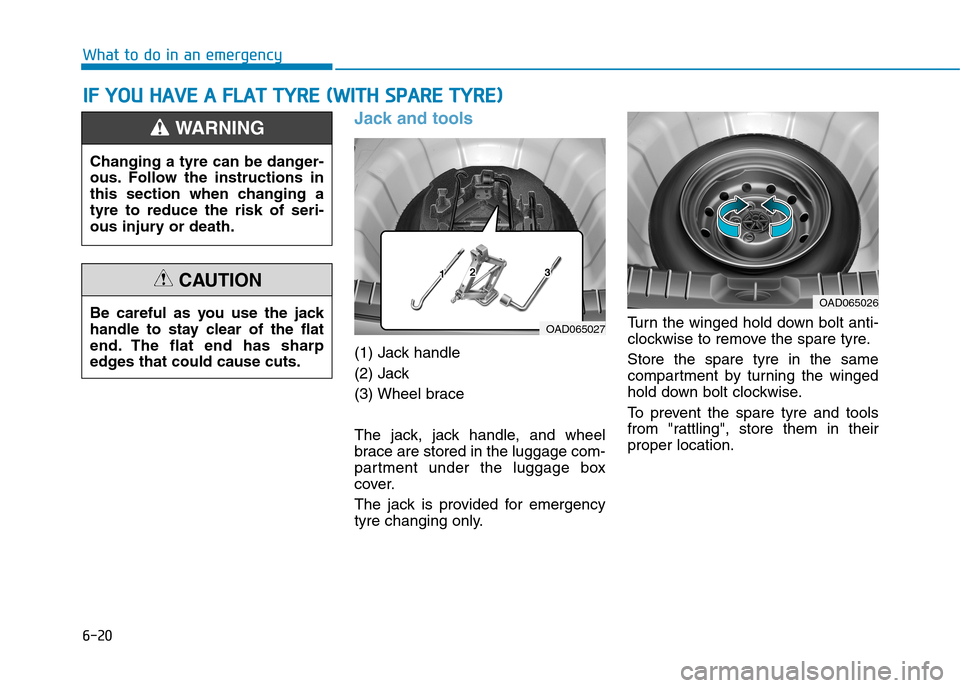
(1) Jack handle
(2) Jack
(3) Wheel brace
The jack, jack handle, and wheel
brace are stored in the luggage com-
partment under the luggage box
cover.
The jack is provided for emergency
tyre changing only.Turn the winged hold down bolt anti-
clockwise to remove the spare tyre.
Store the spare tyre in the same
compartment by turning the winged
hold down bolt clockwise.
To prevent the spare tyre and tools
from "rattling", store them in their
proper location.
I IF
F
Y
YO
OU
U
H
HA
AV
VE
E
A
A
F
FL
LA
AT
T
T
TY
YR
RE
E
(
(W
WI
IT
TH
H
S
SP
PA
AR
RE
E
T
TY
YR
RE
E)
)
OAD065027
OAD065026
Changing a tyre can be danger-
ous. Follow the instructions in
this section when changing a
tyre to reduce the risk of seri-
ous injury or death.
WARNING
Be careful as you use the jack
handle to stay clear of the flat
end. The flat end has sharp
edges that could cause cuts.
CAUTION
Page 495 of 613
6-22
What to do in an emergency
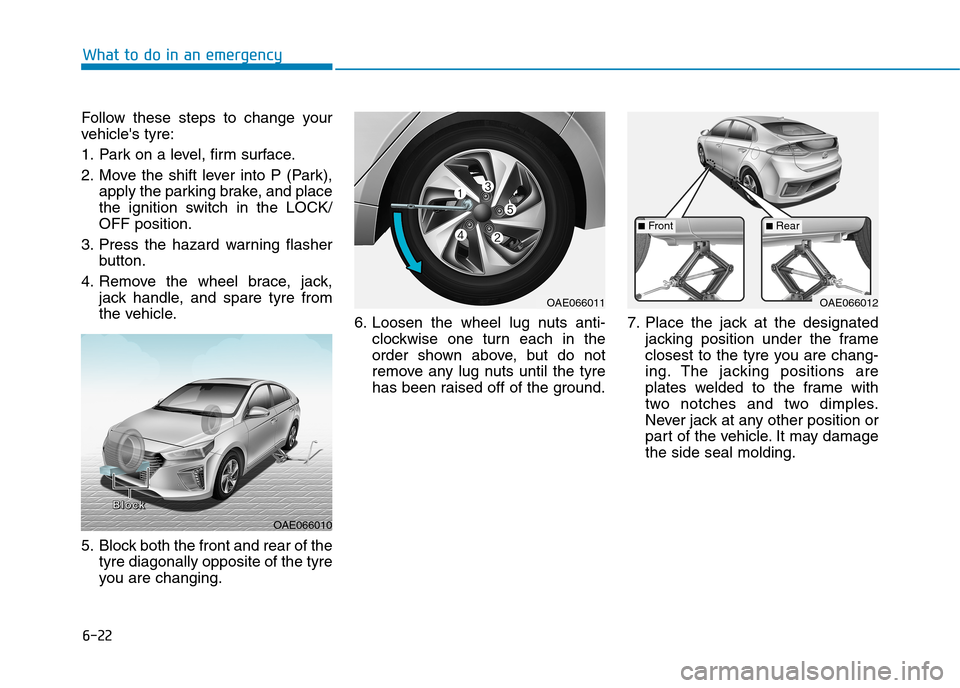
Follow these steps to change your
vehicle's tyre:
1. Park on a level, firm surface.
2. Move the shift lever into P (Park),
apply the parking brake, and place
the ignition switch in the LOCK/
OFF position.
3. Press the hazard warning flasher
button.
4. Remove the wheel brace, jack,
jack handle, and spare tyre from
the vehicle.
5. Block both the front and rear of the
tyre diagonally opposite of the tyre
you are changing.6. Loosen the wheel lug nuts anti-
clockwise one turn each in the
order shown above, but do not
remove any lug nuts until the tyre
has been raised off of the ground.7. Place the jack at the designated
jacking position under the frame
closest to the tyre you are chang-
ing. The jacking positions are
plates welded to the frame with
two notches and two dimples.
Never jack at any other position or
part of the vehicle. It may damage
the side seal molding.
OAE066010
B B B B
l l l l
o o o o
c c c c
k k k k
OAE066011OAE066012
■Front■Rear
Page 496 of 613
6-23
What to do in an emergency
6
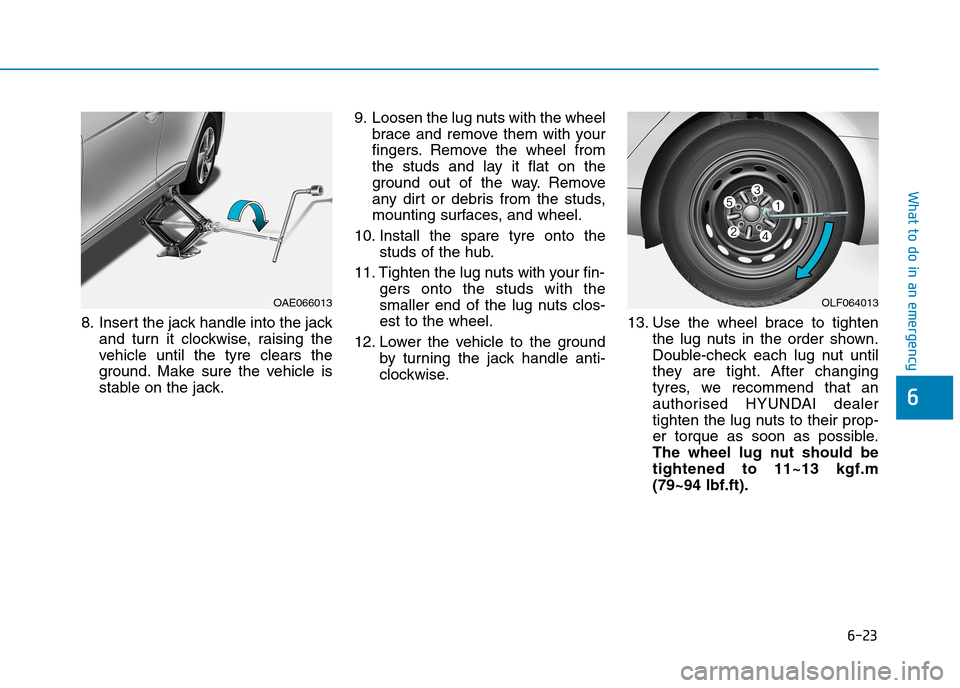
8. Insert the jack handle into the jack
and turn it clockwise, raising the
vehicle until the tyre clears the
ground. Make sure the vehicle is
stable on the jack.9. Loosen the lug nuts with the wheel
brace and remove them with your
fingers. Remove the wheel from
the studs and lay it flat on the
ground out of the way. Remove
any dirt or debris from the studs,
mounting surfaces, and wheel.
10. Install the spare tyre onto the
studs of the hub.
11. Tighten the lug nuts with your fin-
gers onto the studs with the
smaller end of the lug nuts clos-
est to the wheel.
12. Lower the vehicle to the ground
by turning the jack handle anti-
clockwise.13. Use the wheel brace to tighten
the lug nuts in the order shown.
Double-check each lug nut until
they are tight. After changing
tyres, we recommend that an
authorised HYUNDAI dealer
tighten the lug nuts to their prop-
er torque as soon as possible.
The wheel lug nut should be
tightened to 11~13 kgf.m
(79~94 lbf.ft).
OAE066013OLF064013
Page 497 of 613
6-24
What to do in an emergency
If you have a tyre gauge, check the
tyre pressure (see "Tyres and
Wheels" in chapter 8 for tyre pres-
sure instructions.). If the pressure is
lower or higher than recommended,
drive slowly to the nearest service
station and adjust it to the recom-
mended pressure. Always reinstall
the valve cap after checking or
adjusting tyre pressure. If the cap is
not replaced, air may leak from the
tyre. If you lose a valve cap, buy
another and install it as soon as pos-
sible. After changing tyres, secure
the flat tyre and return the jack and
tools to their proper storage loca-
tions.
Check the tyre pressure as soon
as possible after installing a spare
tyre. Adjust it to the recommend-
ed pressure.If any of the equipment such as the
jack, lug nuts, studs, or other equip-
ment is damaged or in poor condi-
tion, do not attempt to change the
tyre and call for assistance.
Check and tighten the tyre wheel lug
nuts after driving over 50km if tyres
are replaced. Re-check the tyre
wheel lug nuts after driving over
1,000km.
Use of compact spare tyres
(if equipped)
Compact spare tyres are designed
for emergency use only. Drive care-
fully on the compact spare tyre and
always follow the safety precautions.
NOTICE
Your vehicle has metric threads
on the studs and lug nuts. Make
certain during tyre changing
that the same nuts that were
removed are reinstalled. If you
have to replace your lug nuts
make sure they have metric
threads to avoid damaging the
studs and ensure the wheel is
properly secured to the hub. We
recommend that you consult an
authorised HYUNDAI dealer for
assistance.
CAUTION
To prevent compact spare tyre
failure and loss of control pos-
sibly resulting in an accident:
Use the compact spare tyre
only in an emergency.
NEVER operate your vehicle
over 80 km/h (50 mph).
Do not exceed the vehicle’s
maximum load rating or the
load carrying capacity shown
on the sidewall of the com-
pact spare tyre.
Do not use the compact spare
tyre continuously. Repair or
replace the original tyre as
soon as possible to avoid fail-
ure of the compact spare tyre.
WARNING
Page 498 of 613
6-25
What to do in an emergency
6
When driving with the compact spare
tyre mounted to your vehicle:
Check the tyre pressure after
installing the compact spare tyre.
The compact spare tyre should be
inflated to 420 kPa (60 psi).
Do not take this vehicle through an
automatic car wash whilst the com-
pact spare tyre is installed.
Do not use the compact spare tyre
on any other vehicle because this
tyre has been designed especially
for your vehicle.
The compact spare tyre's tread life
is shorter than a regular tyre.
Inspect your compact spare tyre
regularly and replace worn com-
pact spare tyres with the same size
and design, mounted on the same
wheel.
Do not use more than one compact
spare tyre at a time.
Do not tow a trailer whilst the com-
pact spare tyre is installed.When the original tyre and wheel
are repaired and reinstalled on the
vehicle, the lug nut torque must be
set correctly. The correct lug nut
tightening torque is 11~13 kgf.m
(79~94 lbf.ft).NOTICE
To prevent damaging the com-
pact spare tyre and your vehi-
cle:
Drive slowly enough for the
road conditions to avoid all
hazards, such as a potholes
or debris.
Avoid driving over obstacles.
The compact spare tyre diam-
eter is smaller than the diame-
ter of a conventional tyre and
reduces the ground clearance
approximately 25 mm (1 inch).
Do not use tyre chains on the
compact spare tyre. Because
of the smaller size, a tyre
chain will not fit properly.
Do not use the compact spare
tyre on any other wheels, nor
should standard tyres, snow
tyres, wheel covers or trim
rings be used with the com-
pact spare wheel.
CAUTION
Page 525 of 613
7-7
7
Maintenance
Owner maintenance schedule
When you stop for fuel:
Check the engine oil level.
Check the coolant level in the
engine coolant reservoir.
Check the windscreen washer fluid
level.
Check for low or under-inflated
tyres.
Whilst operating your vehicle:
Note any changes in the sound of
the exhaust or any smell of
exhaust fumes in the vehicle.
Check for vibrations in the steering
wheel. Notice if there is any
increased steering effort or loose-
ness in the steering wheel, or
change in its straight-ahead posi-
tion.
Notice if your vehicle constantly
turns slightly or “pulls” to one side
when travelling on smooth, level
road.
When stopping, listen and check
for unusual sounds, pulling to one
side, increased brake pedal travel
or “hard-to-push” brake pedal.
If any slipping or changes in the
operation of your transmission
occurs, check the transmission
fluid level.
Check the dual clutch transmission
P (Park) function.
Check the parking brake.
Check for fluid leaks under your
vehicle (water dripping from the air
conditioning system during or after
use is normal).
At least monthly:
Check coolant level in the engine
coolant reservoir.
Check the operation of all exterior
lights, including the stoplights, turn
signals and hazard warning flashers.
Check the inflation pressures of all
tyres including the spare for tyres
that are worn, show uneven wear,
or are damaged.
Check for loose wheel lug nuts.
At least twice a year:
(i.e., every Spring and Autumn)
Check radiator, heater and air condi-
tioning hoses for leaks or damage.
Check windscreen washer spray
and wiper operation. Clean wiper
blades with a clean cloth damp-
ened with washer fluid.
Check headlamp alignment.
Check muffler, exhaust pipes,
shields and clamps.
Check the seat belts for wear and
function. Be careful when checking your
engine coolant/inverter coolant
level when the engine is hot.
This may result in coolant being
blown out of the opening and
cause serious burns and other
injuries.
WARNING