2020 Hyundai Ioniq Hybrid check engine light
[x] Cancel search: check engine lightPage 479 of 613
6-6
The following items may need to be
reset after the battery has been dis-
charged or the battery has been dis-
connected.
See chapter 3 or 4 for:
Power Windows
Trip Computer
Climate Control System
Clock
Audio System
Sunroof
Driver Position Memory System
External power source using 12V
battery
The use of external power acces-
sories may reduce performance
and function of the vehicle.
Especially, the use of dash cam-
eras may shut off the power of the
vehicle prior to the dash camera's
automatic shut-down.
If the power of the vehicle is shut
off, start the vehicle as explained.
(refer to "Using the 12V Battery
Reset Switch")Jump starting
In the event vehicle still does not
have a functional 12V battery (check
if interior lights will not turn on) then
you can try a jump start to the engine
compartment jumper terminals using
a 12V booster pack or jumper cables
from another vehicle's 12V battery
according to the following instruc-
tions.1. Position the vehicles close enough
that the jumper cables will reach,
but do not allow the vehicles to
touch.
2. Avoid fans or any moving parts in
the engine compartment at all
times, even when the vehicles are
turned off.
3. Turn off all electrical devices such
as radios, lights, air conditioning,
etc. Put the vehicles in P (Park)
and set the parking brake. Turn
both vehicles OFF.
NOTICE
What to do in an emergency
Jump starting can be danger-
ous if done incorrectly. Follow
the jump starting procedure in
this section to avoid serious
injury or damage to your vehi-
cle. If in doubt about how to
properly jump start your vehi-
cle, we strongly recommend
that you have a service techni-
cian or towing service do it for
you.
CAUTION
Page 485 of 613
6-12
What to do in an emergency
If your temperature gauge indicates
overheating, you experience a loss
of power, or hear loud pinging or
knocking, the engine may be over-
heating. If this happens, you should:
1. Pull off the road and stop as soon
as it is safe to do so.
2. Place the shift lever in P (Park)
and set the parking brake3. Make sure that there is no hot
steam gushing out of the engine
compartment. When it is safe to
do so, open the engine compart-
ment, and check the water-pump
connector. When the water-pump
connector is disconnected, stop
the engine, re-connect the water-
pump connector, and then re-start
the engine.
4. Set the temperature and the air
flow to the maximum, and turn ON
the air conditioner.5. When the Service warning light
( ) illuminates on the instru-
ment cluster, immediately stop the
engine, and contact an authorised
HYUNDAI dealer. When the
engine warning light ( ) illumi-
nates, or when the coolant or hot
steams gush out of the engine
compartment, leave the engine
compartment opened, whilst run-
ning the engine. This is to ventilate
the engine compartment and to
cool down the engine.
6. Check the coolant temperature
gauge on the instrument cluster to
make sure the coolant temperature
is sufficiently cooled down. Check
the coolant level. When it is insuffi-
cient, check its connection with the
radiator, the heater hose, and the
water pump for any leakage. When
there is no leakage, add the
coolant. However, if the problems
persists, such as the illumination of
the warning lights, leakages, or the
cooling-fan malfunction, which may
overheat the engine, immediately
stop the engine, and have your
vehicle checked by an authorised
HYUNDAI dealer.
I IF
F
T
TH
HE
E
E
EN
NG
GI
IN
NE
E
O
OV
VE
ER
RH
HE
EA
AT
TS
S
Whilst the engine is
running, keep hands,
clothing and tools
away from the mov-
ing parts such as the
cooling fan and drive
belt to prevent seri-
ous injury.
WARNING
OAE066005
Page 489 of 613
6-16
If any of the below happens, have
the system checked by an autho-
rised HYUNDAI dealer.
1. The Low Tyre Pressure Telltale/
TPMS Malfunction Indicator
does not illuminate for 3 sec-
onds when the ignition switch
is placed to the ON position or
engine is running.
2. The TPMS Malfunction Indicator
remains illuminated after blink-
ing for approximately 1 minute.
3. The Low Tyre Pressure Position
Telltale remains illuminated.
Low tyre pressure
telltale
Low tyre pressure position and
tyre pressure telltale
When the tyre pressure monitoring
system warning indicators are illumi-
nated and a warning message dis-
played on the cluster LCD display,
one or more of your tyres is signifi-
cantly under-inflated. The Low Tyre
Pressure Position Telltale will indi-
cate which tyre is significantly under-
inflated by illuminating the corre-
sponding position light.If either telltale illuminates, immedi-
ately reduce your speed, avoid hard
cornering and anticipate increased
stopping distances. You should stop
and check your tyres as soon as pos-
sible. Inflate the tyres to the proper
pressure as indicated on the vehi-
cle’s placard or tyre inflation pres-
sure label located on the driver’s side
centre pillar outer panel.
If you cannot reach a service station
or if the tyre cannot hold the newly
added air, replace the low pressure
tyre with the spare tyre.
The Low Tyre Pressure Telltale will
remain on and the TPMS Malfunction
Indicator may blink for one minute
and then remain illuminated (when
the vehicle is driven approximately
10 minutes at speed above 25 km/h
(15.5 mph)) until you have the low
pressure tyre repaired and replaced
on the vehicle.
NOTICE
What to do in an emergency
■Type A■Type B
OAE046114L/OAE046115L
Page 520 of 613
Tyres and wheels .................................................7-36
Tyre care ...........................................................................7-36
Recommended cold tyre inflation pressures ...........7-37
Check tyre inflation pressure ......................................7-38
Tyre rotation ....................................................................7-39
Wheel alignment and tyre balance.............................7-40
Tyre replacement ............................................................7-40
Wheel replacement .........................................................7-41
Tyre traction .....................................................................7-41
Tyre maintenance ...........................................................7-42
Tyre sidewall labelling ....................................................7-42
Low aspect ratio tyres...................................................7-46
Fuses ......................................................................7-47
Instrument panel fuse replacement ...........................7-48
Engine compartment panel fuse replacement.........7-49
Fuse/relay panel description .......................................7-51
Light bulbs.............................................................7-61
Headlamp, position lamp, turn signal lamp bulb
replacement ......................................................................7-62
Daytime running lamp ....................................................7-66
Side repeater lamp replacement .................................7-66
Rear combination lamp bulb replacement ................7-66
Rear fog lamp ..................................................................7-69
High mounted stop lamp ...............................................7-70
Licence plate light bulb replacement .........................7-70
Interior light bulb replacement ....................................7-70
Appearance care ..................................................7-72
Exterior care ....................................................................7-72
Interior care......................................................................7-78
Emission control system .....................................7-81
Crankcase emission control system ...........................7-81
Evaporative emission control system.........................7-81
Exhaust emission control system ...............................7-82
Procedure for entering forced engine activation
mode ......................................................................7-85
Page 525 of 613
7-7
7
Maintenance
Owner maintenance schedule
When you stop for fuel:
Check the engine oil level.
Check the coolant level in the
engine coolant reservoir.
Check the windscreen washer fluid
level.
Check for low or under-inflated
tyres.
Whilst operating your vehicle:
Note any changes in the sound of
the exhaust or any smell of
exhaust fumes in the vehicle.
Check for vibrations in the steering
wheel. Notice if there is any
increased steering effort or loose-
ness in the steering wheel, or
change in its straight-ahead posi-
tion.
Notice if your vehicle constantly
turns slightly or “pulls” to one side
when travelling on smooth, level
road.
When stopping, listen and check
for unusual sounds, pulling to one
side, increased brake pedal travel
or “hard-to-push” brake pedal.
If any slipping or changes in the
operation of your transmission
occurs, check the transmission
fluid level.
Check the dual clutch transmission
P (Park) function.
Check the parking brake.
Check for fluid leaks under your
vehicle (water dripping from the air
conditioning system during or after
use is normal).
At least monthly:
Check coolant level in the engine
coolant reservoir.
Check the operation of all exterior
lights, including the stoplights, turn
signals and hazard warning flashers.
Check the inflation pressures of all
tyres including the spare for tyres
that are worn, show uneven wear,
or are damaged.
Check for loose wheel lug nuts.
At least twice a year:
(i.e., every Spring and Autumn)
Check radiator, heater and air condi-
tioning hoses for leaks or damage.
Check windscreen washer spray
and wiper operation. Clean wiper
blades with a clean cloth damp-
ened with washer fluid.
Check headlamp alignment.
Check muffler, exhaust pipes,
shields and clamps.
Check the seat belts for wear and
function. Be careful when checking your
engine coolant/inverter coolant
level when the engine is hot.
This may result in coolant being
blown out of the opening and
cause serious burns and other
injuries.
WARNING
Page 552 of 613
7-34
Maintenance
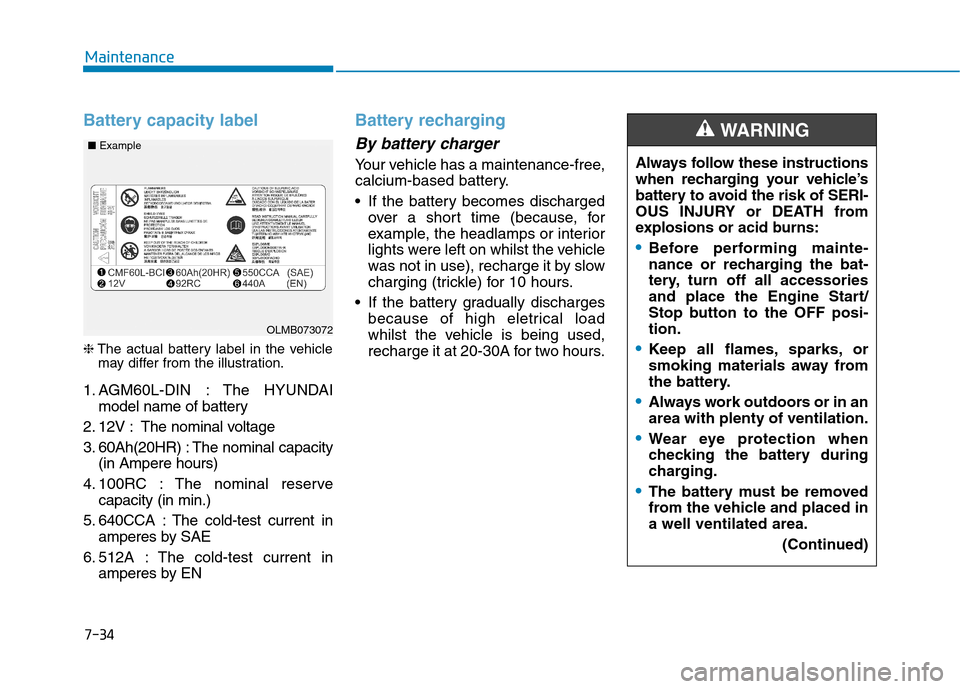
Battery capacity label
❈The actual battery label in the vehicle
may differ from the illustration.
1. AGM60L-DIN : The HYUNDAI
model name of battery
2. 12V : The nominal voltage
3. 60Ah(20HR) : The nominal capacity
(in Ampere hours)
4. 100RC : The nominal reserve
capacity (in min.)
5. 640CCA : The cold-test current in
amperes by SAE
6. 512A : The cold-test current in
amperes by EN
Battery recharging
By battery charger
Your vehicle has a maintenance-free,
calcium-based battery.
If the battery becomes discharged
over a short time (because, for
example, the headlamps or interior
lights were left on whilst the vehicle
was not in use), recharge it by slow
charging (trickle) for 10 hours.
If the battery gradually discharges
because of high eletrical load
whilst the vehicle is being used,
recharge it at 20-30A for two hours.Always follow these instructions
when recharging your vehicle’s
battery to avoid the risk of SERI-
OUS INJURY or DEATH from
explosions or acid burns:
Before performing mainte-
nance or recharging the bat-
tery, turn off all accessories
and place the Engine Start/
Stop button to the OFF posi-
tion.
Keep all flames, sparks, or
smoking materials away from
the battery.
Always work outdoors or in an
area with plenty of ventilation.
Wear eye protection when
checking the battery during
charging.
The battery must be removed
from the vehicle and placed in
a well ventilated area.
(Continued)
WARNING
OLMB073072 ■Example
Page 565 of 613
7-47
7
Maintenance
F FU
US
SE
ES
S
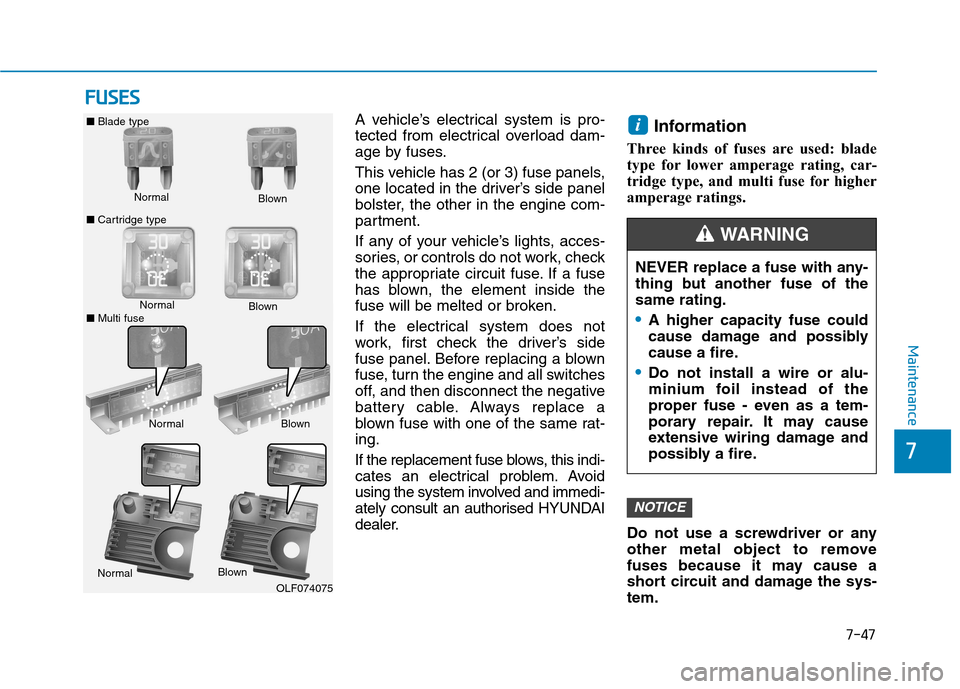
A vehicle’s electrical system is pro-
tected from electrical overload dam-
age by fuses.
This vehicle has 2 (or 3) fuse panels,
one located in the driver’s side panel
bolster, the other in the engine com-
partment.
If any of your vehicle’s lights, acces-
sories, or controls do not work, check
the appropriate circuit fuse. If a fuse
has blown, the element inside the
fuse will be melted or broken.
If the electrical system does not
work, first check the driver’s side
fuse panel. Before replacing a blown
fuse, turn the engine and all switches
off, and then disconnect the negative
battery cable. Always replace a
blown fuse with one of the same rat-
ing.
If the replacement fuse blows, this indi-
cates an electrical problem. Avoid
using the system involved and immedi-
ately consult an authorised HYUNDAI
dealer.Information
Three kinds of fuses are used: blade
type for lower amperage rating, car-
tridge type, and multi fuse for higher
amperage ratings.
Do not use a screwdriver or any
other metal object to remove
fuses because it may cause a
short circuit and damage the sys-
tem.
NOTICE
i
Normal ■Blade type
■Cartridge typeBlown
NormalBlown
NormalBlown
OLF074075
NEVER replace a fuse with any-
thing but another fuse of the
same rating.
A higher capacity fuse could
cause damage and possibly
cause a fire.
Do not install a wire or alu-
minium foil instead of the
proper fuse - even as a tem-
porary repair. It may cause
extensive wiring damage and
possibly a fire.
WARNING
Normal
Blown
■Multi fuse
Page 566 of 613
7-48
Maintenance
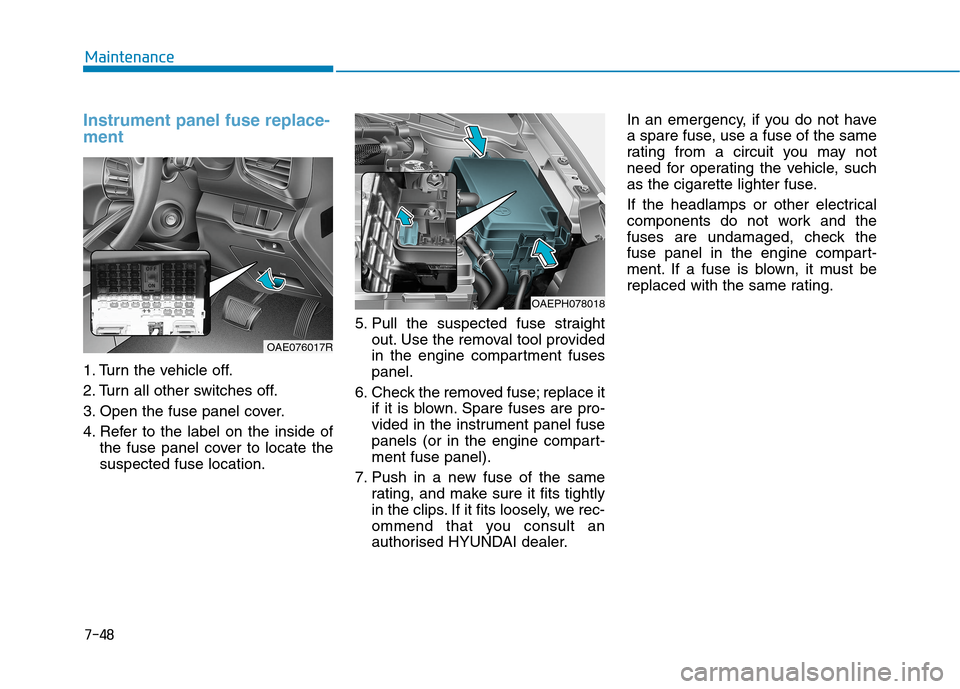
Instrument panel fuse replace-
ment
1. Turn the vehicle off.
2. Turn all other switches off.
3. Open the fuse panel cover.
4. Refer to the label on the inside of
the fuse panel cover to locate the
suspected fuse location.5. Pull the suspected fuse straight
out. Use the removal tool provided
in the engine compartment fuses
panel.
6. Check the removed fuse; replace it
if it is blown. Spare fuses are pro-
vided in the instrument panel fuse
panels (or in the engine compart-
ment fuse panel).
7. Push in a new fuse of the same
rating, and make sure it fits tightly
in the clips. If it fits loosely, we rec-
ommend that you consult an
authorised HYUNDAI dealer.In an emergency, if you do not have
a spare fuse, use a fuse of the same
rating from a circuit you may not
need for operating the vehicle, such
as the cigarette lighter fuse.
If the headlamps or other electrical
components do not work and the
fuses are undamaged, check the
fuse panel in the engine compart-
ment. If a fuse is blown, it must be
replaced with the same rating.
OAE076017R
OAEPH078018