2020 Hyundai Ioniq Hybrid Reset
[x] Cancel search: ResetPage 424 of 613
5-110
Driving your vehicle
Resetting the system
The last break time is set to 00:00
and the driver's attention level is
set to 5 (very attentive) when the
driver resets the Driver Attention
Warning (DAW) system.
The Driver Attention Warning
(DAW) system resets the last
break time to 00:00 and the driver's
attention level to 5 in the following
situations.
- The engine is turned OFF.
- The driver unfastens the seat belt
and then opens the driver's door.
- The vehicle is stopped for more
than 10 minutes.
The Driver Attention Warning
(DAW) system operates again,
when the driver restarts driving.
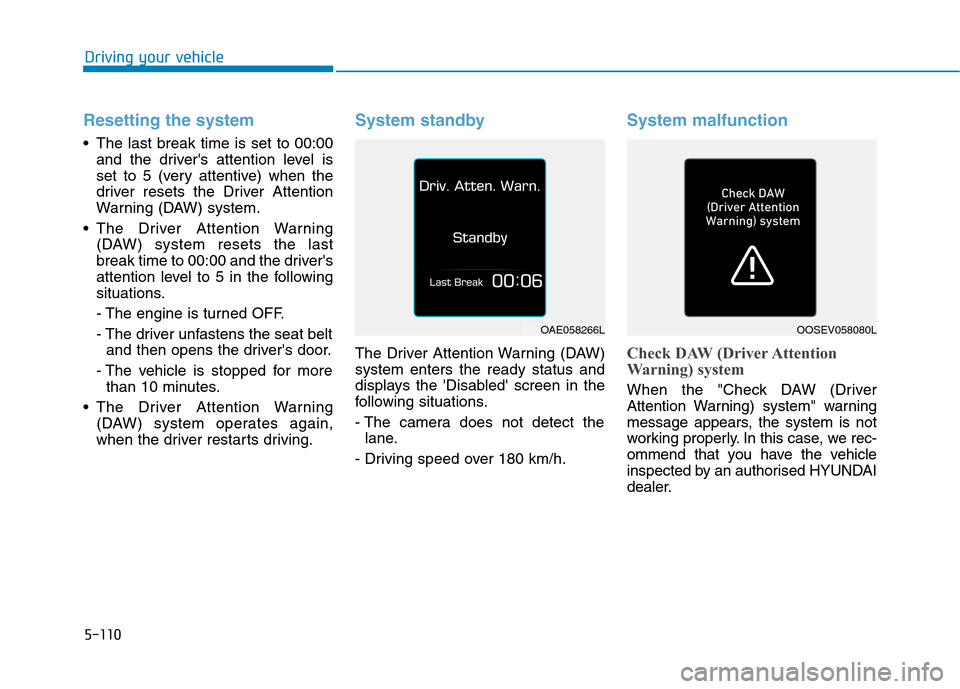
System standby
The Driver Attention Warning (DAW)
system enters the ready status and
displays the 'Disabled' screen in the
following situations.
- The camera does not detect the
lane.
- Driving speed over 180 km/h.
System malfunction
Check DAW (Driver Attention
Warning) system
When the "Check DAW (Driver
Attention Warning) system" warning
message appears, the system is not
working properly. In this case, we rec-
ommend that you have the vehicle
inspected by an authorised HYUNDAI
dealer.
OAE058266LOOSEV058080L
Page 427 of 613
5-113
Driving your vehicle
5
Speed Limit Control operation
You can set the speed limit when you
do not want to drive over a specific
speed.
If you drive over the preset speed
limit, the warning system operates
(set speed limit will blink and chime
will sound) until the vehicle speed
returns within the speed limit.
Information
Whilst speed limit control is in opera-
tion, the cruise control system cannot
be activated.
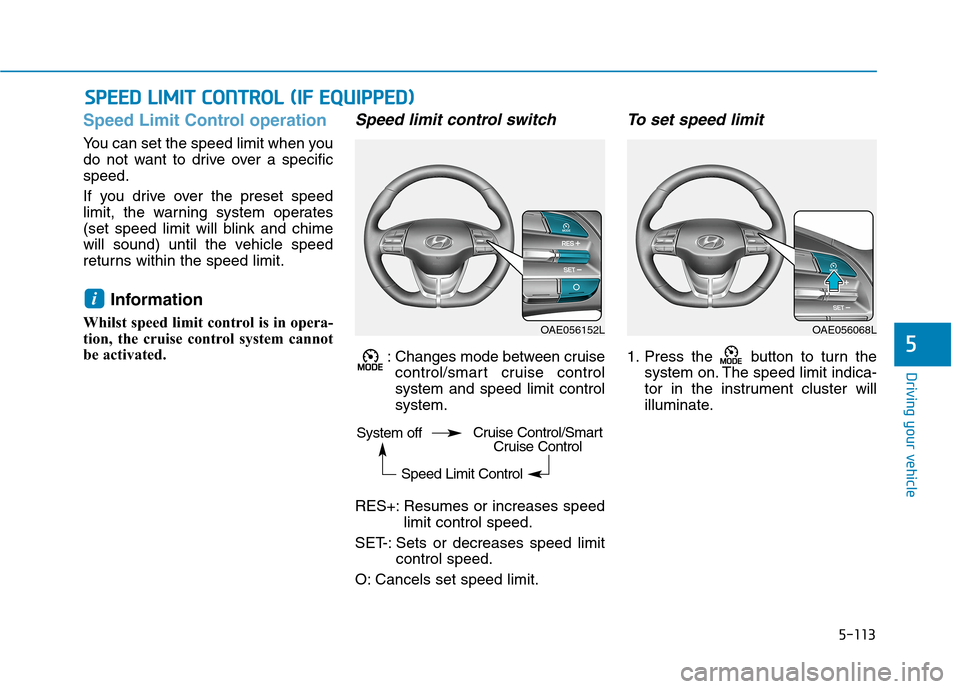
Speed limit control switch
: Changes mode between cruise
control/smart cruise control
system and speed limit control
system.
RES+: Resumes or increases speed
limit control speed.
SET-: Sets or decreases speed limit
control speed.
O: Cancels set speed limit.
To set speed limit
1. Press the button to turn the
system on. The speed limit indica-
tor in the instrument cluster will
illuminate.
i
S SP
PE
EE
ED
D
L
LI
IM
MI
IT
T
C
CO
ON
NT
TR
RO
OL
L
(
(I
IF
F
E
EQ
QU
UI
IP
PP
PE
ED
D)
)
OAE056152LOAE056068L
System off
Speed Limit ControlCruise Control/Smart
Cruise Control
Page 441 of 613
5-127
Driving your vehicle
5
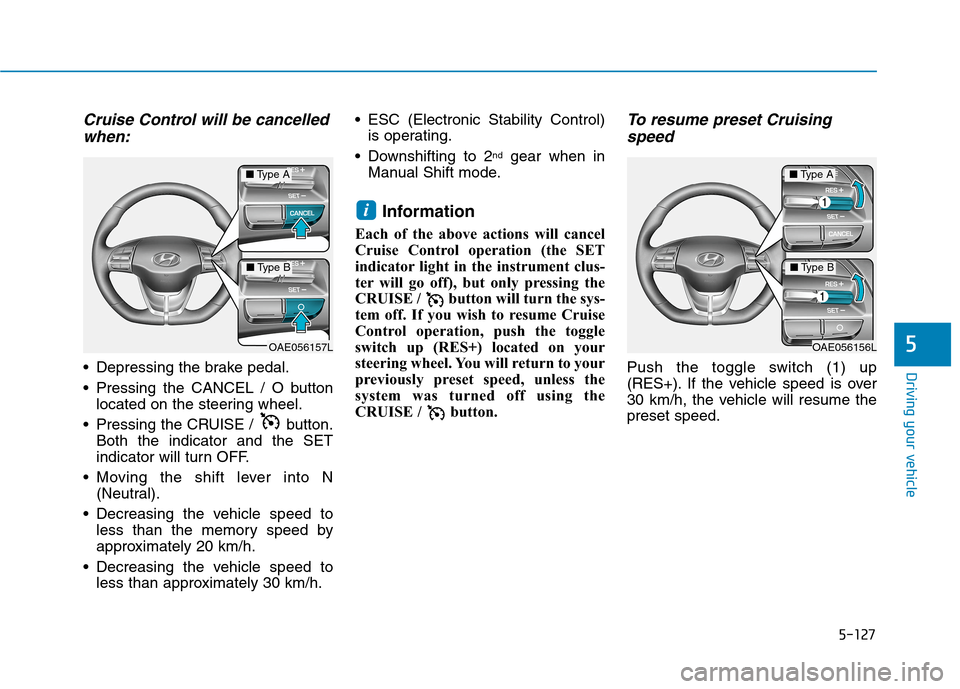
Cruise Control will be cancelled
when:
Depressing the brake pedal.
Pressing the CANCEL / O button
located on the steering wheel.
Pressing the CRUISE / button.
Both the indicator and the SET
indicator will turn OFF.
Moving the shift lever into N
(Neutral).
Decreasing the vehicle speed to
less than the memory speed by
approximately 20 km/h.
Decreasing the vehicle speed to
less than approximately 30 km/h. ESC (Electronic Stability Control)
is operating.
Downshifting to 2
ndgear when in
Manual Shift mode.
Information
Each of the above actions will cancel
Cruise Control operation (the SET
indicator light in the instrument clus-
ter will go off), but only pressing the
CRUISE / button will turn the sys-
tem off. If you wish to resume Cruise
Control operation, push the toggle
switch up (RES+) located on your
steering wheel. You will return to your
previously preset speed, unless the
system was turned off using the
CRUISE / button.
To resume preset Cruising
speed
Push the toggle switch (1) up
(RES+). If the vehicle speed is over
30 km/h, the vehicle will resume the
preset speed.
i
OAE056157L
■Type A
■Type B
OAE056156L
■Type A
■Type B
Page 477 of 613
6-4
I IF
F
T
TH
HE
E
E
EN
NG
GI
IN
NE
E
W
WI
IL
LL
L
N
NO
OT
T
S
ST
TA
AR
RT
T
What to do in an emergency
Hybrid vehicle
Be sure the shift lever is in P
(Park). The vehicle starts only
when the shift lever is in P (Park).
This vehicle does not have a regu-
lar 12V battery that needs periodic
replacement. It is lithium ion poly-
mer type integrated into the HEV
high voltage battery. The vehicle
has a 12V battery protection sys-
tem that cuts 12V battery from
vehicle draw to prevent full dis-
charge. If vehicle will not start, first
try pressing the 12V Battery Reset
switch (left side of the steering
wheel near the fuel door open
switch) to reconnect the 12V bat-
tery, but you must start vehicle
within 15 seconds of pressing the
12V Battery Reset switch. After
starting vehicle, operate the vehi-
cle safely outdoors in ready mode
stopped and/or drive it for 30 min-
utes total to charge the 12V battery
fully. Check the fuel level and add fuel if
necessary.
If the vehicle still does not start, we
recommend that you call an autho-
rised HYUNDAI dealer for assis-
tance.
Plug-in hybrid vehicle
Be sure the shift lever is in P
(Park). The vehicle starts only
when the shift lever is in P (Park).
Check the battery connections to
be sure they are clean and tight.
Turn on the interior light. If the light
dims or goes out when you operate
the starter, the battery is drained.
Do not push or pull the vehicle to
start it. This could cause damage to
your vehicle.See instructions for
"Jump Starting" provided in this
chapter.
Check the fuel level and add fuel if
necessary.
If the vehicle still does not start, we
recommend that you call an autho-
rised HYUNDAI dealer for assis-
tance.Push or pull starting the vehicle
may cause the catalytic convert-
er to overload which can lead to
damage to the emission control
system.
CAUTION
Push or pull starting the vehicle
may cause the catalytic con-
verter to overload which can
lead to damage to the emission
control system.
CAUTION
Page 478 of 613
6-5
What to do in an emergency
Before jump starting
This vehicle does not have a regular
12V battery that needs periodic
replacement. It is lithium ion polymer
type integrated into the HEV high
voltage battery. The vehicle has a
12V battery protection system that
cuts 12V battery from vehicle draw to
prevent full discharge.
Using the 12V battery reset
switch
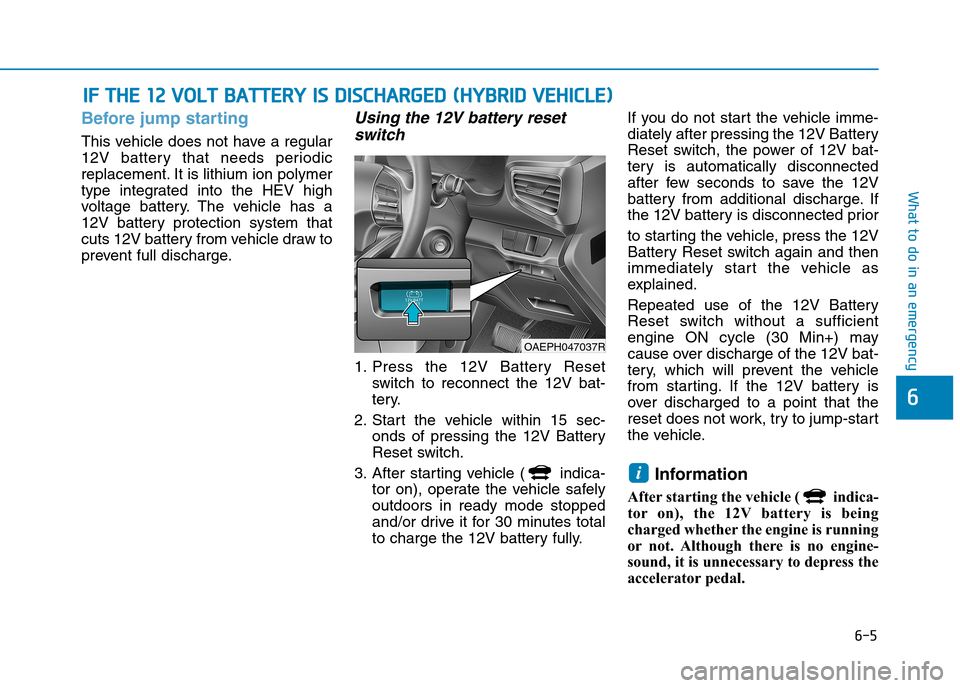
1. Press the 12V Battery Reset
switch to reconnect the 12V bat-
tery.
2. Start the vehicle within 15 sec-
onds of pressing the 12V Battery
Reset switch.
3. After starting vehicle ( indica-
tor on), operate the vehicle safely
outdoors in ready mode stopped
and/or drive it for 30 minutes total
to charge the 12V battery fully.If you do not start the vehicle imme-
diately after pressing the 12V Battery
Reset switch, the power of 12V bat-
tery is automatically disconnected
after few seconds to save the 12V
battery from additional discharge. If
the 12V battery is disconnected prior
to starting the vehicle, press the 12V
Battery Reset switch again and then
immediately start the vehicle as
explained.
Repeated use of the 12V Battery
Reset switch without a sufficient
engine ON cycle (30 Min+) may
cause over discharge of the 12V bat-
tery, which will prevent the vehicle
from starting. If the 12V battery is
over discharged to a point that the
reset does not work, try to jump-start
the vehicle.
Information
After starting the vehicle ( indica-
tor on), the 12V battery is being
charged whether the engine is running
or not. Although there is no engine-
sound, it is unnecessary to depress the
accelerator pedal.
i
I IF
F
T
TH
HE
E
1
12
2
V
VO
OL
LT
T
B
BA
AT
TT
TE
ER
RY
Y
I
IS
S
D
DI
IS
SC
CH
HA
AR
RG
GE
ED
D
(
(H
HY
YB
BR
RI
ID
D
V
VE
EH
HI
IC
CL
LE
E)
)
6
OAEPH047037R
Page 479 of 613
6-6
The following items may need to be
reset after the battery has been dis-
charged or the battery has been dis-
connected.
See chapter 3 or 4 for:
Power Windows
Trip Computer
Climate Control System
Clock
Audio System
Sunroof
Driver Position Memory System
External power source using 12V
battery
The use of external power acces-
sories may reduce performance
and function of the vehicle.
Especially, the use of dash cam-
eras may shut off the power of the
vehicle prior to the dash camera's
automatic shut-down.
If the power of the vehicle is shut
off, start the vehicle as explained.
(refer to "Using the 12V Battery
Reset Switch")Jump starting
In the event vehicle still does not
have a functional 12V battery (check
if interior lights will not turn on) then
you can try a jump start to the engine
compartment jumper terminals using
a 12V booster pack or jumper cables
from another vehicle's 12V battery
according to the following instruc-
tions.1. Position the vehicles close enough
that the jumper cables will reach,
but do not allow the vehicles to
touch.
2. Avoid fans or any moving parts in
the engine compartment at all
times, even when the vehicles are
turned off.
3. Turn off all electrical devices such
as radios, lights, air conditioning,
etc. Put the vehicles in P (Park)
and set the parking brake. Turn
both vehicles OFF.
NOTICE
What to do in an emergency
Jump starting can be danger-
ous if done incorrectly. Follow
the jump starting procedure in
this section to avoid serious
injury or damage to your vehi-
cle. If in doubt about how to
properly jump start your vehi-
cle, we strongly recommend
that you have a service techni-
cian or towing service do it for
you.
CAUTION
Page 480 of 613
6-7
What to do in an emergency
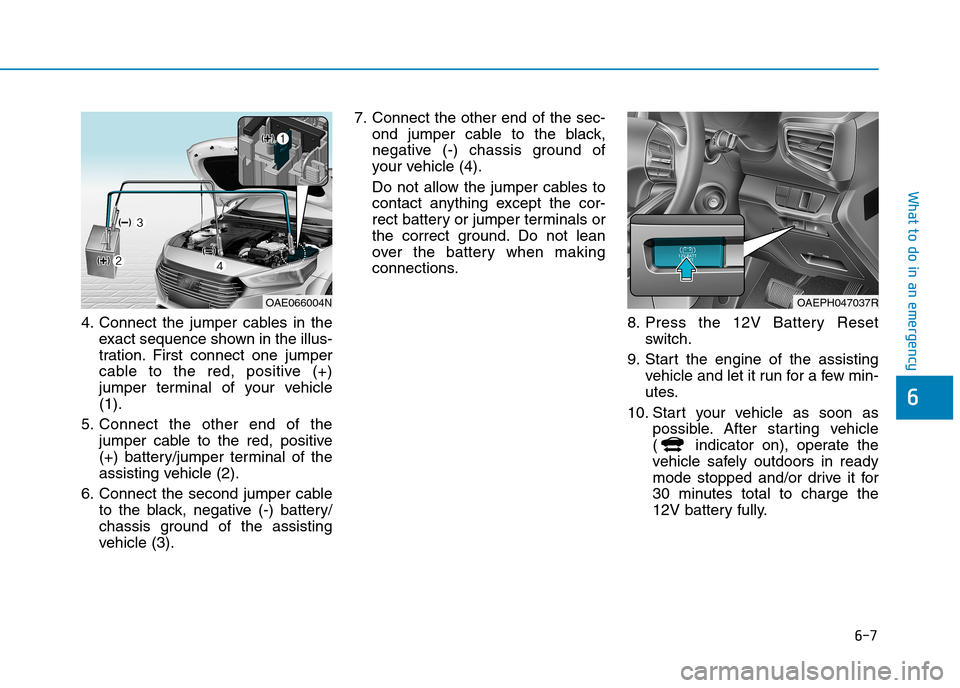
4. Connect the jumper cables in the
exact sequence shown in the illus-
tration. First connect one jumper
cable to the red, positive (+)
jumper terminal of your vehicle
(1).
5. Connect the other end of the
jumper cable to the red, positive
(+) battery/jumper terminal of the
assisting vehicle (2).
6. Connect the second jumper cable
to the black, negative (-) battery/
chassis ground of the assisting
vehicle (3).7. Connect the other end of the sec-
ond jumper cable to the black,
negative (-) chassis ground of
your vehicle (4).
Do not allow the jumper cables to
contact anything except the cor-
rect battery or jumper terminals or
the correct ground. Do not lean
over the battery when making
connections.
8. Press the 12V Battery Reset
switch.
9. Start the engine of the assisting
vehicle and let it run for a few min-
utes.
10. Start your vehicle as soon as
possible. After starting vehicle
( indicator on), operate the
vehicle safely outdoors in ready
mode stopped and/or drive it for
30 minutes total to charge the
12V battery fully.
6
OAE066004NOAEPH047037R
Page 519 of 613
7
Maintenance
7
Maintenance
Engine compartment .............................................7-3
Maintenance services ...........................................7-5
Owner's responsibility ......................................................7-5
Owner maintenance precautions ..................................7-5
Owner maintenance ...............................................7-6
How to Disconnect the (-) Cable for
Regular Maintenance .......................................................7-6
Owner maintenance schedule ........................................7-7
Scheduled maintenance services.........................7-8
Normal maintenance schedule .......................................7-9
Maintenance under severe usage conditions ..........7-13
Explanation of scheduled maintenance items .7-15
Engine oil ..............................................................7-17
Checking the engine oil level .......................................7-17
Checking the engine oil and filter ..............................7-18
Engine coolant/inverter coolantz .....................7-19
Checking the coolant level ...........................................7-19
Changing coolant.............................................................7-22
Brake fluid ............................................................7-23
Checking the brake fluid level .....................................7-23
Hybrid Starter & Generator (HSG) belt ............7-23
Checking the hybrid starter & generator (HSG)
belt ......................................................................................7-23
Washer fluid .........................................................7-24
Checking the washer fluid level ..................................7-24
Air cleaner ............................................................7-25
Parking brake .......................................................7-25
Checking the parking brake .........................................7-25
Filter replacement ...........................................................7-25
Climate control air filter .....................................7-27
Filter inspection ...............................................................7-27
Wiper blades .........................................................7-29
Blade inspection ..............................................................7-29
Blade replacement ..........................................................7-29
Battery (12 volt, plug-in hybrid vehicle) .........7-32
For best battery service................................................7-33
Battery capacity label ....................................................7-34
Battery recharging .........................................................7-34
Reset features .................................................................7-35
7