Page 413 of 613
5-99
Driving your vehicle
5
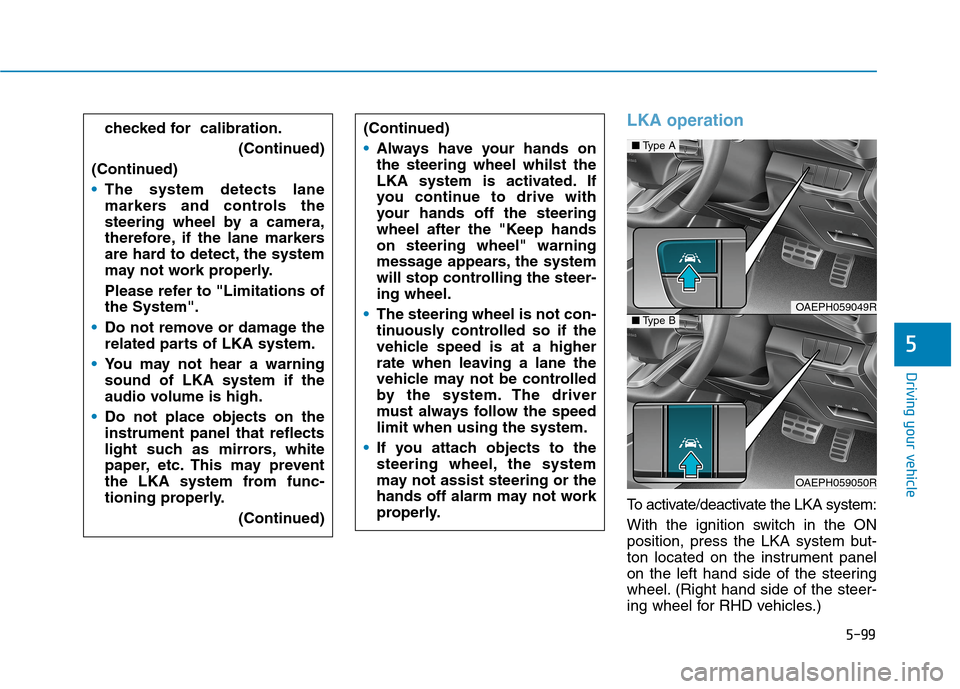
LKA operation
To activate/deactivate the LKA system:
With the ignition switch in the ON
position, press the LKA system but-
ton located on the instrument panel
on the left hand side of the steering
wheel. (Right hand side of the steer-
ing wheel for RHD vehicles.)
■Type A
OAEPH059049R■Type B
OAEPH059050R
checked for calibration.
(Continued)
(Continued)
The system detects lane
markers and controls the
steering wheel by a camera,
therefore, if the lane markers
are hard to detect, the system
may not work properly.
Please refer to "Limitations of
the System".
Do not remove or damage the
related parts of LKA system.
You may not hear a warning
sound of LKA system if the
audio volume is high.
Do not place objects on the
instrument panel that reflects
light such as mirrors, white
paper, etc. This may prevent
the LKA system from func-
tioning properly.
(Continued)(Continued)
Always have your hands on
the steering wheel whilst the
LKA system is activated. If
you continue to drive with
your hands off the steering
wheel after the "Keep hands
on steering wheel" warning
message appears, the system
will stop controlling the steer-
ing wheel.
The steering wheel is not con-
tinuously controlled so if the
vehicle speed is at a higher
rate when leaving a lane the
vehicle may not be controlled
by the system. The driver
must always follow the speed
limit when using the system.
If you attach objects to the
steering wheel, the system
may not assist steering or the
hands off alarm may not work
properly.
Page 426 of 613
5-112
Driving your vehicle
The Driver Attention Warning
(DAW) system may not provide
alerts in the following situa-
tions:
The system may not work
around 15 seconds after start-
ing the vehicle or the initial-
ization or rebooting of the
front view camera.
The lane detection perform-
ance is limited. For more
information, refer to "Lane
Keeping Assist (LKA) system"
in this chapter.
The vehicle is erratically driv-
en or is abruptly turned for
obstacle avoidance (e.g. con-
struction area, other vehicles,
fallen objects, bumpy road).
(Continued)
CAUTION(Continued)
Forward drivability of the
vehicle is severely under-
mined (possibly due to wide
variation in tyre pressures,
uneven tyre wear-out, toe-
in/toe-out alignment).
The vehicle is driven on a
winding road.
The vehicle is driven through
a windy area.
The vehicle is driven on a
bumpy road.
The vehicle is controlled by
the following driving assist
systems:
- Forward Collision-avoidance
Assist (FCA) system
- Smart Cruise Control (SCC)
system
- Lane Keeping Assist (LKA)
system
- Lane following Assist (LFA)
system
Playing the vehicle audio sys-
tem at high volume may pervent
occupants from hearing the
Driver Attention Warning (DAW)
system warning sounds.
CAUTION
Page 453 of 613
5-139
Driving your vehicle
5
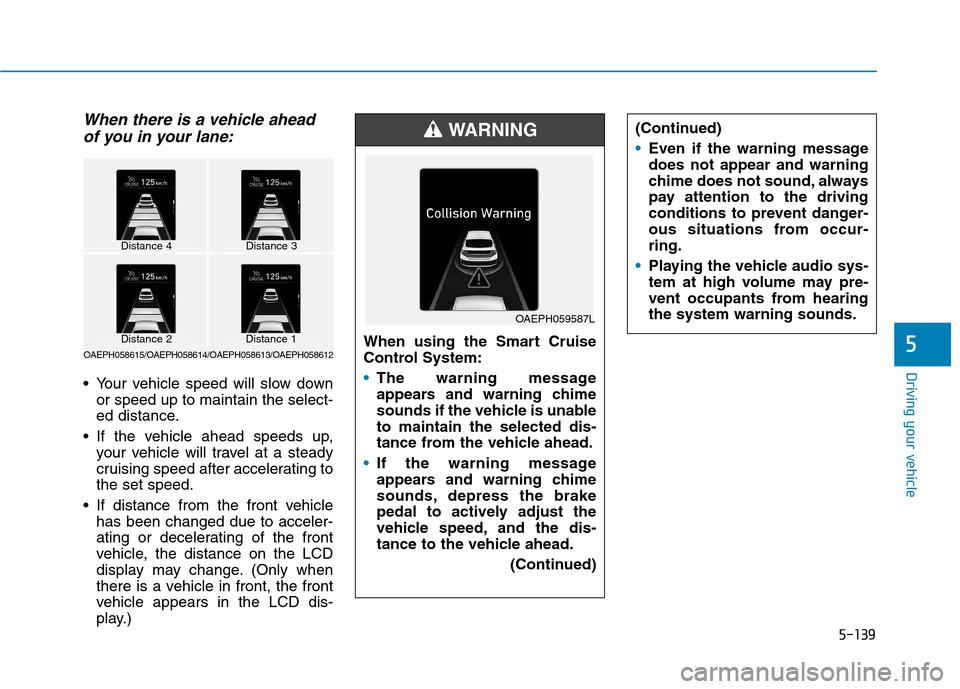
When there is a vehicle ahead
of you in your lane:
Your vehicle speed will slow down
or speed up to maintain the select-
ed distance.
If the vehicle ahead speeds up,
your vehicle will travel at a steady
cruising speed after accelerating to
the set speed.
If distance from the front vehicle
has been changed due to acceler-
ating or decelerating of the front
vehicle, the distance on the LCD
display may change. (Only when
there is a vehicle in front, the front
vehicle appears in the LCD dis-
play.)When using the Smart Cruise
Control System:
The warning message
appears and warning chime
sounds if the vehicle is unable
to maintain the selected dis-
tance from the vehicle ahead.
If the warning message
appears and warning chime
sounds, depress the brake
pedal to actively adjust the
vehicle speed, and the dis-
tance to the vehicle ahead.
(Continued)
WARNING
OAEPH059587L
Distance 4Distance 3
OAEPH058615/OAEPH058614/OAEPH058613/OAEPH058612
Distance 1Distance 2
(Continued)
Even if the warning message
does not appear and warning
chime does not sound, always
pay attention to the driving
conditions to prevent danger-
ous situations from occur-
ring.
Playing the vehicle audio sys-
tem at high volume may pre-
vent occupants from hearing
the system warning sounds.
Page 479 of 613
6-6
The following items may need to be
reset after the battery has been dis-
charged or the battery has been dis-
connected.
See chapter 3 or 4 for:
Power Windows
Trip Computer
Climate Control System
Clock
Audio System
Sunroof
Driver Position Memory System
External power source using 12V
battery
The use of external power acces-
sories may reduce performance
and function of the vehicle.
Especially, the use of dash cam-
eras may shut off the power of the
vehicle prior to the dash camera's
automatic shut-down.
If the power of the vehicle is shut
off, start the vehicle as explained.
(refer to "Using the 12V Battery
Reset Switch")Jump starting
In the event vehicle still does not
have a functional 12V battery (check
if interior lights will not turn on) then
you can try a jump start to the engine
compartment jumper terminals using
a 12V booster pack or jumper cables
from another vehicle's 12V battery
according to the following instruc-
tions.1. Position the vehicles close enough
that the jumper cables will reach,
but do not allow the vehicles to
touch.
2. Avoid fans or any moving parts in
the engine compartment at all
times, even when the vehicles are
turned off.
3. Turn off all electrical devices such
as radios, lights, air conditioning,
etc. Put the vehicles in P (Park)
and set the parking brake. Turn
both vehicles OFF.
NOTICE
What to do in an emergency
Jump starting can be danger-
ous if done incorrectly. Follow
the jump starting procedure in
this section to avoid serious
injury or damage to your vehi-
cle. If in doubt about how to
properly jump start your vehi-
cle, we strongly recommend
that you have a service techni-
cian or towing service do it for
you.
CAUTION
Page 553 of 613
7-35
7
Maintenance
By jump starting
After a jump start from a good bat-
tery, drive the vehicle for 20-30 min-
utes before it is shutoff. The vehicle
may not restart if you shut it off
before the battery had a chance to
adequately recharge. See “Jump
Starting” in chapter 6 for more infor-
mation on jump starting procedures.
Information
An inappropriately disposed
battery can be harmful to
the environment and human
health. Dispose of the bat-
tery according to your local
law(s) or regulations.
Reset features
The following items need to be reset
after the battery has been dis-
charged or the battery has been dis-
connected.
See chapter 3 or 4 for:
Power Windows
Trip Computer
Climate Control System
Clock
Audio System
Sunroof
Driver Position Memory System
i
(Continued)
Watch the battery during
charging, and stop or reduce
the charging rate if the battery
cells begin boiling violently.
The negative battery cable
must be removed first and
installed last when the battery
is disconnected. Disconnect
the battery charger in the fol-
lowing order:
(1) Turn off the battery charger
main switch.
(2) Unhook the negative
clamp from the negative
battery terminal.
(3) Unhook the positive clamp
from the positive battery
terminal.
Always use a genuine HYUNDAI
approved battery when you
replace the battery.
Page 567 of 613
7-49
7
Maintenance
Fuse switch
Always, place the fuse switch to the
ON position.
If you move the switch to the OFF
position, some items such as the
audio system and digital clock must
be reset and the smart key may not
work properly.
Information
If the fuse switch is OFF, “Turn on
FUSE SWITCH” message will appear.
Always place the fuse switch in
the ON position whilst driving
the vehicle.
Do not move the transportation
fuse switch repeatedly. The fuse
switch may be damaged.
Engine compartment panel
fuse replacement
1. Turn the vehicle off.
2. Turn all other switches off.
3. Remove the fuse panel cover by
pressing the tap and pulling up.
NOTICE
i
OAEPH078023
OAEPH078024
■Blade type fuse
■Cartridge type fuseOAE076019ROIK05165L
Page 570 of 613
7-52
Maintenance
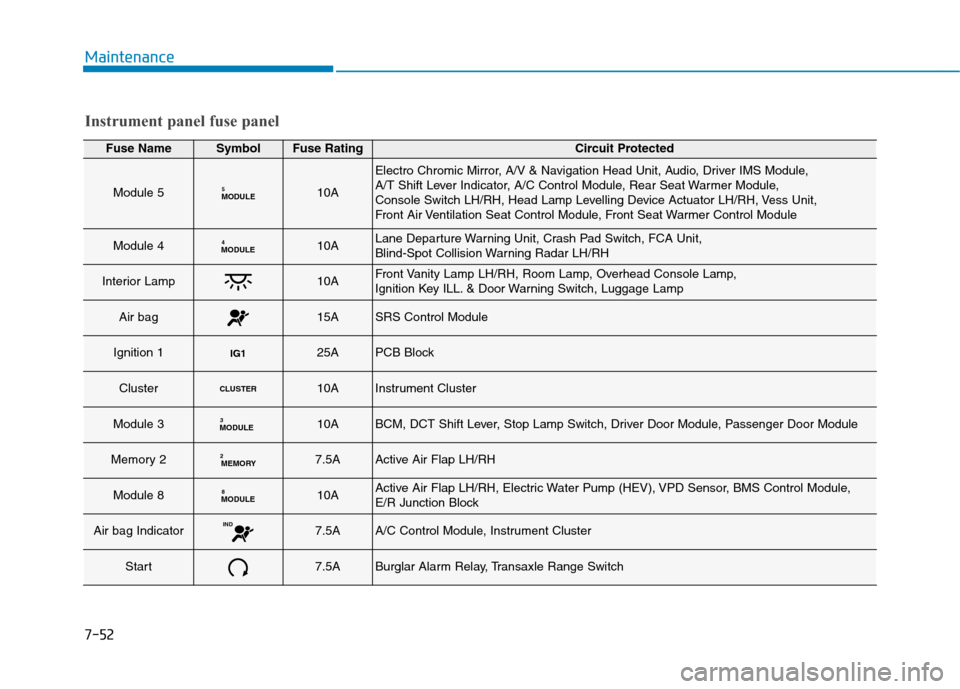
Instrument panel fuse panel
Fuse NameSymbolFuse RatingCircuit Protected
Module 5MODULE510A
Electro Chromic Mirror, A/V & Navigation Head Unit, Audio, Driver IMS Module,
A/T Shift Lever Indicator, A/C Control Module, Rear Seat Warmer Module,
Console Switch LH/RH, Head Lamp Levelling Device Actuator LH/RH, Vess Unit,
Front Air Ventilation Seat Control Module, Front Seat Warmer Control Module
Module 4MODULE410ALane Departure Warning Unit, Crash Pad Switch, FCA Unit,
Blind-Spot Collision Warning Radar LH/RH
Interior Lamp10AFront Vanity Lamp LH/RH, Room Lamp, Overhead Console Lamp,
Ignition Key ILL. & Door Warning Switch, Luggage Lamp
Air bag15ASRS Control Module
Ignition 1IG125APCB Block
ClusterCLUSTER10AInstrument Cluster
Module 3MODULE310ABCM, DCT Shift Lever, Stop Lamp Switch, Driver Door Module, Passenger Door Module
Memory 2MEMORY27.5AActive Air Flap LH/RH
Module 8MODULE810AActive Air Flap LH/RH, Electric Water Pump (HEV), VPD Sensor, BMS Control Module,
E/R Junction Block
Air bag IndicatorIND7.5AA/C Control Module, Instrument Cluster
Start7.5ABurglar Alarm Relay, Transaxle Range Switch
Page 571 of 613
7-53
7
Maintenance
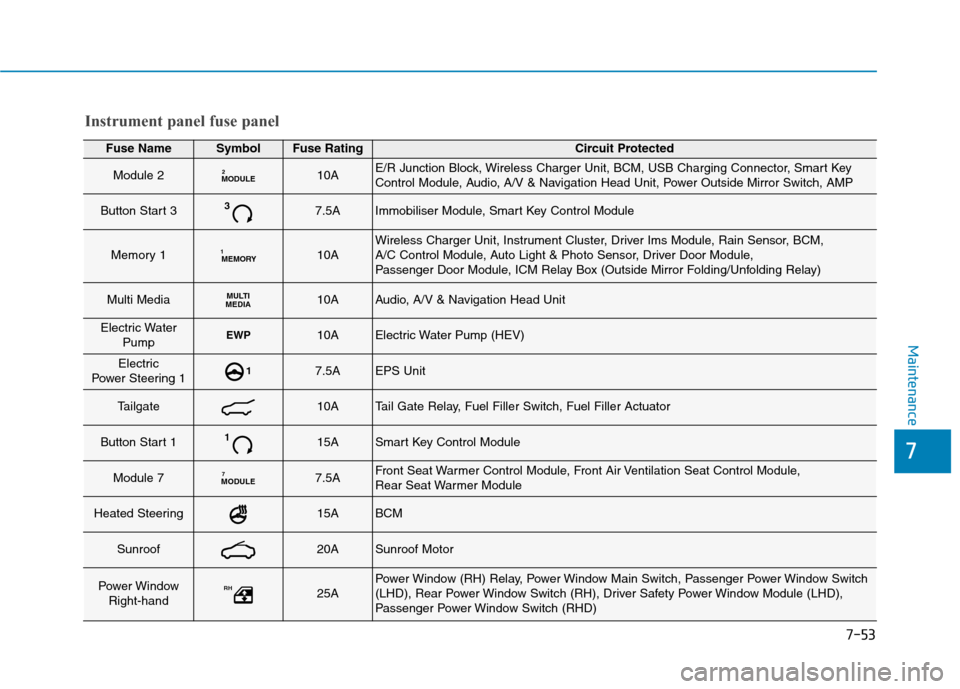
Fuse NameSymbolFuse RatingCircuit Protected
Module 2MODULE210AE/R Junction Block, Wireless Charger Unit, BCM, USB Charging Connector, Smart Key
Control Module, Audio, A/V & Navigation Head Unit, Power Outside Mirror Switch, AMP
Button Start 337.5AImmobiliser Module, Smart Key Control Module
Memory 1MEMORY110AWireless Charger Unit, Instrument Cluster, Driver Ims Module, Rain Sensor, BCM,
A/C Control Module, Auto Light & Photo Sensor, Driver Door Module,
Passenger Door Module, ICM Relay Box (Outside Mirror Folding/Unfolding Relay)
Multi MediaMULTI
MEDIA10AAudio, A/V & Navigation Head Unit
Electric Water
PumpEWP10AElectric Water Pump (HEV)
Electric
Power Steering 117.5AEPS Unit
Tailgate10ATail Gate Relay, Fuel Filler Switch, Fuel Filler Actuator
Button Start 1115ASmart Key Control Module
Module 7MODULE77.5AFront Seat Warmer Control Module, Front Air Ventilation Seat Control Module,
Rear Seat Warmer Module
Heated Steering15ABCM
Sunroof20ASunroof Motor
Power Window
Right-handRH25APower Window (RH) Relay, Power Window Main Switch, Passenger Power Window Switch
(LHD), Rear Power Window Switch (RH), Driver Safety Power Window Module (LHD),
Passenger Power Window Switch (RHD)
Instrument panel fuse panel