2020 Hyundai Ioniq Hybrid fuel type
[x] Cancel search: fuel typePage 242 of 613
3-95
Convenient features of your vehicle
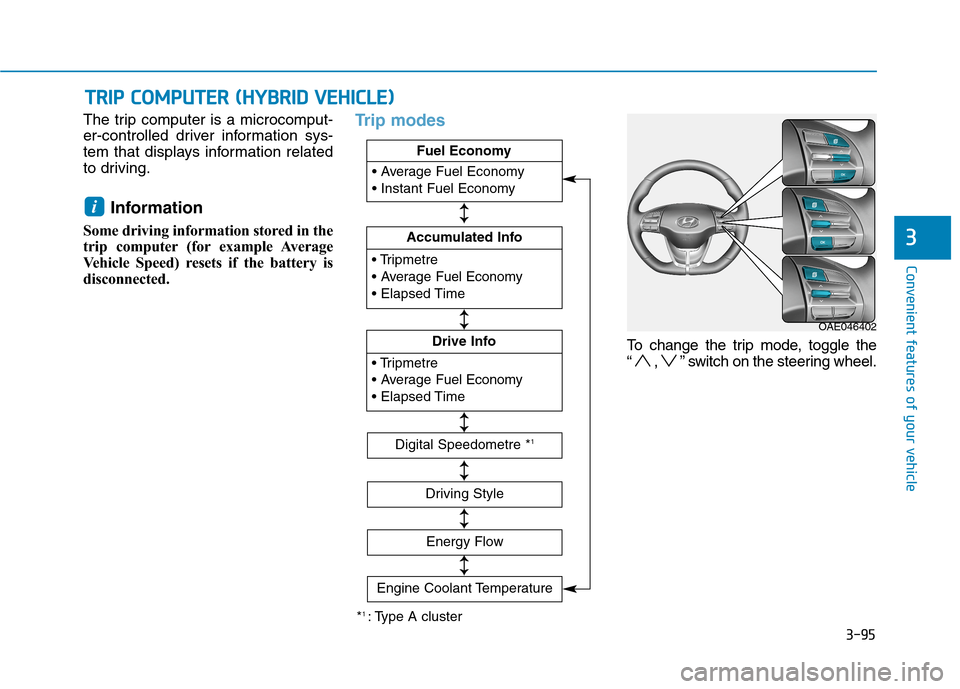
The trip computer is a microcomput-
er-controlled driver information sys-
tem that displays information related
to driving.
Information
Some driving information stored in the
trip computer (for example Average
Vehicle Speed) resets if the battery is
disconnected.
Trip modes
To change the trip mode, toggle the
“ , ” switch on the steering wheel.
i
T TR
RI
IP
P
C
CO
OM
MP
PU
UT
TE
ER
R
(
(H
HY
YB
BR
RI
ID
D
V
VE
EH
HI
IC
CL
LE
E)
)
3
OAE046402
*1 : Type A cluster
Fuel Economy
Accumulated Info
Fuel Economy
Drive Info
Fuel Economy
Digital Speedometre *1
Driving Style
Energy Flow
↕ ↕
↕ ↕
↕ ↕
↕ ↕
↕ ↕
Engine Coolant Temperature
↕
↕
Page 247 of 613
3-100
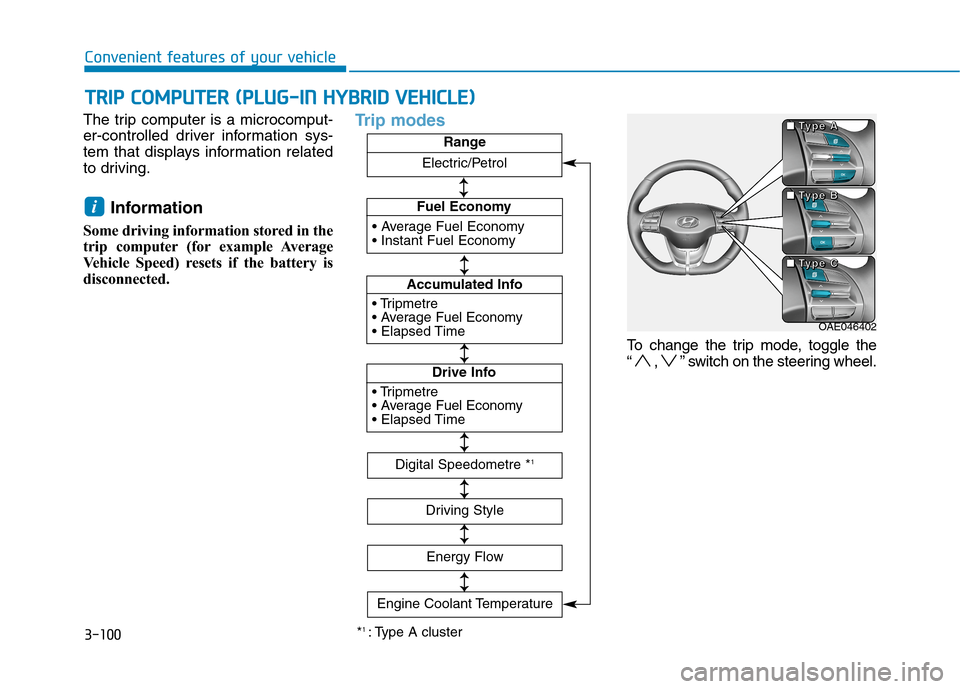
The trip computer is a microcomput-
er-controlled driver information sys-
tem that displays information related
to driving.
Information
Some driving information stored in the
trip computer (for example Average
Vehicle Speed) resets if the battery is
disconnected.
Trip modes
To change the trip mode, toggle the
“ , ” switch on the steering wheel.
i
T TR
RI
IP
P
C
CO
OM
MP
PU
UT
TE
ER
R
(
(P
PL
LU
UG
G-
-I
IN
N
H
HY
YB
BR
RI
ID
D
V
VE
EH
HI
IC
CL
LE
E)
)
Convenient features of your vehicle
*1 : Type A cluster
Fuel Economy
Accumulated Info
Fuel Economy
Drive Info
Fuel EconomyRange
Digital Speedometre *1
Driving Style
Energy Flow
↕ ↕ ↕ ↕
↕ ↕
↕ ↕
↕ ↕
↕ ↕
Engine Coolant Temperature
Electric/Petrol
↕
↕
OAE046402 ■ ■ ■ ■
T T T T
y y y y
p p p p
e e e e
A A A A
■ ■ ■ ■
T T T T
y y y y
p p p p
e e e e
B B B B
■ ■ ■ ■
T T T T
y y y y
p p p p
e e e e
C C C C
Page 330 of 613
5-16
Driving your vehicle
The dual clutch transmission can
be thought of as an automatically
shifting manual transmission. It
gives the driving feel of a manual
transmission, yet provides the
ease of a fully automatic transmis-
sion.
When D (Drive) is selected, the
transmission will automatically shift
through the gears similar to a con-
ventional automatic transmission.
Unlike a traditional automatic
transmission, the gear shifting can
sometimes be felt and heard as the
actuators engage the clutches and
the gears are selected.
The dual clutch transmission incor-
porates a dry-type dual clutch
mechanism, which allows for better
acceleration performance and
increased fuel efficiency whilst
driving. But it differs from a con-
ventional automatic transmission
because it does not incorporate a
torque converter. Instead, the tran-
sition from one gear to the next is
managed by clutch slip, especially
at lower speeds.As a result, shifts are sometimes
more noticeable, and a light vibra-
tion can be felt as the transmission
shaft speed is matched with the
engine shaft speed. This is a nor-
mal condition of the dual clutch
transmission.
The dry-type clutch transfers
torque more directly and provides
a direct-drive feeling which may
feel different from a conventional
automatic transmission. This may
be more noticeable when launch-
ing the vehicle from a stop or when
travelling at low, stop-and-go vehi-
cle speeds.
When rapidly accelerating from a
lower vehicle speed, the engine
rpm may increase dramatically as
a result of clutch slip as the dual
clutch transmission selects the cor-
rect gear. This is a normal condi-
tion.
When accelerating from a stop on
an incline, press the accelerator
smoothly and gradually to avoid
any shudder feeling or jerkiness. When travelling at a lower vehicle
speed, if you release the accelera-
tor pedal quickly, you may feel
engine braking before the trans-
mission changes gears. This
engine braking feeling is similar to
operating a manual transmission at
low speed.
When driving downhill, you may
wish to move the gear shift lever to
Manual Shift mode and downshift
to a lower gear in order to control
your speed without using the brake
pedal excessively.
When you turn the engine on and
off, you may hear clicking sounds
as the system goes through a self-
test. This is a normal sound for the
dual clutch transmission.
During the first 1,500 km (1000
miles), you may feel that the vehi-
cle may not be smooth when accel-
erating at low speed. During this
break-in period, the shift quality
and performance of your new vehi-
cle is continuously optimised.
Page 343 of 613
5-29
Driving your vehicle
5
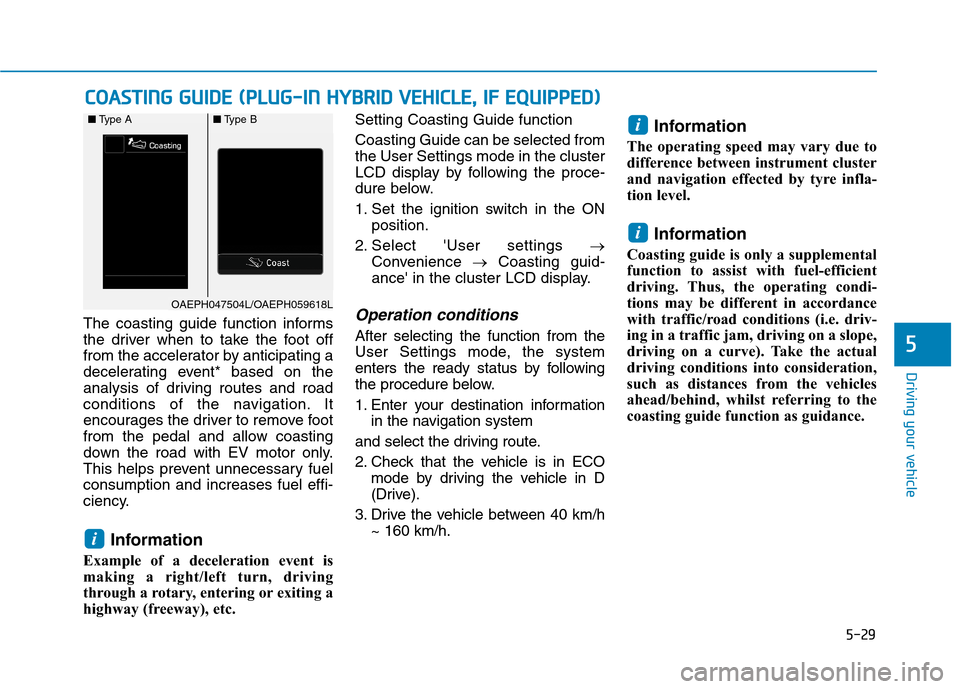
The coasting guide function informs
the driver when to take the foot off
from the accelerator by anticipating a
decelerating event* based on the
analysis of driving routes and road
conditions of the navigation. It
encourages the driver to remove foot
from the pedal and allow coasting
down the road with EV motor only.
This helps prevent unnecessary fuel
consumption and increases fuel effi-
ciency.
Information
Example of a deceleration event is
making a right/left turn, driving
through a rotary, entering or exiting a
highway (freeway), etc. Setting Coasting Guide function
Coasting Guide can be selected from
the User Settings mode in the cluster
LCD display by following the proce-
dure below.
1. Set the ignition switch in the ON
position.
2. Select 'User settings →
Convenience →Coasting guid-
ance' in the cluster LCD display.
Operation conditions
After selecting the function from the
User Settings mode, the system
enters the ready status by following
the procedure below.
1. Enter your destination information
in the navigation system
and select the driving route.
2. Check that the vehicle is in ECO
mode by driving the vehicle in D
(Drive).
3. Drive the vehicle between 40 km/h
~ 160 km/h.
Information
The operating speed may vary due to
difference between instrument cluster
and navigation effected by tyre infla-
tion level.
Information
Coasting guide is only a supplemental
function to assist with fuel-efficient
driving. Thus, the operating condi-
tions may be different in accordance
with traffic/road conditions (i.e. driv-
ing in a traffic jam, driving on a slope,
driving on a curve). Take the actual
driving conditions into consideration,
such as distances from the vehicles
ahead/behind, whilst referring to the
coasting guide function as guidance.
i
i
i
C CO
OA
AS
ST
TI
IN
NG
G
G
GU
UI
ID
DE
E
(
(P
PL
LU
UG
G-
-I
IN
N
H
HY
YB
BR
RI
ID
D
V
VE
EH
HI
IC
CL
LE
E,
,
I
IF
F
E
EQ
QU
UI
IP
PP
PE
ED
D)
)
OAEPH047504L/OAEPH059618L ■Type A■Type B
Page 477 of 613
6-4
I IF
F
T
TH
HE
E
E
EN
NG
GI
IN
NE
E
W
WI
IL
LL
L
N
NO
OT
T
S
ST
TA
AR
RT
T
What to do in an emergency
Hybrid vehicle
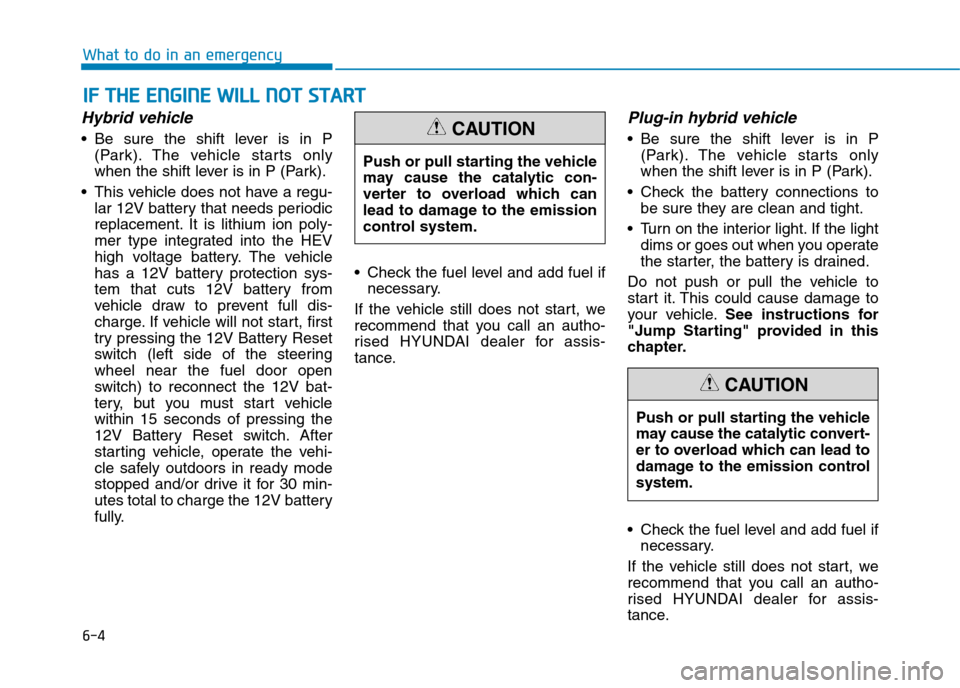
Be sure the shift lever is in P
(Park). The vehicle starts only
when the shift lever is in P (Park).
This vehicle does not have a regu-
lar 12V battery that needs periodic
replacement. It is lithium ion poly-
mer type integrated into the HEV
high voltage battery. The vehicle
has a 12V battery protection sys-
tem that cuts 12V battery from
vehicle draw to prevent full dis-
charge. If vehicle will not start, first
try pressing the 12V Battery Reset
switch (left side of the steering
wheel near the fuel door open
switch) to reconnect the 12V bat-
tery, but you must start vehicle
within 15 seconds of pressing the
12V Battery Reset switch. After
starting vehicle, operate the vehi-
cle safely outdoors in ready mode
stopped and/or drive it for 30 min-
utes total to charge the 12V battery
fully. Check the fuel level and add fuel if
necessary.
If the vehicle still does not start, we
recommend that you call an autho-
rised HYUNDAI dealer for assis-
tance.
Plug-in hybrid vehicle
Be sure the shift lever is in P
(Park). The vehicle starts only
when the shift lever is in P (Park).
Check the battery connections to
be sure they are clean and tight.
Turn on the interior light. If the light
dims or goes out when you operate
the starter, the battery is drained.
Do not push or pull the vehicle to
start it. This could cause damage to
your vehicle.See instructions for
"Jump Starting" provided in this
chapter.
Check the fuel level and add fuel if
necessary.
If the vehicle still does not start, we
recommend that you call an autho-
rised HYUNDAI dealer for assis-
tance.Push or pull starting the vehicle
may cause the catalytic convert-
er to overload which can lead to
damage to the emission control
system.
CAUTION
Push or pull starting the vehicle
may cause the catalytic con-
verter to overload which can
lead to damage to the emission
control system.
CAUTION
Page 578 of 613
7-60
Maintenance
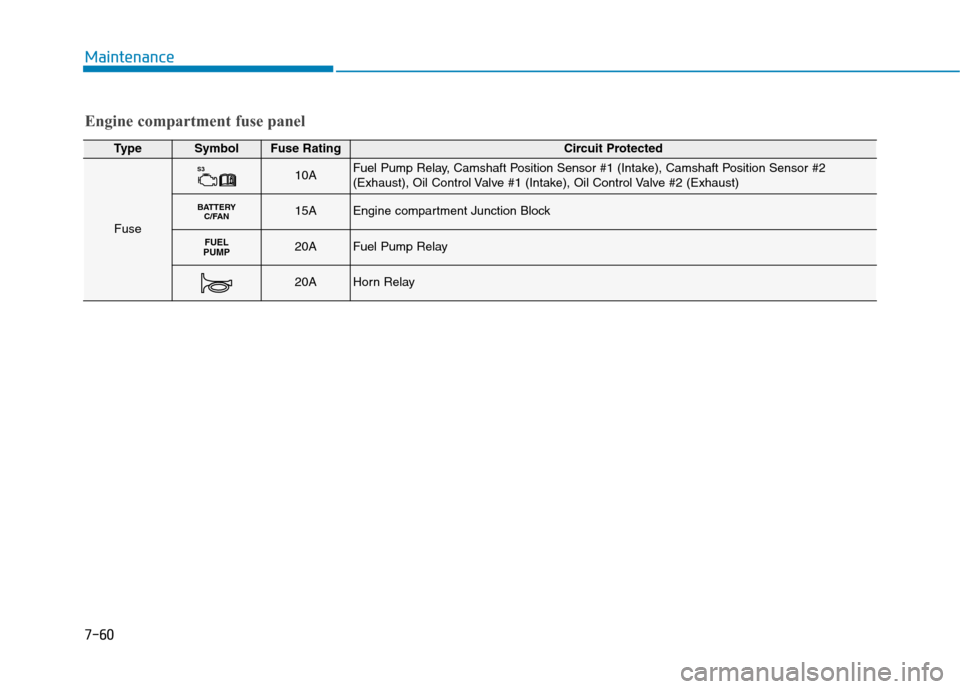
TypeSymbolFuse RatingCircuit Protected
Fuse
S310AFuel Pump Relay, Camshaft Position Sensor #1 (Intake), Camshaft Position Sensor #2
(Exhaust), Oil Control Valve #1 (Intake), Oil Control Valve #2 (Exhaust)
BATTERY
C/FAN15AEngine compartment Junction Block
FUEL
PUMP20AFuel Pump Relay
20AHorn Relay
Engine compartment fuse panel
Page 613 of 613
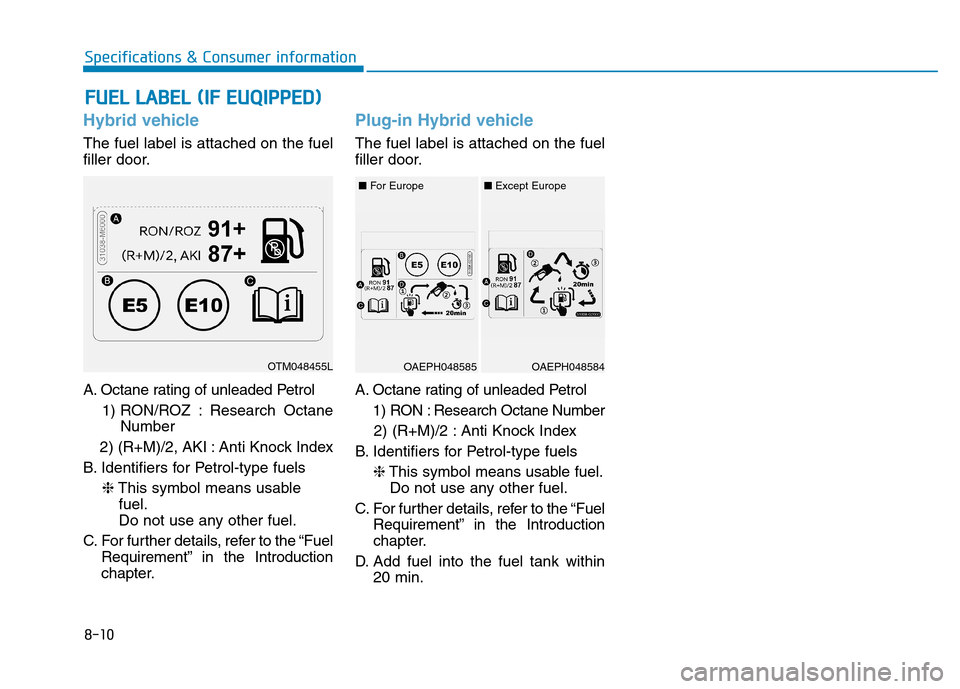
Hybrid vehicle
The fuel label is attached on the fuel
filler door.
A. Octane rating of unleaded Petrol
1) RON/ROZ : Research Octane
Number
2) (R+M)/2, AKI : Anti Knock Index
B. Identifiers for Petrol-type fuels
❈This symbol means usable
fuel.
Do not use any other fuel.
C. For further details, refer to the “Fuel
Requirement” in the Introduction
chapter.
Plug-in Hybrid vehicle
The fuel label is attached on the fuel
filler door.
A. Octane rating of unleaded Petrol
1) RON : Research Octane Number
2) (R+M)/2 : Anti Knock Index
B. Identifiers for Petrol-type fuels
❈This symbol means usable fuel.
Do not use any other fuel.
C. For further details, refer to the “Fuel
Requirement” in the Introduction
chapter.
D. Add fuel into the fuel tank within
20 min.
F FU
UE
EL
L
L
LA
AB
BE
EL
L
(
(I
IF
F
E
EU
UQ
QI
IP
PP
PE
ED
D)
)
8-10
Specifications & Consumer information
OTM048455LOAEPH048584 ■For Europe■Except EuropeOAEPH048585