Page 408 of 561
7
Fuses ......................................................................7-39
Instrument Panel Fuse Replacement..........................7-40
Motor Compartment Panel Fuse Replacement ........7-42
Fuse/Relay Panel Description ......................................7-43
Light Bulbs ............................................................7-52
Headlamp, Parking Lamp, Turn Signal Lamp and
Side Marker ......................................................................7-53
Daytime Running Light (DRL).......................................7-57
Side Repeater Lamp Replacement ..............................7-58
Rear Combination Light Bulb Replacement ..............7-58
High Mounted Stop Light Replacement ....................7-60
License Plate Light Bulb Replacement ......................7-61
Interior Light Bulb Replacement .................................7-61
Appearance Care..................................................7-63
Exterior Care ....................................................................7-63
Interior Care .....................................................................7-69
California Perchlorate Notice.............................7-72
Page 446 of 561
7-40
Maintenance
Do not use a screwdriver or any
other metal object to remove
fuses because it may cause a
short circuit and damage the sys-
tem.
Instrument Panel Fuse
Replacement
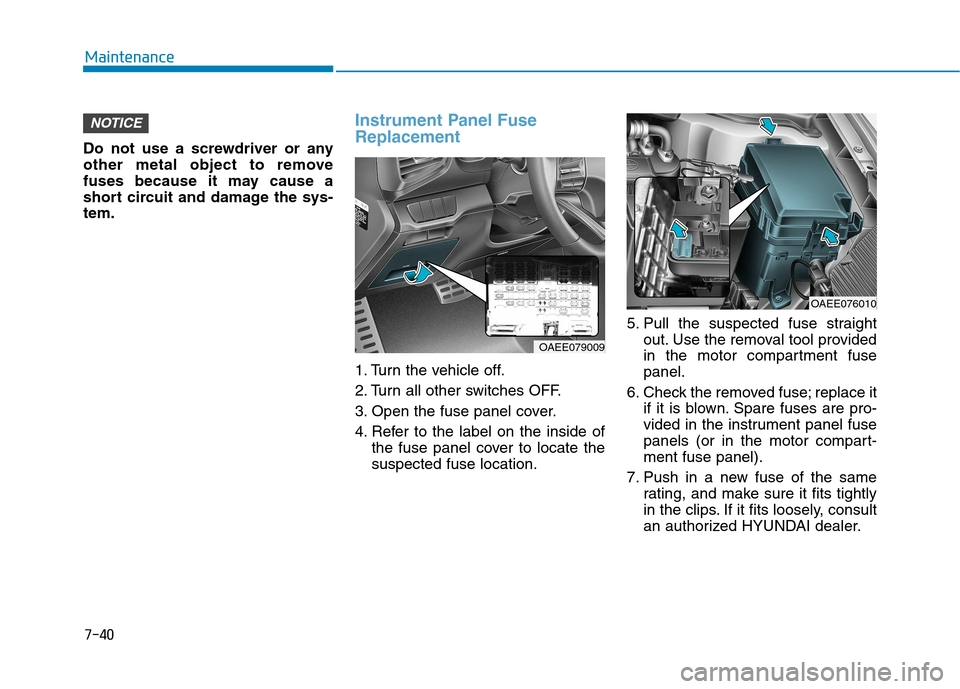
1. Turn the vehicle off.
2. Turn all other switches OFF.
3. Open the fuse panel cover.
4. Refer to the label on the inside of
the fuse panel cover to locate the
suspected fuse location.5. Pull the suspected fuse straight
out. Use the removal tool provided
in the motor compartment fuse
panel.
6. Check the removed fuse; replace it
if it is blown. Spare fuses are pro-
vided in the instrument panel fuse
panels (or in the motor compart-
ment fuse panel).
7. Push in a new fuse of the same
rating, and make sure it fits tightly
in the clips. If it fits loosely, consult
an authorized HYUNDAI dealer.
NOTICE
OAEE076010
OAEE079009
Page 447 of 561
7-41
7
Maintenance
In an emergency, if you do not have
a spare fuse, use a fuse of the same
rating from a circuit you may not
need for operating the vehicle.
If the headlamps or other electrical
components do not work and the
fuses are OK, check the fuse panel
in the motor compartment. If a fuse is
blown, it must be replaced with the
same rating.Fuse switch
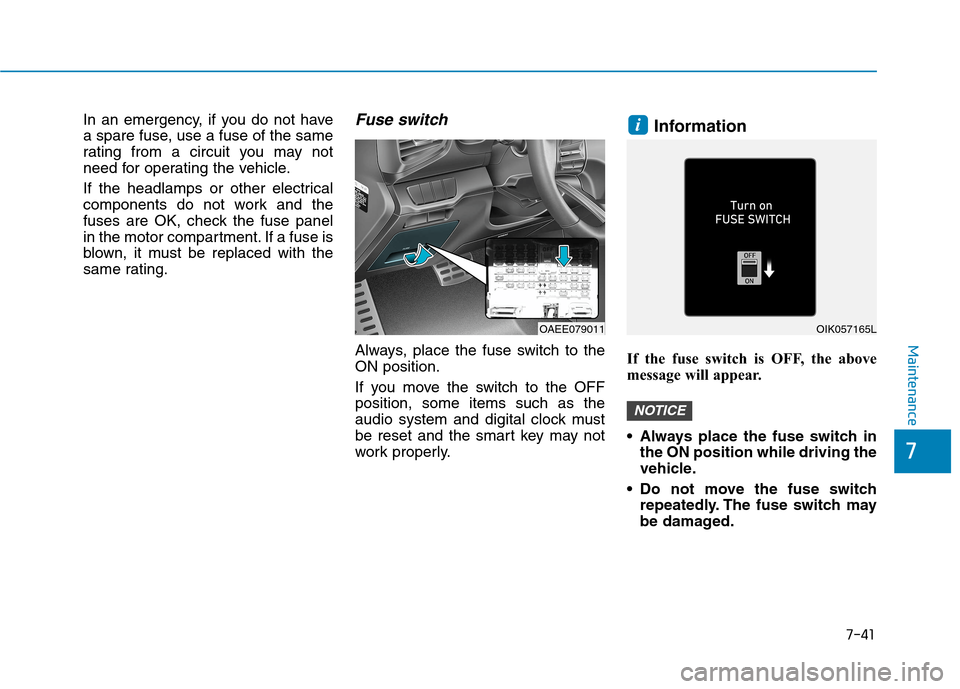
Always, place the fuse switch to the
ON position.
If you move the switch to the OFF
position, some items such as the
audio system and digital clock must
be reset and the smart key may not
work properly.
Information
If the fuse switch is OFF, the above
message will appear.
Always place the fuse switch in
the ON position while driving the
vehicle.
Do not move the fuse switch
repeatedly. The fuse switch may
be damaged.
NOTICE
i
OAEE079011OIK057165L
Page 448 of 561
7-42
Maintenance
Motor Compartment Panel
Fuse Replacement
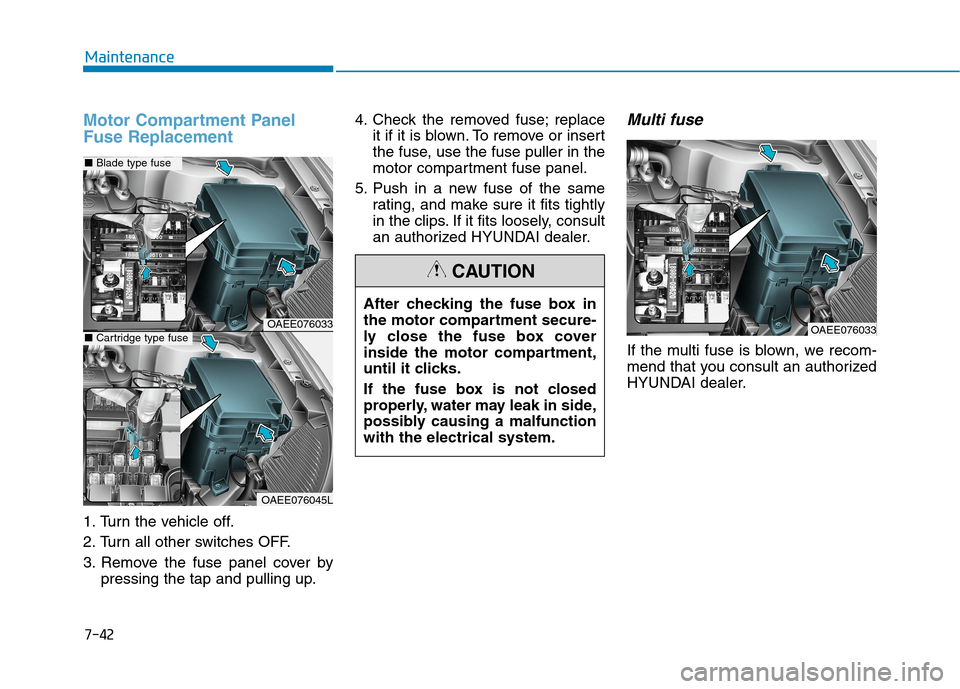
1. Turn the vehicle off.
2. Turn all other switches OFF.
3. Remove the fuse panel cover by
pressing the tap and pulling up.4. Check the removed fuse; replace
it if it is blown. To remove or insert
the fuse, use the fuse puller in the
motor compartment fuse panel.
5. Push in a new fuse of the same
rating, and make sure it fits tightly
in the clips. If it fits loosely, consult
an authorized HYUNDAI dealer.
Multi fuse
If the multi fuse is blown, we recom-
mend that you consult an authorized
HYUNDAI dealer. After checking the fuse box in
the motor compartment secure-
ly close the fuse box cover
inside the motor compartment,
until it clicks.
If the fuse box is not closed
properly, water may leak in side,
possibly causing a malfunction
with the electrical system.
CAUTION
OAEE076033OAEE076033
OAEE076045L
■Blade type fuse
■Cartridge type fuse
Page 454 of 561
7-48
Maintenance
Motor compartment fuse panel
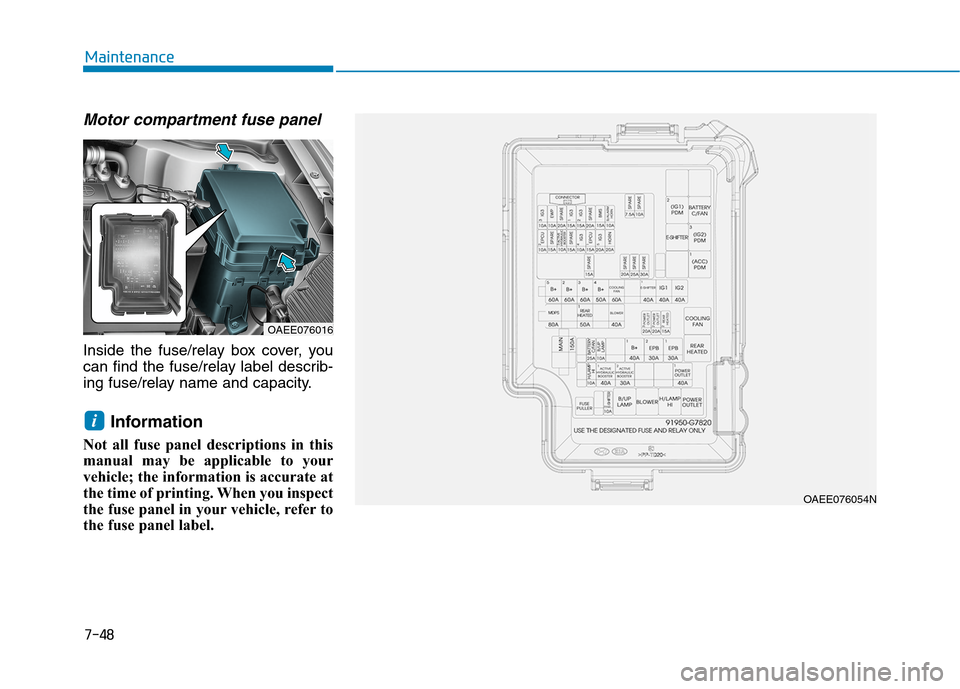
Inside the fuse/relay box cover, you
can find the fuse/relay label describ-
ing fuse/relay name and capacity.
Information
Not all fuse panel descriptions in this
manual may be applicable to your
vehicle; the information is accurate at
the time of printing. When you inspect
the fuse panel in your vehicle, refer to
the fuse panel label.
i
OAEE076016
OAEE076054N
Page 455 of 561
7-49
7
Maintenance
Motor compartment fuse panel
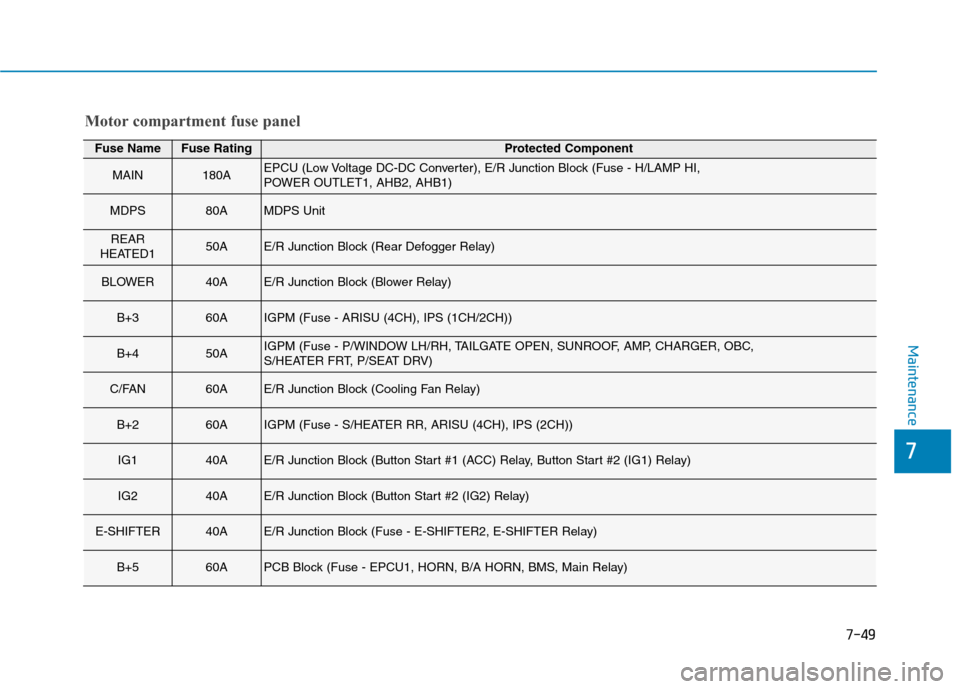
Fuse NameFuse RatingProtected Component
MAIN180AEPCU (Low Voltage DC-DC Converter), E/R Junction Block (Fuse - H/LAMP HI,
POWER OUTLET1, AHB2, AHB1)
MDPS80AMDPS Unit
REAR
HEATED150AE/R Junction Block (Rear Defogger Relay)
BLOWER40AE/R Junction Block (Blower Relay)
B+360AIGPM (Fuse - ARISU (4CH), IPS (1CH/2CH))
B+450AIGPM (Fuse - P/WINDOW LH/RH, TAILGATE OPEN, SUNROOF, AMP, CHARGER, OBC,
S/HEATER FRT, P/SEAT DRV)
C/FAN60AE/R Junction Block (Cooling Fan Relay)
B+260AIGPM (Fuse - S/HEATER RR, ARISU (4CH), IPS (2CH))
IG140AE/R Junction Block (Button Start #1 (ACC) Relay, Button Start #2 (IG1) Relay)
IG240AE/R Junction Block (Button Start #2 (IG2) Relay)
E-SHIFTER40AE/R Junction Block (Fuse - E-SHIFTER2, E-SHIFTER Relay)
B+560APCB Block (Fuse - EPCU1, HORN, B/A HORN, BMS, Main Relay)
Page 456 of 561
7-50
Maintenance
Motor compartment fuse panel
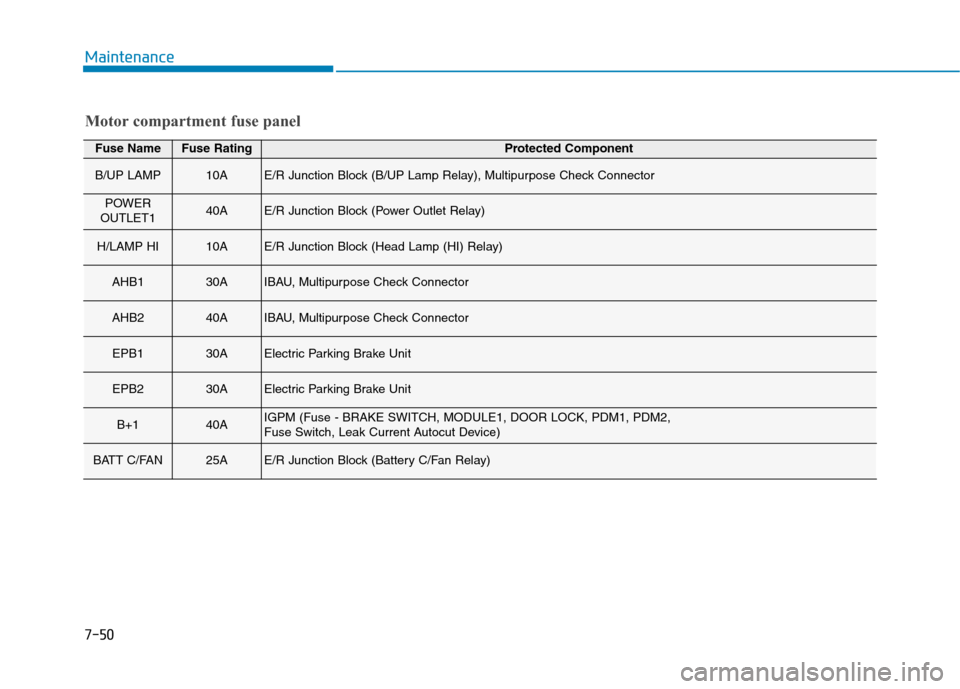
Fuse NameFuse RatingProtected Component
B/UP LAMP10AE/R Junction Block (B/UP Lamp Relay), Multipurpose Check Connector
POWER
OUTLET140AE/R Junction Block (Power Outlet Relay)
H/LAMP HI10AE/R Junction Block (Head Lamp (HI) Relay)
AHB130AIBAU, Multipurpose Check Connector
AHB240AIBAU, Multipurpose Check Connector
EPB130AElectric Parking Brake Unit
EPB230AElectric Parking Brake Unit
B+140AIGPM (Fuse - BRAKE SWITCH, MODULE1, DOOR LOCK, PDM1, PDM2,
Fuse Switch, Leak Current Autocut Device)
BATT C/FAN25AE/R Junction Block (Battery C/Fan Relay)
Page 457 of 561
7-51
7
Maintenance
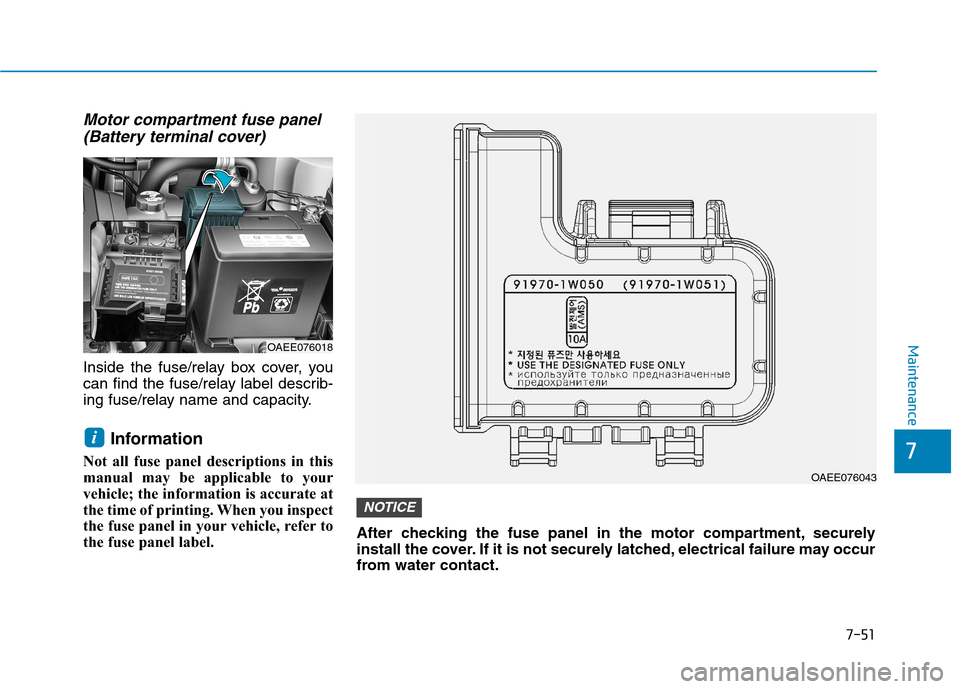
Motor compartment fuse panel
(Battery terminal cover)
Inside the fuse/relay box cover, you
can find the fuse/relay label describ-
ing fuse/relay name and capacity.
Information
Not all fuse panel descriptions in this
manual may be applicable to your
vehicle; the information is accurate at
the time of printing. When you inspect
the fuse panel in your vehicle, refer to
the fuse panel label.
i
OAEE076018
OAEE076043
After checking the fuse panel in the motor compartment, securely
install the cover. If it is not securely latched, electrical failure may occur
from water contact.
NOTICE