2020 Hyundai Ioniq Electric mirror
[x] Cancel search: mirrorPage 11 of 561
1-2
E EX
XT
TE
ER
RI
IO
OR
R
O
OV
VE
ER
RV
VI
IE
EW
W
Your vehicle at a glance
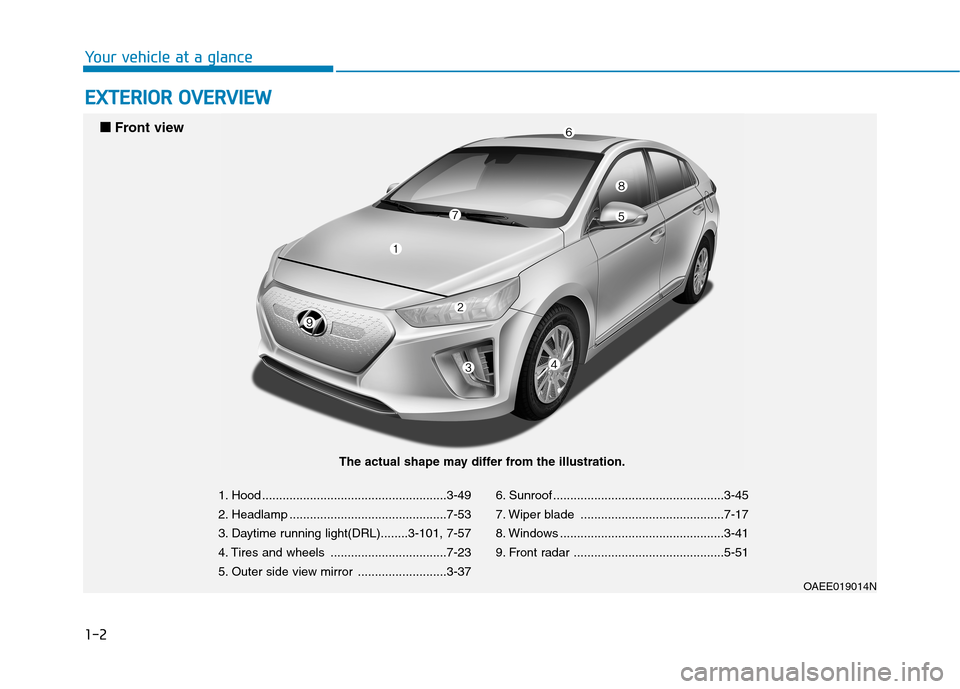
OAEE019014N
■ ■
Front view
The actual shape may differ from the illustration.
1. Hood ......................................................3-49
2. Headlamp ..............................................7-53
3. Daytime running light(DRL)........3-101, 7-57
4. Tires and wheels ..................................7-23
5. Outer side view mirror ..........................3-376. Sunroof ..................................................3-45
7. Wiper blade ..........................................7-17
8. Windows ................................................3-41
9. Front radar ............................................5-51
Page 13 of 561
1-4
Your vehicle at a glance
I IN
NT
TE
ER
RI
IO
OR
R
O
OV
VE
ER
RV
VI
IE
EW
W
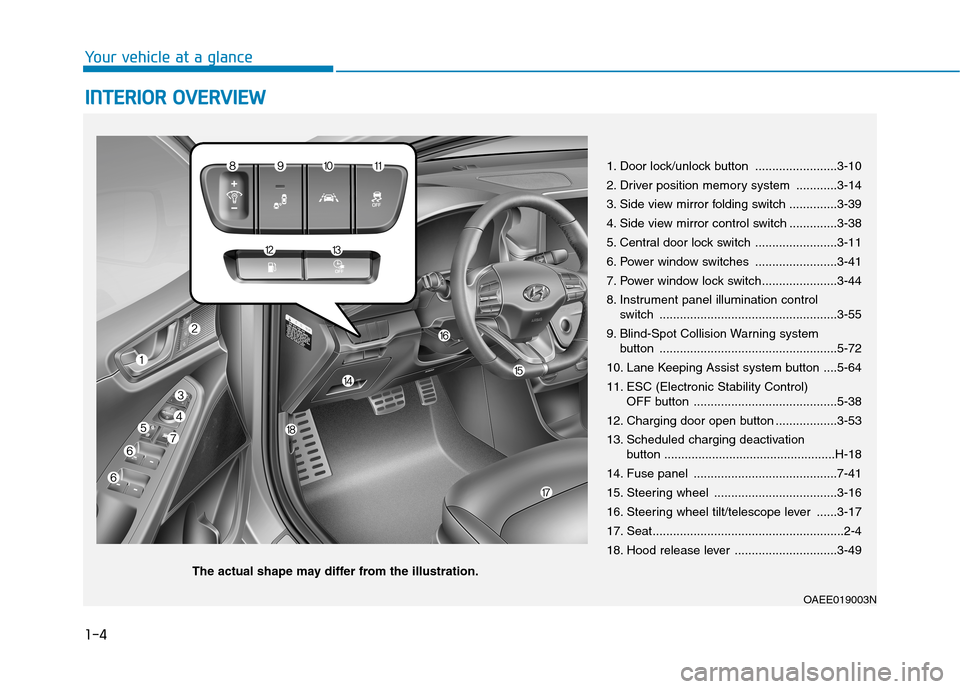
1. Door lock/unlock button ........................3-10
2. Driver position memory system ............3-14
3. Side view mirror folding switch ..............3-39
4. Side view mirror control switch ..............3-38
5. Central door lock switch ........................3-11
6. Power window switches ........................3-41
7. Power window lock switch......................3-44
8. Instrument panel illumination control
switch ....................................................3-55
9. Blind-Spot Collision Warning system
button ....................................................5-72
10. Lane Keeping Assist system button ....5-64
11. ESC (Electronic Stability Control)
OFF button ..........................................5-38
12. Charging door open button ..................3-53
13. Scheduled charging deactivation
button ..................................................H-18
14. Fuse panel ..........................................7-41
15. Steering wheel ....................................3-16
16. Steering wheel tilt/telescope lever ......3-17
17. Seat........................................................2-4
18. Hood release lever ..............................3-49
OAEE019003N
The actual shape may differ from the illustration.
Page 65 of 561
![Hyundai Ioniq Electric 2020 Owners Manual 2-50
Safety system of your vehicle
Side air bags ]
Your vehicle is equipped with a side
air bag in each front seat. The pur-
pose of the air bag is to provide the
vehicles driver and the front passen Hyundai Ioniq Electric 2020 Owners Manual 2-50
Safety system of your vehicle
Side air bags ]
Your vehicle is equipped with a side
air bag in each front seat. The pur-
pose of the air bag is to provide the
vehicles driver and the front passen](/manual-img/35/14896/w960_14896-64.png)
2-50
Safety system of your vehicle
Side air bags ]
Your vehicle is equipped with a side
air bag in each front seat. The pur-
pose of the air bag is to provide the
vehicle's driver and the front passen-
ger with additional protection than
that offered by the seat belt alone.The side air bags are designed to
deploy only during certain side impact
collisions, depending on the crash
severity.
The side and curtain air bags on
both sides of the vehicle may deploy
if a rollover or possible rollover is
detected.
The side air bags are not designed to
deploy in all side impact or rollover
situations.
OAE036037
OAE036038
To reduce the risk of serious
injury or death from an inflating
side air bag, take the following
precautions:
Seat belts must be worn at all
times to help keep occupants
positioned properly.
(Continued)
WARNING
(Continued)
Move your seat as far back as
possible from front air bags,
while still maintaining control
of the vehicle.
Never lean against the door or
center console.
Do not allow the front passen-
ger to place their feet or legs
on the dashboard.
No objects (such as crash pad
cover, cellular phone holder,
cup holder, perfume or stick-
ers) should be placed over or
near the air bag modules on
the steering wheel, instrument
panel, windshield glass, and
the front passenger's panel
above the glove box. Such
objects could cause harm if
the vehicle is in a crash
severe enough to cause the
air bags to deploy.
Do not attach any objects on
front windshield and inside
mirror.
Page 86 of 561
Convenient features of your vehicle
Accessing your vehicle .........................................3-3
Smart Key ..........................................................................3-3
Immobilizer System ...........................................................3-8
Door locks ...............................................................3-9
Operating Door Locks from Outside the Vehicle .....3-9
Operating Door Locks from Inside the Vehicle ......3-10
Auto Door Lock/Unlock Features ...............................3-12
Child-Protector Rear Door locks ................................3-12
Theft-alarm system.............................................3-13
Driver position memory system .........................3-14
Storing Positions into Memory ..................................3-14
Recalling positions from memory ...............................3-15
Easy Access Function ....................................................3-15
Steering wheel......................................................3-16
Electric Power Steering (EPS) .....................................3-16
Tilt Steering / Telescope Steering ..............................3-17
Horn ....................................................................................3-18
Heated Steering Wheel (for Canada) .........................3-18
Mirrors ...................................................................3-19
Inside Rearview Mirror ..................................................3-19
Side View Mirrors .........................................................3-37
Reverse Parking Aid Function ....................................3-40
Windows ................................................................3-41
Power Windows ...............................................................3-42
Sunroof..................................................................3-45
Sunroof opening and closing .......................................3-46
Sliding the sunroof .........................................................3-46
Tilting the sunroof ..........................................................3-47
Sunshade ...........................................................................3-47
Resetting the sunroof ....................................................3-48
Exterior features .................................................3-49
Hood ...................................................................................3-49
Liftgate ..............................................................................3-51
Charging Door ..................................................................3-53
Instrument cluster................................................3-54
Instrument Cluster Control............................................3-55
Gauges and Meters ........................................................3-56
Warning and Indicator lights ........................................3-60
LCD Display Messages ..................................................3-72
LCD Display ..........................................................3-83
LCD Display Control ........................................................3-83
LCD display modes ..........................................................3-84
TRIP Computer .....................................................3-96
Trip modes ........................................................................3-96
Light .....................................................................3-101
Exterior Lights ...............................................................3-101
Interior Lights ................................................................3-109
Welcome System ..........................................................3-112
3
Page 88 of 561
3-3
Convenient features of your vehicle
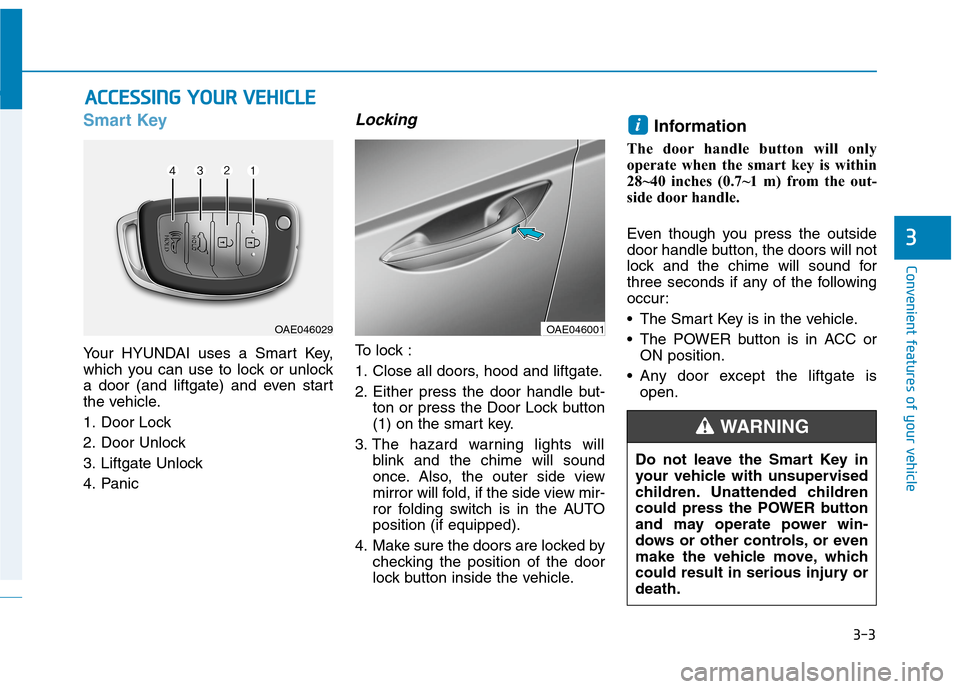
Smart Key
Your HYUNDAI uses a Smart Key,
which you can use to lock or unlock
a door (and liftgate) and even start
the vehicle.
1. Door Lock
2. Door Unlock
3. Liftgate Unlock
4. Panic
Locking
To lock :
1. Close all doors, hood and liftgate.
2. Either press the door handle but-
ton or press the Door Lock button
(1) on the smart key.
3. The hazard warning lights will
blink and the chime will sound
once. Also, the outer side view
mirror will fold, if the side view mir-
ror folding switch is in the AUTO
position (if equipped).
4. Make sure the doors are locked by
checking the position of the door
lock button inside the vehicle.
Information
The door handle button will only
operate when the smart key is within
28~40 inches (0.7~1 m) from the out-
side door handle.
Even though you press the outside
door handle button, the doors will not
lock and the chime will sound for
three seconds if any of the following
occur:
• The Smart Key is in the vehicle.
The POWER button is in ACC or
ON position.
Any door except the liftgate is
open.
i
A AC
CC
CE
ES
SS
SI
IN
NG
G
Y
YO
OU
UR
R
V
VE
EH
HI
IC
CL
LE
E
3
OAE046029OAE046001
Do not leave the Smart Key in
your vehicle with unsupervised
children. Unattended children
could press the POWER button
and may operate power win-
dows or other controls, or even
make the vehicle move, which
could result in serious injury or
death.
WARNING
Page 89 of 561
3-4
Convenient features of your vehicle
Unlocking
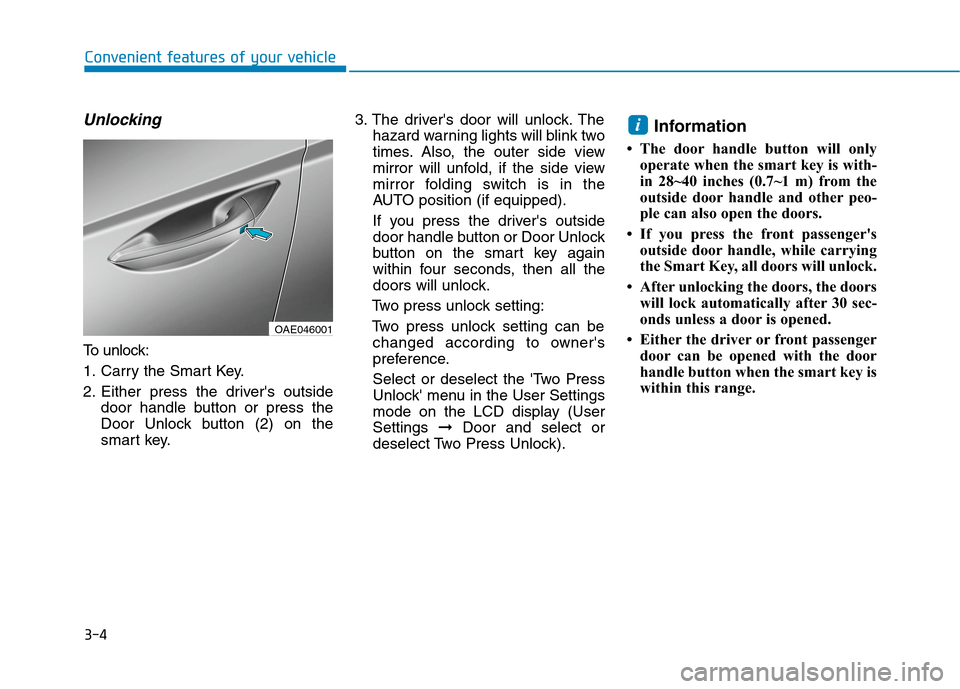
To unlock:
1. Carry the Smart Key.
2. Either press the driver's outside
door handle button or press the
Door Unlock button (2) on the
smart key.3. The driver's door will unlock. The
hazard warning lights will blink two
times. Also, the outer side view
mirror will unfold, if the side view
mirror folding switch is in the
AUTO position (if equipped).
If you press the driver's outside
door handle button or Door Unlock
button on the smart key again
within four seconds, then all the
doors will unlock.
Two press unlock setting:
Two press unlock setting can be
changed according to owner's
preference.
Select or deselect the 'Two Press
Unlock' menu in the User Settings
mode on the LCD display (User
Settings ➞Door and select or
deselect Two Press Unlock).
Information
• The door handle button will only
operate when the smart key is with-
in 28~40 inches (0.7~1 m) from the
outside door handle and other peo-
ple can also open the doors.
• If you press the front passenger's
outside door handle, while carrying
the Smart Key, all doors will unlock.
• After unlocking the doors, the doors
will lock automatically after 30 sec-
onds unless a door is opened.
• Either the driver or front passenger
door can be opened with the door
handle button when the smart key is
within this range.
i
OAE046001
Page 99 of 561
3-14
Convenient features of your vehicle
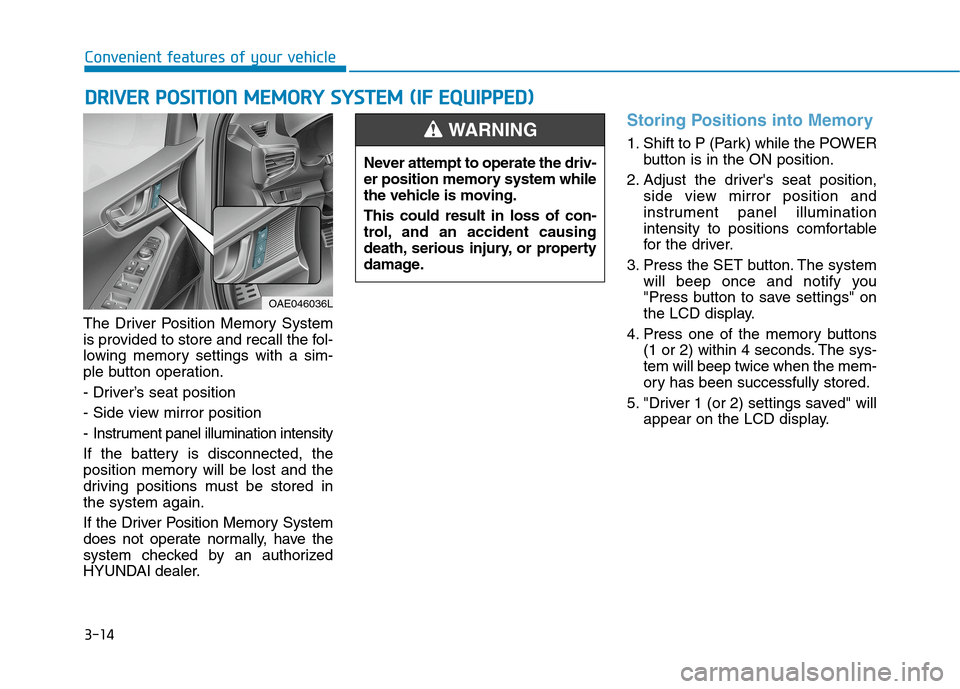
The Driver Position Memory System
is provided to store and recall the fol-
lowing memory settings with a sim-
ple button operation.
- Driver’s seat position
- Side view mirror position
- Instrument panel illumination intensity
If the battery is disconnected, the
position memory will be lost and the
driving positions must be stored in
the system again.
If the Driver Position Memory System
does not operate normally, have the
system checked by an authorized
HYUNDAI dealer.
Storing Positions into Memory
1. Shift to P (Park) while the POWER
button is in the ON position.
2. Adjust the driver's seat position,
side view mirror position and
instrument panel illumination
intensity to positions comfortable
for the driver.
3. Press the SET button. The system
will beep once and notify you
"Press button to save settings" on
the LCD display.
4. Press one of the memory buttons
(1 or 2) within 4 seconds. The sys-
tem will beep twice when the mem-
ory has been successfully stored.
5. "Driver 1 (or 2) settings saved" will
appear on the LCD display.
D DR
RI
IV
VE
ER
R
P
PO
OS
SI
IT
TI
IO
ON
N
M
ME
EM
MO
OR
RY
Y
S
SY
YS
ST
TE
EM
M
(
(I
IF
F
E
EQ
QU
UI
IP
PP
PE
ED
D)
)
OAE046036L
Never attempt to operate the driv-
er position memory system while
the vehicle is moving.
This could result in loss of con-
trol, and an accident causing
death, serious injury, or property
damage.
WARNING
Page 100 of 561
3-15
Convenient features of your vehicle
3
Recalling positions from mem-
ory
1. Shift to P (Park) while the POWER
button is in the ON position.
2. Press the desired memory button
(1 or 2). The system will beep
once, and then the driver’s seat
position, side view mirror position
and instrument panel illumination
intensity will automatically adjust
to the stored positions.
3. "Driver 1(or 2) settings is applied"
will appear on the LCD display. While recalling the "1" memory
position, pressing the SET or 1
button temporarily stops the
adjustment of the recalled memo-
ry position. Pressing the 2 button
recalls the "2" memory position.
While recalling the "2" memory
position, pressing the SET or 2
button temporarily stops the
adjustment of the recalled memo-
ry position. Pressing the 1 button
recalls the "1" memory position.
While recalling the stored posi-
tions, pressing one of the con-
trol buttons for the driver’s seat,
side view mirror or instrument
panel illumination will cause the
movement of that component to
stop and move in the direction
that the control button is
pressed.
Easy Access Function
When exiting the vehicle the driver’s
seat will move rearward when the
vehicle is turned off, and the gear in
P (Park).
When entering the vehicle the dri-
ver's seat will move forward when the
smart key is detected with the
POWER button in the ACC/ON/
START position.
You can activate or deactivate the
Easy Access Function from the User
Settings mode on the LCD display.
For more information, refer to the
"LCD Display" section in this
chapter.
NOTICE