Page 172 of 561
3-87
Convenient features of your vehicle
3
User settings mode
In this mode, you can change the
settings of the instrument cluster,
doors, lamps, etc.
1. Driver Assistance
2. Door
3. Lights
4. Sound
5. Convenience
6. Service interval
7. Other (features)
8. Languages
9. Reset
The information provided may dif-
fer depending on which functions
are applicable to your vehicle.
Shift to P to edit settings
This warning message appears if
you try to adjust the User Settings
while driving.
For your safety, change the User
Settings after parking the vehicle,
applying the parking brake and shift-
ing to P (Park).
Quick guide (Help)
This mode provides quick guides for
the systems in the User Settings
mode.
Select an item, press and hold the
OK button.
For more details about each sys-
tem, refer to this Owner's Manual
OAD048572L
OOSEV048172L
Page 176 of 561
3-91
Convenient features of your vehicle
3
ItemsExplanation
One touch turn signal
The one touch turn signal function will be deactivated.
The turn signal indicator will blink 3, 5, or 7 times when the turn signal lever is moved
slightly.
For more details, refer to "Lighting" in this chapter.
Headlight DelayTo activate or deactivate the headlight delay function.
For more details, refer to "Lighting" in this chapter.
High Beam Assist To activate or deactivate High Beam Assist system.
For more details, refer to "High Beam Assist (HBA)" in this chapter.
ItemsExplanation
Cluster soundTo adjust the cluster volume.
- OFF/Level 1/Level 2/Level 3
4. Sound 3. Lights
❈ ❈
The information provided may differ depending on which functions are applicable to your vehicle.
Page 177 of 561

3-92
Convenient features of your vehicle
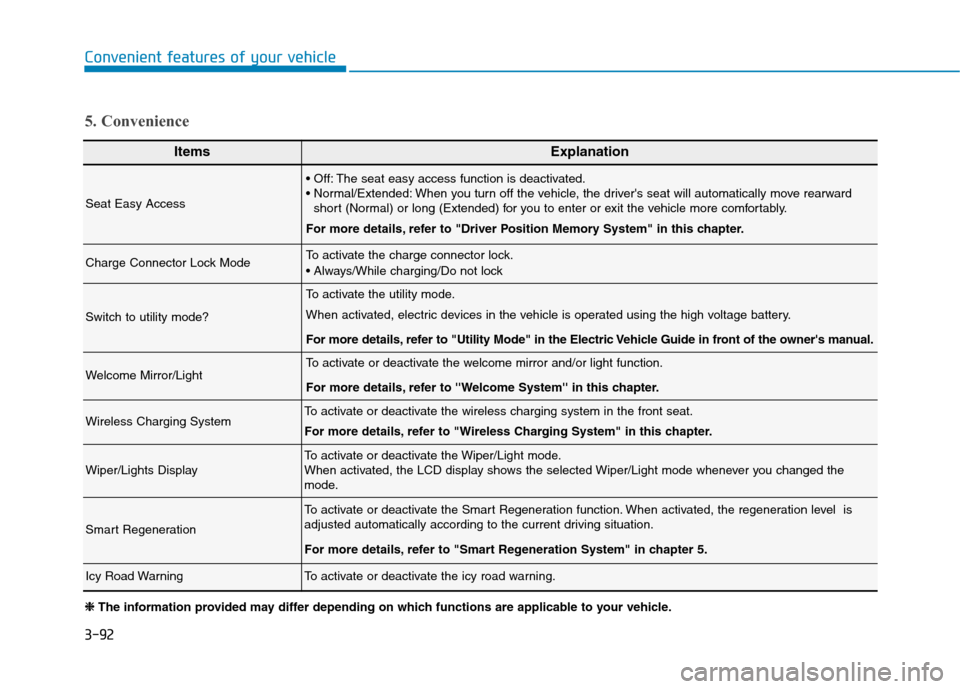
ItemsExplanation
Seat Easy Access
The seat easy access function is deactivated.
When you turn off the vehicle, the driver's seat will automatically move rearward
short (Normal) or long (Extended) for you to enter or exit the vehicle more comfortably.
For more details, refer to "Driver Position Memory System" in this chapter.
Charge Connector Lock ModeTo activate the charge connector lock.
Switch to utility mode?
To activate the utility mode.
When activated, electric devices in the vehicle is operated using the high voltage battery.
For more details, refer to "Utility Mode" in the Electric Vehicle Guide in front of the owner's manual.
Welcome Mirror/LightTo activate or deactivate the welcome mirror and/or light function.
For more details, refer to ''Welcome System'' in this chapter.
Wireless Charging SystemTo activate or deactivate the wireless charging system in the front seat.
For more details, refer to "Wireless Charging System" in this chapter.
Wiper/Lights DisplayTo activate or deactivate the Wiper/Light mode.
When activated, the LCD display shows the selected Wiper/Light mode whenever you changed the
mode.
Smart Regeneration
To activate or deactivate the Smart Regeneration function. When activated, the regeneration level is
adjusted automatically according to the current driving situation.
For more details, refer to "Smart Regeneration System" in chapter 5.
Icy Road WarningTo activate or deactivate the icy road warning.
5. Convenience
❈ ❈
The information provided may differ depending on which functions are applicable to your vehicle.
Page 183 of 561

3-98
Convenient features of your vehicle
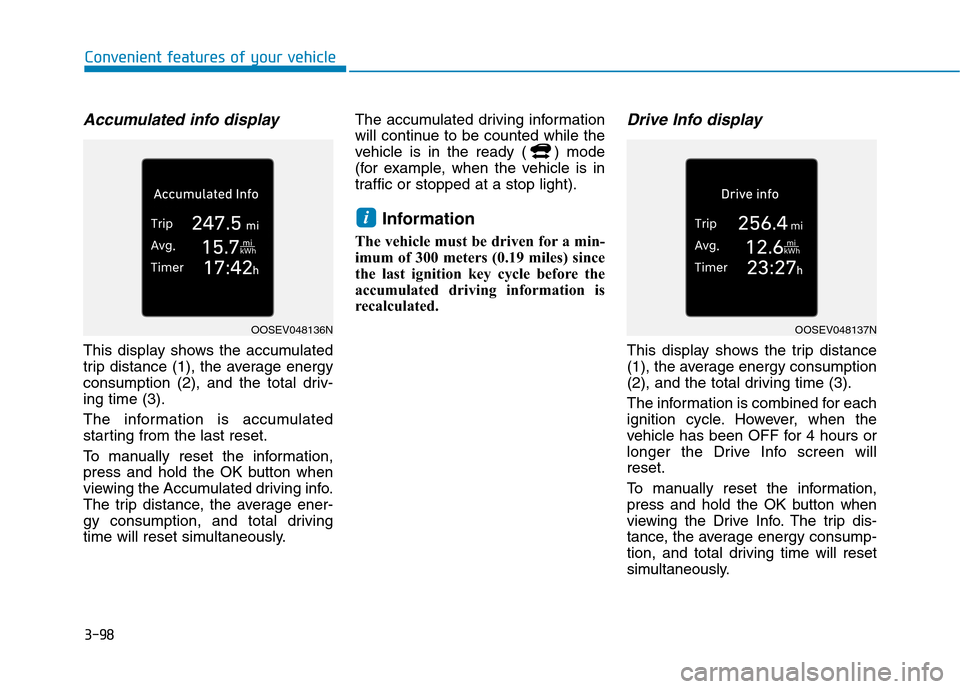
Accumulated info display
This display shows the accumulated
trip distance (1), the average energy
consumption (2), and the total driv-
ing time (3).
The information is accumulated
starting from the last reset.
To manually reset the information,
press and hold the OK button when
viewing the Accumulated driving info.
The trip distance, the average ener-
gy consumption, and total driving
time will reset simultaneously.The accumulated driving information
will continue to be counted while the
vehicle is in the ready ( ) mode
(for example, when the vehicle is in
traffic or stopped at a stop light).
Information
The vehicle must be driven for a min-
imum of 300 meters (0.19 miles) since
the last ignition key cycle before the
accumulated driving information is
recalculated.
Drive Info display
This display shows the trip distance
(1), the average energy consumption
(2), and the total driving time (3).
The information is combined for each
ignition cycle. However, when the
vehicle has been OFF for 4 hours or
longer the Drive Info screen will
reset.
To manually reset the information,
press and hold the OK button when
viewing the Drive Info. The trip dis-
tance, the average energy consump-
tion, and total driving time will reset
simultaneously.
i
OOSEV048136NOOSEV048137N
Page 184 of 561
3-99
Convenient features of your vehicle
3
The driving information will continue
to be counted while the vehicle is in
the ready ( ) mode (for example,
when the vehicle is in traffic or
stopped at a stop light.)
Information
The vehicle must be driven for a min-
imum of 0.19 miles (300 meters) since
the last ignition key cycle before the
driving information is recalculated.
Digital speedometer
This digital speedometer display
shows the speed of the vehicle
(km/h, MPH).
Driving style
This display shows whether the dri-
ver's driving style is Economical(1),
Normal (2) or Aggressive (3).
i
OIK047151NOAEPH049537L
Page 186 of 561

3-101
Convenient features of your vehicle
3
L LI
IG
GH
HT
T
Exterior Lights
Lighting control
To operate the lights, turn the knob at
the end of the control lever to one of
the following positions:
1. DRL (Daytime Running Lights)
OFF position
2. AUTO light position
3. Parking lamp position
4. Headlamp position
Daytime running light (DRL)
(if equipped)
The Daytime Running Lights (DRL)
can make it easier for others to see
the front of your vehicle during the
day, especially after dawn and before
sunset.
The DRL system will turn the dedi-
cated lamp OFF when :
• The light switch is in the DRL OFF
position.
The headlights are ON.
The vehicle is turned off.
AUTO light position (if equipped)
The parking lamp and headlamp will
be turned ON or OFF automatically
depending on the amount of light
outside the vehicle.
Even with the AUTO light feature in
operation, it is recommended to
manually turn ON the lamps when
driving at night or in a fog, driving in
the rain, or when you enter dark
areas, such as tunnels and parking
facilities.
OLF044084N
OAEE046510N
Page 187 of 561
3-102
Convenient features of your vehicle
• Do not cover or spill anything on
the sensor (1) located in front of
the instrument panel.
Do not clean the sensor using a
window cleaner, the cleanser may
leave a light film which could
interfere with sensor operation.
If your vehicle has window tint
or other types of metallic coat-
ing on the front windshield, the
AUTO light system may not work
properly.
Parking lamp position ( )
The parking lamp, license plate lamp
and instrument panel lamp are turned
ON.
Headlamp position ( )
The headlamp, parking lamp, license
plate lamp and instrument panel lamp
are turned ON.
Information
The POWER button must be in the
ON position to turn on the headlamp.
i
NOTICE
OLF044086NOLF044087N
Page 188 of 561
3-103
Convenient features of your vehicle
3
High beam operation
To turn on the high beam headlamp,
push the lever away from you. The
lever will return to its original position.
The high beam indicator will light
when the headlamp high beams are
switched on.
To turn off the high beam headlamp,
pull the lever towards you. The low
beams will turn on.To flash the high beam headlamp,
pull the lever towards you, then
release the lever. The high beams
will remain ON as long as you hold
the lever towards you.
High Beam Assist (HBA)
(if equipped)
High Beam Assist is a system that
automatically adjusts the headlamp
range (switches between high beam
and low beam) according to the
brightness of other vehicles and road
conditions.
Do not use high beam when there
are other vehicles approaching
you. Using high beam could
obstruct the other driver’s vision.
WARNING
OLF044089N
OLF044088N
OAE048581L