Page 461 of 561
7-55
7
Maintenance
5. Install a new bulb by inserting it
into the socket and rotating it until
it locks into place.
6. Install the socket in the assembly
by aligning the tabs on the socket
with the slots in the assembly.
7. Push the socket into the assembly
and turn the socket clockwise.Side marker
1. Open the hood.
2. Disconnect the negative battery
cable.
3. Remove the socket from the
assembly by turning the socket
counterclockwise until the tabs on
the socket align with the slots on
the assembly.
4. Remove the bulb from the socket
by pulling out the bulb.
5. Insert a new bulb.
■ ■
Type B - LED type
(1) Headlamp (high)
(2) Headlamp (low)
(3) Turn signal lamp
(4) Parking lamp
(5) Side marker lamp
OAE078052
Page 463 of 561
7-57
7
Maintenance
Turn signal lamp
1. Open the hood.
2. Disconnect the negative battery
cable.
3. Remove the socket from the
assembly by turning the socket
counterclockwise until the tabs on
the socket align with the slots on
the assembly.
4. Remove the bulb from the socket
by pressing it in and rotating it
counterclockwise until the tabs on
the bulb align with the slots in the
socket. Pull the bulb out of the
socket.5.Insert a new bulb by inserting it into
the socket and rotating it until it
locks into place.
6.Install the socket into the assembly
by aligning the tabs on the socket
with the slots in the assembly.
7.Push the socket into the assembly
and turn the socket clockwise.
Daytime Running Light (DRL)
Your vehicle is equipped with LED
lamps. LED lamps do not have
replaceable bulbs. If the LED lamp
does not operate, have the vehicle
checked by an authorized HYUNDAI
dealer.
OAE078049
OAEPH078041
Page 465 of 561
7-59
7
Maintenance
4. Remove the rear combination
lamp assembly from the body of
the vehicle.5. Remove the socket from the
assembly by turning the socket
counterclockwise until the tabs on
the socket align with the slots on
the assembly.6. Remove the bulb from the socket
by pressing it in and rotating it
counterclockwise until the tabs on
the bulb align with the slots in the
socket. Pull the bulb out of the
socket.
7. Insert a new bulb by inserting it
into the socket and rotating it until
it locks into place.
8. Install the socket into the assem-
bly by aligning the tabs on the
socket with the slots in the assem-
bly. Push the socket into the
assembly and turn the socket
clockwise.
9. Reinstall the lamp assembly to the
body of the vehicle.
OAEPH078031
Turn signal lamp
OAE076038
Page 466 of 561

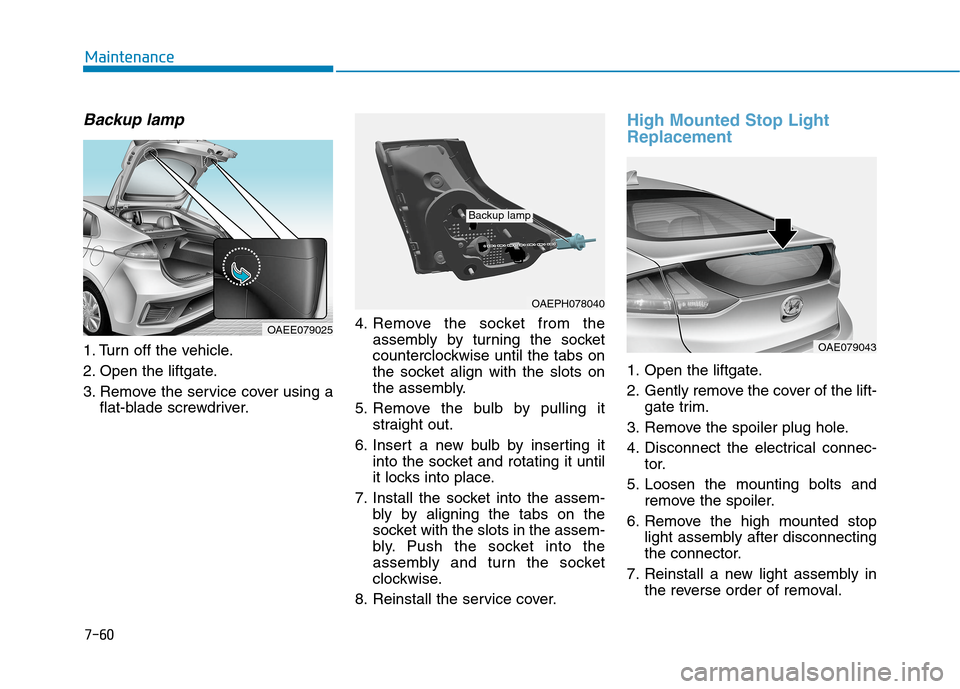
Backup lamp
1. Turn off the vehicle.
2. Open the liftgate.
3. Remove the service cover using a
flat-blade screwdriver.4. Remove the socket from the
assembly by turning the socket
counterclockwise until the tabs on
the socket align with the slots on
the assembly.
5. Remove the bulb by pulling it
straight out.
6. Insert a new bulb by inserting it
into the socket and rotating it until
it locks into place.
7. Install the socket into the assem-
bly by aligning the tabs on the
socket with the slots in the assem-
bly. Push the socket into the
assembly and turn the socket
clockwise.
8. Reinstall the service cover.
High Mounted Stop Light
Replacement
1. Open the liftgate.
2. Gently remove the cover of the lift-
gate trim.
3. Remove the spoiler plug hole.
4. Disconnect the electrical connec-
tor.
5. Loosen the mounting bolts and
remove the spoiler.
6. Remove the high mounted stop
light assembly after disconnecting
the connector.
7. Reinstall a new light assembly in
the reverse order of removal.
7-60
Maintenance
OAEPH078040
Backup lamp
OAE079043
OAEE079025
Page 468 of 561
7-62
Maintenance
1. Using a flat-blade screwdriver,
gently pry the lens from the interi-
or lamp housing.
2. Remove the bulb by pulling it
straight out.
3. Install a new bulb in the socket.
4. Align the lens tabs with the interi-
or lamp housing notches and snap
the lens into place.
Use care not to dirty or damage
lens, lens tab, and plastic hous-
ings.
NOTICE
Prior to working on the Interior
Lights, ensure that the lamp is
off to avoid burning your fingers
or receiving an electric shock.
WARNING
■Map lamp (Bulb type)
OAE076045
OAE076046
■Vanity mirror lamp
■Luggage compartment lamp
OAE076048
OAE076047
■Room lamp (Bulb type)
Map lamp, room lamp, vanity mirror lamp and
luggage compartment lamp
Page 476 of 561

7-70
Maintenance
Caring for the leather seats
- Vacuum the seat periodically to
remove dust and sand on the
seat. It will prevent abrasion or
damage of the leather and main-
tain its quality.
- Wipe the natural leather seat
cover often with dry or soft cloth.
- Use of proper leather protective
may prevent abrasion of the
cover and helps maintain the
color. Be sure to read the instruc-
tions and consult a specialist
when using leather coating or
protective agent.
- Light colored (beige, cream
beige) leather is easily contami-
nated and the stain is noticeable.
Clean the seats frequently.
- Avoid wiping with wet cloth. It may
cause the surface to crack. Cleaning the leather seats
- Remove all contaminations
instantly. Refer to instructions
below for removal of each con-
taminant.
- Cosmetic products (sunscreen,
foundation, etc.)
Apply cleansing cream on a cloth
and wipe the contaminate spot.
Wipe off the cream with a wet
cloth and remove water with a dry
cloth.
- Beverages (coffee, soft drink,
etc.)
Apply a small amount of neutral
detergent and wipe until contami-
nations do not smear.
- Oil
Remove oil instantly with
absorbable cloth and wipe with
stain remover used only for natu-
ral leather.
- Chewing gum
Harden the gum with ice and
remove gradually.
Wrinkles or abrasions which
appear naturally from usage
are not covered by warranty.
Belts with metallic acces-
sories, zippers or keys inside
the back pocket may damage
the seat fabric.
Make sure not to wet the seat.
It may change the nature of
natural leather.
Jeans or clothes which could
bleach may contaminate the
surface of the seat covering
fabric.
CAUTION
Page 555 of 561

I-2
Accessing your vehicle .....................................................3-3
Immobilizer System .....................................................3-8
Smart Key ....................................................................3-3
Air bag - Advanced Supplemental Restraint System .....2-47
Additional Safety Precautions ....................................2-69
Air Bag Warning Labels.............................................2-70
How Does the Air Bag System Operate? ...................2-53
Occupant Classification System (OCS) .....................2-58
SRS Care ....................................................................2-68
What to Expect After an Air Bag Inflates ..................2-57
Where Are the Air Bags? ...........................................2-49
Why Didn't My Air Bag Go Off in a Collision?........2-63
Air Conditioning System ..................................................8-5
Appearance Care .............................................................7-63
Exterior Care ..............................................................7-63
Interior Care ...............................................................7-69
Automatic climate control system ................................3-119
Automatic Heating and Air Conditioning ................3-120
Manual Heating and Air Conditioning .....................3-121
System Maintenance ................................................3-130
System Operation .....................................................3-128Battery(12V) ...................................................................7-20
Battery Recharging .....................................................7-21
For Best Battery Service ............................................7-21
Reset Features ............................................................7-22
Before driving ...................................................................5-3
Before Entering the Vehicle .........................................5-3
Before Starting .............................................................5-3
Blind-spot Collision Warning (BCW) ...........................5-71
Declaration of conformity .........................................5-82
System description .....................................................5-71
System setting and operation .....................................5-72
Warning message and system control ........................5-74
Brake Fluid .....................................................................7-13
Checking the Brake Fluid Level ................................7-13
Braking system ..............................................................5-26
Anti-lock Brake System (ABS)..................................5-36
Auto Hold ...................................................................5-32
Disc Brake Wear Indicator .........................................5-27
Electronic Parking Brake (EPB) ................................5-27
Electronic Stability Control (ESC).............................5-38
Good Braking Practices..............................................5-44
Hill-Start Assist Control (HAC) .................................5-43
Power Brakes..............................................................5-26
Vehicle Stability Management (VSM) .......................5-42
Bulb Wattage .....................................................................8-3
Index
AB
Page:
< prev 1-8 9-16 17-24