2020 HONDA PILOT center set
[x] Cancel search: center setPage 171 of 743

169
Controls
Moonroof*
Opening and Closing the Moonroof
You can operate the moonroof when the power mode is in ON. Use the switch in
the front of the ceiling to open and close the moonroof.
■Automatic operation
To open: Pull the switch back firmly.
To close: Push the switch forward firmly.
The moonroof will automatically open or close
all the way. To stop the moonroof midway,
push the switch briefly.
■Manual operation
To open: Pull the switch back lightly, and
hold it until the desired position is reached.
To close: Push the switch forward lightly, and
hold it until the desired position is reached.
■Tilting the moonroof up
To tilt: Push on the center of the moonroof
switch.
To close: Push the switch forward firmly, then
release.
■Using the Moonroof Switch
1 Opening and Closing the Moonroof
NOTICE
Opening the moonroof in below freezing
temperature or when it is covered with snow or ice
can damage the moonr oof panel or motor.
The power moonroof can be operated for up to 10
minutes after you set the power mode to OFF.
Opening either front door cancels this function.
When resistance is detected, the auto reverse function
causes the moonroof to chan ge directions, then stop.
Auto reverse stops sensing when the moonroof is
almost closed to ensure that it fully closes.
You can use the remote transmitter or the key to
operate the moonroof. 2 Opening Windows and the Moonroof
*
with the Remote P. 167
2 Opening/Closing Windows and the
Moonroof
* with the Key P. 168
3WARNING
Opening or closing the moonroof on
someone’s hands or fingers can cause
serious injury.
Make sure all hands and fingers are clear of
the moonroof before opening or closing it.
Open
CloseTilt
Models without panoramic roof
Models with panoramic roof
Open
CloseTilt
* Not available on all models
20 PILOT-31TG76401.book 169 ページ 2019年7月24日 水曜日 午後3時32分
Page 195 of 743

193
uuAdjusting the Mirrors uPower Door Mirrors
Controls
Power Door Mirrors
You can adjust the door mirrors when the
power mode is in ON.
■Mirror position adjustment
L/R selector switch: Select the left or right
mirror. After adjusting the mirror, return the
switch to the center position.
Mirror positi on adjustment switch: Press
the switch left, right, up , or down to move the
mirror.
■Folding door mirrors*
Press the folding button to fold in and out the
door mirrors.
If activated, either side door mirror
automatically tilts do wnward when you put
the transmission into
(R; this improves close-
in visibility on the selected side of the vehicle
when backing up. The mirror automatically
returns to its original position when you take
the transmission out of
(R.
To activate this feature, set the power mode
to ON, and slide the sele ctor switch to the left
or right side.
Selector
Switch
Adjustment Switch
Folding
Button*
■Reverse Tilt Door Mirror*
Selector
Switch
* Not available on all models
20 PILOT-31TG76401.book 193 ページ 2019年7月24日 水曜日 午後3時32分
Page 228 of 743

uuInterior Lights/Interior Convenience Items uInterior Convenience Items
226
Controls
The power mode must be in ON to use the
seat heaters.
There is no heater in the rear center seating
position.
Press the seat heater button:
Once - The HI setting (three indicators on)
Twice - The MID setting (two indicators on)
Three times - The LO setting (one indicator on)
Four times - The OFF se tting (no indicators on)
■Second Row Outer Seat Heaters*1Second Row Outer Seat Heaters*
Do not use the seat heaters even in LO when the
engine is off. Under such conditions, the battery may
be weakened, making the engine difficult to start.
After a certain period of time, the strength setting for
the rear seat heaters will automatically be reduced by
one level at a time until the rear seat heat er shuts off.
The elapsed time varies according to the interior
environment.
3WARNING
Heat induced burns are possible when
using seat heaters.
Persons with a diminished ability to sense
temperature (e.g., persons with diabetes,
lower-limb nerve damage, or paralysis) or
with sensitive skin should not use seat
heaters.
* Not available on all models
20 PILOT-31TG76401.book 226 ページ 2019年7月24日 水曜日 午後3時32分
Page 236 of 743
234
uuHeating and Cooling*uUsing Vents, Heating and A/C
Controls
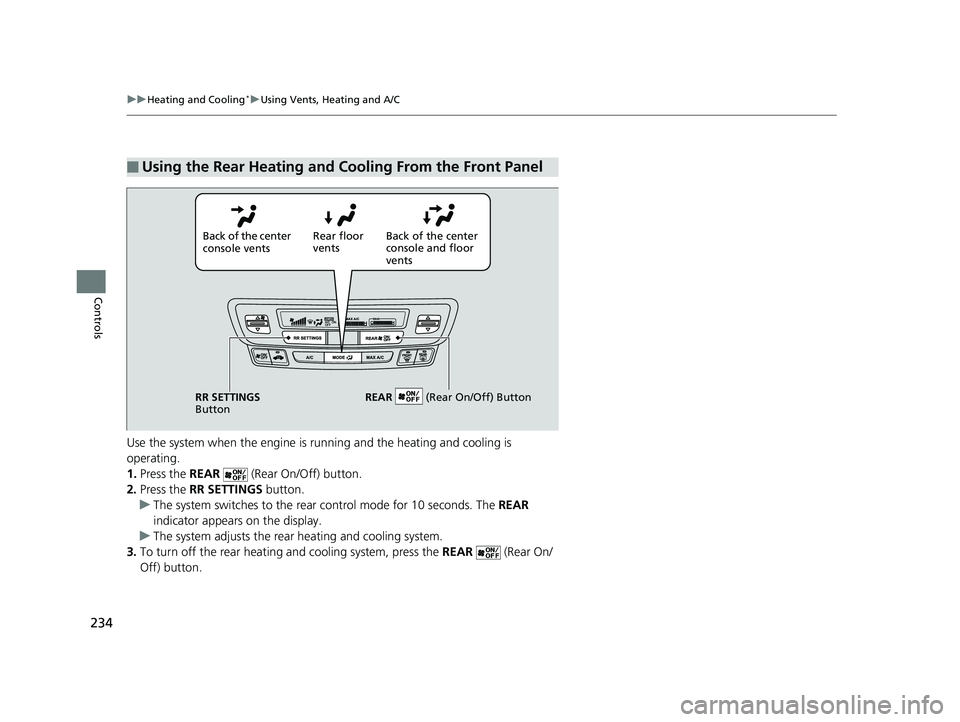
Use the system when the engine is ru nning and the heating and cooling is
operating.
1. Press the REAR (Rear On/Off) button.
2. Press the RR SETTINGS button.
u The system switches to the rear control mode for 10 seconds. The REAR
indicator appears on the display.
u The system adjusts the rear heating and cooling system.
3. To turn off the rear heating and cooling system, press the REAR (Rear On/
Off) button.
■Using the Rear Heating and Cooling From the Front Panel
Back of the center
console vents Rear floor
vents
Back of the center
console and floor
vents
RR SETTINGS
Button REAR
(Rear On/Off) Button
20 PILOT-31TG76401.book 234 ページ 2019年7月24日 水曜日 午後3時32分
Page 237 of 743

235Continued
Controls
Climate Control System*
Using Automatic Climate Control
The automatic climate control system maintains the interior temperature you select.
The system also selects the proper mix of h eated or cooled air that will as quickly as
possible, raise or lower the interior temperature to your preference.
Use the system when the engine is running.
1. Press the AUTO button.
2. Adjust the interior temperature using the driver’s side or passenger’s side
temperature control switch.
3. Press the ON/OFF button to cancel.1Using Automatic Climate Control
If any buttons are presse d while using the climate
control system in auto, the function of the button
that was pressed will take priority.
The AUTO indicator will go off, but functions
unrelated to the button th at was pressed will be
controlled automatically.
During idle-stops, air-conditioning is suspended, and
only the blower remains active.
If you do not want air-cond itioning suspended, press
the Auto Idle Stop OFF button to cancel idle-stop.
To prevent cold air from bl owing in from outside, the
fan may operate at low speed for a while after the
AUTO button has been pressed.
If the interior is very warm, you can cool it down
more rapidly by partial ly opening the windows,
turning the system on auto, and setting the
temperature to low. Change the fresh mode to
recirculation mode until the temperature cools down.
When you set the temperature to the lower or upper
limit, Lo or Hi is displayed.
Models with Auto Idle Stop
All models
Floor and
defroster
vents
Floor vents
Dashboard and floor,
and back of the
center console vents
Dashboard and
back of the center
console vents
AUTO Button
Driver’s Side
Temperature
Control Switch
(Recirculation) Button
Fan Control Button A/C
(Air Conditioning)
Button
Passenger’s Side
Temperature Control
Switch
(On/Off) Button
(Windshield Defroster)
Button
SYNC (Synchronization) Button
* Not available on all models
20 PILOT-31TG76401.book 235 ページ 2019年7月24日 水曜日 午後3時32分
Page 298 of 743

296
uuAudio System Basic Operation uAdjusting the Sound
Features
Adjusting the Sound
1. Select .
2. Select an audio source icon.
3. Select Sound .
Select an item from the following choices:
• Bass / Treble : Treble, Midrange, Bass
• Center / Subwoofer Volume : Center
*,
Subwoofer
• Balance / Fader : Balance, Fader
• Audio Zones
*: Driver Only, Front Only,
Rear Only, Full Vehicle
• Speed Volume Compensation : Speed
Volume Compensation (SVC)
• DTS Neural Surround
*: DTS Neural
SurroundTM
1 Adjusting the Sound
SVC adjusts the volume level based on the vehicle
speed. As you go faster, audio volume increases. As
you slow down, audi o volume decreases.
You can also adjust the sound the following
procedure.
1. Select .
2. Select Settings .
3. Select Sound .
To reset each setting for Bass / Treble , Center /
Subwoofer Volume and Balance / Fader , select
Reset .
* Not available on all models
20 PILOT-31TG76401.book 296 ページ 2019年7月24日 水曜日 午後3時32分
Page 452 of 743

450
uuCustomized Features u
Features
Setup
Group Customizable Features
Description Selectable Settings
Sound Bass / Treble
Adjusts the settings of the audio speakers’ sound.
2Adjusting the Sound P. 296
Center /
Subwoofer
Volume
*
Subwoofer
Volume*
Balance / Fader
Audio Zones
*
Speed Volume
Compensation
DTS Neural
Surround
*
NotificationsChanges the notification settings for apps.—
* Not available on all models
20 PILOT-31TG76401.book 450 ページ 2019年7月24日 水曜日 午後3時32分
Page 534 of 743

532
uuWhen Driving uPrecautions While Driving
Driving
Precautions While Driving
Utility vehicles have a significantly higher rollover rate than other types of vehicles.
To prevent rollovers or loss of control:
• Take corners at slower speeds than yo u would with a passenger vehicle.
• Avoid sharp turns and abrupt maneuvers whenever possible.
• Do not modify your vehicle in any way that you would raise the center of gravity.
• Do not carry heavy cargo on the roof.
Never carry more than 165 lbs (75 kg) of cargo on the roof rack (Honda accessory).
Avoid driving in deep water and on flooded roads. This can damage the engine,
driveline, or cause elec trical component failure.
If there is a strong impact with something under the vehicle, stop in a safe location.
Check the underside of the vehicle for damage or any fluid leaks.
■Driving Guidelines for Your Utility Vehicle
■In Rain
■Other Precautions
1 Precautions While Driving
NOTICE
Do not change the gear position while pressing the
accelerator pedal. You could damage the
transmission.
NOTICE
If you repeatedly turn the steering wheel at an
extremely low speed, or hold the steering wheel in
the full left or right position for a while, the electric
power steering (EPS) system heats up. The system
goes into a protective mode, and limits its
performance. The steering wheel becomes harder
and harder to operate. Once the system cools down,
the EPS system is restored. Repeated operation under
these conditions can eventually damage the system.
If the power mode is set to ACCESSORY while
driving, the engine will shut down and all steering
and brake power assist functi ons will stop, making it
difficult to control the vehicle.
Do not change the gear position to
( N, as you will
lose engine braking (and acceleration) performance.
During the first 600 miles (1,000 km) of operation,
avoid sudden acceleration or full throttle operation so
as not to damage the engine or powertrain.
Avoid hard braking for the first 200 miles (300 km).
You should also follow this when the brake pads are
replaced.
20 PILOT-31TG76401.book 532 ページ 2019年7月24日 水曜日 午後3時32分