2020 HONDA HR-V Navigation Manual (in English)
-
 1
1 -
 2
2 -
 3
3 -
 4
4 -
 5
5 -
 6
6 -
 7
7 -
 8
8 -
 9
9 -
 10
10 -
 11
11 -
 12
12 -
 13
13 -
 14
14 -
 15
15 -
 16
16 -
 17
17 -
 18
18 -
 19
19 -
 20
20 -
 21
21 -
 22
22 -
 23
23 -
 24
24 -
 25
25 -
 26
26 -
 27
27 -
 28
28 -
 29
29 -
 30
30 -
 31
31 -
 32
32 -
 33
33 -
 34
34 -
 35
35 -
 36
36 -
 37
37 -
 38
38 -
 39
39 -
 40
40 -
 41
41 -
 42
42 -
 43
43 -
 44
44 -
 45
45 -
 46
46 -
 47
47 -
 48
48 -
 49
49 -
 50
50 -
 51
51 -
 52
52 -
 53
53 -
 54
54 -
 55
55 -
 56
56 -
 57
57 -
 58
58 -
 59
59 -
 60
60 -
 61
61 -
 62
62 -
 63
63 -
 64
64 -
 65
65 -
 66
66 -
 67
67 -
 68
68 -
 69
69 -
 70
70 -
 71
71 -
 72
72 -
 73
73 -
 74
74 -
 75
75 -
 76
76 -
 77
77 -
 78
78 -
 79
79 -
 80
80 -
 81
81 -
 82
82 -
 83
83 -
 84
84 -
 85
85 -
 86
86 -
 87
87 -
 88
88 -
 89
89 -
 90
90 -
 91
91 -
 92
92 -
 93
93 -
 94
94 -
 95
95 -
 96
96 -
 97
97 -
 98
98 -
 99
99 -
 100
100 -
 101
101 -
 102
102 -
 103
103 -
 104
104 -
 105
105 -
 106
106 -
 107
107 -
 108
108 -
 109
109 -
 110
110 -
 111
111 -
 112
112 -
 113
113 -
 114
114 -
 115
115 -
 116
116 -
 117
117 -
 118
118 -
 119
119 -
 120
120 -
 121
121 -
 122
122 -
 123
123 -
 124
124 -
 125
125 -
 126
126 -
 127
127 -
 128
128 -
 129
129 -
 130
130 -
 131
131 -
 132
132 -
 133
133 -
 134
134 -
 135
135 -
 136
136 -
 137
137 -
 138
138
 23
uu Personal Information u Saved Locations
Continued
System Setup
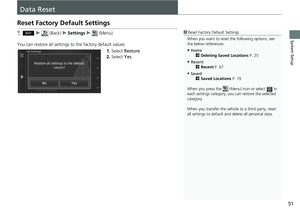
5. Select an option.
The following options are available:
•Na
me: Enters a new name for the location.
• Ph
one Number : Enters")
 24
uu Personal Information u Saved Locations
System SetupH u u Saved
1.Select a
saved location you want
to delete.
2. Select .
3. Press the (Menu) icon or select
.
4. Select De")
 25
uu Personal Information u Saved Locations
System SetupH u u Saved
1.Press the (Menu) icon or select
.
2. Select Delet
e Saved Places .
3. Select a
saved location you want
to")
 26
System Setup
Display Mode Settings
Switching Display Mode Manually
Set the screen brightness separately for Day and Night modes. Press the
(Display Mode) button to cycle through th e
display m")
 27
uu Display Mode Settings u Switching Display Mode Manually
System SetupIllumination
controlOperation
(Display
Mode) button
Selects Day or Night display mode when the user
wants to change the b")
 28
System Setup
Map & Vehicle
H u (Back) u Settings u Map & Vehicle
Change the map settings. Select an option.
The following options are available:
• Vehicle : Changes the ico")
 29
uu Map & Vehicle u Vehicle
System Setup
Vehicle
H u (Back) u Settings u Map & Vehicle u Vehicle
You can choose your vehicle icon. 1.Select an option.
2. Select Save")
 30
uu Map & Vehicle u Driving Map View (Map Orientation)
System Setup
Driving Map View (Map Orientation)
H u (Back) u Settings u Map & Vehicle u Driving Map View
Selec")