2020 GMC SIERRA light
[x] Cancel search: lightPage 155 of 502
GMC Sierra/Sierra Denali Owner Manual (GMNA-Localizing-U.S./Canada/
Mexico-13337776) - 2020 - CRC - 4/4/19
154 Instruments and Controls
!:Press to select the display
view. Each press will change the
display view.
D: Pull and hold to brighten the
display. Press and hold to dim the
display. Continue to hold to turn the
display off.
The HUD image will automatically
dim and brighten to compensate for
outside lighting. Use
Dto adjust
as needed.
The HUD image can temporarily
light up depending on the angle and
position of sunlight on the HUD
display. This is normal.
Polarized sunglasses could make
the HUD image harder to see.
Head-Up Display (HUD) Rotation
Option
If equipped, this feature under the
Options menu of the instrument
cluster allows for adjusting the angle
of the HUD image and changing or
turning off the Speed Limit Sign. HUD Rotation: Press the
thumbwheel while Adjust Rotation is
highlighted to enter Adjust Mode.
Scroll to adjust the angle of the
HUD display. Press the thumbwheel
to confirm and save the setting. This
feature may only be available in
P (Park).
Speed Limit Style Adjustment
If equipped, the speed limit style
can be changed to a speed limit bar
or speed limit sign from the Options
menu in the instrument cluster.
Press the thumbwheel while Speed
Limit Style is highlighted to change
the speed sign style or to turn it off.
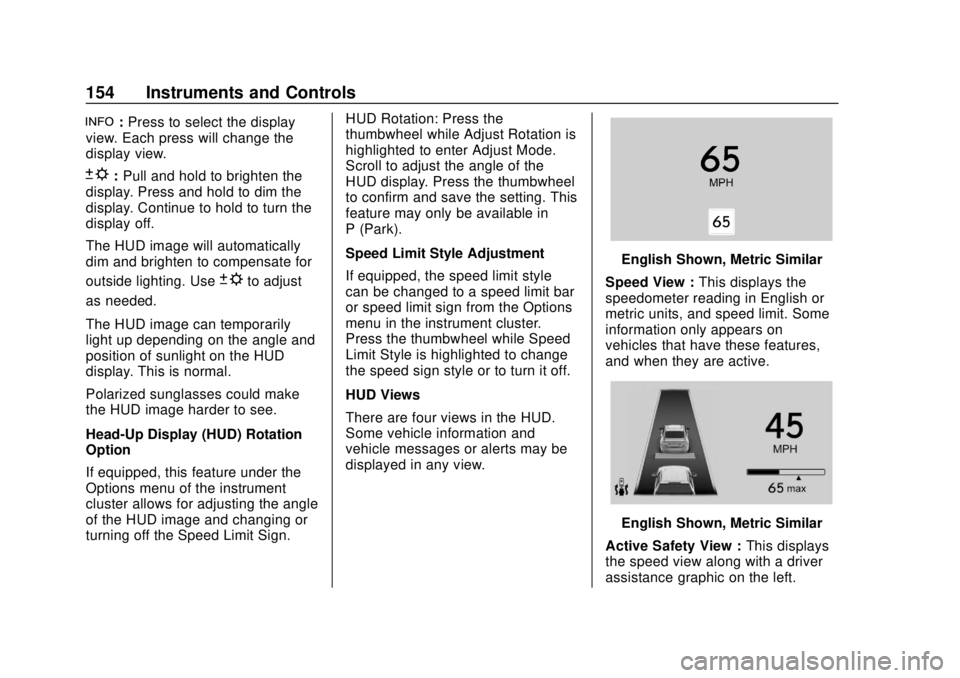
HUD Views
There are four views in the HUD.
Some vehicle information and
vehicle messages or alerts may be
displayed in any view.
English Shown, Metric Similar
Speed View : This displays the
speedometer reading in English or
metric units, and speed limit. Some
information only appears on
vehicles that have these features,
and when they are active.
English Shown, Metric Similar
Active Safety View : This displays
the speed view along with a driver
assistance graphic on the left.
Page 157 of 502

GMC Sierra/Sierra Denali Owner Manual (GMNA-Localizing-U.S./Canada/
Mexico-13337776) - 2020 - CRC - 4/4/19
156 Instruments and Controls
Vehicle Messages
Messages displayed on the Driver
Information Center (DIC) indicate
the status of the vehicle or some
action that may be needed to
correct a condition. Multiple
messages may appear one after
another.
The messages that do not require
immediate action can be
acknowledged and cleared by
pressing the thumbwheel. The
messages that require immediate
action cannot be cleared until that
action is performed.
All messages should be taken
seriously; clearing the message
does not correct the problem.
If a SERVICE message appears,
see your dealer.
Follow the instructions given in the
messages. The system displays
messages regarding the following
topics:
.Service Messages
. Fluid Levels .
Vehicle Security
. Brakes
. Steering
. Ride Control Systems
. Driver Assistance Systems
. Cruise Control
. Lighting and Bulb Replacement
. Wiper/Washer Systems
. Doors and Windows
. Seat Belts
. Airbag Systems
. Engine and Transmission
. Tire Pressure
. Battery
Engine Power Messages
ENGINE POWER IS REDUCED
This message displays when the
vehicle's propulsion power is
reduced. A reduction in propulsion
power can affect the vehicle's ability
to accelerate. If this message is on,
but there is no observed reduction in performance, proceed to your
destination. The performance may
be reduced the next time the vehicle
is driven. The vehicle may be driven
while this message is on, but
maximum acceleration and speed
may be reduced. Anytime this
message stays on, or displays
repeatedly, the vehicle should be
taken to your dealer for service as
soon as possible.
Under certain operating conditions,
propulsion will be disabled. Try
restarting after the vehicle has been
off for 30 seconds.
Vehicle Speed Messages
SPEED LIMITED TO XXX KM/
H (MPH)
This message shows that the
vehicle speed has been limited to
the speed displayed. The limited
speed is a protection for various
propulsion and vehicle systems,
such as lubrication, thermal, brakes,
suspension, Teen Driver if
equipped, or tires.
Page 160 of 502

GMC Sierra/Sierra Denali Owner Manual (GMNA-Localizing-U.S./Canada/
Mexico-13337776) - 2020 - CRC - 4/4/19
Instruments and Controls 159
Touch Off, On - Driver and
Passenger, On - Driver, or On -
Passenger.
Remote Mirror Folding
When on, the outside mirrors will
remotely fold or unfold when the
Remote Keyless Entry (RKE)
transmitter
QorKbutton is
pressed and held. See Folding
Mirrors 043.
Touch Off or On.
Lighting
Touch and the following may
display:
. Vehicle Locator Lights
. Exit Lighting
Vehicle Locator Lights
This setting flashes the vehicle’ s
headlamps when
Kis pressed on
the Remote Keyless Entry (RKE)
transmitter.
Touch Off or On. Exit Lighting
This setting specifies how long the
headlamps stay on after the vehicle
is turned off and exited.
Touch Off, 30 Seconds, 60 Seconds,
or 120 Seconds.
Power Door Locks
Touch and the following may
display:
.
Open Door Anti Lock Out
. Auto Door Unlock
. Delayed Door Lock
Open Door Anti Lock Out
This setting prevents the driver door
from locking when the door is open.
If this setting is on, the Delayed
Door Lock menu will not be
available.
Touch Off or On.
Auto Door Unlock
This setting allows selection of
which doors will automatically
unlock when the vehicle is shifted
into P (Park). Touch Off, All Doors, or Driver Door.
Delayed Door Lock
This setting delays the locking of
the vehicle’
s doors.
Touch Off or On.
Remote Lock, Unlock, Start
Touch and the following may
display:
. Remote Unlock Light Feedback
. Remote Lock Feedback
. Remote Door Unlock
. Remote Start Auto Cool Seats
. Remote Start Auto Heat Seats
. Remote Window Operation
. Passive Door Unlock
. Passive Door Lock
. Remote Left in Vehicle Alert
Remote Unlock Light Feedback
This setting flashes the exterior
lamps when the vehicle is unlocked
with the RKE transmitter.
Touch Off or Flash Lights.
Page 161 of 502
GMC Sierra/Sierra Denali Owner Manual (GMNA-Localizing-U.S./Canada/
Mexico-13337776) - 2020 - CRC - 4/4/19
160 Instruments and Controls
Remote Lock Feedback
This setting specifies how the
vehicle responds when the vehicle
is locked with the RKE transmitter.
Touch Off, Lights and Horn, Lights
Only, or Horn Only.
Remote Door Unlock
This setting specifies whether all
doors, or just the driver door, unlock
when pressing
Kon the RKE
transmitter.
Touch All Doors or Driver Door.
Remote Start Auto Cool Seats
If equipped and turned on, this
feature will turn on the ventilated
seats when using remote start on
warm days. See Heated and
Ventilated Front Seats 061 and
Remote Vehicle Start 024.
Touch Off or On.
Remote Start Auto Heat Seats
If equipped and turned on, this
feature will turn on the heated seats
when using remote start on cold days. See
Heated and
Ventilated Front Seats 061 and
Remote Vehicle Start 024.
If equipped with Auto Heated
Steering Wheel, this feature will turn
on when the Remote Start Auto
Heated Seats turn on.
Touch Off or On.
Remote Window Operation
If equipped, this feature enables
remote operation of the windows
with the RKE transmitter. See
Remote Keyless Entry (RKE)
System Operation (Key Access)
0 13 or
Remote Keyless Entry (RKE)
System Operation (Keyless Access)
0 15.
Touch Off or On.
Passive Door Unlock
This allows the selection of what
doors will unlock when using the
button on the driver door to unlock
the vehicle.
Touch Off, All Doors, or Driver
Door Only. Passive Door Lock
This allows passive locking to be
turned on or off and selects
feedback. See
Remote Keyless
Entry (RKE) System Operation (Key
Access) 013 or
Remote Keyless Entry (RKE)
System Operation (Keyless Access)
0 15.
Touch Off, On with Horn
Chirp, or On.
Remote Left in Vehicle Alert
This feature sounds an alert when
the RKE transmitter is left in the
vehicle. This menu also enables
Remote No Longer In Vehicle Alert.
Touch Off or On.
Seating Position
Touch and the following may
display:
. Seat Entry Memory
. Seat Exit Memory
Page 163 of 502
GMC Sierra/Sierra Denali Owner Manual (GMNA-Localizing-U.S./Canada/
Mexico-13337776) - 2020 - CRC - 4/4/19
162 Instruments and Controls
instructions refer to a garage door
opener, but can be used for other
devices.
Do not use the Universal Remote
system with any garage door opener
that does not have the stop and
reverse feature. This includes any
garage door opener model
manufactured before April 1, 1982.
Read the instructions completely
before programming the Universal
Remote system. It may help to have
another person assist with the
programming process.
Keep the original hand-held
transmitter for use in other vehicles
as well as for future programming.
Erase the programming when
vehicle ownership is terminated.
See“Erasing Universal Remote
System Buttons” later in this
section.
To program a garage door opener,
park outside directly in line with and
facing the garage door opener
receiver. Clear all people and
objects near the garage door. Make sure the hand-held transmitter
has a new battery for quick and
accurate transmission of the
radio-frequency signal.
Programming the Universal
Remote System
For questions or programming help,
see www.homelink.com/gm or call
1-800-355-3515. For calls placed
outside the U.S., Canada, or Puerto
Rico, international rates will apply
and may differ based on landline or
mobile phone.
Programming involves
time-sensitive actions, and may time
out causing the procedure to be
repeated.
To program up to three devices:
1. Hold the end of the hand-held transmitter about 3 to 8 cm (1
to 3 in) away from the
Universal Remote system
buttons with the indicator light
in view. The hand-held
transmitter was supplied by the
manufacturer of the garage
door opener receiver. 2. At the same time, press and
hold both the hand-held
transmitter button and one of
the three Universal Remote
system buttons to be used to
operate the garage door. Do
not release either button until
the indicator light goes from a
slow to a rapid flashing light.
Then release both buttons.
Some garage door openers
may require substitution of
Step 2 with the procedure
under “Radio Signals for Some
Gate Operators” later in this
section.
3. Press and hold the newly programmed Universal Remote
system button for five seconds
while watching the indicator
light and garage door
activation.
.If the indicator light stays on
continuously or the garage
door moves when the
button is pressed, then
programming is complete.
There is no need to
complete Steps 4–6.
Page 164 of 502
GMC Sierra/Sierra Denali Owner Manual (GMNA-Localizing-U.S./Canada/
Mexico-13337776) - 2020 - CRC - 4/4/19
Instruments and Controls 163
.If the indicator light does
not come on or the garage
door does not move, a
second button press may
be required. For a second
time, press and hold the
newly programmed button
for five seconds. If the light
stays on or the garage door
moves, programming is
complete.
. If the indicator light blinks
rapidly for two seconds,
then changes to a solid light
and the garage door does
not move, continue with
programming Steps 4–6.
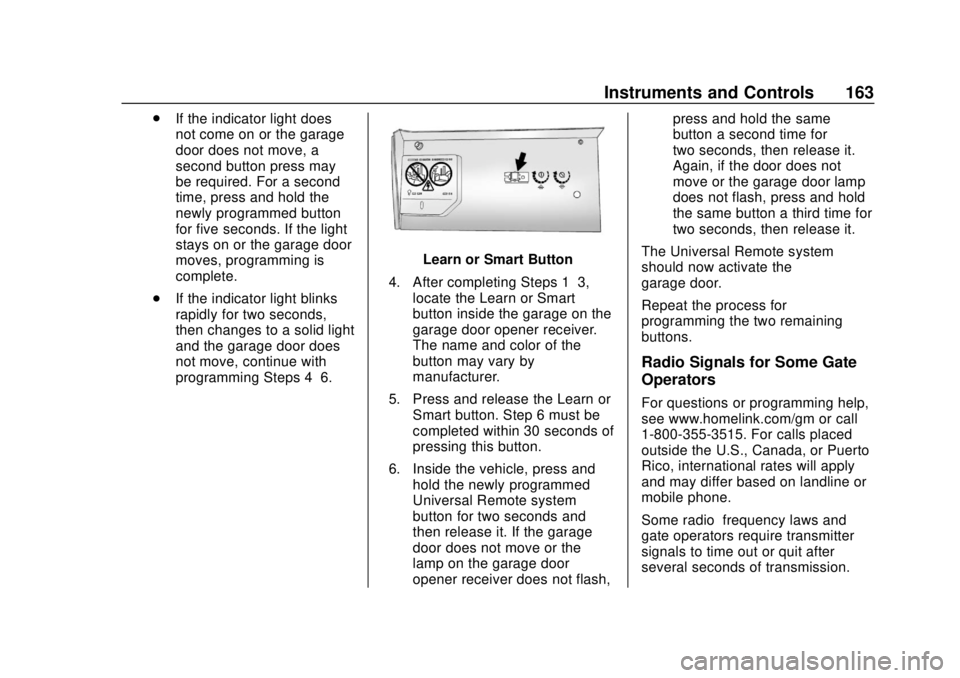
Learn or Smart Button
4. After completing Steps 1–3, locate the Learn or Smart
button inside the garage on the
garage door opener receiver.
The name and color of the
button may vary by
manufacturer.
5. Press and release the Learn or Smart button. Step 6 must be
completed within 30 seconds of
pressing this button.
6. Inside the vehicle, press and hold the newly programmed
Universal Remote system
button for two seconds and
then release it. If the garage
door does not move or the
lamp on the garage door
opener receiver does not flash, press and hold the same
button a second time for
two seconds, then release it.
Again, if the door does not
move or the garage door lamp
does not flash, press and hold
the same button a third time for
two seconds, then release it.
The Universal Remote system
should now activate the
garage door.
Repeat the process for
programming the two remaining
buttons.
Radio Signals for Some Gate
Operators
For questions or programming help,
see www.homelink.com/gm or call
1-800-355-3515. For calls placed
outside the U.S., Canada, or Puerto
Rico, international rates will apply
and may differ based on landline or
mobile phone.
Some radio–frequency laws and
gate operators require transmitter
signals to time out or quit after
several seconds of transmission.
Page 165 of 502
GMC Sierra/Sierra Denali Owner Manual (GMNA-Localizing-U.S./Canada/
Mexico-13337776) - 2020 - CRC - 4/4/19
164 Instruments and Controls
This may not be long enough for the
Universal Remote system to pick up
the signal during programming.
If the programming did not work,
replace Step 2 under“Programming
the Universal Remote System” with
the following:
Press and hold the Universal
Remote system button while
pressing and releasing the
hand-held transmitter button every
two seconds until the signal has
been successfully accepted by the
Universal Remote system. The
Universal Remote system indicator
light will flash slowly at first and then
rapidly. Proceed with Step 3 under
“Programming the Universal Remote
System” to complete.Universal Remote System
Operation
Using the Universal Remote
System
Press and hold the appropriate
Universal Remote system button for
at least one-half second. The
indicator light will come on while the
signal is being transmitted.
Erasing Universal Remote
System Buttons
Erase all programmed buttons when
vehicle ownership is terminated.
To erase:
1. Press and hold the two outside buttons until the indicator light
begins to flash. This should
take about 10 seconds.
2. Release both buttons.
Reprogramming a Single
Universal Remote System
Button
To reprogram any of the system
buttons: 1. Press and hold any one of the buttons. Do not release the
button.
2. The indicator light will begin to flash after 20 seconds. Without
releasing the button, proceed
with Step 1 under
“Programming the Universal
Remote System.”
Page 166 of 502

GMC Sierra/Sierra Denali Owner Manual (GMNA-Localizing-U.S./Canada/
Mexico-13337776) - 2020 - CRC - 4/4/19
Lighting 165
Lighting
Exterior Lighting
Exterior Lamp Controls . . . . . . . 165
Exterior Lamps OffReminder . . . . . . . . . . . . . . . . . . . 167
Headlamp High/Low-Beam Changer . . . . . . . . . . . . . . . . . . . . 167
Flash-to-Pass . . . . . . . . . . . . . . . . 168
Daytime Running Lamps (DRL) . . . . . . . . . . . . . . . 168
Automatic Headlamp System . . . . . . . . . . . . . . . . . . . . . . 168
Hazard Warning Flashers . . . . . 169
Turn and Lane-Change Signals . . . . . . . . . . . . . . . . . . . . . . 170
Fog Lamps . . . . . . . . . . . . . . . . . . . 170
Task Lighting . . . . . . . . . . . . . . . . . 171
Exterior Cargo Lamps . . . . . . . . 171
Interior Lighting
Instrument Panel Illumination Control . . . . . . . . . . . . . . . . . . . . . . 172
Dome Lamps . . . . . . . . . . . . . . . . . 172
Reading Lamps . . . . . . . . . . . . . . 173
Lighting Features
Entry Lighting . . . . . . . . . . . . . . . . 173
Exit Lighting . . . . . . . . . . . . . . . . . . 173 Battery Load Management . . . 174
Battery Power Protection . . . . . 174
Exterior Lighting Battery
Saver . . . . . . . . . . . . . . . . . . . . . . . 174
Exterior Lighting
Exterior Lamp Controls
The exterior lamp control is on the
instrument panel to the left of the
steering wheel.
O: Turns off the automatic
headlamps and Daytime Running
Lamps (DRL). Turn the headlamp
control to
Oagain to turn the
automatic headlamps or DRL
back on.