2020 GMC SIERRA DENALI park assist
[x] Cancel search: park assistPage 212 of 501
GMC Sierra/Sierra Denali Owner Manual (GMNA-Localizing-U.S./Canada/
Mexico-13337776) - 2020 - CRC - 8/27/19
Driving and Operating 211
0 (Stopping the Engine/LOCK/
OFF) :This position turns off the
vehicle. It also locks the ignition, the
transmission, and the steering
column, if equipped with a locking
steering column.
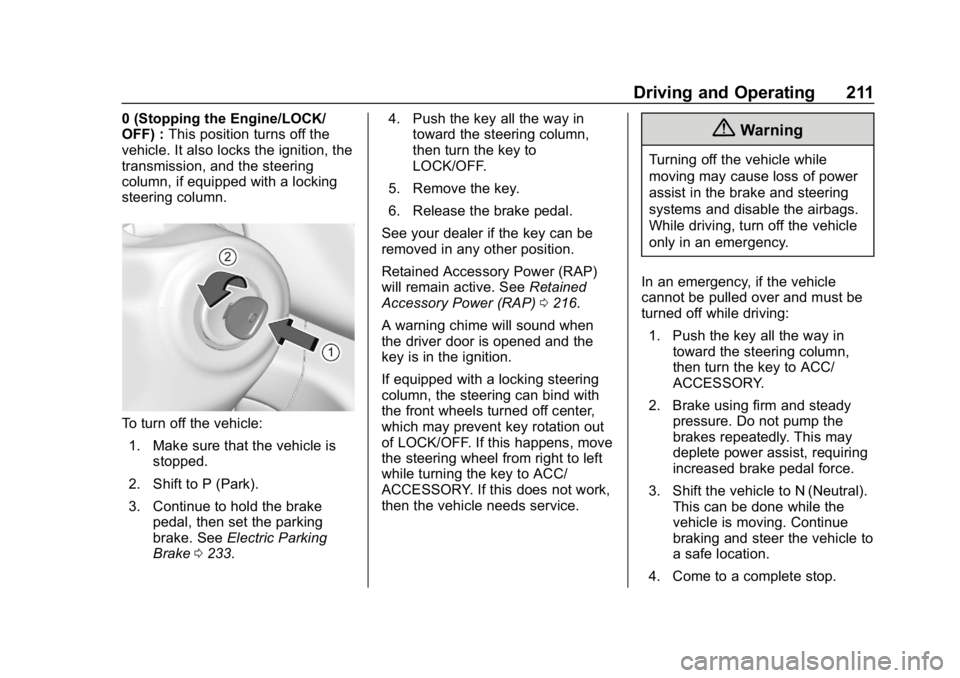
To turn off the vehicle:
1. Make sure that the vehicle is stopped.
2. Shift to P (Park).
3. Continue to hold the brake pedal, then set the parking
brake. See Electric Parking
Brake 0233. 4. Push the key all the way in
toward the steering column,
then turn the key to
LOCK/OFF.
5. Remove the key.
6. Release the brake pedal.
See your dealer if the key can be
removed in any other position.
Retained Accessory Power (RAP)
will remain active. See Retained
Accessory Power (RAP) 0216.
A warning chime will sound when
the driver door is opened and the
key is in the ignition.
If equipped with a locking steering
column, the steering can bind with
the front wheels turned off center,
which may prevent key rotation out
of LOCK/OFF. If this happens, move
the steering wheel from right to left
while turning the key to ACC/
ACCESSORY. If this does not work,
then the vehicle needs service.
{Warning
Turning off the vehicle while
moving may cause loss of power
assist in the brake and steering
systems and disable the airbags.
While driving, turn off the vehicle
only in an emergency.
In an emergency, if the vehicle
cannot be pulled over and must be
turned off while driving: 1. Push the key all the way in toward the steering column,
then turn the key to ACC/
ACCESSORY.
2. Brake using firm and steady pressure. Do not pump the
brakes repeatedly. This may
deplete power assist, requiring
increased brake pedal force.
3. Shift the vehicle to N (Neutral). This can be done while the
vehicle is moving. Continue
braking and steer the vehicle to
a safe location.
4. Come to a complete stop.
Page 235 of 501
GMC Sierra/Sierra Denali Owner Manual (GMNA-Localizing-U.S./Canada/
Mexico-13337776) - 2020 - CRC - 8/27/19
234 Driving and Operating
is only partially applied or there is a
problem with the EPB. A DIC
message will display. Release the
EPB and try to apply it again. If the
light does not come on, or keeps
flashing, have the vehicle serviced.
Do not drive the vehicle if the
Yor
PARK light is flashing. See your
dealer. See Electric Parking Brake
Light 0140.
If the
8light is on, press the EPB
switch and hold it. Continue to hold
the switch until the
Yor PARK
light remains on. If the
8light
remains on, see your dealer.
If the EPB is applied while the
vehicle is moving, the vehicle will
decelerate as long as the switch is
pressed. If the switch is pressed
until the vehicle comes to a stop,
the EPB will remain applied.
The vehicle may automatically apply
the EPB in some situations when
the vehicle is not moving. This is
normal, and is done to periodically
check the correct operation of the
EPB system. If the EPB fails to apply, block the
rear wheels to prevent vehicle
movement.
EPB Release
To release the EPB:
1. Turn the ignition on or to ACC/ ACCESSORY.
2. Apply and hold the brake pedal.
3. Press the EPB switch momentarily.
The EPB is released when the
Y
or PARK light is off.
If the
8light is on, release the EPB
by pressing and holding the EPB
switch. Continue to hold the switch
until the
Yor PARK light is off.
If either light stays on after release
is attempted, see your dealer.
Caution
Driving with the parking brake on
can overheat the brake system
and cause premature wear or
damage to brake system parts.
Make sure that the parking brake
is fully released and the brake
warning light is off before driving.
Automatic EPB Release
The EPB will automatically release if
the vehicle is running, placed into
gear, and an attempt is made to
drive away. Avoid rapid acceleration
when the EPB is applied, to
preserve parking brake lining life.
Brake Assist
Brake Assist detects rapid brake
pedal applications due to
emergency braking situations and
provides additional braking to
activate the Antilock Brake System
(ABS) if the brake pedal is not
pushed hard enough to activate
ABS normally. Minor noise, brake
Page 236 of 501
GMC Sierra/Sierra Denali Owner Manual (GMNA-Localizing-U.S./Canada/
Mexico-13337776) - 2020 - CRC - 8/27/19
Driving and Operating 235
pedal pulsation, and/or pedal
movement during this time may
occur. Continue to apply the brake
pedal as the driving situation
dictates. Brake Assist disengages
when the brake pedal is released.
Hill Start Assist (HSA)
{Warning
Do not rely on the HSA feature.
HSA does not replace the need to
pay attention and drive safely.
You may not hear or feel alerts or
warnings provided by this system.
Failure to use proper care when
driving may result in injury, death,
or vehicle damage. See
Defensive Driving0187. When the vehicle is stopped on a
grade, Hill Start Assist (HSA)
prevents the vehicle from rolling in
an unintended direction during the
transition from brake pedal release
to accelerator pedal apply. The
brakes release when the accelerator
pedal is applied. If the accelerator
pedal is not applied within a few
minutes, the Electric Parking Brake
will apply. The brakes may also
release under other conditions. Do
not rely on HSA to hold the vehicle.
HSA is available when the vehicle is
facing uphill in a forward gear,
or when facing downhill in
R (Reverse). The vehicle must
come to a complete stop on a grade
for HSA to activate.
Ride Control Systems
Traction Control/
Electronic Stability
Control
System Operation
The vehicle has a Traction Control
System (TCS) and StabiliTrak/
Electronic Stability Control (ESC)
system. These systems help limit
wheel spin and assist the driver in
maintaining control, especially on
slippery road conditions.
TCS activates if it senses any of the
drive wheels are spinning or
beginning to lose traction. When this
happens, TCS applies the brakes to
the spinning wheels and reduces
engine power to limit wheel spin.
StabiliTrak/ESC activates when the
vehicle senses a difference between
the intended path and the direction
the vehicle is actually traveling.
StabiliTrak/ESC selectively applies
braking pressure to any one of the
vehicle wheel brakes to assist the
driver in keeping the vehicle on the
Page 241 of 501
GMC Sierra/Sierra Denali Owner Manual (GMNA-Localizing-U.S./Canada/
Mexico-13337776) - 2020 - CRC - 8/27/19
240 Driving and Operating
StabiliTrak/Electronic Stability
Control (ESC), the Antilock Brake
System (ABS), and the Traction
Control System (TCS) will change
for optimal off-road performance.
Use this mode for public off-road
recreational driving. SeeOff-Road
Driving 0191.
When selected, the Off-Road Mode
indicator light displays in the
instrument cluster.
_Tow/Haul Mode : This feature
assists when pulling a heavy trailer
or a heavy load. See Tow/Haul
Mode 0227.
Tow/Haul Mode is designed to be
most effective when the vehicle and
trailer combined weight is at least
75% of the vehicle’s Gross
Combined Weight Rating (GCWR).
See “Weight of the Trailer” under
Trailer Towing 0292.
Tow/Haul Mode is most useful when
pulling a heavy trailer or a heavy
load under the following conditions:
. Through rolling terrain
. In stop-and-go traffic .
In busy parking lots where
improved low speed control of
the vehicle is desired
Operating the vehicle in Tow/Haul
Mode when lightly loaded or with no
trailer at all will not cause damage.
However, there is no benefit to
selecting Tow/Haul Mode when the
vehicle is unloaded. Such a
selection when unloaded may result
in unpleasant engine and
transmission driving characteristics,
heavy or light steering, and reduced
fuel economy.
When selected, the Tow/Haul Mode
light will display in the instrument
cluster.
If the vehicle is turned off with Tow/
Haul Mode active and then restarted
within four hours or less, Tow/Haul
will remain active. Otherwise the
vehicle will start in Normal Mode.
gTerrain Mode : Use for finer
control during low speed, off-road
driving. When using this mode it will
mimic the characteristics of
four-wheel-drive low (4
n) without
the torque capabilities. Use when:
.
Traveling on very rough roads at
very low speeds, such as a
two-track or heavily rutted road.
. Traveling slowly in grassy fields.
. Pulling a boat out of the water
on a trailer.
. Using the vehicle for public
off-road recreational driving. See
Off-Road Driving 0191 and
Hill and Mountain Roads 0197.
When in Terrain Mode, the vehicle
will shift automatically but may hold
a lower gear longer to maximize
engine torque. The steering will
change to provide more precise
control. A unique pedal map,
transmission shift pattern, and rpm
control are utilized to give better
control at lower speeds and over
rough terrain. When the vehicle
comes to a stop, Vehicle Hold is
engaged. TCS will be optimized for
maximum torque transfer across
axles, and Active Braking During Lift
Throttle will be engaged.
Page 256 of 501

GMC Sierra/Sierra Denali Owner Manual (GMNA-Localizing-U.S./Canada/
Mexico-13337776) - 2020 - CRC - 8/27/19
Driving and Operating 255
.Subjected to strong light from
opposing lane traffic in the front
of the vehicle, such as
high-beam headlamps from
oncoming traffic.
Accessory Installations and
Vehicle Modifications
Do not install or place any object
around the front camera windshield
area that would obstruct the front
camera view.
Do not install objects on top of the
vehicle that overhang and obstruct
the front camera, such as a canoe,
kayak, or other items that can be
transported on the vehicle roof.
Do not modify the hood, headlamps,
or fog lamps, as this may limit the
camera’s ability to detect an object.
Cleaning the Sensing System
The camera sensor on the
windshield behind the rearview
mirror can become blocked by
snow, ice, dirt, mud, or debris. This
area needs to be cleaned for ACC
to operate properly. The vehicle headlamps may need to
be cleaned due to dirt, snow, or ice.
Objects that are not illuminated
correctly may be difficult to detect.
If ACC will not operate, regular
cruise control may be available. See
“Switching Between ACC and
Regular Cruise Control”
previously
in this section. Always consider
driving conditions before using
either cruise control system.
For cleaning instructions, see
“Washing the Vehicle” under
Exterior Care 0429.Driver Assistance
Systems
This vehicle may have features that
work together to help avoid crashes
or reduce crash damage while
driving, backing, and parking. Read
this entire section before using
these systems.
{Warning
Do not rely on the Driver
Assistance Systems. These
systems do not replace the need
for paying attention and driving
safely. You may not hear or feel
alerts or warnings provided by
these systems. Failure to use
proper care when driving may
result in injury, death, or vehicle
damage. See Defensive Driving
0 187.
Under many conditions, these
systems will not: (Continued)
Page 258 of 501
GMC Sierra/Sierra Denali Owner Manual (GMNA-Localizing-U.S./Canada/
Mexico-13337776) - 2020 - CRC - 8/27/19
Driving and Operating 257
.Front and rear bumpers and the
area below the bumpers
. Front grille and headlamps
. Front camera lens in the front
grille or near the front emblem
. Front side and rear side panels
. Outside of the windshield in front
of the rearview mirror
. Side camera lens on the bottom
of the outside mirrors
. Rear side corner bumpers
. Rear Vision Camera in the
tailgate handle
. Rear Camera Mirror and Cargo
View Camera in the Center
High-Mounted Stoplamp
Assistance Systems for
Parking or Backing
If equipped, the Rear Vision Camera
(RVC), Surround Vision, Rear Park
Assist (RPA), Front Park Assist
(FPA), and Rear Cross Traffic Alert
(RCTA) may help the driver park or avoid objects. Always check around
the vehicle when parking or
backing.
The RVC, RPA, and Surround
Vision will not work properly if the
tailgate is down. If the tailgate is
down, do not use these systems.
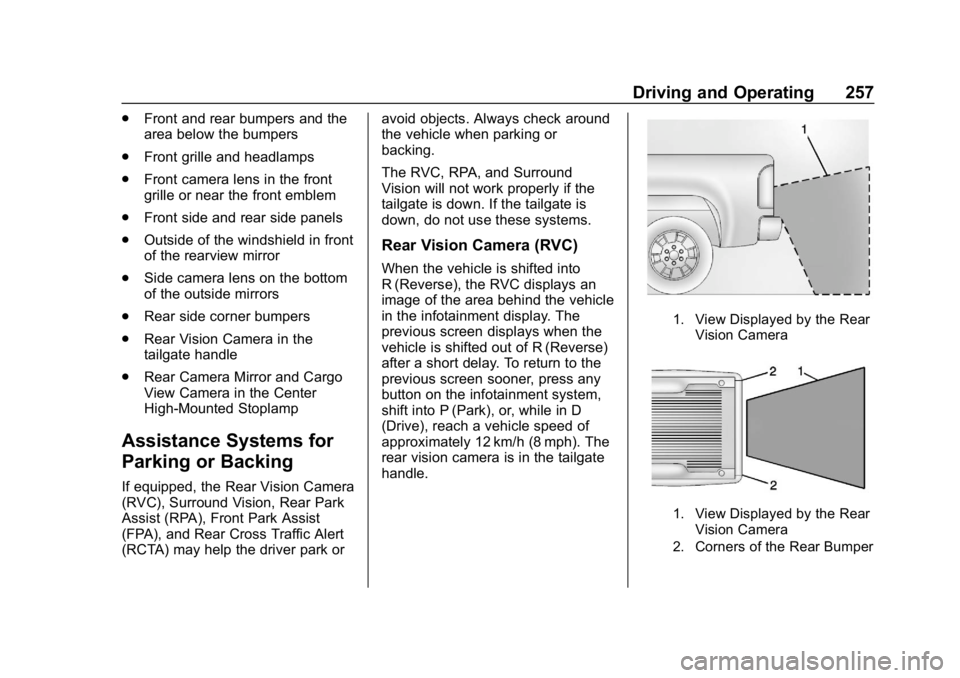
Rear Vision Camera (RVC)
When the vehicle is shifted into
R (Reverse), the RVC displays an
image of the area behind the vehicle
in the infotainment display. The
previous screen displays when the
vehicle is shifted out of R (Reverse)
after a short delay. To return to the
previous screen sooner, press any
button on the infotainment system,
shift into P (Park), or, while in D
(Drive), reach a vehicle speed of
approximately 12 km/h (8 mph). The
rear vision camera is in the tailgate
handle.
1. View Displayed by the Rear
Vision Camera
1. View Displayed by the RearVision Camera
2. Corners of the Rear Bumper
Page 259 of 501
GMC Sierra/Sierra Denali Owner Manual (GMNA-Localizing-U.S./Canada/
Mexico-13337776) - 2020 - CRC - 8/27/19
258 Driving and Operating
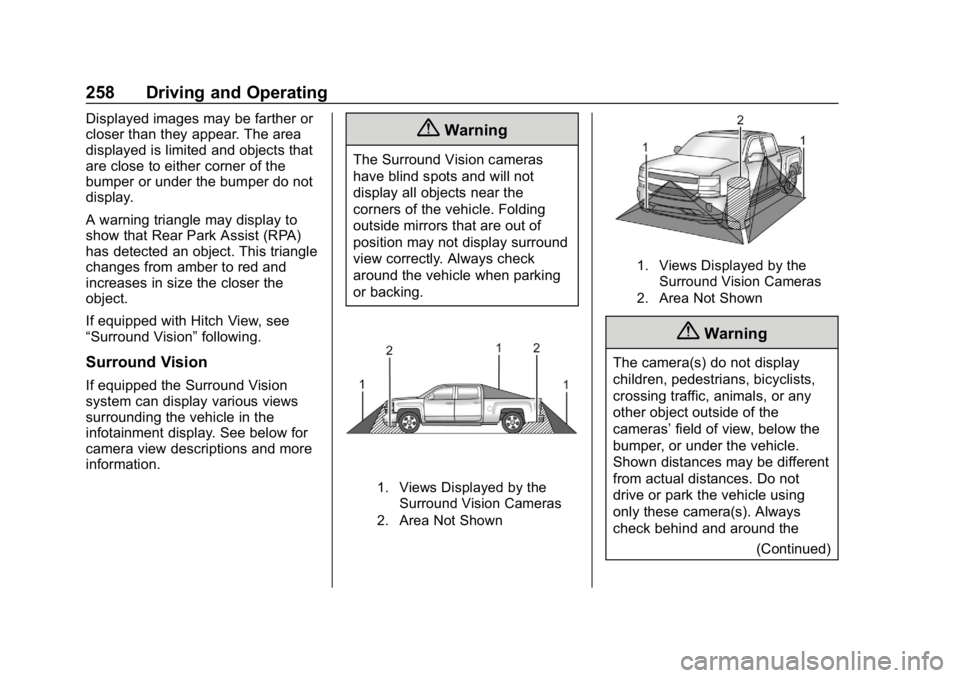
Displayed images may be farther or
closer than they appear. The area
displayed is limited and objects that
are close to either corner of the
bumper or under the bumper do not
display.
A warning triangle may display to
show that Rear Park Assist (RPA)
has detected an object. This triangle
changes from amber to red and
increases in size the closer the
object.
If equipped with Hitch View, see
“Surround Vision”following.
Surround Vision
If equipped the Surround Vision
system can display various views
surrounding the vehicle in the
infotainment display. See below for
camera view descriptions and more
information.
{Warning
The Surround Vision cameras
have blind spots and will not
display all objects near the
corners of the vehicle. Folding
outside mirrors that are out of
position may not display surround
view correctly. Always check
around the vehicle when parking
or backing.
1. Views Displayed by the
Surround Vision Cameras
2. Area Not Shown
1. Views Displayed by the Surround Vision Cameras
2. Area Not Shown
{Warning
The camera(s) do not display
children, pedestrians, bicyclists,
crossing traffic, animals, or any
other object outside of the
cameras’ field of view, below the
bumper, or under the vehicle.
Shown distances may be different
from actual distances. Do not
drive or park the vehicle using
only these camera(s). Always
check behind and around the
(Continued)
Page 260 of 501
GMC Sierra/Sierra Denali Owner Manual (GMNA-Localizing-U.S./Canada/
Mexico-13337776) - 2020 - CRC - 8/27/19
Driving and Operating 259
Warning (Continued)
vehicle before driving. Failure to
use proper care may result in
injury, death, or vehicle damage.
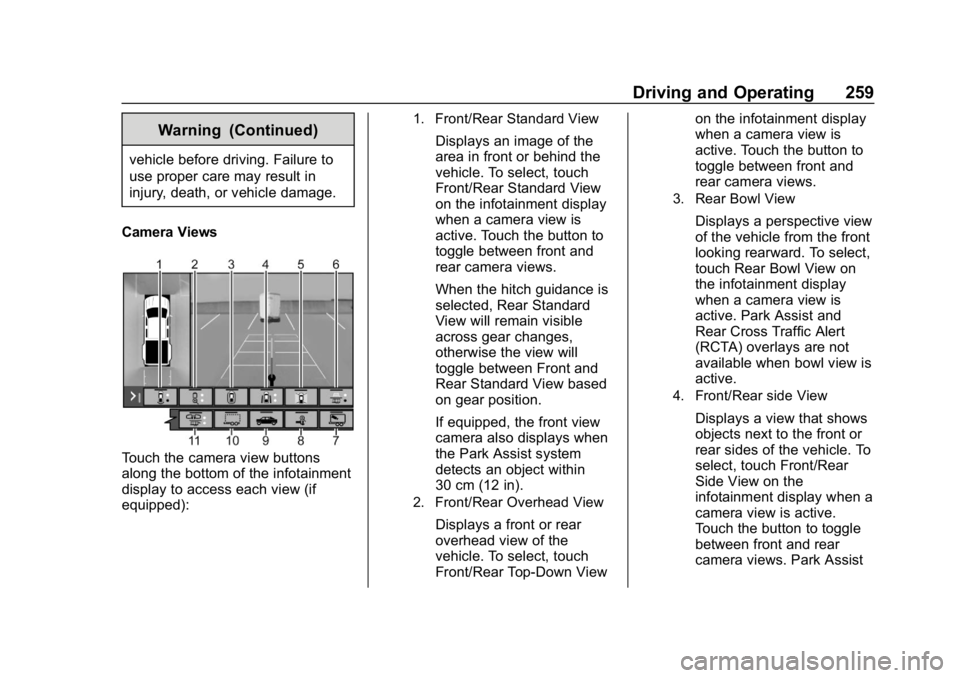
Camera Views
Touch the camera view buttons
along the bottom of the infotainment
display to access each view (if
equipped):
1. Front/Rear Standard View
Displays an image of the
area in front or behind the
vehicle. To select, touch
Front/Rear Standard View
on the infotainment display
when a camera view is
active. Touch the button to
toggle between front and
rear camera views.
When the hitch guidance is
selected, Rear Standard
View will remain visible
across gear changes,
otherwise the view will
toggle between Front and
Rear Standard View based
on gear position.
If equipped, the front view
camera also displays when
the Park Assist system
detects an object within
30 cm (12 in).
2. Front/Rear Overhead View
Displays a front or rear
overhead view of the
vehicle. To select, touch
Front/Rear Top-Down View on the infotainment display
when a camera view is
active. Touch the button to
toggle between front and
rear camera views.
3. Rear Bowl View
Displays a perspective view
of the vehicle from the front
looking rearward. To select,
touch Rear Bowl View on
the infotainment display
when a camera view is
active. Park Assist and
Rear Cross Traffic Alert
(RCTA) overlays are not
available when bowl view is
active.
4. Front/Rear side View
Displays a view that shows
objects next to the front or
rear sides of the vehicle. To
select, touch Front/Rear
Side View on the
infotainment display when a
camera view is active.
Touch the button to toggle
between front and rear
camera views. Park Assist