2020 GMC SIERRA DENALI tailgate
[x] Cancel search: tailgatePage 32 of 501
GMC Sierra/Sierra Denali Owner Manual (GMNA-Localizing-U.S./Canada/
Mexico-13337776) - 2020 - CRC - 8/27/19
Keys, Doors, and Windows 31
Caution
To avoid damage to the tailgate,
make sure the area behind the
tailgate is clear before opening it.
If equipped with this feature, the
vehicle must be in P (Park).
Switches in the inner tailgate
prevent the primary tailgate from
being opened when the inner
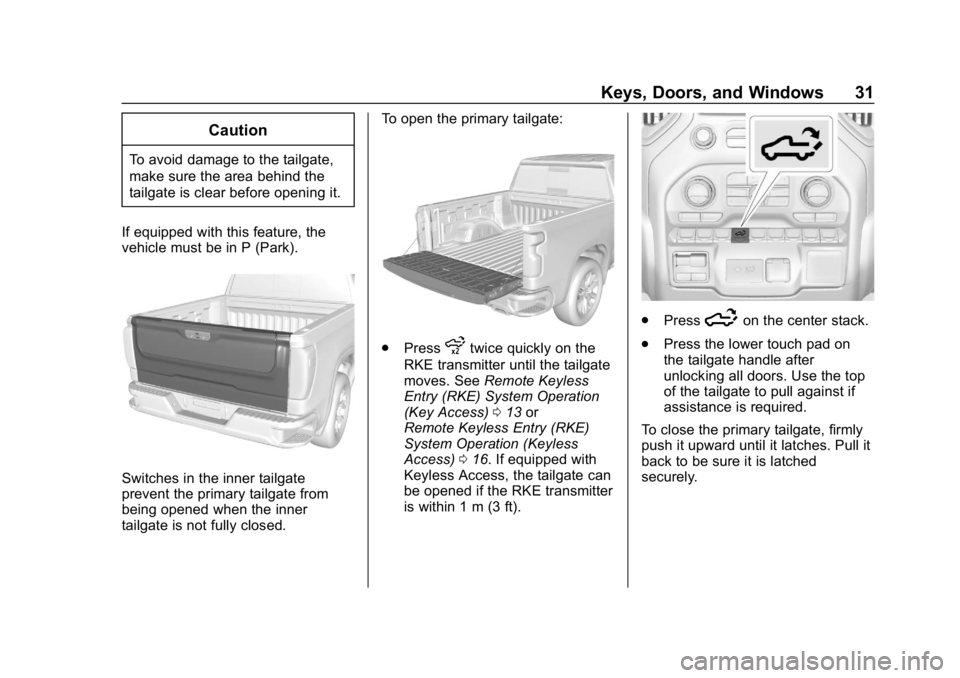
tailgate is not fully closed. To open the primary tailgate:
.
Pressxtwice quickly on the
RKE transmitter until the tailgate
moves. See Remote Keyless
Entry (RKE) System Operation
(Key Access) 013 or
Remote Keyless Entry (RKE)
System Operation (Keyless
Access) 016. If equipped with
Keyless Access, the tailgate can
be opened if the RKE transmitter
is within 1 m (3 ft).
. Press5on the center stack.
. Press the lower touch pad on
the tailgate handle after
unlocking all doors. Use the top
of the tailgate to pull against if
assistance is required.
To close the primary tailgate, firmly
push it upward until it latches. Pull it
back to be sure it is latched
securely.
Page 33 of 501
GMC Sierra/Sierra Denali Owner Manual (GMNA-Localizing-U.S./Canada/
Mexico-13337776) - 2020 - CRC - 8/27/19
32 Keys, Doors, and Windows
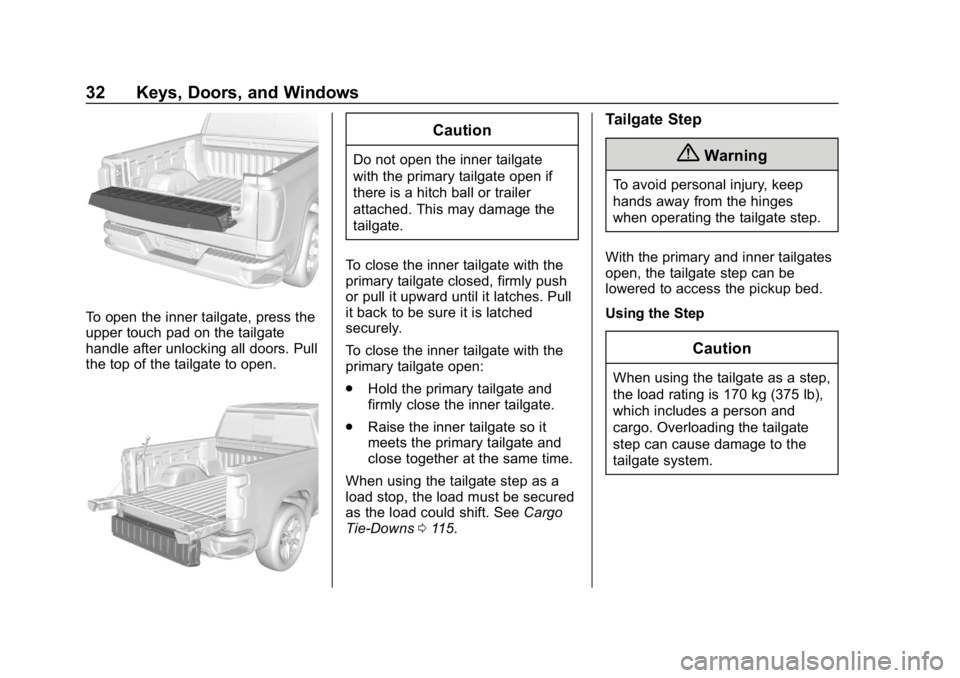
To open the inner tailgate, press the
upper touch pad on the tailgate
handle after unlocking all doors. Pull
the top of the tailgate to open.
Caution
Do not open the inner tailgate
with the primary tailgate open if
there is a hitch ball or trailer
attached. This may damage the
tailgate.
To close the inner tailgate with the
primary tailgate closed, firmly push
or pull it upward until it latches. Pull
it back to be sure it is latched
securely.
To close the inner tailgate with the
primary tailgate open:
. Hold the primary tailgate and
firmly close the inner tailgate.
. Raise the inner tailgate so it
meets the primary tailgate and
close together at the same time.
When using the tailgate step as a
load stop, the load must be secured
as the load could shift. See Cargo
Tie-Downs 0115.
Tailgate Step
{Warning
To avoid personal injury, keep
hands away from the hinges
when operating the tailgate step.
With the primary and inner tailgates
open, the tailgate step can be
lowered to access the pickup bed.
Using the Step
Caution
When using the tailgate as a step,
the load rating is 170 kg (375 lb),
which includes a person and
cargo. Overloading the tailgate
step can cause damage to the
tailgate system.
Page 34 of 501

GMC Sierra/Sierra Denali Owner Manual (GMNA-Localizing-U.S./Canada/
Mexico-13337776) - 2020 - CRC - 8/27/19
Keys, Doors, and Windows 33
.To lower the tailgate step, press
the button at the center of the
step. Make sure it lowers to the
fully open position.
. To close the tailgate step, lift it
firmly. Make sure that both side
latches are engaged.Do not place a load on top of the
step when using it as a load stop.
Using the Assist Handle
The assist handle helps with
entering the pickup box. To use:
1. Lift up on the handle until it locks in the open position.
2. To return the assist handle, pull the release lever toward the
ball end of the handle and push
the handle back to the closed
position.
Applying Loads to Tailgates
Caution
Do not put ramp loads on the
inner tailgate alone. Damage to
the inner tailgate may occur.
Page 35 of 501

GMC Sierra/Sierra Denali Owner Manual (GMNA-Localizing-U.S./Canada/
Mexico-13337776) - 2020 - CRC - 8/27/19
34 Keys, Doors, and Windows
Preferred MethodAlternate Method
When applying any load to the
tailgate, distribute the weight evenly
across the width of the tailgate. This
applies to all tailgate types.
. Use a load-distributing
member (1).
. Secure the ramp to the
bumper (2).
Power Assist Steps
{Warning
To avoid personal injury or
property damage, before entering
or exiting the vehicle, be sure the
power assist step is fully
extended. Do not step on the
power assist step while it is
moving. Never place hands or
other body parts between the
extended power assist step and
the vehicle.
If equipped, the power assist steps,
when enabled, will extend when the
door is opened. They will retract
three seconds after the door is
closed or immediately if the vehicle
starts moving.
Keep hands, children, pets, objects,
and clothing clear of the power
assist steps when in motion.
The steps will reverse direction if
there is an obstruction. If possible,
carefully remove the obstruction,
then open and close the door on the
Page 172 of 501
GMC Sierra/Sierra Denali Owner Manual (GMNA-Localizing-U.S./Canada/
Mexico-13337776) - 2020 - CRC - 8/27/19
Lighting 171
When the headlamps are changed
to high beam, the fog lamps also go
off. When the high-beam headlamps
are turned off, the fog lamps will
come on again.
Some localities have laws that
require the headlamps to be on with
the fog lamps.
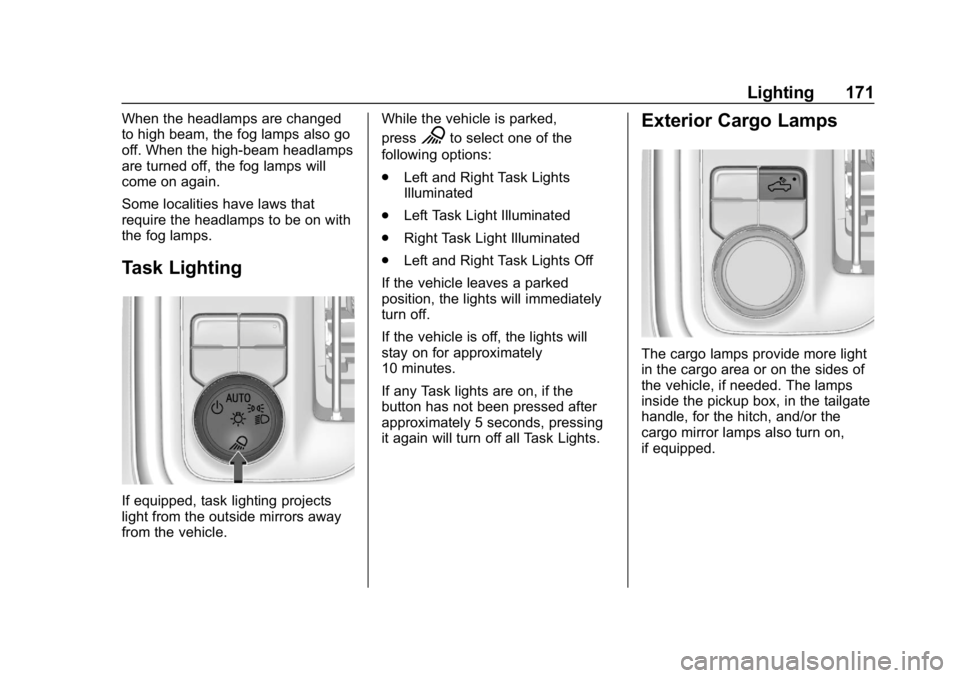
Task Lighting
If equipped, task lighting projects
light from the outside mirrors away
from the vehicle.While the vehicle is parked,
press
Kto select one of the
following options:
. Left and Right Task Lights
Illuminated
. Left Task Light Illuminated
. Right Task Light Illuminated
. Left and Right Task Lights Off
If the vehicle leaves a parked
position, the lights will immediately
turn off.
If the vehicle is off, the lights will
stay on for approximately
10 minutes.
If any Task lights are on, if the
button has not been pressed after
approximately 5 seconds, pressing
it again will turn off all Task Lights.Exterior Cargo Lamps
The cargo lamps provide more light
in the cargo area or on the sides of
the vehicle, if needed. The lamps
inside the pickup box, in the tailgate
handle, for the hitch, and/or the
cargo mirror lamps also turn on,
if equipped.
Page 258 of 501
GMC Sierra/Sierra Denali Owner Manual (GMNA-Localizing-U.S./Canada/
Mexico-13337776) - 2020 - CRC - 8/27/19
Driving and Operating 257
.Front and rear bumpers and the
area below the bumpers
. Front grille and headlamps
. Front camera lens in the front
grille or near the front emblem
. Front side and rear side panels
. Outside of the windshield in front
of the rearview mirror
. Side camera lens on the bottom
of the outside mirrors
. Rear side corner bumpers
. Rear Vision Camera in the
tailgate handle
. Rear Camera Mirror and Cargo
View Camera in the Center
High-Mounted Stoplamp
Assistance Systems for
Parking or Backing
If equipped, the Rear Vision Camera
(RVC), Surround Vision, Rear Park
Assist (RPA), Front Park Assist
(FPA), and Rear Cross Traffic Alert
(RCTA) may help the driver park or avoid objects. Always check around
the vehicle when parking or
backing.
The RVC, RPA, and Surround
Vision will not work properly if the
tailgate is down. If the tailgate is
down, do not use these systems.
Rear Vision Camera (RVC)
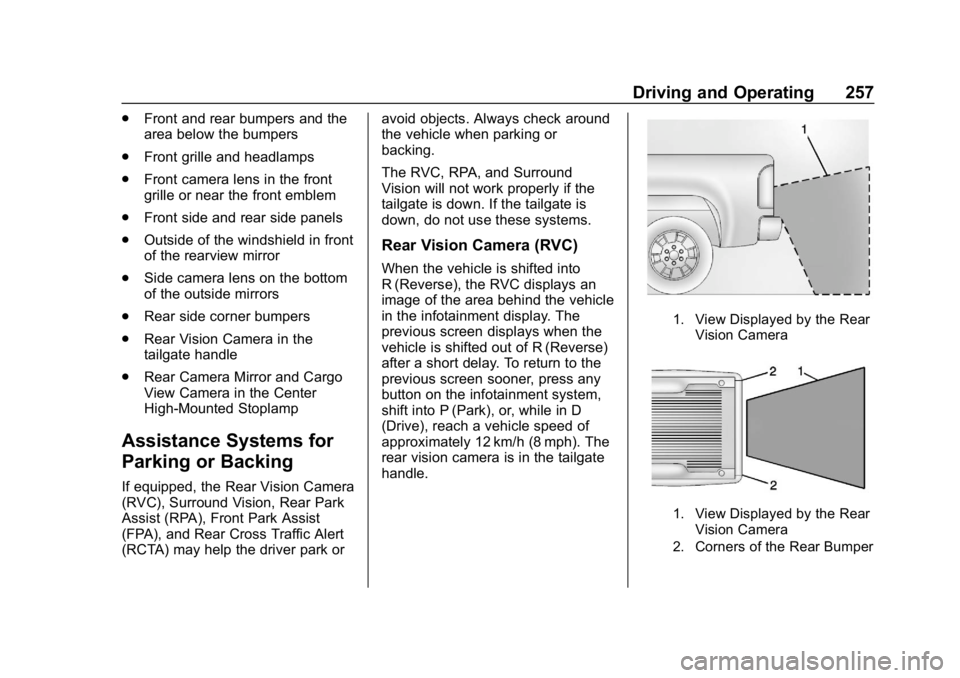
When the vehicle is shifted into
R (Reverse), the RVC displays an
image of the area behind the vehicle
in the infotainment display. The
previous screen displays when the
vehicle is shifted out of R (Reverse)
after a short delay. To return to the
previous screen sooner, press any
button on the infotainment system,
shift into P (Park), or, while in D
(Drive), reach a vehicle speed of
approximately 12 km/h (8 mph). The
rear vision camera is in the tailgate
handle.
1. View Displayed by the Rear
Vision Camera
1. View Displayed by the RearVision Camera
2. Corners of the Rear Bumper
Page 265 of 501
GMC Sierra/Sierra Denali Owner Manual (GMNA-Localizing-U.S./Canada/
Mexico-13337776) - 2020 - CRC - 8/27/19
264 Driving and Operating
HD Surround Vision with Trailer
Camera Provisions
If equipped, this feature provides
additional views to aid in trailering/
towing. The system shows multiple
views in the infotainment display
using five cameras mounted around
the vehicle and up to two additional
accessory cameras that can be
mounted on or in a trailer. The front
camera is in the grille under the
front emblem, the side cameras are
on the bottom of the outside mirrors,
the rear camera is in the tailgate
handle and the bed camera is
mounted on the rear of the cab.
Additionally, up to two accessory
cameras can be mounted to the rear
and/or interior of the trailer. See
your dealer for accessory trailer
cameras. To access, touch
CAMERA on the infotainment
display or shift to R (Reverse). To
return to the previous screen when
not in reverse, touch the Home or
Back buttons on the infotainment
display.Available camera views:
.
Front/Rear Standard View
. Front/Rear Top-Down View
. Rear Bowl View
. Front/Rear Side View
. Hitch View
. Bed View
. Rear trailer View
. Rear Side view with a available
articulation functionality
. Picture-in-Picture Side View
. Interior Trailer View
. Transparent trailer View
. Surround View
. Guidance Lines
. Hitch Guidance
Surround Vision (360 Degrees)
If equipped, the Surround Vision
system can display various views
surrounding the vehicle in the
infotainment display using four
cameras mounted around the
vehicle. The front camera is in the grille under the front emblem, the
side cameras are on the bottom of
the outside mirrors, and the rear
camera is in the tailgate handle.
The Surround Vision system can be
accessed by selecting CAMERA in
the infotainment display or when the
vehicle is shifted into R (Reverse).
To return to the previous screen
sooner, when not in R (Reverse),
press the Home or Back button on
the infotainment system, shift into
P (Park), or, while in D (Drive),
reach a vehicle speed of
approximately 12 km/h (8 mph).
Available camera views:
.
Front/Rear Standard View
. Front/Rear Top-Down View
. Rear Bowl View
. Front/Rear Side View
. Hitch View
. Surround View
. Guidance Lines
. Hitch Guidance
Page 266 of 501
GMC Sierra/Sierra Denali Owner Manual (GMNA-Localizing-U.S./Canada/
Mexico-13337776) - 2020 - CRC - 8/27/19
Driving and Operating 265
Surround Vision
If equipped, this feature provides,
additional views to aid in trailering/
towing. The Front Vision Camera
and Surround Vision cameras are
not supported. The system can
show various views in the
infotainment display using cameras
mounted in and around the vehicle
and trailer. The rear camera is in the
tailgate handle and the cargo bed
camera is mounted on the rear of
the cab. Up to two accessory
cameras can be mounted to the rear
and/or interior of the trailer. See
your dealer for these accessory
cameras.
The system can be accessed by
selecting CAMERA in the
infotainment display or when the
vehicle is shifted into R (Reverse).
To return to the previous screen
sooner, when not in R (Reverse),
press the Home or Back button on
the infotainment system or shift into
P (Park).Available camera views:
.
Rear Standard View
. Hitch View
. Bed View
. Rear Trailer View
. Interior Trailer View
. Guidance Lines
. Hitch Guidance
Troubleshooting
The Transparent Trailer calibration
may take longer than expected or
not calibrate if:
. The vehicle is driven too fast
during calibration. Speed should
be maintained below 50 km/h
(31 mph).
. The vehicle is not driven straight
during calibration. Steering
should be maintained as straight
as possible, excessive steering
during calibration may extend
calibration time. .
The calibration is attempted in
low light. Calibration should be
attempted when there is enough
light.
. The calibration is attempted
during adverse weather
conditions. Calibration during
conditions such as snow or
heavy rain should be avoided.
. The road surface is not ideal for
calibration. Calibration should be
attempted on an alternate road
surface.
. The accessory trailer cameras
are swapped at the hitch
connector. Ensure that the
camera mounted to the rear of
the trailer is connected to the
rear trailer camera input.
. The accessory trailer camera is
mounted, angled or rotated
outside of the defined mounting
location (see camera installation
instructions).