Page 9 of 20
9
POWER LIFTGATEF
F Optional equipment
OPEN/CLOSE THE POWER LIFTGATE
Press the Power Liftgate button on the Remote Keyless Entry transmitter twice.
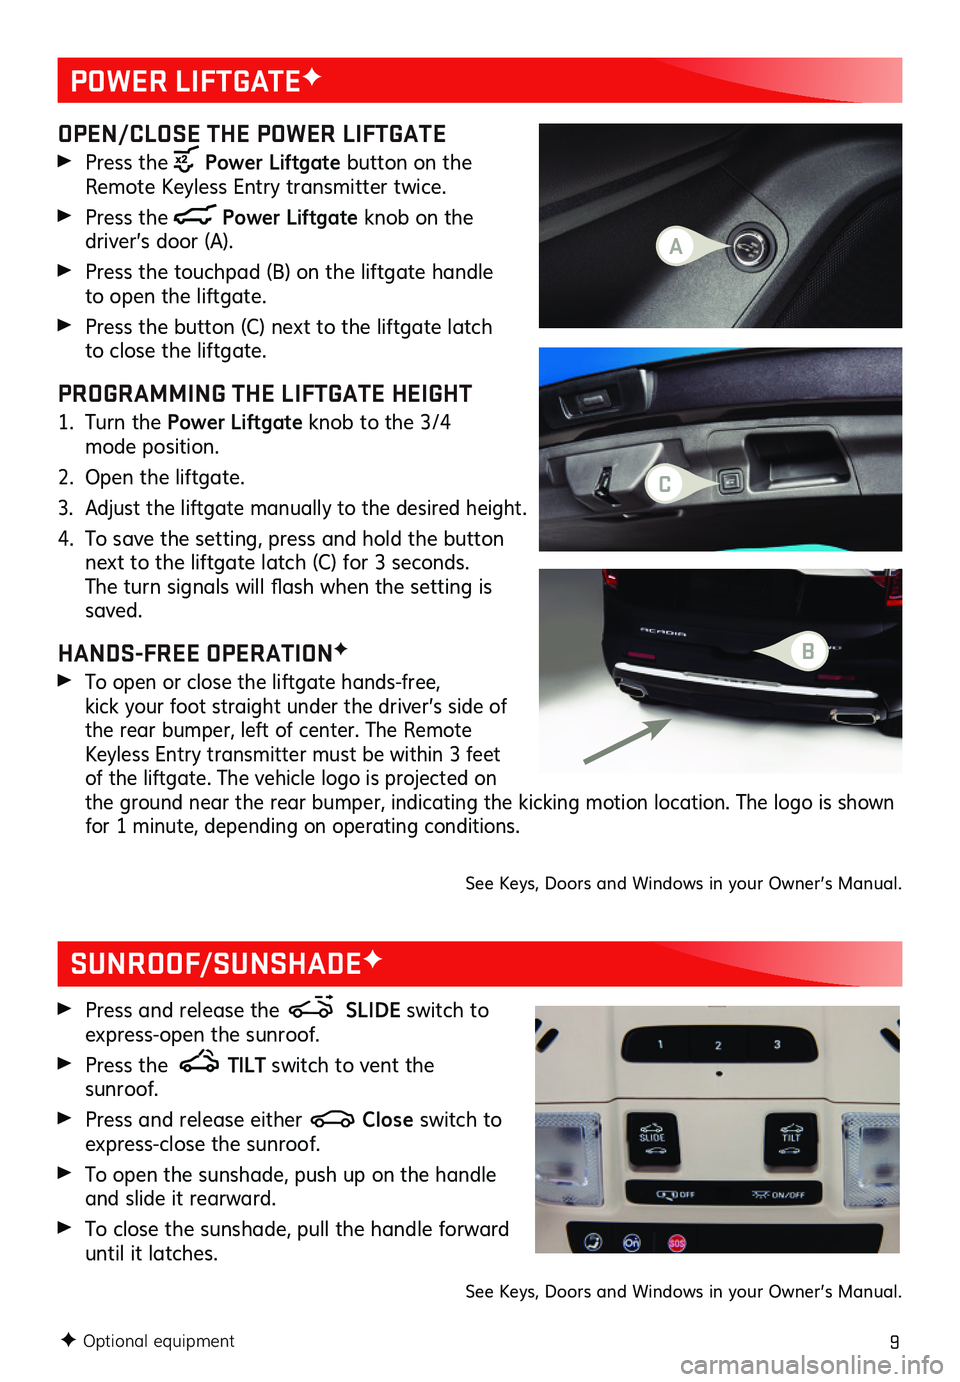
Press the Power Liftgate knob on the
driver’s door (A).
Press the touchpad (B) on the liftgate handle to open the liftgate.
Press the button (C) next to the liftgate latch to close the liftgate.
PROGRAMMING THE LIFTGATE HEIGHT
1. Turn the Power Liftgate knob to the 3/4 mode position.
2. Open the liftgate.
3. Adjust the liftgate manually to the desired height.
4. To save the setting, press and hold the button next to the liftgate latch (C) for 3 seconds. The turn signals will flash when the setting is saved.
HANDS-FREE OPERATIONF
To open or close the liftgate hands-free, kick your foot straight under the driver’s side of the rear bumper, left of center. The Remote Keyless Entry transmitter must be within 3 feet of the liftgate. The vehicle logo is projected on the ground near the rear bumper, indicating the kicking motion location. The logo is shown for 1 minute, depending on operating conditions.
See Keys, Doors and Windows in your Owner’s Manual.
SUNROOF/SUNSHADEF
Press and release the SLIDE switch to express-open the sunroof.
Press the TILT switch to vent the sunroof.
Press and release either Close switch to express-close the sunroof.
To open the sunshade, push up on the handle and slide it rearward.
To close the sunshade, pull the handle forward until it latches.
See Keys, Doors and Windows in your Owner’s Manual.
C
A
B
Page 10 of 20
10F Optional equipment
AUDIO STEERING WHEEL CONTROLS
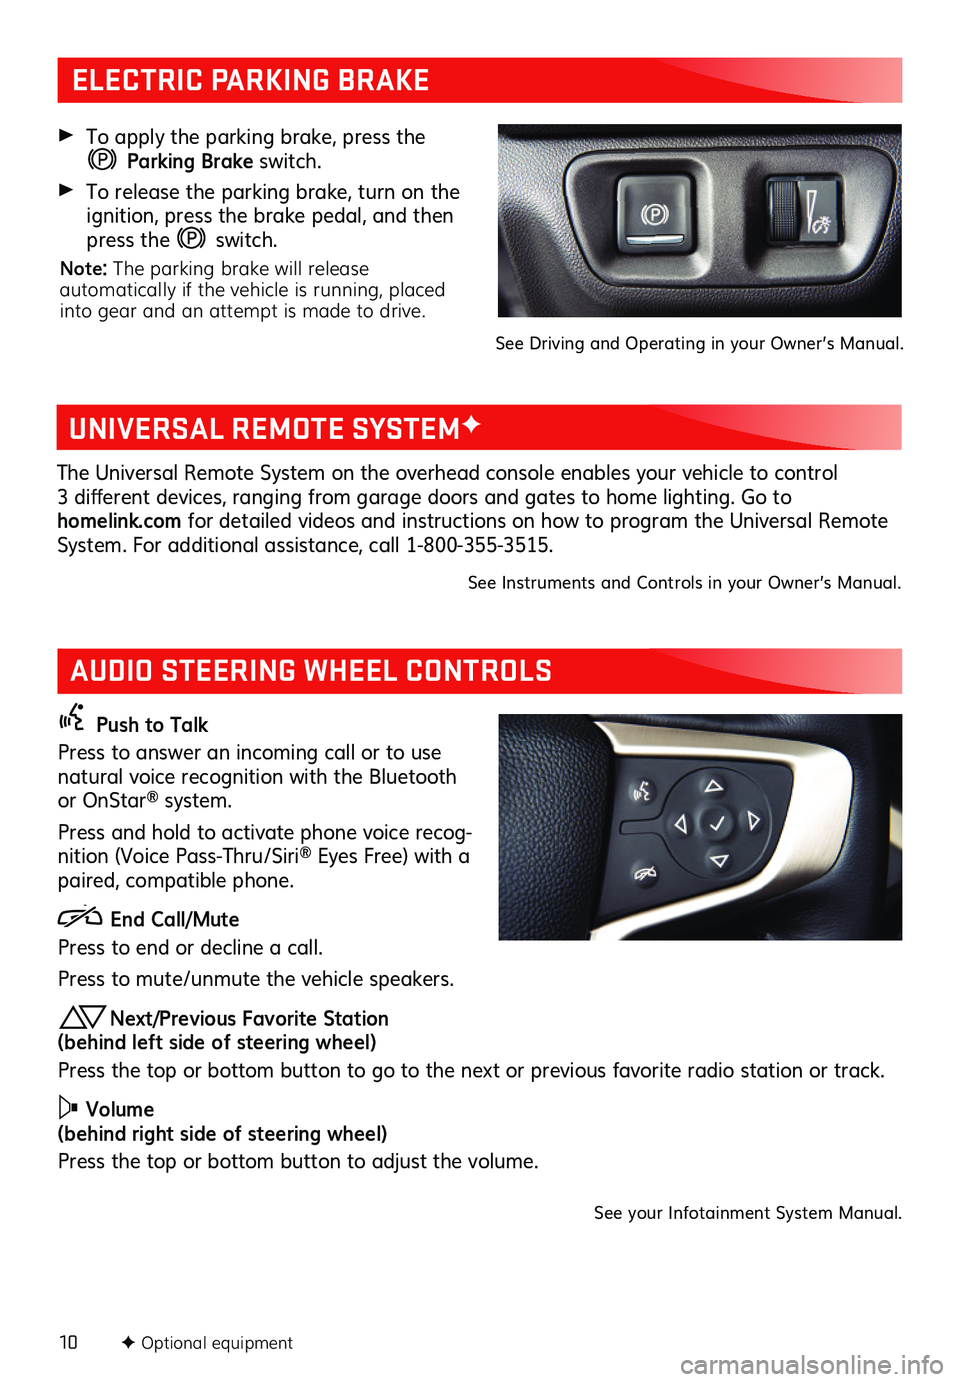
Push to Talk
Press to answer an incoming call or to use natural voice recognition with the Bluetooth or OnStar® system.
Press and hold to activate phone voice recog-nition (Voice Pass-Thru/Siri® Eyes Free) with a paired, compatible phone.
End Call/Mute
Press to end or decline a call.
Press to mute/unmute the vehicle speakers.
Next/Previous Favorite Station (behind left side of steering wheel)
Press the top or bottom button to go to the next or previous favorite radio station or track.
Volume (behind right side of steering wheel)
Press the top or bottom button to adjust the volume.
See your Infotainment System Manual.
ELECTRIC PARKING BRAKE
To apply the parking brake, press the
Parking Brake switch.
To release the parking brake, turn on the ignition, press the brake pedal, and then press the switch.
Note: The parking brake will release automatically if the vehicle is running, placed into gear and an attempt is made to drive.
See Driving and Operating in your Owner’s Manual.
UNIVERSAL REMOTE SYSTEMF
The Universal Remote System on the overhead console enables your vehicle to control 3 different devices, ranging from garage doors and gates to home lighting. Go to homelink.com for detailed videos and instructions on how to program the Universal Remote System. For additional assistance, call 1-800-355-3515.
See Instruments and Controls in your Owner’s Manual.
Page 11 of 20
11
INFOTAINMENT SYSTEM
F Optional equipment
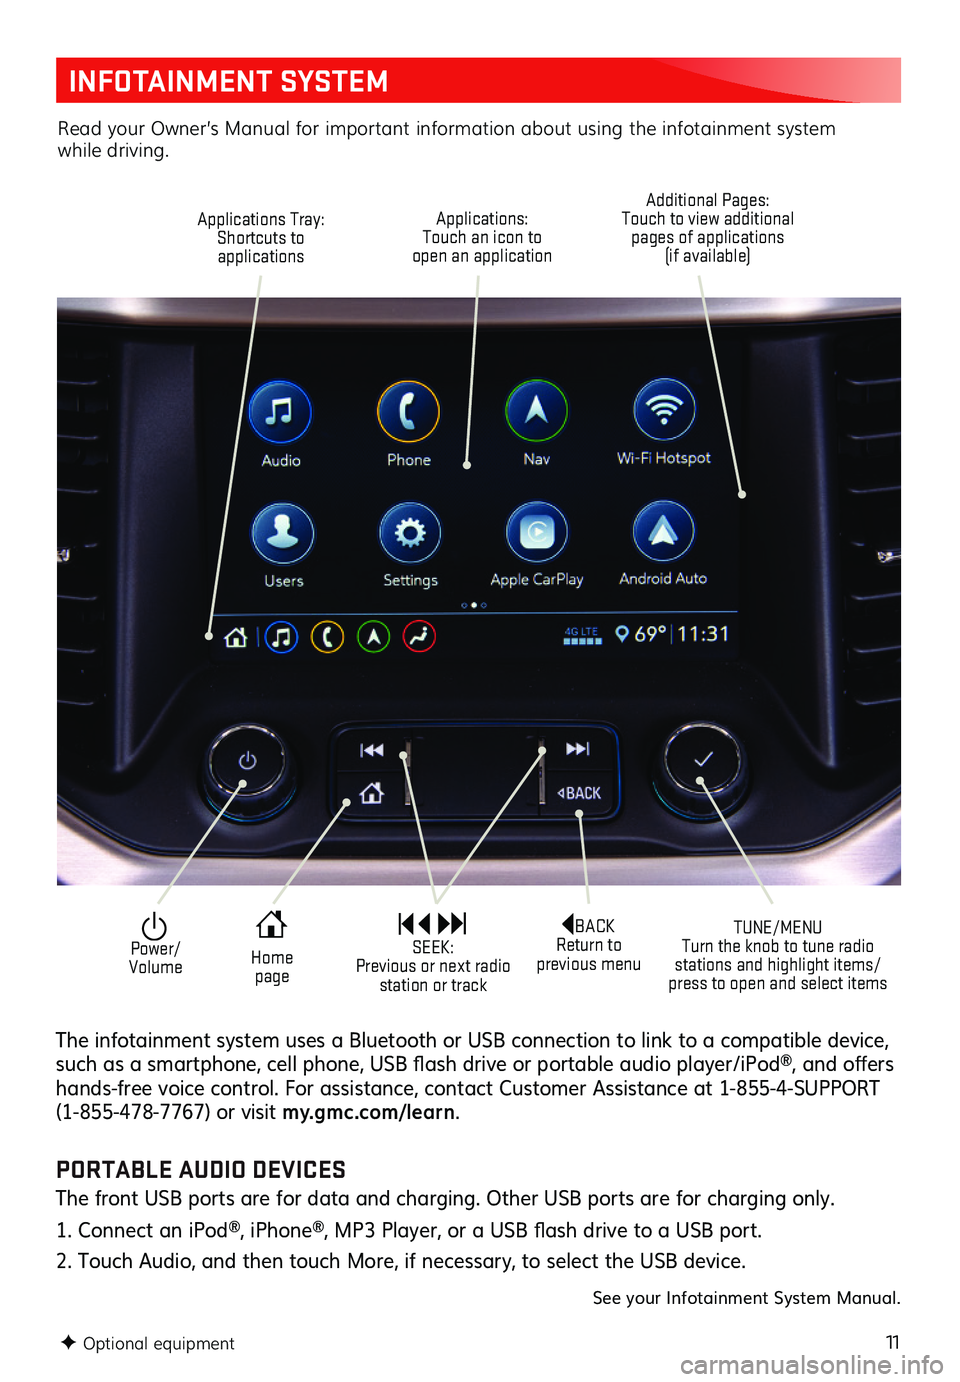
Applications Tray: Shortcuts to applications
TUNE/MENU Turn the knob to tune radio stations and highlight items/press to open and select items
Applications: Touch an icon to open an application
Additional Pages: Touch to view additional pages of applications (if available)
Power/ Volume
BACK Return to previous menu Home page
SEEK: Previous or next radio station or track
The infotainment system uses a Bluetooth or USB connection to link to a compatible device, such as a smartphone, cell phone, USB flash drive or portable audio player/iPod®, and offers hands-free voice control. For assistance, contact Customer Assistance at 1-855-4-SUPPORT (1-855-478-7767) or visit my.gmc.com/ learn.
Read your Owner’s Manual for important information about using the infotainment system while driving.
PORTABLE AUDIO DEVICES
The front USB ports are for data and charging. Other USB ports are for charging only.
1. Connect an iPod®, iPhone®, MP3 Player, or a USB flash drive to a USB port.
2. Touch Audio, and then touch More, if necessary, to select the USB device.
See your Infotainment System Manual.
Page 12 of 20
12
INFOTAINMENT SYSTEM
STORING FAVORITES
Radio stations from all bands (AM, FM or SiriusXMF) can be stored in any order.
1 Display the desired radio station.
2. Select the desired page of favorite screen buttons.
3. Touch and hold one of the favorite screen buttons until a beep is heard.
4. Repeat the steps to store another favorite item.
Note: To change the number of favorites displayed, go to Settings > System > Favorites.
SIRIUSXM® WITH 360LF
SiriusXM with 360L provides subscribers an enhanced in-vehicle listening experience with unique satellite and streaming channels, on-demand content, personalized recommenda-tions, and an interactive interface. For the full SiriusXM with 360L experience, OnStar Connected Access is required. Learn more about OnStar services at onstar.com.
NATURAL VOICE RECOGNITIONF
Control the music source and make phone calls hands-free (after pairing your Bluetooth-enabled phone) using the natural voice recognition system.
1. Press the Push to Talk button on the steering wheel.
2. The radio will play a prompt followed by a beep.
3. After the beep, say what you want it to do using natural speech.
Examples: “Call Dave” or “Tune 99.5 FM.” Say “Help” for assistance.
APPLE CARPLAY™
Apple CarPlay capability is available through a compatible smartphone using the Apple CarPlay icon on the Home page of the infotainment system. No app is required.
1. Connect your phone by plugging the Lightning cable into a USB data port. Use the
factory-provided Lightning cable. Aftermarket cables may not work.
2. The Apple CarPlay icon will illuminate. Touch the icon to have your apps displayed.
Press the Home button to exit Apple CarPlay. To return to the last page viewed in Apple CarPlay, press and hold the Home button.
To change the Apple CarPlay settings, go to Settings > Apps > Apple CarPlay.
ANDROID AUTO™
Android Auto capability is available through a compatible smartphone using the Android Auto icon on the Home page of the infotainment system.
1. Download the Android Auto app to your phone from the Google Play Store.
2. Connect your phone by plugging the phone USB cable into a USB data port. Use the factory-provided USB cable. Aftermarket cables may not work.
3. The Android Auto icon will illuminate. Touch the icon to have your apps displayed.
Press the Home button to exit Android Auto. To return to the last page viewed in Android Auto, press and hold the Home button.
To change the Android Auto settings, go to Settings > Apps > Android Auto.
See your Infotainment System Manual.
F Optional equipment
Page 13 of 20
13F Optional equipment
BLUETOOTH® SYSTEM
4G LTE WI-FI® HOTSPOT
VEHICLE CUSTOMIZATION
With the vehicle’s available 4G LTE Wi-Fi hotspot, up to 7 devices (smartphones, tablets and laptops) can be connected to high-speed internet.
To retrieve the SSID and password for the hotspot, select the Wi-Fi Hotspot icon on the Home page or go to Settings > System > Wi-Fi Hotspot.
Note: For more information on use and system limitations, visit my.gmc.com/learn.
See your Infotainment System Manual.
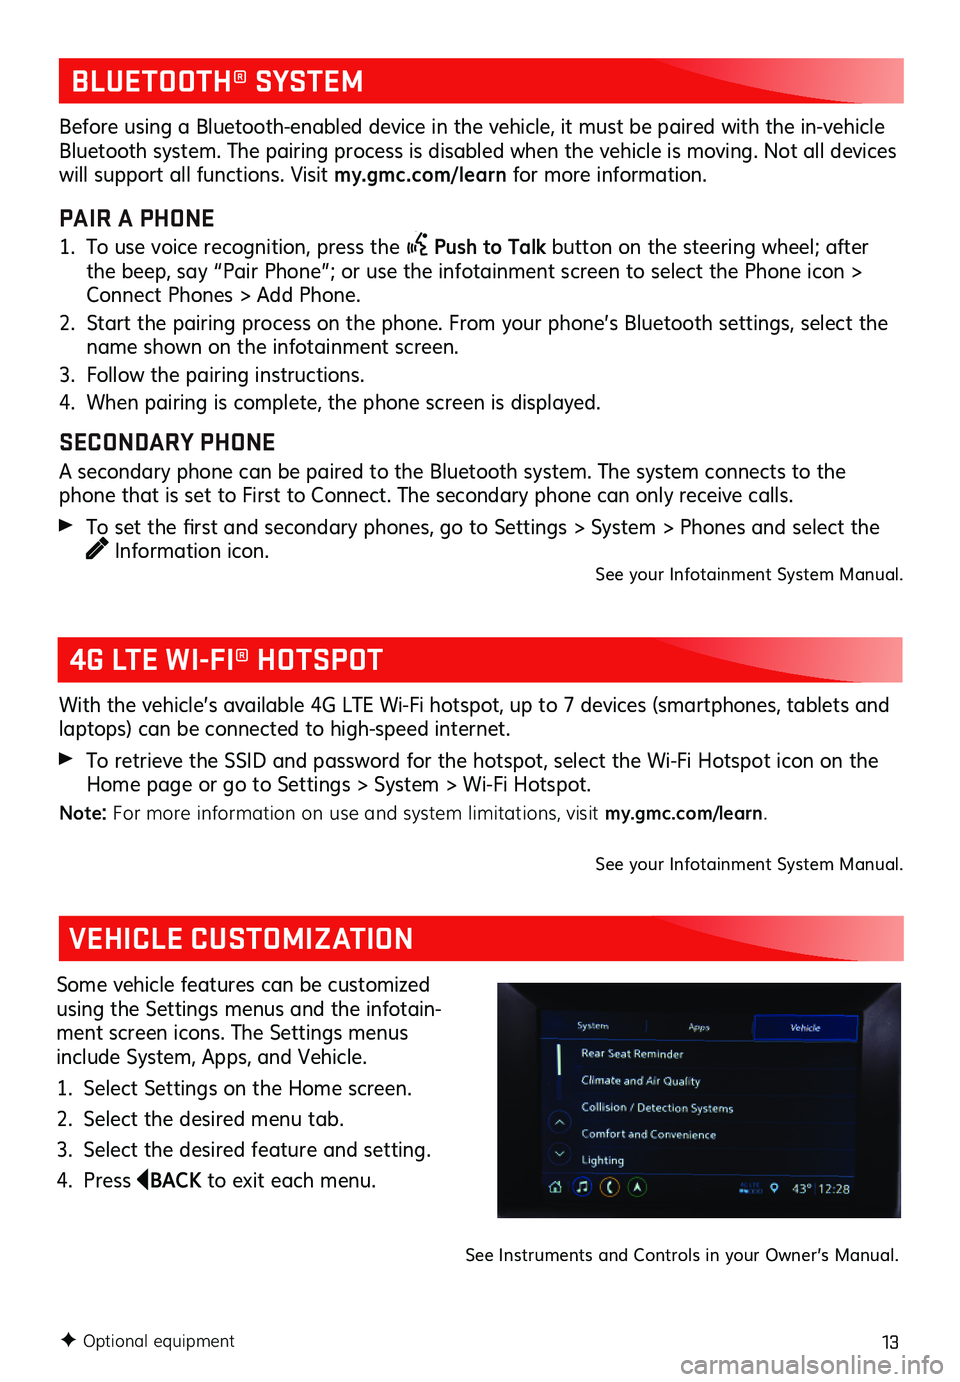
Some vehicle features can be customized using the Settings menus and the infotain-ment screen icons. The Settings menus include System, Apps, and Vehicle.
1. Select Settings on the Home screen.
2. Select the desired menu tab.
3. Select the desired feature and setting.
4. Press BACK to exit each menu.
See Instruments and Controls in your Owner’s Manual.
Before using a Bluetooth-enabled device in the vehicle, it must be paired with the in- vehicle Bluetooth system. The pairing process is disabled when the vehicle is moving. Not all devices will support all functions. Visit my.gmc.com/ learn for more information.
PAIR A PHONE
1. To use voice recognition, press the Push to Talk button on the steering wheel; after the beep, say “Pair Phone”; or use the infotainment screen to select the Phone icon > Connect Phones > Add Phone.
2. Start the pairing process on the phone. From your phone’s Bluetooth settings, select the name shown on the infotainment screen.
3. Follow the pairing instructions.
4. When pairing is complete, the phone screen is displayed.
SECONDARY PHONE
A secondary phone can be paired to the Bluetooth system. The system connects to the phone that is set to First to Connect. The secondary phone can only receive calls.
To set the first and secondary phones, go to Settings > System > Phones and select the Information icon.See your Infotainment System Manual.
Page 14 of 20
14
AUTOMATIC CLIMATE CONTROLS
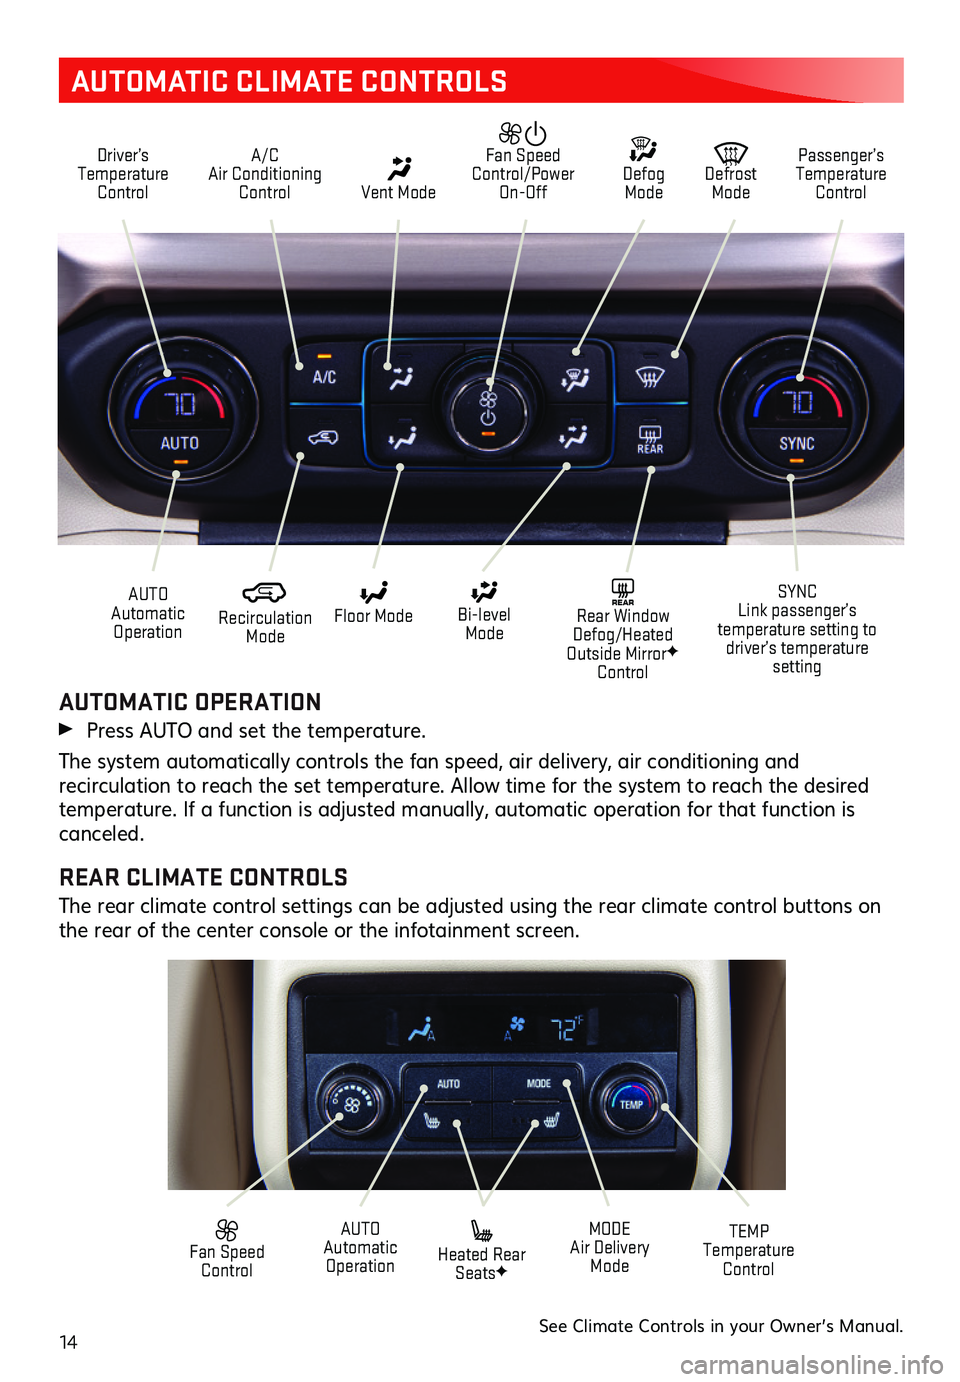
Driver’s Temperature Control
A/C Air Conditioning Control Vent Mode
Defrost Mode
Defog Mode
Passenger’s Temperature Control
Fan Speed Control/Power On-Off
Recirculation Mode
AUTO Automatic Operation
Floor Mode
Heated Rear SeatsF
Bi-level Mode
SYNC Link passenger’s temperature setting to driver’s temperature setting
TEMP Temperature Control
REAR Rear Window Defog/Heated Outside MirrorF Control
MODE Air Delivery Mode
AUTO Automatic Operation
Fan Speed Control
AUTOMATIC OPERATION
Press AUTO and set the temperature.
The system automatically controls the fan speed, air delivery, air conditioning and
recirculation to reach the set temperature. Allow time for the system to reach the desired temperature. If a function is adjusted manually, automatic operation for that function is canceled.
REAR CLIMATE CONTROLS
The rear climate control settings can be adjusted using the rear climate control buttons on the rear of the center console or the infotainment screen.
See Climate Controls in your Owner’s Manual.
Page 15 of 20
15
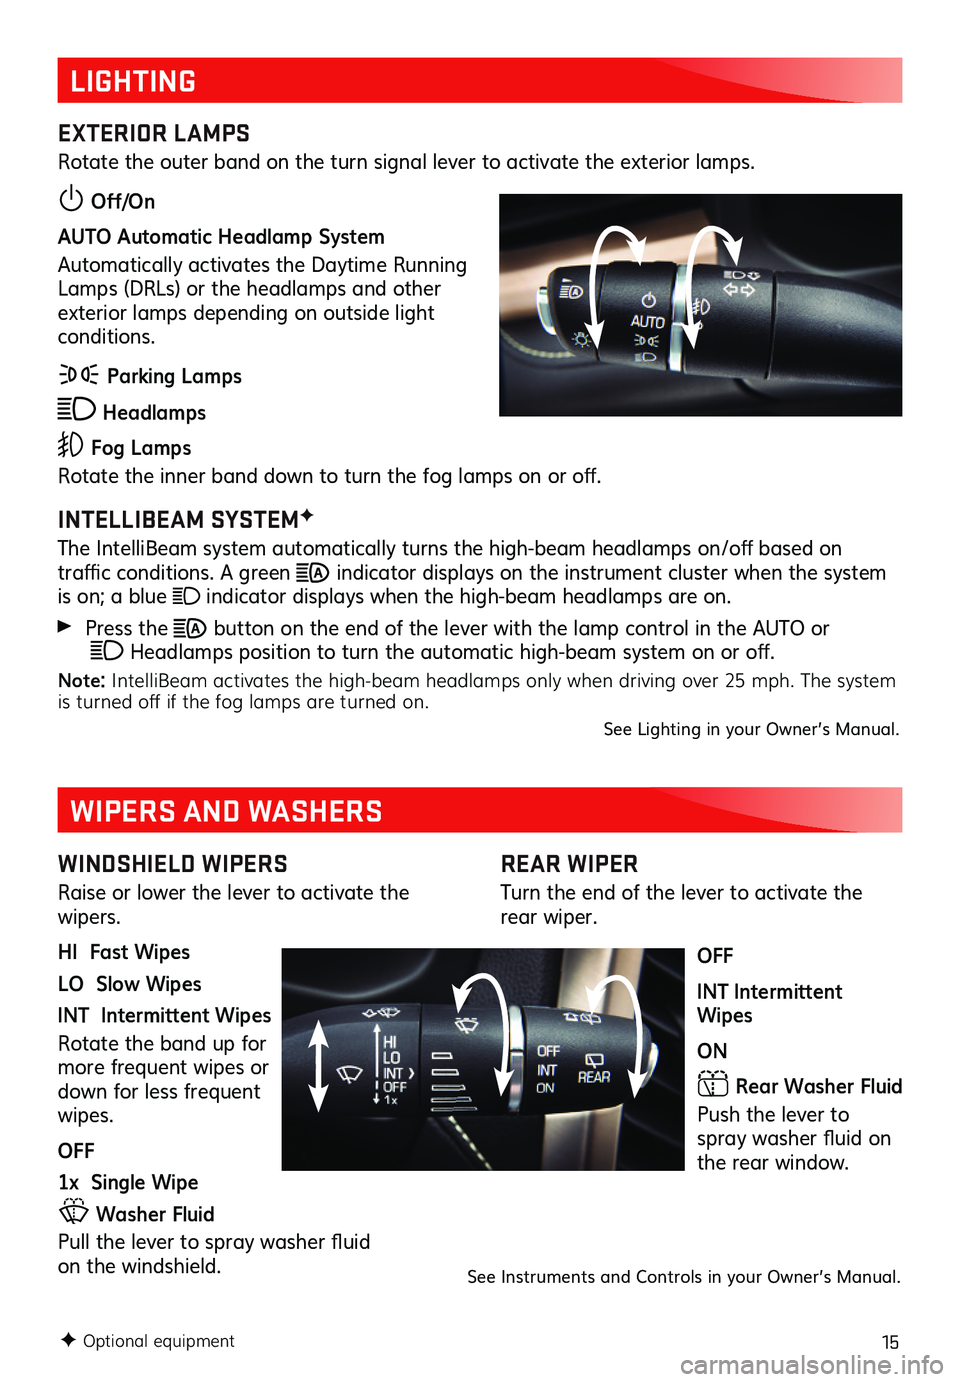
REAR WIPER
Turn the end of the lever to activate the rear wiper.
OFF
INT Intermittent Wipes
ON
Rear Washer Fluid
Push the lever to spray washer fluid on the rear window.
LIGHTING
EXTERIOR LAMPS
Rotate the outer band on the turn signal lever to activate the exterior lamps.
Off/On
AUTO Automatic Headlamp System
Automatically activates the Daytime Running Lamps (DRLs) or the headlamps and other exterior lamps depending on outside light conditions.
Parking Lamps
Headlamps
Fog Lamps
Rotate the inner band down to turn the fog lamps on or off.
INTELLIBEAM SYSTEMF
The IntelliBeam system automatically turns the high-beam headlamps on/off based on
traffic conditions. A green indicator displays on the instrument cluster when the system is on; a blue indicator displays when the high-beam headlamps are on.
Press the button on the end of the lever with the lamp control in the AUTO or Headlamps position to turn the automatic high-beam system on or off.
Note: IntelliBeam activates the high-beam headlamps only when driving over 25 mph. The system is turned off if the fog lamps are turned on.See Lighting in your Owner’s Manual.
WINDSHIELD WIPERS
Raise or lower the lever to activate the wipers.
HI Fast Wipes
LO Slow Wipes
INT Intermittent Wipes
Rotate the band up for more frequent wipes or down for less frequent wipes.
OFF
1x Single Wipe
Washer Fluid
Pull the lever to spray washer fluid on the windshield.
WIPERS AND WASHERS
See Instruments and Controls in your Owner’s Manual.
F Optional equipment
Page 16 of 20
16
DRIVER ASSISTANCE SYSTEMS
Safety or driver assistance features are no substitute for the driver’s responsibility to operate the vehicle in a safe manner. The driver should remain attentive to traffic, surroundings and road conditions at all times. Read your Owner’s Manual for important feature limitations and information.
SAFETY ALERT SEATF – The driver’s seat pulses — left side, right side or simultaneously — to alert the driver of the direction of potential hazards.
Audible alerts or seat pulsing alerts may be selected. To change the alert settings, go to Settings > Vehicle > Collision/Detection > Alert Type.
LANE CHANGE ALERT WITH SIDE BLIND ZONE ALERT – While driving, the system displays a warning symbol on the left or right side mirror when a vehicle is detected in that side blind zone area or rapidly approaching that area. The warning symbol flashes if a turn signal is activated when a vehicle has been detected on the same side.
To turn on or off, go to Settings > Vehicle > Collision/Detection > Lane Change Alert.
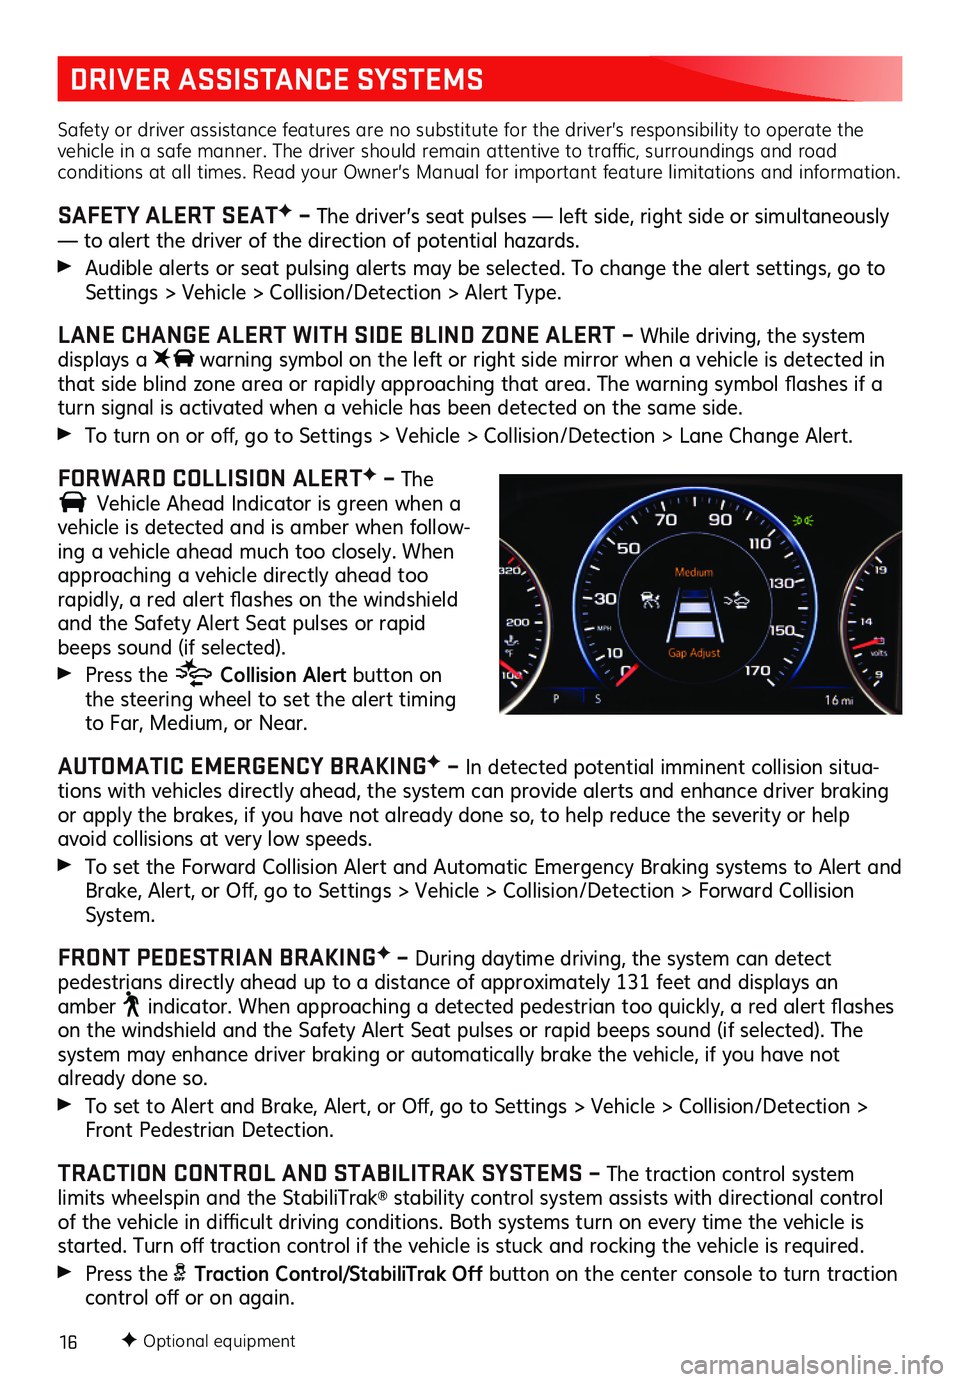
FORWARD COLLISION ALERTF – The
Vehicle Ahead Indicator is green when a
vehicle is detected and is amber when follow-ing a vehicle ahead much too closely. When approaching a vehicle directly ahead too
rapidly, a red alert flashes on the windshield and the Safety Alert Seat pulses or rapid beeps sound (if selected).
Press the Collision Alert button on the steering wheel to set the alert timing to Far, Medium, or Near.
AUTOMATIC EMERGENCY BRAKINGF – In detected potential imminent collision situa-tions with vehicles directly ahead, the system can provide alerts and enhance driver braking or apply the brakes, if you have not already done so, to help reduce the severity or help avoid collisions at very low speeds.
To set the Forward Collision Alert and Automatic Emergency Braking systems to Alert and Brake, Alert, or Off, go to Settings > Vehicle > Collision/Detection > Forward Collision System.
FRONT PEDESTRIAN BRAKINGF – During daytime driving, the system can detect
pedestrians directly ahead up to a distance of approximately 131 feet and displays an amber indicator. When approaching a detected pedestrian too quickly, a red alert flashes on the windshield and the Safety Alert Seat pulses or rapid beeps sound (if selected). The system may enhance driver braking or automatically brake the vehicle, if you have not already done so.
To set to Alert and Brake, Alert, or Off, go to Settings > Vehicle > Collision/Detection > Front Pedestrian Detection.
TRACTION CONTROL AND STABILITRAK SYSTEMS – The traction control system limits wheelspin and the StabiliTrak® stability control system assists with directional control of the vehicle in difficult driving conditions. Both systems turn on every time the vehicle is started. Turn off traction control if the vehicle is stuck and rocking the vehicle is required.
Press the Traction Control/StabiliTrak Off button on the center console to turn traction control off or on again.
F Optional equipment