Page 17 of 23

Quick Reference Guide I 2827 I Quick Reference Guide
USB PORT
Plug in a USB cable to connect a
compatible audio device and listen to it
through the audio system in your
vehicle.
Map position
Standard Navigation
Premium Navigation
NAVIGATION
1 Move to the Home Screen2 Map view modeThe map view can be switch between Head Up and North Up.
3 Navigation Voice Guidance On/Off
4 Zoom in the map
5 Map scaleSet the zoom level automatically according to the guidance.
6 Zoom out the map
1 Clock display2 Move to the Home Screen3 Change the map view mode4 Navigation voice guidance on/off5 Zoom in the map6 Map scale display7 Zoom out the map
7 [MENU] button
8 Unified Search
9 Touch to scroll the map
10 Set a waypoint to the current route
11 Save frequently used address to address book
12 Find a POI (Point Of Interest) around the
current position
13 Vehicle position
8 [MENU] button9 Route guidance10 Vehicle position11 Current position and Destination12 Remaining distance display/ Remaining time13 Cancel Route14 [Route] button
1
21
34567
81112
9
13
10
14
8
9
101112
13
23456
7
WIRELESS CELLULAR PHONE CHARGING SYSTEM
NOTE:
The wireless cellular phone charging system supports only the
Qi-enabled cellular phones ().
NOTE: Do not place any metallic items such as coins, keys on the
charger. Avoid putting credit cards, etc. on the charger as they
might get damaged by the magnetic field.
There is a wireless cellular phone charging system inside the front console.
The system operates with all doors closed, and the ignition switch is in\
the
ACC/ON position.
Scan to view a video of: Wireless Phone Charging
INFOTAINMENT
GENESIS G80
Page 18 of 23

Quick Reference Guide I 3029 I Quick Reference Guide
CLOCK ADJUSTMENT
1.
Press "HOME" button.
1.
Press the "SETUP" button.
2. Press "Settings" icon on the screen, then press "Clock".
3. To set your preferred Time Setting:
• Check "GPS Time" to adjust the time automatically.
• Press “Time Setting” to adjust the clock manually. GPS Time must
not be selected.
• If "Daylight Savings Time" is selected, the clock will be adjusted
forward by one hour.
2. Press "Clock" icon on the screen.
3. To set your preferred Time Setting:
• Check "GPS Time" to adjust the time automatically.
• Press “Date/Time Setting” to adjust the clock manually.
GPS Time must not be selected.
• If "Daylight Savings Time" is selected, the clock will be adjusted
forward by one hour.
With Premium Navigation
With Standard Navigation
NOTE: Once the digital clock is adjusted, the analog
clock will be updated accordingly.
HOMELINK WIRELESS GARAGE CONTROL SYSTEM
Standard Programming
1. For first time programming, press and hold the two outside
buttons ( , ) until the indicator light starts to flash. (to
reprogram buttons, skip this step)
2. Press and hold the desired button ( , or )and your
transmitter’s button at the same time until the Homelink
indicator light changes from a slow to a rapid blink.
(The transmitter has to be 1 to 3 inches away from the mirror)The
desired Homelink button is now programmed.
NOTE: If you have a rolling code garage door opener, complete
additional steps:
3. Locate the “Learn” or “Smart” button on your garage door
opener. Press and release the button and complete Step 4
within 30 seconds.
4. Return to the vehicle and press the programmed Homelink
button up to 4 times (or until the garaged door operates)
For more detailed information, please refer to your Owner’s manual
or visit www.homelink.com or call (800) 355-3515
FlashingFlashing
INFOTAINMENT
GENESIS G80
Page 19 of 23

system helps detects")
Quick Reference Guide I 3231 I Quick Reference Guide
• To turn LKA on,
press the LKA switch.
• To turn LKA off,
press the switch again.
The Lane Keeping Assist (LKA)
system helps detects lane markers
on the road, and assists the driver’s
steering to help keep the vehicle
between lanes.
LANE KEEPING ASSIST (LKA)
LKA operates only when the vehicle
speed is above 40 mph and when the
LKA icon in the instrument cluster is
green. LKA will not operate properly if the
following conditions are present:
- the lane line is not clear
- on sharp bend in a road
- heavy fog
Refer to the Owner's Manual for more
detailed information.
NOTE: During operation, you
may feel the sensation of steering
wheel movement. Depending on
the road condition(gradient), the
deflection driving may occur. LKA
settings can be adjusted in the
User Settings page of the
instrument cluster.
ELECTRONIC PARKING BRAKE (EPB)
or
Stop the vehicle then pull
the EPB switch.
Applying
Move shift lever from P to
R, N or D while depressing
the brake pedal.
Releasing
Press the EPB switch while
depressing the brake pedal.
NOTE: If necessary, emergency braking is
possible by pulling and holding the EPB
switch.
The Driver Attention Warning (DAW) system is designed as a safety
feature to help reduce drowsy or inattentive driving.
• To adjust the Driver Attention Alert sensitivity, go
to: User Settings > Driving Assist > Driver
Attention Warning > Normal or High in the
instrument cluster.
OFF - System is deactivated.
NORMAL - Alerts the driver of his/her fatigue
level or inattentive driving practices.
HIGH - Alerts system alerts the driver of his/her
fatigue level or inattentive driving practices faster
than Normal mode.
The Driver Attention Warning system is operable,
when driving speed is between 40 mph and 110 mph
.
DRIVER ATTENTION WARNING (DAW)
SHIFT BY WIRE (Electronic type shifter)
P (Park)
Always stop completely before
shifting into P (Park). To shift the
gear from R (Reverse), N (Neutral),
D (Drive) or Manual mode to P
(Park), press the [P] button while
depressing the brake pedal.
R (Reverse) / N (Neutral) / D
(Drive)
To select gear, press the
[UNLOCK] button while
depressing the brake pedal and
then move the shift lever forward (R
side) or backward (D side).
DRIVING
GENESIS G80
Page 20 of 23
 uses radar
sensors in the
rear bumper to
monitor and warn
the driver of an
approaching
vehicle in")
Quick Reference Guide I 3433 I Quick Reference Guide
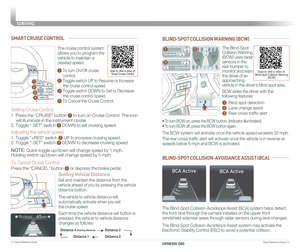
The Blind-Spot
Collision Warning
(BCW) uses radar
sensors in the
rear bumper to
monitor and warn
the driver of an
approaching
vehicle in the driver’s blind spot area.
1 Blind spot detection
2 Lane change assist
3 Rear cross traffic alert
The BCW system will activate once the vehicle speed exceeds 20 mph.
The Blind-Spot Collision-Avoidance Assist (BCA) system helps detect
the front lane through the camera installed on the upper front
windshield side/rear areas through radar sensors during lane changes.
The Blind-Spot Collision-Avoidance Assist system may activate the
Electronic Stability Control (ESC) to avoid a potential collision.
The rear cross traffic alert will activate once the vehicle is in reverse at
speeds below 6 mph and BCW is activated.
BLIND-SPOT COLLISION WARNING (BCW)
BLIND-SPOT COLLISION-AVOIDANCE ASSIST (BCA)
• To turn BCW on, press the BCW button. (indicator illuminated)
• To turn BCW off, press the BCW button again.
1
2
3
Scan to view a video of: Blind-Spot Collision Warning (BCW)
BCW aides the driver with the
following features:
SMART CRUISE CONTROL
Setting Vehicle Distance
The vehicle to vehicle distance will
automatically activate when you set
the cruise speed.
Set and maintain the distance from the
vehicle ahead of you by pressing the vehicle
distance button.
Each time the vehicle distance set button is
pressed, the vehicle to vehicle distance
changes as follows:
The cruise control system
allows you to program the
vehicle to maintain a
desired speed.
1 To turn On/Off cruise
control.
2 Toggle switch UP to Resume or Increase
the cruise control speed.
3 Toggle switch DOWN to Set or Decrease
the cruise control speed.
4 To Cancel the Cruise Control.
2
3
1
4
Distance 2
Distance 3Distance 4(starting distance)
Distance 1
Setting Cruise Control
1. Press the “CRUISE” button 1 to turn on Cruise Control. The icon
will illuminate in the instrument cluster.
2. Toggle “-SET” switch 3 DOWN to set cruising speed.
Adjusting the vehicle speed
1. Toggle “+RES” switch 2 UP to increase cruising speed.
2. Toggle “-SET” switch 3 DOWN to decrease cruising speed.
NOTE: Quick toggle up/down will change speed by 1 mph.
Holding switch up/down will change speed by 5 mph.
To Cancel Cruise Control
Press the “CANCEL” button 4 or depress the brake pedal.
Scan to view a video of: Smart Cruise Control
DRIVING
GENESIS G80
Page 21 of 23

Low Tire Pressure
Indicator /
TPMS Malfunction
Indicator
Scan to view a video of: Tire Pressure M")
Quick Reference Guide I 3635 I Quick Reference Guide
TIRE PRESSURE MONITORING SYSTEM (TPMS)
Low Tire Pressure
Indicator /
TPMS Malfunction
Indicator
Scan to view a video of: Tire Pressure Monitoring System
LOW TIRE PRESSURE INDICATOR
Illuminates if one or more of your tires are significantly under-inflated.
TPMS MALFUNCTION INDICATOR
Blinks for approximately one minute, then remains illuminated when
there is a malfunction with the TPMS. Inspect all tires and adjust
tire pressure to specification. If the lamp remains illuminated, have
the system checked by an authorized retailer of Genesis Brand
Products as soon as possible.
Low Tire Pressure /
Tire Pressure
Monitor / TPMS
Malfunction Display
(shown on the
cluster LCD display)
To access the TPMS menu within
the LCD display, press the Assist
mode button on the steering wheel
to display tire pressure.
Tire pressures will display after
driving a short distance. If a
tire pressure drops lower than
predetermined specification, the
Low Tire Pressure Indicator will
illuminate and the LCD display
will indicate tire(s) requiring air.
The Forward Collision Avoidance (FCA)
system is designed to detect and
monitor the vehicle ahead and warn
the driver if a collision is imminent. On
vehicles equipped with both camera
and radar sensor, pedestrian detection
is also available.
FORWARD COLLISION-AVOIDANCE ASSIST (FCA)
Early: This setting maximizes the amount of distance between the
vehicle or pedestrian ahead before the initial warning occurs.
Normal: This setting allows for a nominal amount of distance between
the vehicle or pedestrian ahead before the initial warning occurs.
Late: This setting reduces the amount of distance between the
vehicle or pedestrian ahead before the initial warning occurs.
NOTE: If driver does not maneuver to avoid impact when system detects a
slower/stopped vehicle or pedestrian ahead, system applies automatic bra\
king
To operate the system, select the FCA (Forward Collision Avoidance
Assist) sub menu in the LCD cluster display under User Settings.
Please refer to your Owner’s Manual for further information.
PARKING ASSIST SYSTEM (PAS)
The parking assist system assists
the driver during movement of the
vehicle by chiming if any object is
sensed within the distance of 3.3 ft
in front and 4 ft behind the vehicle.
PAS ON/OFF
Press button to turn ON/OFF:
ON – Led on
OFF – Led off
If the PAS is OFF, the system will turn
ON automatically when in Reverse.
The system will automatically turn
OFF when vehicle is driven forward
at speed above 6 mph.
NOTE: Front parking sensor
will not operate if the PAS is
OFF.
DRIVING
GENESIS G80
Page 22 of 23

GENESIS SERVICE VALET PROGRAM TERMS AND CONDITIONS
Program Coverage Summary
Genesis Service Valet is included for the first 3 years
or 36,000 miles, whichever comes first, of ownership.
Complimentary
ServicesService ValetComplimentary
Loaner VehicleMaintenance
Original Owner or
LesseeYe sYe sYe s
Subsequent Owner or
Lessee
Warranty
Only
Warranty
OnlyNo
See below for program terms and conditions.
Service Valet is available while your vehicle is receiving complimentary maintenance, wear items, or warranty repairs by an authorized Genesis retailer. Simply contact your authorized Genesis retailer’s Service Experience Manager\
or contact the Customer Care Center at 844-340-9741 to make your appointment. The retailer will work with you to arrange your pickup and delivery time and location.
• Valet appointments must be made at least 2 business days in advance.
• Valet area of coverage is valid only within an estimated 1 hour drive time distance (based on traffic, weather, and road conditions) from the participating retailer location to the pickup/delivery location.
• Valet pickup and delivery must occur during normal business hours. After-hours pickup and delivery are at the discretion of your participating retailer.
• You must notify your Genesis Service Experience Manager 1 business day i\
n advance if location or time of valet services changes. If a change or cancellation is not made at least 1 business day in advance, you may be charged a fee, or Service Valet may be cancelled.
• You will be charged a fee if you elect to extend the use of the courtesy replacement vehicle or delay the delivery of your vehicle.
• Prior to or at the time of your vehicle pickup, you will need to provide your valet with the following information if a courtesy replacement vehicle is needed:
• Insurance company name, policy number, and expiration date
• Driver’s license number, state, expiration, and date of birth
• Credit card number and expiration date (standard requirement for rental car use)
• The above information for any additional drivers
Genesis brand vehicle owner must provide the valet with the Genesis brand vehicle that is currently registered in compliance with local and state laws. Road tolls incurred during the Service Valet may be charged to the vehicle owner.
SERVICE VALET
We come to you and provide you with alternative transportation. While yo\
ur vehicle is being serviced under this program, qualified drivers will be provided\
a courtesy replacement Genesis brand vehicle at no additional cost. You must be at \
least 25 years of age (in most states) with a valid driver’s license to drive a loaner vehicle. Please provide your Service Advocate with the following information:
• Insurance company name, policy number, and expiration date
• Driver’s license number, state, expiration and birth date
• Credit card number and expiration date (standard requirement for rental car use)
• The above information for any additional drivers
Vehicle Eligibility
For original retail owners of the Genesis vehicle, all factory-recommended scheduled maintenance are covered for the first 3 years or 36,000 miles,\
whichever comes first. The Service Valet Program is applicable to all 2017 - 2019 \
model year Genesis brand vehicle United States specification vehicles purchased in \
the United States from authorized Genesis retailers. The program is not in effect o\
utside of the United States.
• Vehicle coverage begins on the date of first retail sale. Fleet vehicles are excluded from this program.
• If the vehicle becomes damaged (such as by accident, fire, act of natur\
e, etc.) and is subsequently titled salvaged, flooded, or reconstructed, it is no\
longer eligible for the benefits of the Genesis G80 complimentary maintenance Program.
Guidelines for Scheduling Maintenance
The Service Valet Program covers factory-recommended scheduled maintenan\
ce for the first 3 years or 36,000 miles, whichever comes first. Covered ma\
intenance costs include all labor and parts necessary to complete the factory reco\
mmended service. Having your vehicle serviced at the specified time/mile interva\
ls is critical in maintaining long-term durability. Failure to have your vehicle serviced at the specified interval may invalidate the warranty under certain circumstanc\
es.
If for any reason a service is missed, the authorized Genesis retailer w\
ill perform the next or missed major service.
Some owners may wish to have their oil changed more frequently. The cust\
omer must pay for any additional services performed on the vehicle. Service procedures not specifically referenced in the Genesis Customer Care Quick Reference\
Guide must be preauthorized by a Genesis District Parts and Service Manager.
COMPLIMENTARY LOANER VEHICLE
COMPLIMENTARY MAINTENANCE COVERAGE
Page 23 of 23

39 I Quick Reference Guide
GENESIS BRAND OWNER RETAILER NAME
SALES CONSULTANT DATE
VIN PREVIOUS VEHICLE
GENESIS GUEST DELIVERY CHECKLIST
BEFORE DELIVERY
☐ SET TIRE PRESURE LF RF RR LR
☐ VERIFY VEHICLE IS CLEAN, IN GOOD CONDITION, FREE OF CHIPS AND SCRATCHES · CLEAN WINDSHIELD AND BACK WINDOW
☐ ENSURE FLOORMATS ARE SNAPPED INTO PLACE
Quick Reference Guide I 40
GENESIS SERVICE VALET PROGRAM TERMS AND CONDITIONS
GENESIS G80
WALK THE CUSTOMER THROUGH EACH OF
THE FOLLOWING KEY DELIVERY FEATURES
☐ REVIEW QUICK REFERENCE GUIDE
☐ PAIR CUSTOMER'S PHONE TO THE BLUETOOTH SYSTEM
☐ OPERATION OF THE NAVIAGATION SYSTEM - page 27
☐ REVIEW AND TEAR OFF VOICE COMMAND / QUICK TIP CARD
☐ OPERATION OF THE AUDIO SYSTEM
NOTES
Guest Date
Exclusions from Coverage
The following items, without limitations, are not covered :
• Gasoline and gasoline additives
• State inspections
• Wear and tear of soft trim, including seats, carpets, door casings, wood veneer, headliner, and all chrome trim
• Wear and tear or damage to exterior body panels, trim, and glass
• Damage due to poor fuel quality, misuse, abuse, neglect, fire, accident, flood, or installation of unapproved parts and accessories
• Vehicles used in competitive events
• Vehicles with an unreadable/tampered VIN, or where true mileage cannot be determined
• Repairs and maintenance not performed at at an Authorized retailer of Genesis.
• Repairs covered under the New Vehicle Limited Warranty
• Required maintenance and covered wear parts replacement on United States specification vehicles operating outside the United States\
Transfer of Coverage
The described coverage only applies to the original retail purchaser or original lessee of a Genesis Brand vehicle. The coverage is not transferable to s\
ubsequent owners, with the exception of immediate family members. Immediate family members include the following:
• Spouses or registered domestic partners
• Parents
• Children or stepchildren
Dealerships will verify that the owner/customer is the original owner/le\
ssee. Certain limitations and exclusions apply to this program. Please refer to your New Vehicle Limited Warranty guide for warranty details.
BLU ETO OTH
®
SWIT CHING BETWEEN P AIRED PHONES
On the r adio:
CONNE CTING \fOUR PHONEOn the r adio:
U sing Voic e Command:
“Change Blue too th de vice”1. Select All Menus.
2. Select Setup.
3. Select Bluetooth ->
Bluetooth Connection.
**Alternately, you can also press the green
colored answer button on the steering
wheel OR the PHONE hard key located on
the center stack to initiate Bluetooth Pairing.
4. Select Add New Device.
In your phone’sBluetooth settings:
5. Select the on your phone
6. Enter the passkey from the radio or accept
the authorization pop-up on your phone.
1. Select All Menus.
2. Select Setup.
3. Select Bluetooth ->
Bluetooth Connection.
4. Select Connect next to the desired phone.
Page:
< prev 1-8 9-16 17-24