2020 FORD TRANSIT CONNECT clock
[x] Cancel search: clockPage 259 of 509

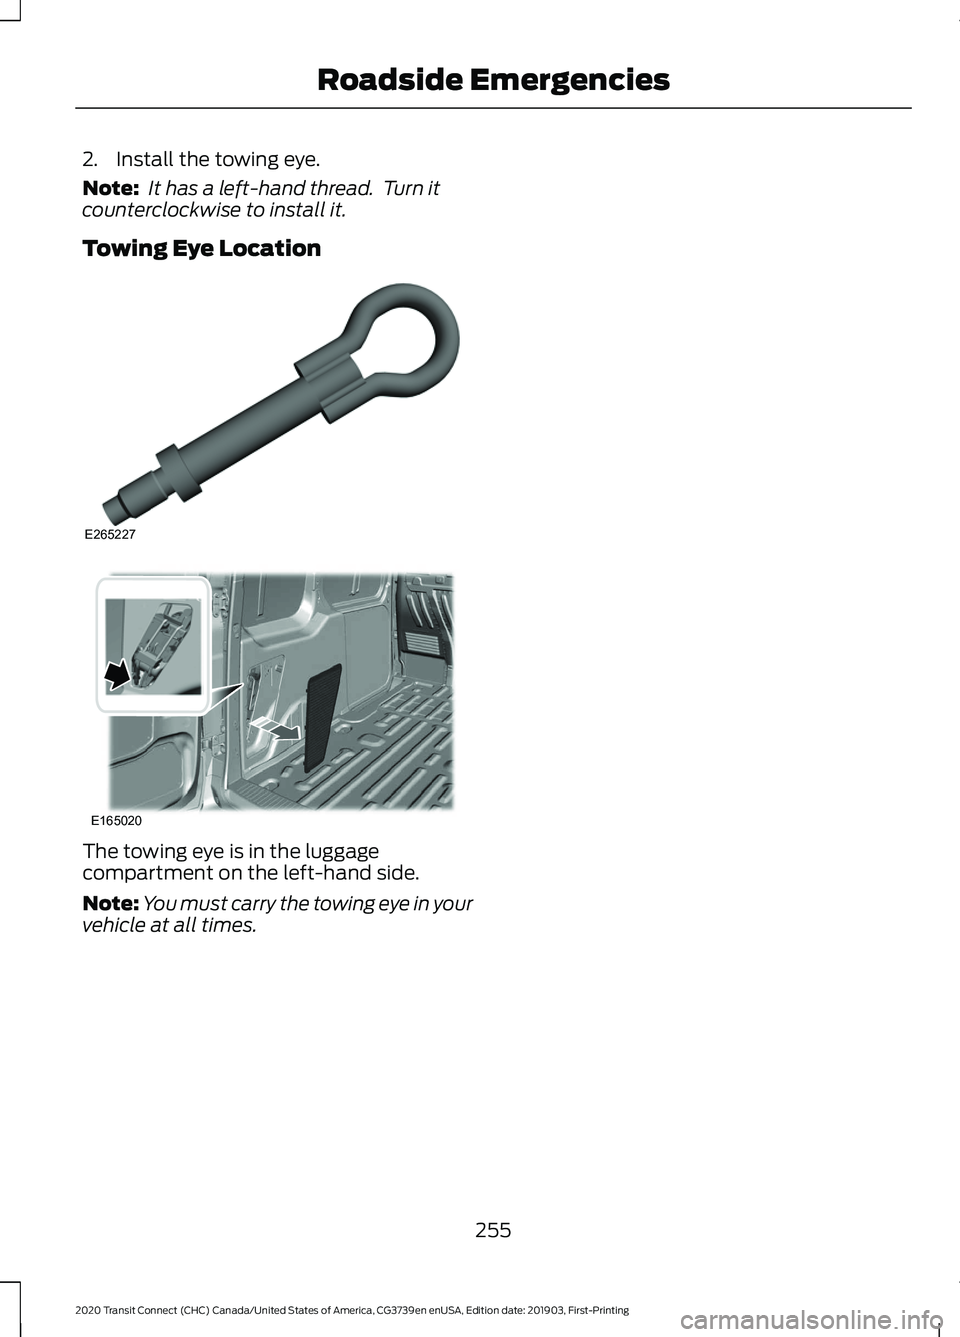
2. Install the towing eye.
Note:
It has a left-hand thread. Turn it
counterclockwise to install it.
Towing Eye Location The towing eye is in the luggage
compartment on the left-hand side.
Note:
You must carry the towing eye in your
vehicle at all times.
255
2020 Transit Connect (CHC) Canada/United States of America, CG3739en enUSA, Edition date: 201903, First-Printing Roadside EmergenciesE265227 E165020
Page 281 of 509

Note:
The oil consumption of new engines
reaches its normal level after approximately
3,000 mi (5,000 km).
Adding Engine Oil WARNING:
Do not add engine oil
when the engine is hot. Failure to follow
this instruction could result in personal
injury. WARNING:
Do not remove the
filler cap when the engine is running.
Do not use supplemental engine oil
additives because they are unnecessary
and could lead to engine damage that may
not be covered by the vehicle Warranty. Only use oils certified for gasoline engines
by the American Petroleum Institute (API).
An oil with this trademark symbol
conforms to the current engine and
emission system protection standards and
fuel economy requirements of the
International Lubricants Specification
Advisory Committee (ILSAC).
To top up the engine oil level do the
following:
1. Clean the area surrounding the engine
oil filler cap before you remove it. 2. Remove the engine oil filler cap. See
Under Hood Overview
(page 272).
Turn it counterclockwise and remove
it.
3. Add engine oil that meets our specifications.
See Capacities and
Specifications (page 345). You may
have to use a funnel to pour the engine
oil into the opening.
4. Recheck the oil level.
5. If the oil level is correct, replace the dipstick and make sure it is fully seated.
6. Replace the engine oil filler cap. Turn it clockwise until you feel a strong
resistance.
Note: Do not add oil further than the
maximum mark. Oil levels above the
maximum mark may cause engine damage.
Note: Make sure you install the oil filler cap
correctly.
Note: Soak up any spillage with an
absorbent cloth immediately.
OIL CHANGE INDICATOR
RESET
Only reset the system after changing the
engine oil and oil filter.
Resetting the Oil Life Monitoring
System
1. Switch the ignition on. Do not start the
engine.
2. Fully press the accelerator and brake pedals at the same time.
3. Keep the accelerator and brake pedals
fully pressed.
4. After three seconds, a message appears confirming that the reset is in
progress.
5. After 25 seconds, a message appears confirming that the reset is complete.
277
2020 Transit Connect (CHC) Canada/United States of America, CG3739en enUSA, Edition date: 201903, First-Printing MaintenanceE142732
Page 283 of 509

Maintain coolant concentration within
48% to 50%, which equates to a freeze
point between -29°F (-34°C) and -35°F
(-37°C). Coolant concentration should be
checked using a refractometer. We do not
recommend the use of hydrometers or
coolant test strips for measuring coolant
concentration.
Adding Coolant WARNING:
Do not add engine
coolant when the engine is on or the
cooling system is hot. Failure to follow
this instruction could result in personal
injury. WARNING:
Do not remove the
coolant reservoir cap when the engine is
on or the cooling system is hot. Wait 10
minutes for the cooling system to cool
down. Cover the coolant reservoir cap
with a thick cloth to prevent the
possibility of scalding and slowly remove
the cap. Failure to follow this instruction
could result in personal injury. WARNING:
Do not put coolant in
the windshield washer reservoir. If
sprayed on the windshield, coolant could
make it difficult to see through the
windshield.
Note: Do not use stop leak pellets, cooling
system sealants, or non-specified additives
as they can cause damage to the engine
cooling or heating systems. Resulting
component damage may not be covered by
the vehicle Warranty.
Note: Automotive fluids are not
interchangeable. It is very important to use prediluted
coolant approved to the correct
specification in order to avoid plugging the
small passageways in the engine cooling
system. Do not mix different colors or types
of coolant in your vehicle. Mixing of engine
coolants or using an incorrect coolant may
harm the engine or cooling system
components and may not be covered by
the vehicle Warranty.
Note:
If prediluted coolant is not available,
use the approved concentrated coolant
diluting it to 50/50 with distilled water.
Using water that has not been deionised
may contribute to deposit formation,
corrosion and plugging of the small cooling
system passageways.
Note: Coolants marketed for all makes and
models may not be approved to our
specifications and may cause damage to
the cooling system. Resulting component
damage may not be covered by the vehicle
Warranty.
If the coolant level is at or below the
minimum mark, add prediluted coolant
immediately.
To top up the coolant level do the
following:
1. Unscrew the cap slowly. Any pressure escapes as you unscrew the cap.
2. Add prediluted coolant approved to the correct specification.
3. Add enough prediluted coolant to reach the correct level.
4. Replace the coolant reservoir cap, turn
it clockwise until you feel a strong
resistance.
5. Check the coolant level in the coolant reservoir the next few times you drive
your vehicle. If necessary, add enough
prediluted engine coolant to bring the
coolant level to the correct level.
279
2020 Transit Connect (CHC) Canada/United States of America, CG3739en enUSA, Edition date: 201903, First-Printing Maintenance
Page 289 of 509

Because your vehicle
’s engine is
electronically-controlled by a computer,
some engine control settings are
maintained by power from the low voltage
battery. Some engine computer settings,
like the idle trim and fuel trim strategy,
optimize the driveability and performance
of the engine. Some other computer
settings, like the clock and radio station
presets, are also maintained in memory by
power from the low voltage battery. When
a technician disconnects and connects the
low voltage battery, these settings are
erased. Complete the following procedure
in order to restore the settings:
1. With the vehicle at a complete stop, set the parking brake.
2. Shift the transmission into park (P).
3. Switch off all accessories.
4. Fully press the brake pedal and start the vehicle.
5. Run the engine until it reaches normal operating temperature. While the
engine is warming up, complete the
following: Reset the clock. See Audio
System (page 367). Reset the power
windows bounce-back feature. See
Windows and Mirrors
(page 89).
Reset the radio station presets. See
Audio System
(page 367).
6. Allow the engine to idle for at least one
minute. If the engine turns off, press
the accelerator pedal to start the
engine.
7. While the engine is running, press the brake pedal and shift into neutral (N).
8. Allow the engine to run for at least one
minute by pressing on the accelerator
pedal.
9. Drive the vehicle at least 12 mi (20 km)
to completely relearn the idle and fuel
trim strategy. Note:
If you do not allow the engine to
relearn the idle and fuel trim strategy, the
idle quality of your vehicle may be adversely
affected until the engine computer
eventually relearns the idle trim and fuel
trim strategy.
Make sure that you dispose of old batteries
in an environmentally friendly way. Seek
advice from your local authority about
recycling old batteries.
CHECKING THE WIPER
BLADES Run the tip of your fingers over the edge of
the blade to check for roughness.
Clean the wiper blades with washer fluid
or water applied with a soft sponge or
cloth.
CHANGING THE FRONT WIPER
BLADES
1. Switch the ignition off.
285
2020 Transit Connect (CHC) Canada/United States of America, CG3739en enUSA, Edition date: 201903, First-Printing MaintenanceE142463
Page 292 of 509

Note:
There may be an identifying mark on
the lens to help you locate the center of the
bulb.
Note: To see a clearer light pattern while
adjusting one headlamp, you may want to
block the light from the other headlamp.
3. Switch on the low beam headlamps and open the hood. 4. On the wall or screen you will observe
a flat zone of high intensity light
located at the top of the beam pattern.
If the top edge of the flat zone of high
intensity light is not on the horizontal
reference line, adjust the aim of the
headlamp beam. 5. Locate the vertical adjuster on each
headlamp. Use a suitable tool, for
example a screwdriver or hexagonal
socket, to turn the adjuster clockwise
or counterclockwise to adjust the
vertical aim of the headlamp. The
horizontal edge of the brighter light
should touch the horizontal reference
line.
6. Close the hood and switch off the lamps.
Horizontal Aim Adjustment
The horizontal aim of the headlamp beam
on your vehicle is not adjustable.
CHANGING A BULB WARNING: Switch the lamps and
the ignition off. Failure to do so could
result in serious personal injury.
288
2020 Transit Connect (CHC) Canada/United States of America, CG3739en enUSA, Edition date: 201903, First-Printing MaintenanceE199411 E142465 E164485
Page 294 of 509

Direction Indicator
1.
Turn the bulb holder counterclockwise
and remove it.
Note: You cannot separate the bulb from
the bulb holder.
Headlamp Low Beam 1. Remove the cover.
2.
Turn the bulb holder counterclockwise
and remove it.
3. Remove the bulb by pulling it straight out.
Note: Do not touch the glass of the bulb. Headlamp High Beam
1. Remove the cover.
2.
Turn the bulb holder counterclockwise
and remove it.
Note: Do not touch the glass of the bulb.
Side Direction Indicator 1. Turn the lamp clockwise and remove
it.
290
2020 Transit Connect (CHC) Canada/United States of America, CG3739en enUSA, Edition date: 201903, First-Printing Maintenance1
E165475 1
3
2
E171013 1
3
2
E171014 1
E165495
Page 295 of 509

2.
Hold the bulb holder and turn the lamp
counterclockwise and remove it.
3. Remove the bulb by pulling it straight out.
Front Fog Lamps 1. Disconnect the electrical connector.
2.
Turn the bulb holder counterclockwise
and remove it.
Note: Do not touch the glass of the bulb.
Note: You cannot separate the bulb from
the bulb holder. Rear Lamps
1. Remove the screws.
2.
Turn the bulb holders counterclockwise
to remove them.
3. Remove the bulbs by pulling them straight out.
291
2020 Transit Connect (CHC) Canada/United States of America, CG3739en enUSA, Edition date: 201903, First-Printing MaintenanceE165496
2
3 E71062
1
2 1
E165484 23
E165485
Page 296 of 509

Central High Mounted Brake Lamp
These are not serviceable items, see an
authorized dealer if they fail.
License Plate Lamp
These are not serviceable items, see an
authorized dealer if they fail.
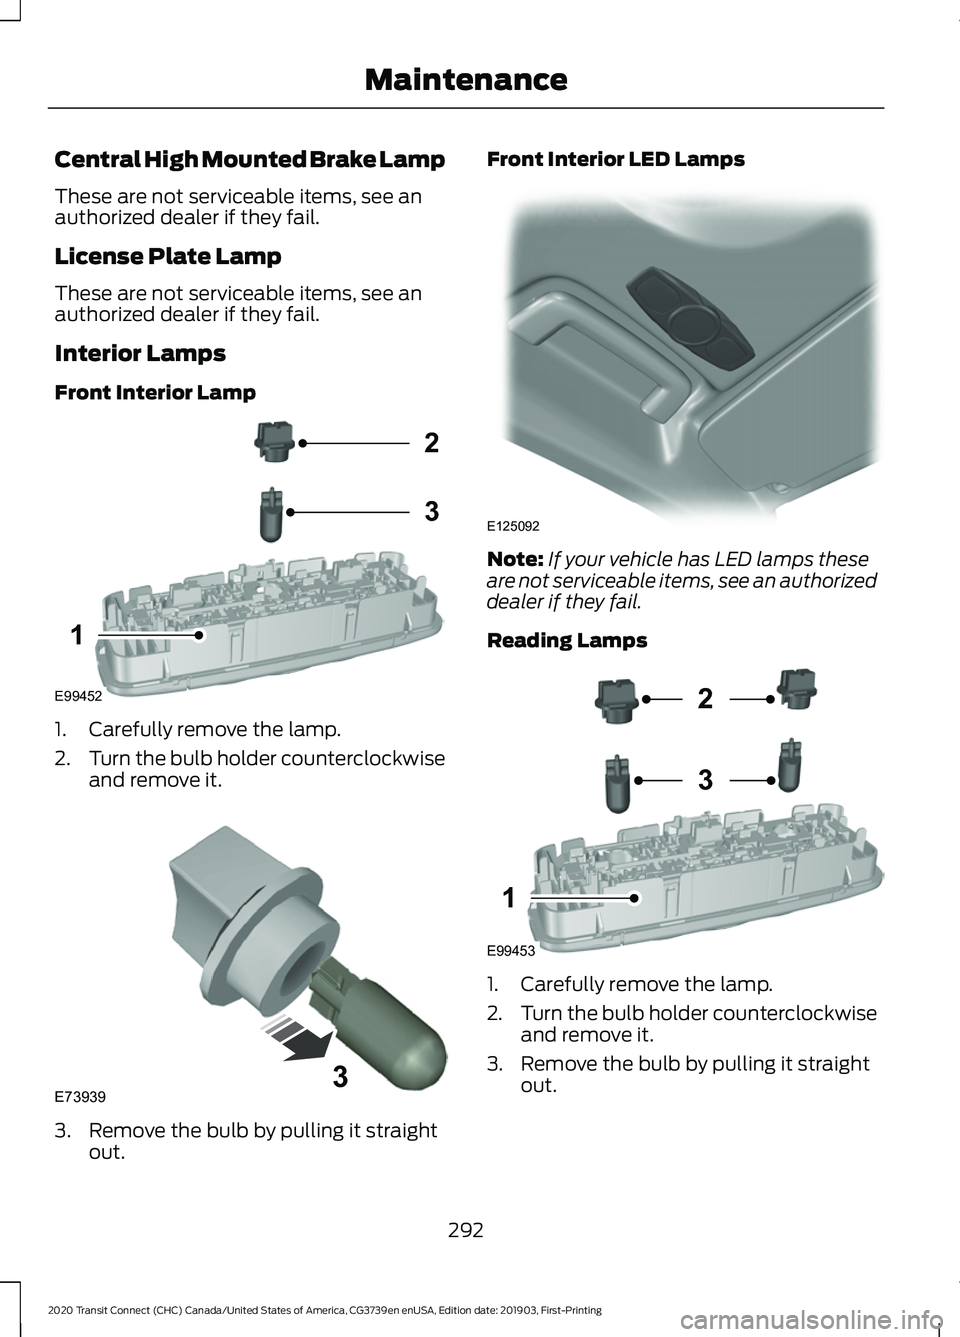
Interior Lamps
Front Interior Lamp
1. Carefully remove the lamp.
2.
Turn the bulb holder counterclockwise
and remove it. 3. Remove the bulb by pulling it straight
out. Front Interior LED Lamps
Note:
If your vehicle has LED lamps these
are not serviceable items, see an authorized
dealer if they fail.
Reading Lamps 1. Carefully remove the lamp.
2.
Turn the bulb holder counterclockwise
and remove it.
3. Remove the bulb by pulling it straight out.
292
2020 Transit Connect (CHC) Canada/United States of America, CG3739en enUSA, Edition date: 201903, First-Printing MaintenanceE99452
2
3
1 E739393 E125092 E99453
2
3
1