2020 FORD POLICE INTERCEPTOR reset
[x] Cancel search: resetPage 230 of 395

Follow your community's regulations and
standards for recycling and disposing of
automotive fluids.
Severe Climates
If you drive in extremely cold climates:
•
It may be necessary to increase the
coolant concentration above 50%.
• A coolant concentration of 60%
provides improved freeze point
protection. Coolant concentrations
above 60% decrease the overheat
protection characteristics of the
coolant and may cause engine
damage.
If you drive in extremely hot climates:
• You can decrease the coolant
concentration to 40%.
• Coolant concentrations below 40%
decrease the freeze and corrosion
protection characteristics of the
coolant and may cause engine
damage.
Vehicles driven year-round in non-extreme
climates should use prediluted coolant for
optimum cooling system and engine
protection.
Coolant Change
At specific mileage intervals, as listed in
the scheduled maintenance information,
the coolant should be changed. Add
prediluted coolant approved to the correct
specification. See Capacities and
Specifications (page 277).
Fail-Safe Cooling
Fail-safe cooling allows you to temporarily
drive your vehicle before any incremental
component damage occurs. The fail-safe
distance depends on ambient
temperature, vehicle load and terrain. How Fail-Safe Cooling Works If the engine begins to overheat,
the coolant temperature gauge
moves toward the red zone:
A warning lamp illuminates and
a message may appear in the
information display.
If the engine reaches a preset
over-temperature condition, the engine
automatically switches to alternating
cylinder operation. Each disabled cylinder
acts as an air pump and cools the engine.
When this occurs, your vehicle still
operates, however:
• Engine power is limited.
• The air conditioning system turns off.
Continued operation increases the engine
temperature, causing the engine to
completely shut down. Your steering and
braking effort increases in this situation.
When the engine temperature cools, you
can re-start the engine. Have your vehicle
checked as soon as possible to minimize
engine damage.
When Fail-Safe Mode Is Activated WARNING:
Fail-safe mode is for
use during emergencies only. Operate
your vehicle in fail-safe mode only as
long as necessary to bring your vehicle
to rest in a safe location and seek
immediate repairs. When in fail-safe
mode, your vehicle will have limited
power, will not be able to maintain
high-speed operation, and may
completely shut down without warning,
potentially losing engine power, power
steering assist, and power brake assist,
which may increase the possibility of a
crash resulting in serious injury.
227
Explorer (CTW) Police, Canada/United States of America, Police, enUSA, Edition date: 201902, Second-Printing Maintenance
Page 236 of 395

4. Disconnect the negative battery cable
terminal.
5. Disconnect the positive battery cable terminal.
6. Remove the battery securing clamp.
7. Remove the battery.
8. To install, reverse the removal procedure.
Note: Before reconnecting the battery,
make sure the ignition remains switched off.
Note: Make sure the battery cable terminals
are fully tightened.
If you disconnect or replace the vehicle
battery, you must reset the following
features:
• Window bounce-back. See Power
Windows (page 75).
• Clock Settings.
• Pre-set radio stations.
Battery Disposal Make sure that you dispose of
old batteries in an
environmentally friendly way.
Seek advice from your local authority
about recycling old batteries.
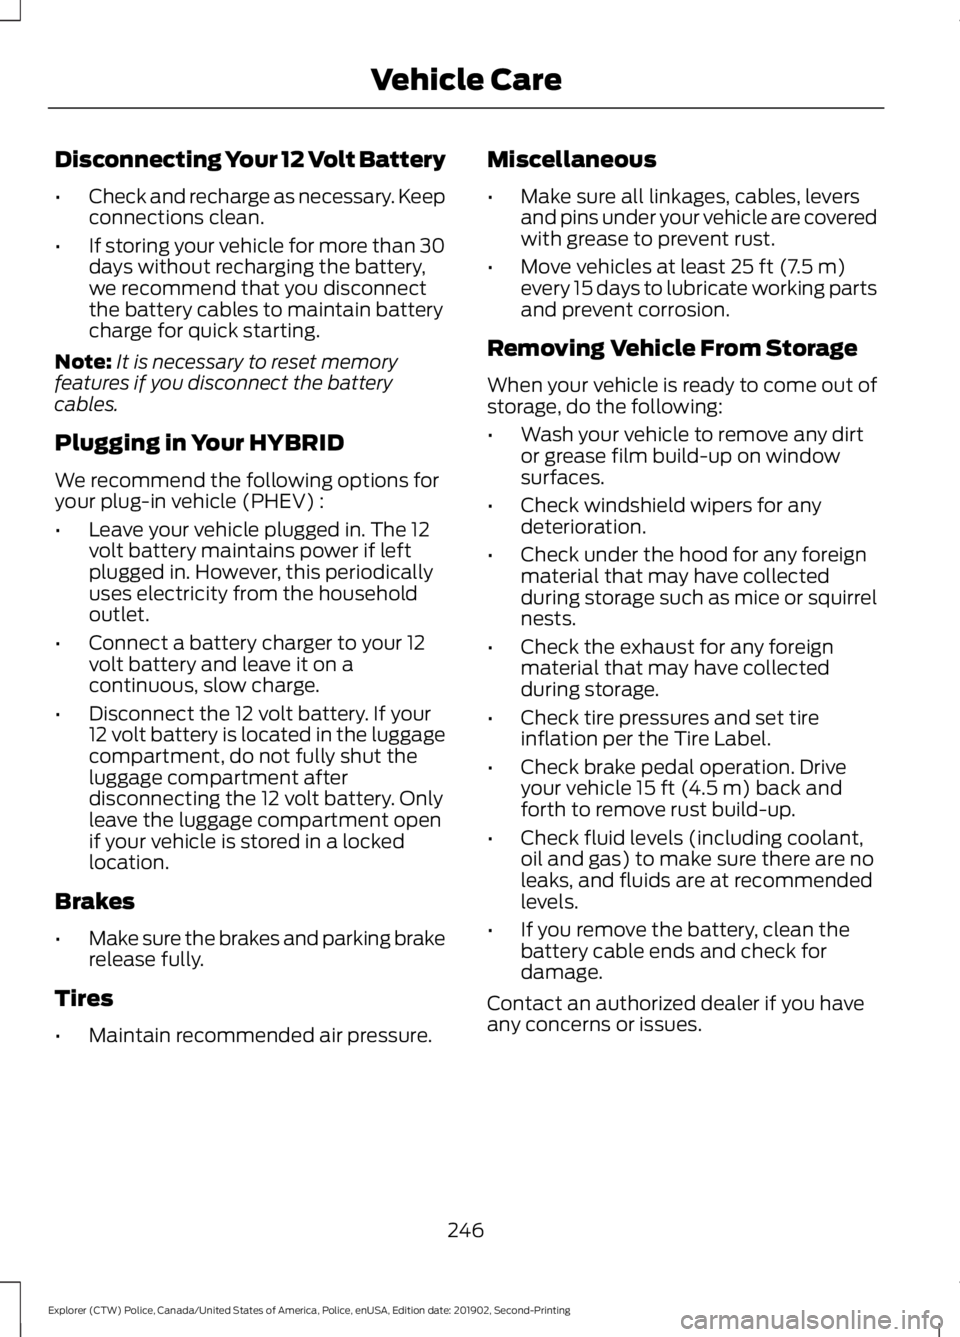
CHECKING THE WIPER
BLADES Run the tip of your fingers over the edge of
the blade to check for roughness. Clean the wiper blades with washer fluid
or water applied with a soft sponge or
cloth.
CHANGING THE FRONT WIPER
BLADES
You can improve poor wiper quality by
cleaning the wiper blades and the
windshield.
Replace the wiper blades at least annually
for optimum performance.
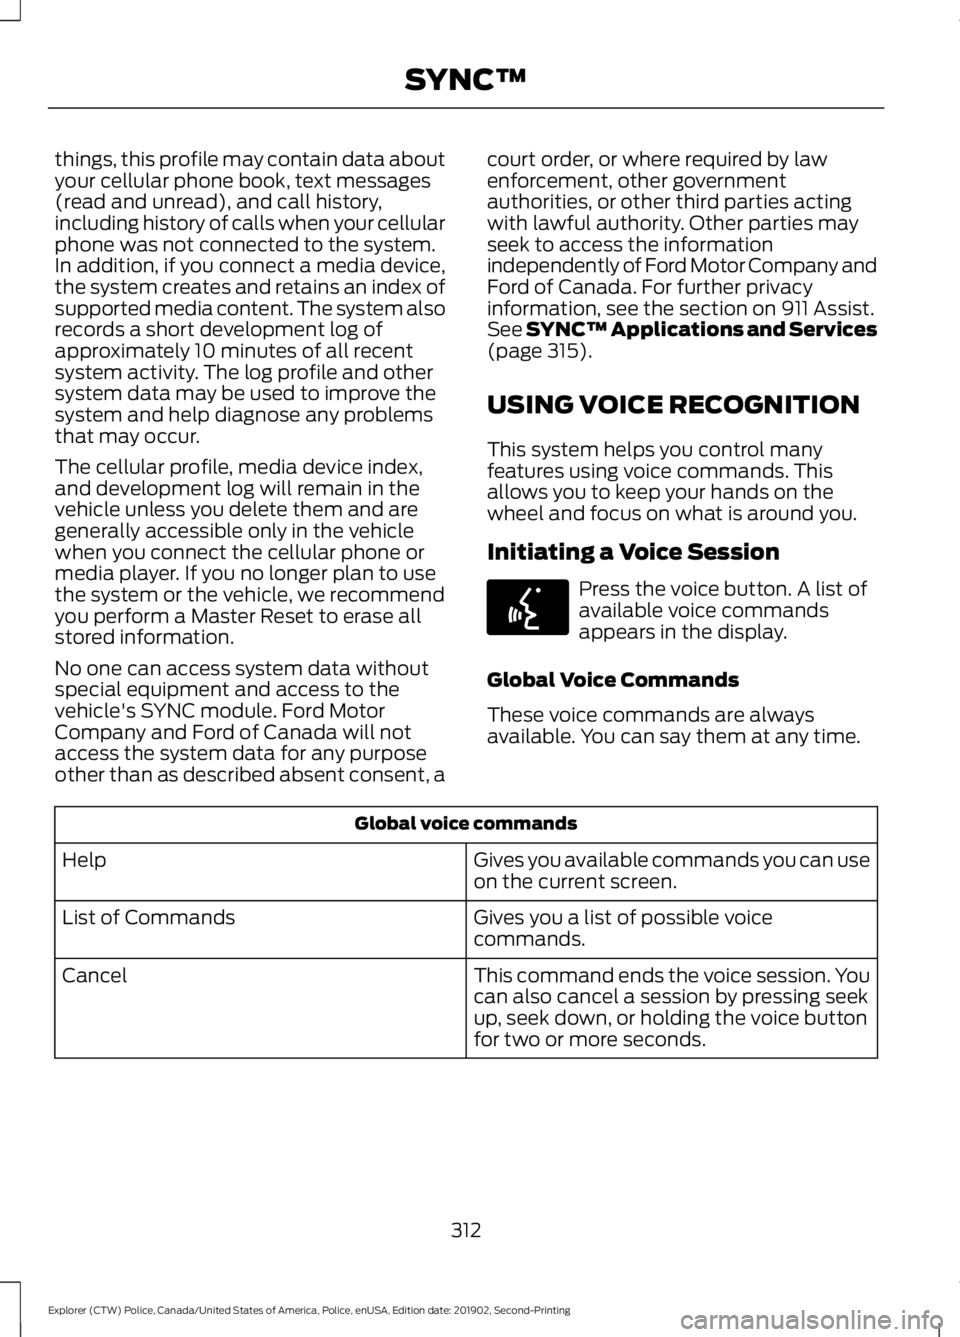
1. Lift the wiper arm and then press the
wiper blade locking buttons together.
Note: Do not hold the wiper blade to lift the
wiper arm.
Note: Make sure that the wiper arm does
not spring back against the glass when the
wiper blade is not attached.
2. Slightly rotate the wiper blade.
3. Remove the wiper blade.
4. To install, reverse the removal procedure.
Note: Make sure that the wiper blade locks
into place.
233
Explorer (CTW) Police, Canada/United States of America, Police, enUSA, Edition date: 201902, Second-Printing MaintenanceE107998 E142463 E129990
1
1 2
Page 249 of 395

Disconnecting Your 12 Volt Battery
•
Check and recharge as necessary. Keep
connections clean.
• If storing your vehicle for more than 30
days without recharging the battery,
we recommend that you disconnect
the battery cables to maintain battery
charge for quick starting.
Note: It is necessary to reset memory
features if you disconnect the battery
cables.
Plugging in Your HYBRID
We recommend the following options for
your plug-in vehicle (PHEV) :
• Leave your vehicle plugged in. The 12
volt battery maintains power if left
plugged in. However, this periodically
uses electricity from the household
outlet.
• Connect a battery charger to your 12
volt battery and leave it on a
continuous, slow charge.
• Disconnect the 12 volt battery. If your
12 volt battery is located in the luggage
compartment, do not fully shut the
luggage compartment after
disconnecting the 12 volt battery. Only
leave the luggage compartment open
if your vehicle is stored in a locked
location.
Brakes
• Make sure the brakes and parking brake
release fully.
Tires
• Maintain recommended air pressure. Miscellaneous
•
Make sure all linkages, cables, levers
and pins under your vehicle are covered
with grease to prevent rust.
• Move vehicles at least 25 ft (7.5 m)
every 15 days to lubricate working parts
and prevent corrosion.
Removing Vehicle From Storage
When your vehicle is ready to come out of
storage, do the following:
• Wash your vehicle to remove any dirt
or grease film build-up on window
surfaces.
• Check windshield wipers for any
deterioration.
• Check under the hood for any foreign
material that may have collected
during storage such as mice or squirrel
nests.
• Check the exhaust for any foreign
material that may have collected
during storage.
• Check tire pressures and set tire
inflation per the Tire Label.
• Check brake pedal operation. Drive
your vehicle
15 ft (4.5 m) back and
forth to remove rust build-up.
• Check fluid levels (including coolant,
oil and gas) to make sure there are no
leaks, and fluids are at recommended
levels.
• If you remove the battery, clean the
battery cable ends and check for
damage.
Contact an authorized dealer if you have
any concerns or issues.
246
Explorer (CTW) Police, Canada/United States of America, Police, enUSA, Edition date: 201902, Second-Printing Vehicle Care
Page 270 of 395

Customer action required
Possible cause
Low tire pressure
warning light
On vehicles with different front and rear
tire pressures, the system must be
retrained following every tire rotation.
See Tire Pressure Monitoring System
Reset procedure later in this section.
Tire rotation without
sensor training
Repair the damaged road wheel and tire
assembly and reinstall it on the vehicle
to restore system function. For a
description on how the system functions,
see When Your Temporary Spare Tire
is Installed
in this section.
Spare tire in use
Flashing warning light
If the tires are properly inflated and the
spare tire is not in use but the light
remains on, contact your authorized
dealer as soon as possible.
TPMS malfunction
When Inflating Your Tires WARNING:
Do not use the tire
pressure displayed in the information
display as a tire pressure gauge. Failure
to follow this instruction could result in
personal injury or death.
When putting air into your tires (such as at
a gas station or in your garage), the tire
pressure monitoring system will not
respond immediately to the air added to
your tires.
It could take up to two minutes of driving
over 20 mph (32 km/h) for the light to turn
off after you have filled your tires to the
recommended inflation pressure. How Temperature Affects Your Tire
Pressure
The tire pressure monitoring system
monitors tire pressure in each pneumatic
tire. While driving in a normal manner, a
typical passenger tire inflation pressure
could increase about
2
–4 psi (14– 28 kPa)
from a cold start situation. If the vehicle is
stationary overnight with the outside
temperature significantly lower than the
daytime temperature, the tire pressure
could decrease about
3 psi (21 kPa) for a
drop of 30°F (17°C) in ambient
temperature. This lower pressure value
could be detected by the tire pressure
monitoring system as being significantly
lower than the recommended inflation
pressure and activate the system warning
light for low tire pressure. If the low tire
pressure warning light is on, visually check
each tire to verify that no tire is flat. If one
or more tires are flat, repair as necessary.
267
Explorer (CTW) Police, Canada/United States of America, Police, enUSA, Edition date: 201902, Second-Printing Wheels and Tires
Page 271 of 395

Check the air pressure in the road tires. If
any tire is under-inflated, carefully drive
the vehicle to the nearest location where
air can be added to the tires. Inflate all the
tires to the recommended inflation
pressure.
Tire Pressure Monitoring System Reset
Procedure
WARNING: To determine the
required pressure(s) for your vehicle, see
the Safety Compliance Certification
Label (on the door hinge pillar,
door-latch post or the door edge that
meets the door-latch post, next to the
driver seat) or the Tire Label on the
B-Pillar or the edge of the driver door.
Note: You need to perform the tire pressure
monitoring system reset procedure after
each tire rotation.
To provide the vehicle's load carrying
capability, some vehicles require different
recommended tire pressures in the front
tires as compared to the rear tires. The tire
pressure monitoring system equipped on
these vehicles is designed to illuminate the
low tire pressure warning light at two
different pressures; one for the front tires
and one for the rear tires.
Since tires need to be rotated to provide
consistent performance and maximum tire
life, the tire pressure monitoring system
needs to know when the tires are rotated
to determine which set of tires are on the
front and which are on the rear. With this
information, the system can detect and
properly warn of low tire pressures.
System reset tips: •
To reduce the chances of interference
from another vehicle, perform the
system reset procedure at least
3 ft
(1 m) away from another Ford Motor
Company vehicle undergoing the
system reset procedure at the same
time.
• Do not wait more than two minutes
between resetting each tire sensor or
the system can time-out and you have
to repeat the entire procedure on all
four wheels.
• A double horn sounds indicating the
need to repeat the procedure.
Performing the System Reset Procedure
Read the entire procedure before
attempting.
1. Drive the vehicle above
20 mph
(32 km/h) for at least two minutes,
then park in a safe location where you
can easily get to all four tires and have
access to an air pump.
2. Place the ignition in the off position and
keep the key in the ignition.
3. Cycle the ignition to the on position with the engine off.
4. Turn the hazard flashers on then off three times. You must accomplish this
within 10 seconds. If you successfully
enter the reset mode, the horn sounds
once, the system indicator flashes and
a message shows in the information
display. If this does not occur, please
try again starting at step 2. If after
repeated attempts to enter the reset
mode, the horn does not sound, the
system indicator does not flash and no
message shows in the information
display, seek service from your
authorized dealer.
268
Explorer (CTW) Police, Canada/United States of America, Police, enUSA, Edition date: 201902, Second-Printing Wheels and Tires
Page 272 of 395

5. Train the tire pressure monitoring
system sensors in the tires using the
following system reset sequence
starting with the left front tire in the
following clockwise order: Left front -
driver side front tire, Right front -
passenger side front tire, Right rear -
passenger side rear tire, Left rear -
driver side rear tire.
6. Remove the valve cap from the valve stem on the left front tire. Decrease the
air pressure until the horn sounds.
Note: The single horn tone confirms that
the sensor identification code has been
learned by the module for this position. If a
double horn is heard, the reset procedure
was unsuccessful, and you must repeat it.
7. Remove the valve cap from the valve stem on the right front tire. Decrease
the air pressure until the horn sounds.
8. Remove the valve cap from the valve stem on the right rear tire. Decrease the
air pressure until the horn sounds.
9. Remove the valve cap from the valve stem on the left rear tire. Decrease the
air pressure until the horn sounds.
Training is complete after the horn
sounds for the last tire trained, driver
side rear tire, the system indicator
stops flashing, and a message shows
in the information display.
10. Turn the ignition off. If two short horn
beeps are heard, the reset procedure
was unsuccessful and you must
repeat it. If after repeating the
procedure and two short beeps are
heard when the ignition is turned to
off, seek assistance from your
authorized dealer. 11.
Set all four tires to the recommended
air pressure as indicated on the
Safety Compliance Certification
Label, affixed to either the door hinge
pillar, door-latch post, or the door
edge that meets the door-latch post,
next to the driver seating position or
Tire Label located on the B-Pillar or
the edge of the driver door.
CHANGING A ROAD WHEEL WARNING: If the tire pressure
monitor sensor becomes damaged it
may not function.
Note: You should only use tire sealants in
roadside emergencies as they may cause
damage to the tire pressure monitoring
system sensor.
Note: The tire pressure monitoring system
indicator light illuminates when the spare
tire is in use. To restore the full function of
the monitoring system, all road wheels
equipped with tire pressure monitoring
sensors must be mounted on the vehicle.
If you get a flat tire when driving, do not
apply the brake heavily. Instead, gradually
decrease your speed. Hold the steering
wheel firmly and slowly move to a safe
place on the side of the road.
Have a flat serviced by an authorized
dealer in order to prevent damage to the
tire pressure monitoring system sensors.
See
Tire Pressure Monitoring System
(page 264). Replace the spare tire with a
road tire as soon as possible. During
repairing or replacing of the flat tire, have
the authorized dealer inspect the tire
pressure monitoring system sensor for
damage.
269
Explorer (CTW) Police, Canada/United States of America, Police, enUSA, Edition date: 201902, Second-Printing Wheels and Tires
Page 315 of 395

things, this profile may contain data about
your cellular phone book, text messages
(read and unread), and call history,
including history of calls when your cellular
phone was not connected to the system.
In addition, if you connect a media device,
the system creates and retains an index of
supported media content. The system also
records a short development log of
approximately 10 minutes of all recent
system activity. The log profile and other
system data may be used to improve the
system and help diagnose any problems
that may occur.
The cellular profile, media device index,
and development log will remain in the
vehicle unless you delete them and are
generally accessible only in the vehicle
when you connect the cellular phone or
media player. If you no longer plan to use
the system or the vehicle, we recommend
you perform a Master Reset to erase all
stored information.
No one can access system data without
special equipment and access to the
vehicle's SYNC module. Ford Motor
Company and Ford of Canada will not
access the system data for any purpose
other than as described absent consent, a
court order, or where required by law
enforcement, other government
authorities, or other third parties acting
with lawful authority. Other parties may
seek to access the information
independently of Ford Motor Company and
Ford of Canada. For further privacy
information, see the section on 911 Assist.
See SYNC™ Applications and Services
(page 315).
USING VOICE RECOGNITION
This system helps you control many
features using voice commands. This
allows you to keep your hands on the
wheel and focus on what is around you.
Initiating a Voice Session Press the voice button. A list of
available voice commands
appears in the display.
Global Voice Commands
These voice commands are always
available. You can say them at any time. Global voice commands
Gives you available commands you can use
on the current screen.
Help
Gives you a list of possible voice
commands.
List of Commands
This command ends the voice session. You
can also cancel a session by pressing seek
up, seek down, or holding the voice button
for two or more seconds.
Cancel
312
Explorer (CTW) Police, Canada/United States of America, Police, enUSA, Edition date: 201902, Second-Printing SYNC™E142599
Page 323 of 395

Phone issues
Possible solution(s)
Possible cause(s)
Issue
Review your phone's manualabout audio adjustments.
The audio control settings
on your phone may be
affecting SYNC perform- ance.
There is excessive back-
ground noise during a phone call.
Try turning off the device,resetting the device,
removing the device's
battery, then trying again.
This may be a possible
phone malfunction.
During a call, I can hear the
other person but theycannot hear me.
Go to the website to reviewyour phone's compatibility.
This is a phone-dependent feature.
SYNC is not able to down- load my phonebook. Try turning off the device,
resetting the device orremoving the device's
battery, then trying again.
Try pushing your phonebook contacts to SYNC by usingthe Add Contacts feature.
This may be a possible
phone malfunction. Use the SYNCmyphone
feature available on the website.
Try pushing your phonebook contacts to SYNC by usingthe Add Contacts feature.
This may be a limitation on your phone's capability.
The system says Phonebook
Downloaded but the
phonebook in SYNC is
empty or missing contacts. If the missing contacts are
stored on your SIM card, try moving them to the device memory.
Remove any pictures or
special ring tones associ- ated with the missing contact.
320
Explorer (CTW) Police, Canada/United States of America, Police, enUSA, Edition date: 201902, Second-Printing SYNC™