2020 FORD POLICE INTERCEPTOR brake
[x] Cancel search: brakePage 38 of 395

Pregnant women should always wear their
seatbelt. Position the lap belt portion of a
combination lap and shoulder belt low
across the hips below the belly and worn
as tight as comfort allows. Position the
shoulder belt to cross the middle of the
shoulder and the center of the chest.
Seatbelt Locking Modes
WARNING: If your vehicle is
involved in a crash, have the seatbelts
and associated components inspected
as soon as possible. Failure to follow this
instruction could result in personal injury
or death.
All safety restraints in the vehicle are
combination lap and shoulder belts. The
driver seatbelt has the first type of locking
mode, and the front outboard passenger
and rear seat seatbelts have both types of
locking modes described as follows:
Vehicle Sensitive Mode
This is the normal retractor mode, which
allows free shoulder belt length
adjustment to your movements and
locking in response to vehicle movement.
For example, if the driver brakes suddenly
or turns a corner sharply, or the vehicle
receives an impact of about
5 mph
(8 km/h) or more, the combination
seatbelts lock to help reduce forward
movement of the driver and passengers.
In addition, the design of the retractor is to
lock if you pull the webbing out too quickly.
If the seatbelt retractor locks, slowly lower
the height adjuster to allow the seatbelt
to retract. If the retractor does not unlock,
pull the seatbelt out slowly then feed a small length of webbing back toward the
stowed position. For rear seatbelts, recline
the rear seat backrest or push the seat
backrest cushion away from the seatbelt.
Feed a small length of webbing back
toward the stowed position.
Automatic Locking Mode
In this mode, the shoulder belt
automatically pre-locks. The belt retracts
to remove any slack in the shoulder belt.
The automatic locking mode is not
available on the driver seatbelt.
When to Use the Automatic Locking
Mode
Use this mode any time you install a child
safety seat, except a booster, in passenger
front or rear seating positions. Properly
restrain children 12 years old and under in
a rear seating position whenever possible.
See
Child Safety (page 20).
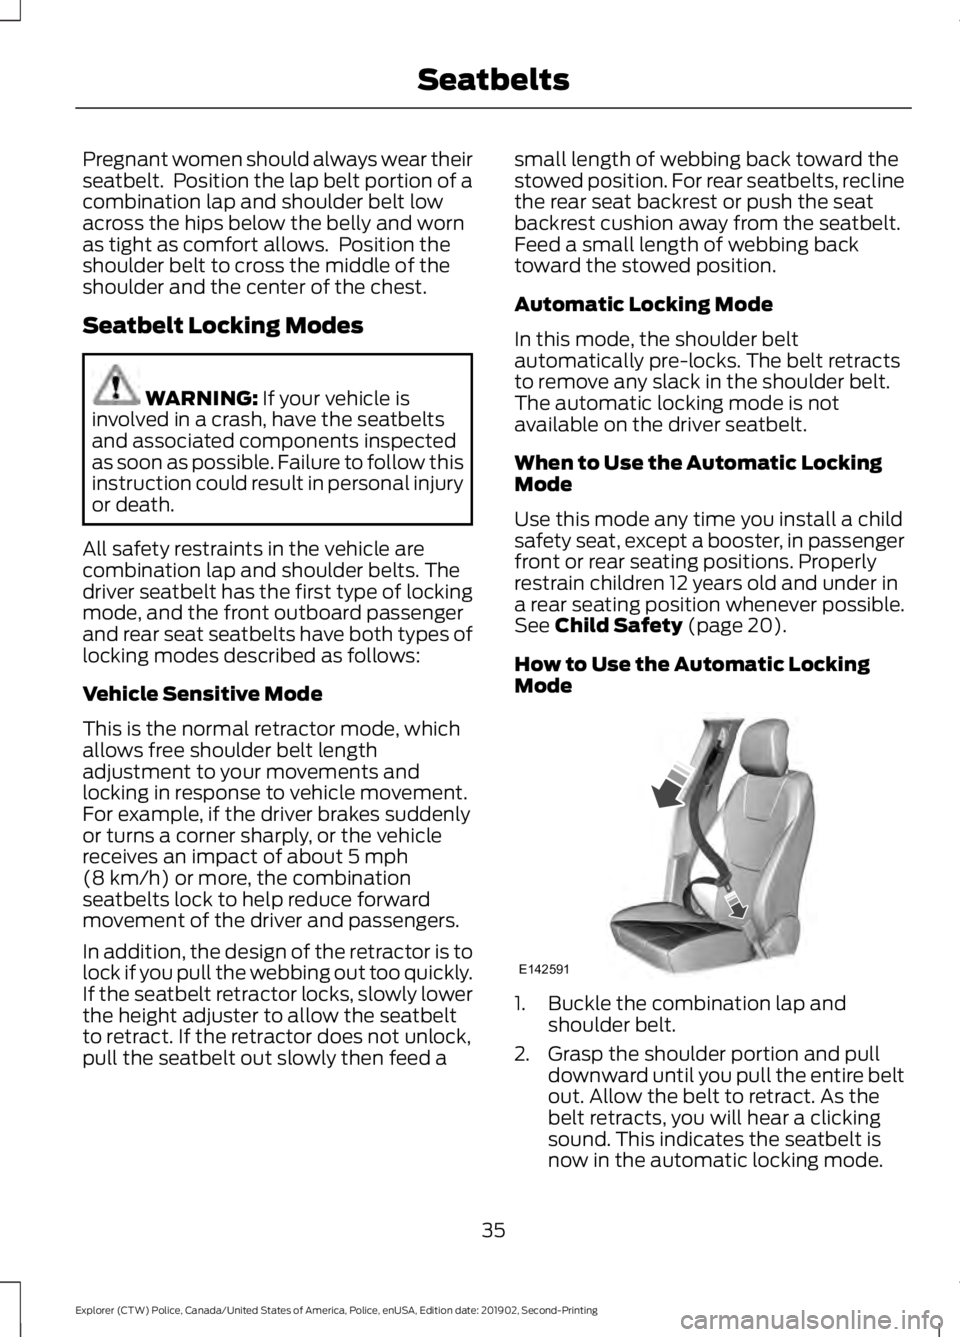
How to Use the Automatic Locking
Mode 1. Buckle the combination lap and
shoulder belt.
2. Grasp the shoulder portion and pull downward until you pull the entire belt
out. Allow the belt to retract. As the
belt retracts, you will hear a clicking
sound. This indicates the seatbelt is
now in the automatic locking mode.
35
Explorer (CTW) Police, Canada/United States of America, Police, enUSA, Edition date: 201902, Second-Printing SeatbeltsE142591
Page 41 of 395

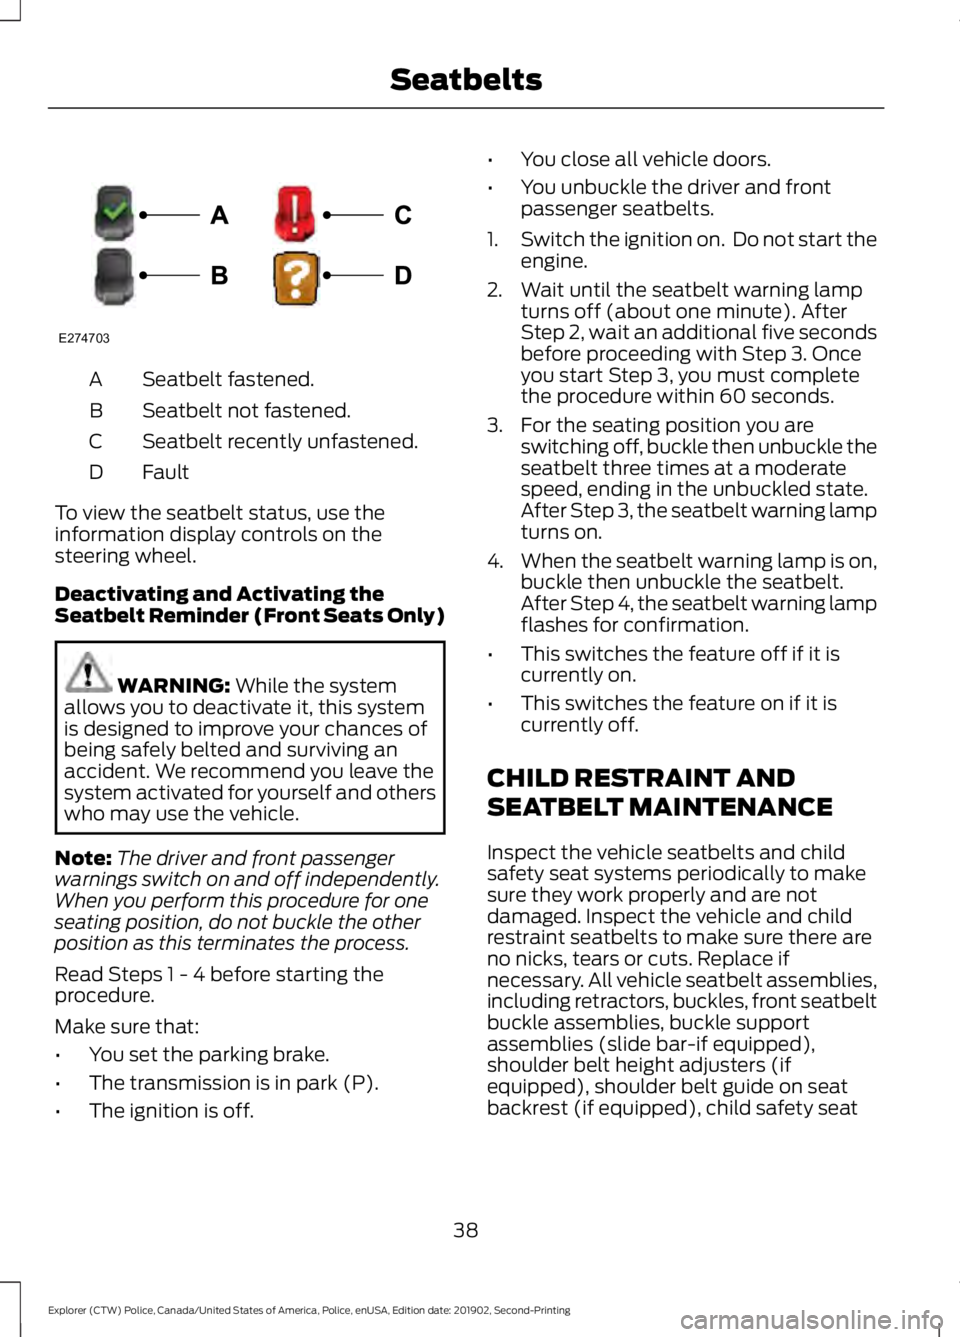
Seatbelt fastened.
A
Seatbelt not fastened.
B
Seatbelt recently unfastened.
C
Fault
D
To view the seatbelt status, use the
information display controls on the
steering wheel.
Deactivating and Activating the
Seatbelt Reminder (Front Seats Only) WARNING: While the system
allows you to deactivate it, this system
is designed to improve your chances of
being safely belted and surviving an
accident. We recommend you leave the
system activated for yourself and others
who may use the vehicle.
Note: The driver and front passenger
warnings switch on and off independently.
When you perform this procedure for one
seating position, do not buckle the other
position as this terminates the process.
Read Steps 1 - 4 before starting the
procedure.
Make sure that:
• You set the parking brake.
• The transmission is in park (P).
• The ignition is off. •
You close all vehicle doors.
• You unbuckle the driver and front
passenger seatbelts.
1. Switch the ignition on. Do not start the
engine.
2. Wait until the seatbelt warning lamp turns off (about one minute). After
Step 2, wait an additional five seconds
before proceeding with Step 3. Once
you start Step 3, you must complete
the procedure within 60 seconds.
3. For the seating position you are switching off, buckle then unbuckle the
seatbelt three times at a moderate
speed, ending in the unbuckled state.
After Step 3, the seatbelt warning lamp
turns on.
4. When the seatbelt warning lamp is on,
buckle then unbuckle the seatbelt.
After Step 4, the seatbelt warning lamp
flashes for confirmation.
• This switches the feature off if it is
currently on.
• This switches the feature on if it is
currently off.
CHILD RESTRAINT AND
SEATBELT MAINTENANCE
Inspect the vehicle seatbelts and child
safety seat systems periodically to make
sure they work properly and are not
damaged. Inspect the vehicle and child
restraint seatbelts to make sure there are
no nicks, tears or cuts. Replace if
necessary. All vehicle seatbelt assemblies,
including retractors, buckles, front seatbelt
buckle assemblies, buckle support
assemblies (slide bar-if equipped),
shoulder belt height adjusters (if
equipped), shoulder belt guide on seat
backrest (if equipped), child safety seat
38
Explorer (CTW) Police, Canada/United States of America, Police, enUSA, Edition date: 201902, Second-Printing SeatbeltsE274703
Page 75 of 395

INSTRUMENT LIGHTING
DIMMER
The instrument lighting dimmer buttons
are on the lighting control.
Repeatedly press one of the
buttons to adjust the brightness.
DAYTIME RUNNING LAMPS -
VEHICLES WITH:
CONFIGURABLE DAYTIME
RUNNING LAMPS WARNING: The daytime running
lamps system does not activate the rear
lamps and may not provide adequate
lighting during low visibility driving
conditions. Make sure you switch the
headlamps on, as appropriate, during all
low visibility conditions. Failure to do so
may result in a crash.
Switch the daytime running lamps on or
off using the touchscreen:
1. Select
Settings.
2. Select
Vehicle.
3. Select
Lighting.
The daytime running lamps turn on when:
1. The lamps are on in the information display.
2. You switch the ignition on.
3. The transmission is not in park (P) for vehicles with automatic transmissions
or you release the parking brake for
vehicles with manual transmissions. 4.
The lighting control is in the autolamps
position.
5. The headlamps are off.
The other lighting control switch positions
do not turn on the daytime running lamps.
If the daytime running lamps are off in the
information display, the lamps stay off in
all switch positions.
DAYTIME RUNNING LAMPS -
VEHICLES WITH: DAYTIME
RUNNING LAMPS (DRL) WARNING:
The daytime running
lamps system does not activate the rear
lamps and may not provide adequate
lighting during low visibility driving
conditions. Make sure you switch the
headlamps on, as appropriate, during all
low visibility conditions. Failure to do so
may result in a crash.
The system turns the lamps on in daylight
conditions.
To switch the system on, switch the
lighting control to any position except
headlamps.
FRONT FOG LAMPS
(IF EQUIPPED)
Switching the Front Fog Lamps On
or Off
Only switch the front fog lamps on during
reduced visibility.
72
Explorer (CTW) Police, Canada/United States of America, Police, enUSA, Edition date: 201902, Second-Printing LightingE291299 E296433
Page 83 of 395

Low Fuel Reminder
A low fuel level reminder displays and
sounds when the distance to empty
reaches 75 mi (120 km) to empty for
MyKey, and at 50 mi (80 km), 25 mi
(40 km), 10 mi (20 km) and 0 mi (0 km)
for all vehicle keys.
Note: The low fuel reminder can appear at
different fuel gauge positions depending on
fuel economy conditions. This variation is
normal.
Engine Coolant Temperature
Gauge
Indicates engine coolant temperature. At
normal operating temperature, the level
indicator will be in the normal range. If the
engine coolant temperature exceeds the
normal range, stop your vehicle as soon as
safely possible, switch off the engine and
let the engine cool. WARNING:
Do not remove the
coolant reservoir cap when the engine is
on or the cooling system is hot. Wait 10
minutes for the cooling system to cool
down. Cover the coolant reservoir cap
with a thick cloth to prevent the
possibility of scalding and slowly remove
the cap. Failure to follow this instruction
could result in personal injury.
WARNING LAMPS AND
INDICATORS
The following warning lamps and
indicators alert you to a vehicle condition
that may become serious. Some lamps
illuminate when you start your vehicle to
make sure they work. If any lamps remain
on after starting your vehicle, refer to the
respective system warning lamp for further
information. Note:
Some warning indicators appear in
the information display and function the
same as a warning lamp, but do not display
when you start your vehicle.
Anti-Lock Braking System If it illuminates when you are
driving, this indicates a system
error. You continue to have the
normal braking (without ABS) unless the
brake system warning lamp also
illuminates. Have the system checked by
an authorized dealer.
Battery If it illuminates while driving, it
indicates a system error. Switch
off all unnecessary electrical
equipment and have the system checked
by an authorized dealer immediately.
Blind Spot Monitor
(If Equipped) Illuminates when you switch this
feature off or in conjunction with
a message. See
Blind Spot
Information System (page 168).
Brake System Warning Lamp WARNING:
Driving your vehicle
with the warning lamp on is dangerous.
A significant decrease in braking
performance may occur. It may take you
longer to stop your vehicle. Have your
vehicle checked as soon as possible.
Driving extended distances with the
parking brake engaged can cause brake
failure and the risk of personal injury.
Note: Indicators vary depending on region.
This lamp is a dual function lamp and
illuminates when:
80
Explorer (CTW) Police, Canada/United States of America, Police, enUSA, Edition date: 201902, Second-Printing Instrument Cluster E151262
Page 84 of 395

•
You apply the parking brake with the
ignition on.
• Your vehicle has a brake fault or low
brake fluid level, regardless of parking
brake position. If the lamp illuminates when you
are moving, you may have the
parking brake applied. Make sure
the parking brake is off. Have
your vehicle checked as soon as
possible if the lamp continues to
illuminate.
Cruise Control Illuminates when you switch this
feature on.
Deep Snow and Sand Illuminates when you switch this
feature on.
Direction Indicator Illuminates when you switch on
the left or right direction
indicator or the hazard flasher. If
the indicators stay on or flash faster, check
for a burned out bulb. See Changing a
Bulb (page 235).
Door Ajar Illuminates when the ignition is
on and any door is not
completely closed.
Electric Park Brake Illuminates or flashes when the
electric parking brake has a
system error. See
Electric
Parking Brake (page 153). Engine or Motor Coolant
Temperature Illuminates when the engine
coolant temperature is high.
Stop your vehicle as soon as
possible, switch off the engine and let it
cool. See
Engine Coolant Check (page
225).
Engine Oil If it illuminates with the engine
running or when you are driving,
this indicates a system error.
Stop your vehicle as soon as it is safe to
do so and switch the engine off. Check the
engine oil level. See
Engine Oil Check
(page 223).
Note: Do not resume your journey if it
illuminates despite the level being correct.
Have the system checked by an authorized
dealer immediately.
Fasten Seatbelt Illuminates and a tone sounds
to remind you to fasten your
seatbelt. See
Seatbelt
Reminder (page 37).
Front Airbag If it fails to illuminate when you
start your vehicle, continues to
flash or remains on, it indicates
there is a system error. Have the system
checked by an authorized dealer.
Front Fog Lamps
(If Equipped) Illuminates when you switch the
front fog lamps on.
81
Explorer (CTW) Police, Canada/United States of America, Police, enUSA, Edition date: 201902, Second-Printing Instrument ClusterE270480 E71340 E295420 E146190 E71880 E67017
Page 87 of 395

Parking Brake On Warning Chime
Sounds when you have left the parking
brake on and drive your vehicle. If the
warning chime remains on after you have
released the parking brake, have the
system checked by your authorized dealer
immediately.
Automatic Transmission Warning
Chime
Sounds when you have not moved the
transmission selector lever to position P.
A message will be shown in the display.
84
Explorer (CTW) Police, Canada/United States of America, Police, enUSA, Edition date: 201902, Second-Printing Instrument Cluster
Page 91 of 395

Settings
Oil Life
Brake Fluid Life
Tire Pressure
INFORMATION MESSAGES
Note: Depending on your vehicle options
and instrument cluster type, not all of the
messages will display or be available.
Certain messages may be abbreviated or
shortened depending upon which cluster
type you have. Press the OK button to acknowledge and
remove some messages from the
information display. Other messages will
be removed automatically after a short
time.
Certain messages need to be confirmed
before you can access the menus.
AWD Action
Message
The all wheel drive system has automatically disabled itselfdue to the system overheating.
AWD Temporarily
Disabled
The all wheel drive system is locking up the torque transferclutch to help reduce clutch temperature.
AWD Temporarily
Locked
Displays when the system automatically disables to protect
itself. This may be caused by operating the vehicle with a mini spare tire installed, if the system detects dissimilar size tires,
or if there is an issue with another vehicle system preventing AWD operation. The system resumes normal operation and
clears this message after you cycle the ignition on and off and drive a short distance with the road tire re-installed or after the other vehicle system issues are resolved.
AWD OFF
Displays after the system cools and the all wheel drive systemresumes normal function.
AWD Restored
88
Explorer (CTW) Police, Canada/United States of America, Police, enUSA, Edition date: 201902, Second-Printing Information DisplaysE222314
Page 93 of 395

Battery and Charging System (12 volt)
Action
Message
The charging system needs servicing. If the warning stays on
or continues to come on, contact an authorized dealer as soon as possible.
Check Charging System
The charging system needs servicing. If the warning stays on
or continues to come on, contact an authorized dealer as soon as possible.
Charging System Service
Soon
The charging system needs servicing. Contact an authorized dealer as soon as possible.
Charging System Service
Now
The battery management system determines that the 12V
battery is at a low state of charge. Start the engine to charge
the battery or charge the battery using an aftermarket battery charger. This message clears once you restart your vehicle and the battery state of charge has recovered.
Battery State of Charge
Low
The battery management system determines that the batteryis at a low state of charge. Turn the ignition off as soon as
possible to protect the battery. This message will clear once the vehicle has been started and the battery state of charge has recovered. Turning off unnecessary electrical loads will allow faster battery state-of-charge recovery.
Turn Power Off To Save
Battery
Displayed when the battery management system detects an
extended low-voltage condition. Various vehicle features willbe disabled to help preserve the battery. Turn off as many of the electrical loads as soon as possible to improve systemvoltage. If the system voltage has recovered, the disabled features will operate again as normal.
Low Battery Features
Temporarily Turned Off
Blind Spot Information and Cross Traffic Alert System Action
Message
A system error has occurred. Contact an authorized dealer as soon as possible.
Blind Spot System Fault
The system sensors are blocked. See Blind Spot Informa-
tion System (page 168).
Blind Spot Not Available
Sensor Blocked See Manual
The system detects a vehicle and automatically applied the brakes.
Cross Traffic Alert
Applying Brakes
90
Explorer (CTW) Police, Canada/United States of America, Police, enUSA, Edition date: 201902, Second-Printing Information Displays