2020 FORD POLICE INTERCEPTOR engine
[x] Cancel search: enginePage 248 of 395

Do not clean the wheels when they are hot.
Note:
Some car washes could damage
wheel rims and covers.
Note: Using non-recommended cleaners,
harsh cleaning products, chrome wheel
cleaners or abrasive materials could
damage wheel rims and covers.
VEHICLE STORAGE
If you plan on storing your vehicle for 30
days or more, read the following
maintenance recommendations to make
sure your vehicle stays in good operating
condition.
We engineer and test all motor vehicles
and their components for reliable, regular
driving. Under various conditions,
long-term storage may lead to degraded
engine performance or failure unless you
use specific precautions to preserve engine
components.
General
• Store all vehicles in a dry, ventilated
place.
• Protect from sunlight, if possible.
• If vehicles are stored outside, they
require regular maintenance to protect
against rust and damage.
Body
• Wash your vehicle thoroughly to
remove dirt, grease, oil, tar or mud from
exterior surfaces, rear-wheel housing
and the underside of front fenders.
• Periodically wash your vehicle if it is
stored in exposed locations.
• Touch-up exposed or primed metal to
prevent rust. •
Cover chrome and stainless steel parts
with a thick coat of auto wax to prevent
discoloration. Re-wax as necessary
when you wash your vehicle.
• Lubricate all hood, door and luggage
compartment hinges and latches with
a light grade oil.
• Cover interior trim to prevent fading.
• Keep all rubber parts free from oil and
solvents.
Engine
• Change the engine oil and filter prior to
storage because used engine oil
contains contaminates which may
cause engine damage.
• Start the engine every 15 days for a
minimum of 15 minutes. Run at fast
idle with the climate controls set to
defrost until the engine reaches normal
operating temperature.
• With your foot on the brake, shift
through all the gears while the engine
is running.
• We recommend that you change the
engine oil before you use your vehicle
again.
Fuel system
• Fill the fuel tank with high-quality fuel
until the first automatic shutoff of the
fuel pump nozzle.
Cooling system
• Protect against freezing temperatures.
• When removing your vehicle from
storage, check coolant fluid level.
Confirm that there are no cooling
system leaks and that fluid is at the
recommended level.
245
Explorer (CTW) Police, Canada/United States of America, Police, enUSA, Edition date: 201902, Second-Printing Vehicle Care
Page 271 of 395

Check the air pressure in the road tires. If
any tire is under-inflated, carefully drive
the vehicle to the nearest location where
air can be added to the tires. Inflate all the
tires to the recommended inflation
pressure.
Tire Pressure Monitoring System Reset
Procedure
WARNING: To determine the
required pressure(s) for your vehicle, see
the Safety Compliance Certification
Label (on the door hinge pillar,
door-latch post or the door edge that
meets the door-latch post, next to the
driver seat) or the Tire Label on the
B-Pillar or the edge of the driver door.
Note: You need to perform the tire pressure
monitoring system reset procedure after
each tire rotation.
To provide the vehicle's load carrying
capability, some vehicles require different
recommended tire pressures in the front
tires as compared to the rear tires. The tire
pressure monitoring system equipped on
these vehicles is designed to illuminate the
low tire pressure warning light at two
different pressures; one for the front tires
and one for the rear tires.
Since tires need to be rotated to provide
consistent performance and maximum tire
life, the tire pressure monitoring system
needs to know when the tires are rotated
to determine which set of tires are on the
front and which are on the rear. With this
information, the system can detect and
properly warn of low tire pressures.
System reset tips: •
To reduce the chances of interference
from another vehicle, perform the
system reset procedure at least
3 ft
(1 m) away from another Ford Motor
Company vehicle undergoing the
system reset procedure at the same
time.
• Do not wait more than two minutes
between resetting each tire sensor or
the system can time-out and you have
to repeat the entire procedure on all
four wheels.
• A double horn sounds indicating the
need to repeat the procedure.
Performing the System Reset Procedure
Read the entire procedure before
attempting.
1. Drive the vehicle above
20 mph
(32 km/h) for at least two minutes,
then park in a safe location where you
can easily get to all four tires and have
access to an air pump.
2. Place the ignition in the off position and
keep the key in the ignition.
3. Cycle the ignition to the on position with the engine off.
4. Turn the hazard flashers on then off three times. You must accomplish this
within 10 seconds. If you successfully
enter the reset mode, the horn sounds
once, the system indicator flashes and
a message shows in the information
display. If this does not occur, please
try again starting at step 2. If after
repeated attempts to enter the reset
mode, the horn does not sound, the
system indicator does not flash and no
message shows in the information
display, seek service from your
authorized dealer.
268
Explorer (CTW) Police, Canada/United States of America, Police, enUSA, Edition date: 201902, Second-Printing Wheels and Tires
Page 274 of 395

When driving with the full-size dissimilar
spare wheel and tire assembly additional
caution should be given to:
•
Towing a trailer.
• Driving vehicles equipped with a
camper body.
• Driving vehicles with a load on the
cargo rack.
Drive cautiously when using a full-size
dissimilar spare wheel and tire assembly
and seek service as soon as possible.
Tire Change Procedure WARNING: To reduce the risk of
possible serious injury or death, do not
remove the full size spare tire from the
factory secured location. This location
is necessary to achieve police-rated
75 mph (120 km/h)
rear impact
crash-test performance. Removal
increases the risk of fuel leak in
high-speed rear impacts. WARNING: The jack supplied with
this vehicle is only intended for changing
wheels. Do not use the vehicle jack other
than when you are changing a wheel in
an emergency. WARNING:
Check that the vehicle
jack is not damaged or deformed and
the thread is lubricated and clean. WARNING:
To help prevent your
vehicle from moving when changing a
wheel, shift the transmission into park
(P), set the parking brake and use an
appropriate block or wheel chock to
secure the wheel diagonally opposite to
the wheel being changed. For example,
when changing the front left wheel,
place an appropriate block or wheel
chock on the right rear wheel. WARNING:
Always use the jack
provided as original equipment with your
vehicle. If using a jack other than the one
provided, make sure the jack capacity is
adequate for the vehicle weight,
including any vehicle cargo or
modifications. If you are unsure if the jack
capacity is adequate, contact the
authorized dealer. WARNING:
Failure to follow these
guidelines could result in an increased
risk of loss of vehicle control, injury or
death. WARNING:
Use only the specified
jacking points. If you use other positions,
you may damage the body, steering,
suspension, engine, braking system or
the fuel lines. WARNING:
Never place anything
between the vehicle jack and your
vehicle. WARNING:
Never place anything
between the vehicle jack and the ground. WARNING:
Park your vehicle so
that you do not obstruct the flow of
traffic or place yourself in any danger and
set up a warning triangle. WARNING:
Do not attempt to
change a tire on the side of the vehicle
close to moving traffic. Pull far enough
off the road to avoid the danger of being
hit when operating the jack or changing
the wheel.
Note: Passengers should not remain in your
vehicle when the vehicle is being jacked.
Note: Jack at the specified locations to
avoid damage to the vehicle.
271
Explorer (CTW) Police, Canada/United States of America, Police, enUSA, Edition date: 201902, Second-Printing Wheels and Tires
Page 275 of 395

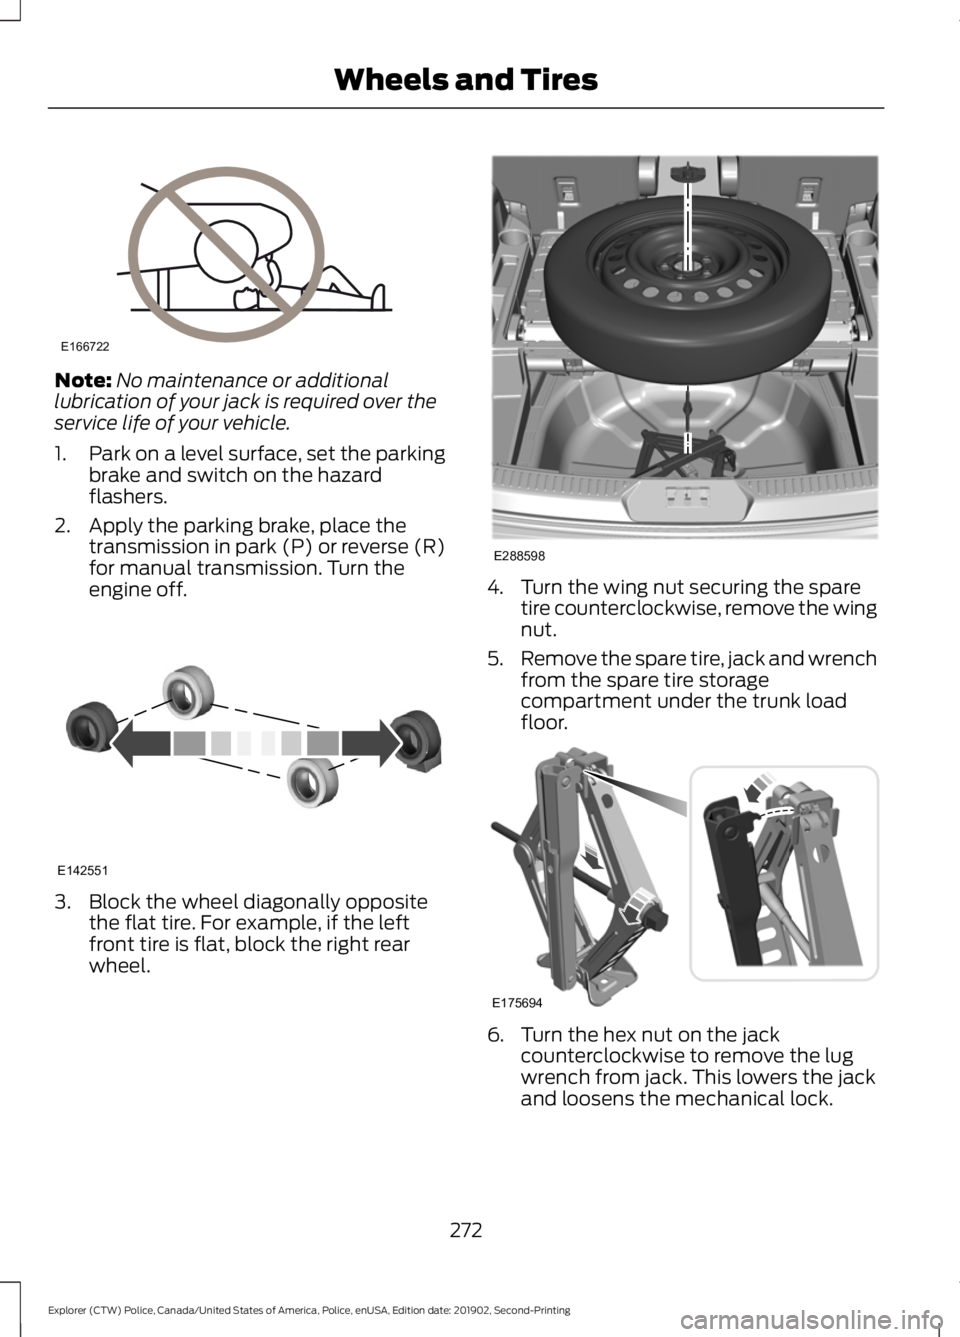
Note:
No maintenance or additional
lubrication of your jack is required over the
service life of your vehicle.
1. Park on a level surface, set the parking
brake and switch on the hazard
flashers.
2. Apply the parking brake, place the transmission in park (P) or reverse (R)
for manual transmission. Turn the
engine off. 3. Block the wheel diagonally opposite
the flat tire. For example, if the left
front tire is flat, block the right rear
wheel. 4. Turn the wing nut securing the spare
tire counterclockwise, remove the wing
nut.
5. Remove the spare tire, jack and wrench
from the spare tire storage
compartment under the trunk load
floor. 6. Turn the hex nut on the jack
counterclockwise to remove the lug
wrench from jack. This lowers the jack
and loosens the mechanical lock.
272
Explorer (CTW) Police, Canada/United States of America, Police, enUSA, Edition date: 201902, Second-Printing Wheels and TiresE166722 E142551 E288598 E175694
Page 280 of 395

ENGINE SPECIFICATIONS - 3.0L
3.0L
Engine
180 in³ (2,956 cm³)
Displacement.
Minimum 87 octane
Fuel type.
1-4-2-5-3-6
Firing order.
Coil on plug
Ignition system.
0.028–0.031 in (0.7–0.8 mm)
Spark plug gap.
9.5:1
Compression ratio.
Drivebelt Routing ENGINE SPECIFICATIONS - 3.3L
3.3L
Engine
204 in³ (3,340 cm³)
Displacement.
Minimum 87 octane
Fuel type.
1-4-2-5-3-6
Firing order.
Coil on plug
Ignition system.
0.049–0.053 in (1.25–1.35 mm)
Spark plug gap.
12.0:1
Compression ratio.
277
Explorer (CTW) Police, Canada/United States of America, Police, enUSA, Edition date: 201902, Second-Printing Capacities and SpecificationsE297178
Page 281 of 395

Drivebelt Routing
Long drivebelt is on second
pulley groove farthest from
engine.
A.
Short drivebelt is on first pulley
groove closest to engine.
B.
ENGINE SPECIFICATIONS - 3.3L, HYBRID ELECTRIC VEHICLE
(HEV) 3.3L HEV
Engine
204 in³ (3,340 cm³)
Displacement.
Minimum 87 octane
Fuel type.
1-4-2-5-3-6
Firing order.
Coil on plug
Ignition system.
0.049–0.053 in (1.25–1.35 mm)
Spark plug gap.
12.0:1
Compression ratio.
Drivebelt Routing 278
Explorer (CTW) Police, Canada/United States of America, Police, enUSA, Edition date: 201902, Second-Printing Capacities and SpecificationsE288323 E291364
Page 282 of 395

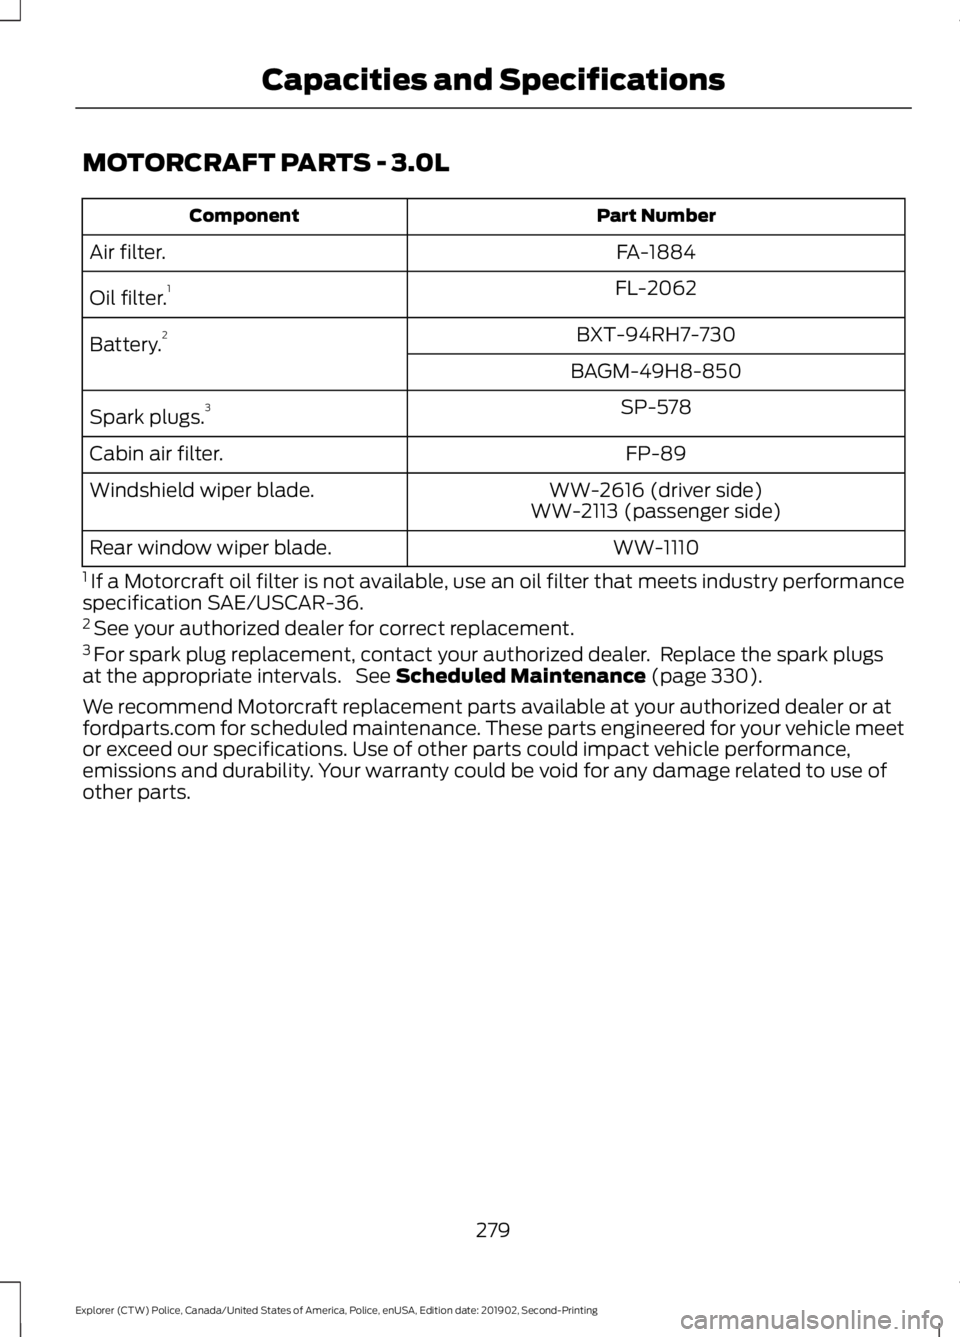
MOTORCRAFT PARTS - 3.0L
Part Number
Component
FA-1884
Air filter.
FL-2062
Oil filter. 1
BXT-94RH7-730
Battery. 2
BAGM-49H8-850SP-578
Spark plugs. 3
FP-89
Cabin air filter.
WW-2616 (driver side)
Windshield wiper blade.
WW-2113 (passenger side)
WW-1110
Rear window wiper blade.
1 If a Motorcraft oil filter is not available, use an oil filter that meets industry performance
specification SAE/USCAR-36.
2 See your authorized dealer for correct replacement.
3 For spark plug replacement, contact your authorized dealer. Replace the spark plugs
at the appropriate intervals. See Scheduled Maintenance (page 330).
We recommend Motorcraft replacement parts available at your authorized dealer or at
fordparts.com for scheduled maintenance. These parts engineered for your vehicle meet
or exceed our specifications. Use of other parts could impact vehicle performance,
emissions and durability. Your warranty could be void for any damage related to use of
other parts.
279
Explorer (CTW) Police, Canada/United States of America, Police, enUSA, Edition date: 201902, Second-Printing Capacities and Specifications
Page 283 of 395

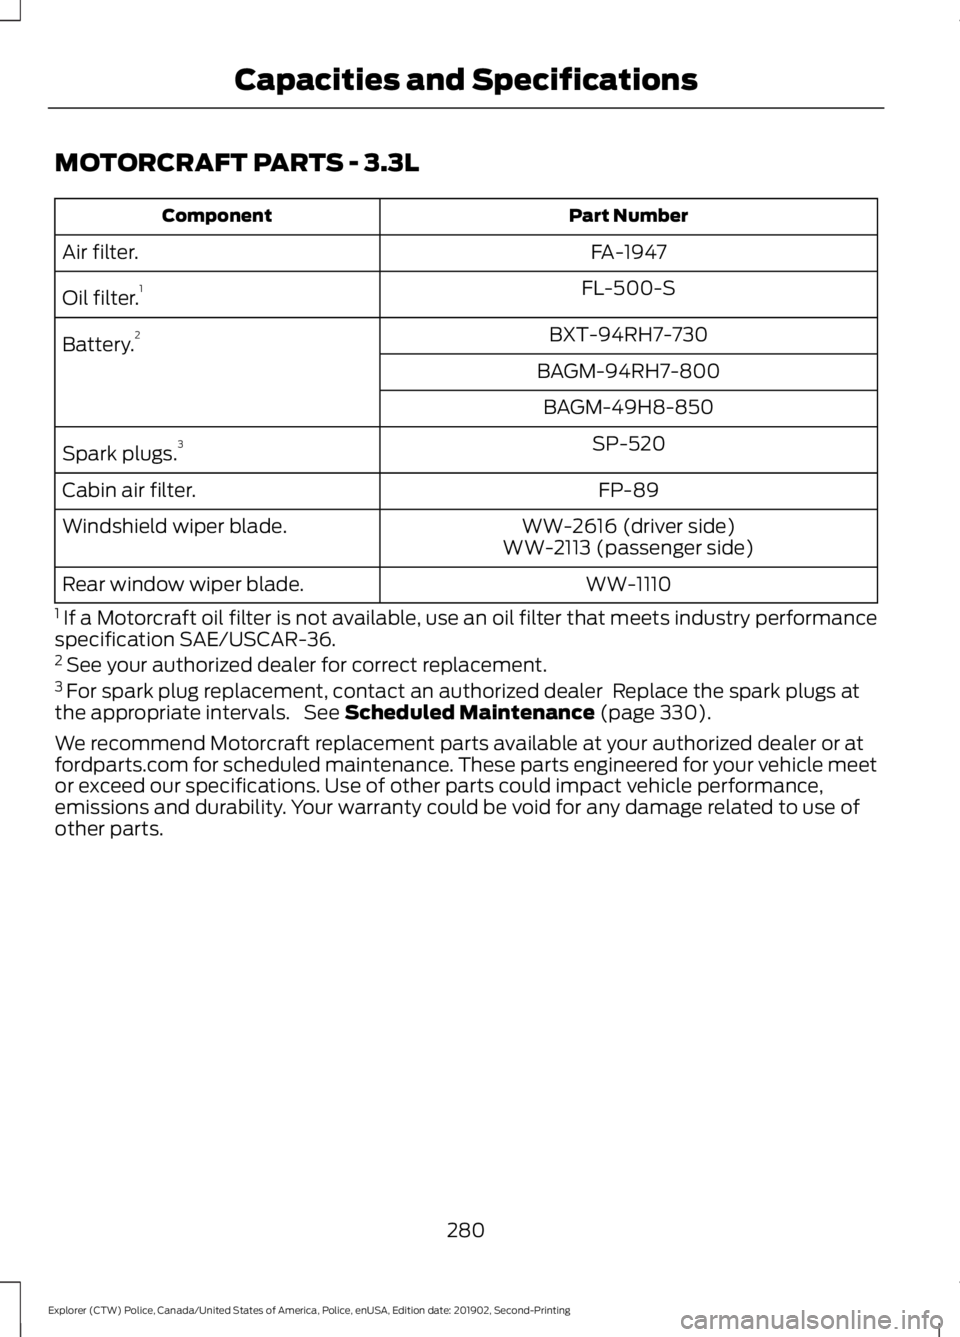
MOTORCRAFT PARTS - 3.3L
Part Number
Component
FA-1947
Air filter.
FL-500-S
Oil filter. 1
BXT-94RH7-730
Battery. 2
BAGM-94RH7-800BAGM-49H8-850 SP-520
Spark plugs. 3
FP-89
Cabin air filter.
WW-2616 (driver side)
Windshield wiper blade.
WW-2113 (passenger side)
WW-1110
Rear window wiper blade.
1 If a Motorcraft oil filter is not available, use an oil filter that meets industry performance
specification SAE/USCAR-36.
2 See your authorized dealer for correct replacement.
3 For spark plug replacement, contact an authorized dealer Replace the spark plugs at
the appropriate intervals. See Scheduled Maintenance (page 330).
We recommend Motorcraft replacement parts available at your authorized dealer or at
fordparts.com for scheduled maintenance. These parts engineered for your vehicle meet
or exceed our specifications. Use of other parts could impact vehicle performance,
emissions and durability. Your warranty could be void for any damage related to use of
other parts.
280
Explorer (CTW) Police, Canada/United States of America, Police, enUSA, Edition date: 201902, Second-Printing Capacities and Specifications