2020 FORD MUSTANG wheel
[x] Cancel search: wheelPage 119 of 464

2.
Adjust the temperature function to the
setting you prefer. Use 72°F (22°C) as
a starting point, then adjust the setting
as necessary.
Defogging the Side Windows in
Cold Weather
1. Press and release defrost or maximum
defrost.
2. Adjust the temperature control to the setting you prefer. Use
72°F (22°C) as
a starting point, then adjust the setting
as necessary.
HEATED REAR WINDOW Press the button to clear the rear
window of thin ice and fog. The
heated rear window turns off
after a short period of time.
Note: Do not use harsh chemicals, razor
blades or other sharp objects to clean or
remove decals from the inside of the heated
rear window. The vehicle warranty may not
cover damage to the heated rear window
grid lines.
HEATED EXTERIOR MIRRORS
(IF EQUIPPED)
When you switch the heated rear window
on, the heated exterior mirrors turn on.
Note: Do not remove ice from the mirrors
with a scraper or adjust the mirror glass
when it is frozen in place.
Note: Do not clean the mirror housing or
glass with harsh abrasives, fuel or other
petroleum-based cleaning products. The
vehicle warranty may not cover damage
caused to the mirror housing or glass. REMOTE START
(IF EQUIPPED)
You can switch this feature on or off and
adjust the settings in the information
display.
The system adjusts the interior
temperature depending on your chosen
settings during remote start.
You cannot adjust the climate control
setting during remote start operation. The
information display and the indicators do
not turn on during remote start. When you
switch the ignition on, the climate control
system returns to the previous settings.
You can now make adjustments.
You need to switch on certain
vehicle-dependent features, such as:
• Heated seats.
• Cooled seats.
• Heated steering wheel.
• Heated mirrors.
• Heated rear window.
Automatic Settings
In hot weather, the system sets to
72°F
(22°C). The cooled seats are set to high,
if available, and AUTO is on in the
information display.
In moderate weather, the system either
heats or cools, based on pre-selected
settings. The rear defroster, heated mirrors
and heated or cooled seats do not turn on.
In cold weather, the system sets to
72°F
(22°C). The heated seats are set to high,
if available, and AUTO is on in the
information display. The heated rear
window and heated mirrors turn on.
116
Mustang (CZG) Canada/United States of America, Vehicles Built From: 15-07-2019, enUSA, Edition date: 201906, Second-Printing Climate ControlE184884
Page 121 of 464

SITTING IN THE CORRECT
POSITION
WARNING: Sitting improperly, out
of position or with the seatback reclined
too far can take weight off the seat
cushion and affect the decision of the
passenger sensing system, resulting in
serious injury or death in the event of a
crash. Always sit upright against your
seat back, with your feet on the floor. WARNING:
Do not recline the
seatback too far as this can cause the
occupant to slide under the seatbelt,
resulting in serious injury in the event of
a collision. WARNING:
Do not place objects
higher than the top of the seat backrest.
Failure to follow this instruction could
result in personal injury or death in the
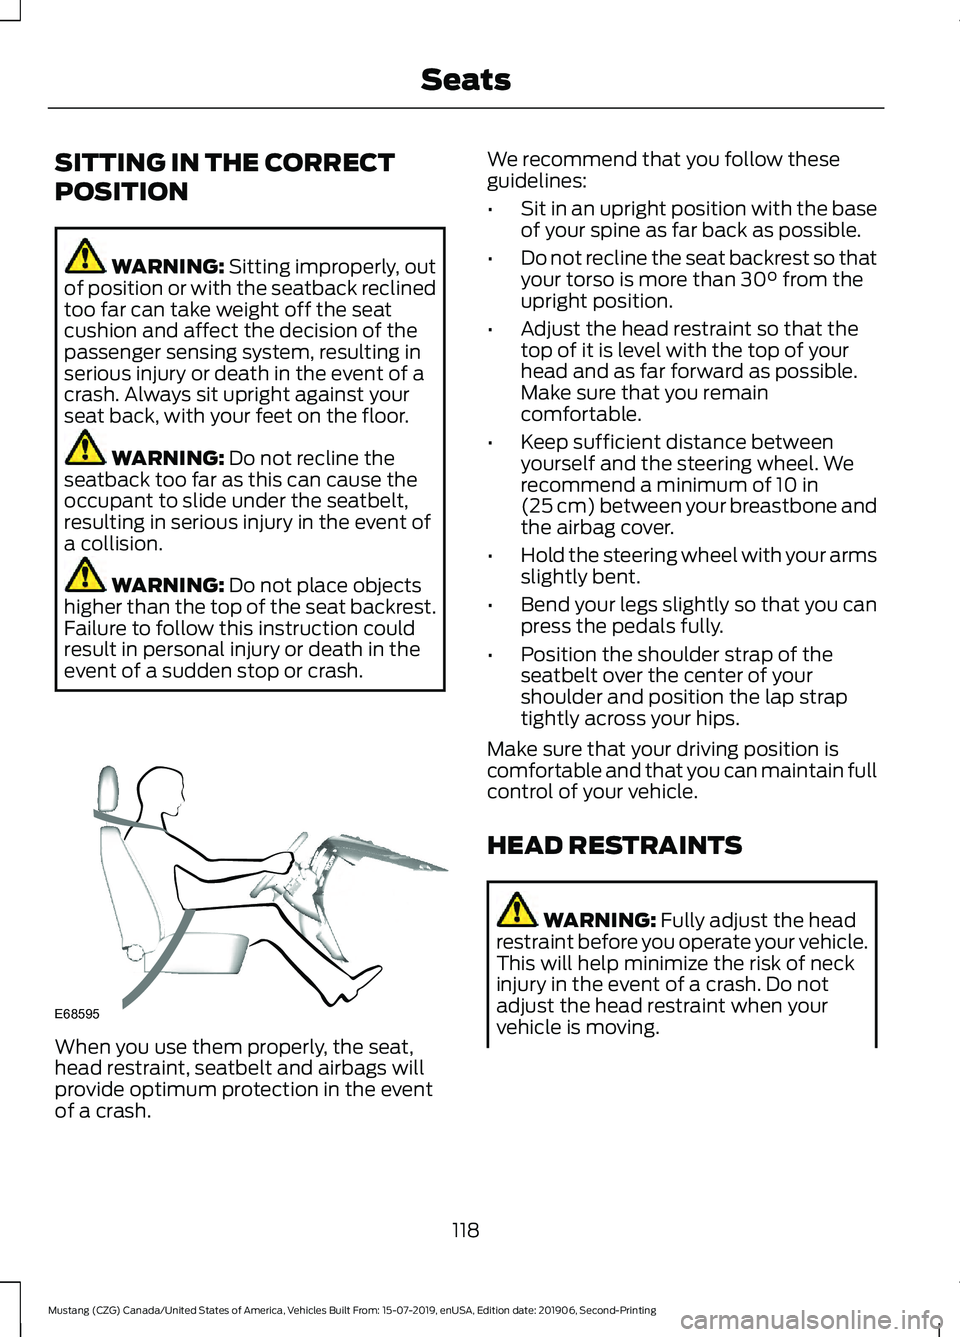
event of a sudden stop or crash. When you use them properly, the seat,
head restraint, seatbelt and airbags will
provide optimum protection in the event
of a crash. We recommend that you follow these
guidelines:
•
Sit in an upright position with the base
of your spine as far back as possible.
• Do not recline the seat backrest so that
your torso is more than
30° from the
upright position.
• Adjust the head restraint so that the
top of it is level with the top of your
head and as far forward as possible.
Make sure that you remain
comfortable.
• Keep sufficient distance between
yourself and the steering wheel. We
recommend a minimum of
10 in
(25 cm) between your breastbone and
the airbag cover.
• Hold the steering wheel with your arms
slightly bent.
• Bend your legs slightly so that you can
press the pedals fully.
• Position the shoulder strap of the
seatbelt over the center of your
shoulder and position the lap strap
tightly across your hips.
Make sure that your driving position is
comfortable and that you can maintain full
control of your vehicle.
HEAD RESTRAINTS WARNING:
Fully adjust the head
restraint before you operate your vehicle.
This will help minimize the risk of neck
injury in the event of a crash. Do not
adjust the head restraint when your
vehicle is moving.
118
Mustang (CZG) Canada/United States of America, Vehicles Built From: 15-07-2019, enUSA, Edition date: 201906, Second-Printing SeatsE68595
Page 135 of 464

•
Press the brake pedal (automatic
transmission) or clutch pedal (manual
transmission), and then press the
button for any length of time. An
indicator light on the button illuminates
when the ignition is on and when the
engine starts.
STEERING WHEEL LOCK (IF
EQUIPPED)
Your vehicle has an electronically
controlled steering wheel lock that
automatically operates.
The steering wheel will lock shortly after
you have parked your vehicle and the
passive key is outside it or when you lock
your vehicle.
Note: The steering wheel will not lock when
the ignition is on or when your vehicle is
moving.
Unlocking the Steering Wheel
The steering wheel unlocks when the
system detects a valid passive key inside
your vehicle. If the steering wheel relocks,
switch the ignition on to unlock it.
Note: You may have to slightly rotate the
steering wheel to assist unlocking it.
STARTING A GASOLINE
ENGINE
When you start the engine, the idle speed
increases, this helps to warm up the
engine. If the engine idle speed does not
slow down automatically, have your
vehicle checked by an authorized dealer. Note:
You can crank the engine for a total
of 60 seconds (without the engine starting)
before the starting system temporarily
disables. The 60 seconds does not have to
be all at once. For example, if you crank the
engine three times for 20 seconds each
time, without the engine starting, you
reached the 60-second time limit. A
message appears in the information display
alerting you that you exceeded the cranking
time. You cannot attempt to start the engine
for at least 15 minutes. After 15 minutes, you
are limited to a 15-second engine cranking
time. You need to wait 60 minutes before
you can crank the engine for 60 seconds
again.
Before starting the engine, check the
following:
• Make sure all occupants have fastened
their seatbelts.
• Make sure the headlamps and
electrical accessories are off.
• Make sure the parking brake is on.
• Move the transmission selector lever
to park (P) (automatic transmission)
or neutral (manual transmission)
Note: Do not touch the accelerator pedal.
Note: You must have your intelligent access
key in the vehicle in order to shift the
transmission out of position
P.
1. Fully press the brake pedal.
2. Press the button.
The system does not function if:
• The key frequencies are jammed.
• The key battery has no charge.
If you are unable to start the engine, do the
following:
132
Mustang (CZG) Canada/United States of America, Vehicles Built From: 15-07-2019, enUSA, Edition date: 201906, Second-Printing Starting and Stopping the Engine
Page 152 of 464

Understanding the Positions of
Your Automatic Transmission
Putting your vehicle in gear:
1. Fully press down on the brake pedal.
2. Press and hold the button on the top
of the gearshift lever.
3. Move the gearshift lever into the desired gear.
4. Release the button and your transmission remains in the selected
gear. Transmission Selector Positions
The instrument cluster displays the current
gear.
Park (P)
This position locks the transmission and
prevents the rear wheels from turning.
Come to a complete stop before putting
your vehicle into and out of park (P).
Reverse (R)
With the selector in reverse (R), your
vehicle moves backward. Always come to
a complete stop before shifting into and
out of reverse (R). Neutral (N)
With the selector in neutral (N), you can
start your vehicle and it is free to roll. Hold
the brake pedal down when in this position.
Drive (D)
Drive (D) is the normal driving position for
the best fuel economy. The overdrive
function allows automatic upshifts and
downshifts through all gears.
Sport (S)
Putting your vehicle in sport (S):
•
Provides additional engine braking and
extends lower gear operation to
enhance performance for uphill climbs,
hilly terrain or mountainous areas. This
increases engine RPM during engine
braking.
• Provides additional lower gear
operation through the automatic
transmission shift strategy.
• Provides gear upshifts and downshifts
more quickly at higher engine speeds.
SelectShift Automatic ™
Transmission
This feature gives you the ability to change
gears up or down as desired.
As long as the engine speed does not
exceed the maximum allowable limit,
downshifts are allowed. SelectShift
automatically downshifts at low engine
speeds in order to prevent engine stalls.
Note: Engine damage may occur if you
maintain excessive engine revving without
shifting.
In drive (D) SelectShift automatically
upshifts at the optimal max engine speed,
regardless of accelerator pedal travel.
In sport (S) mode SelectShift does not
automatically upshift, even if the engine is
approaching the RPM limit.
149
Mustang (CZG) Canada/United States of America, Vehicles Built From: 15-07-2019, enUSA, Edition date: 201906, Second-Printing TransmissionE174572
Page 153 of 464

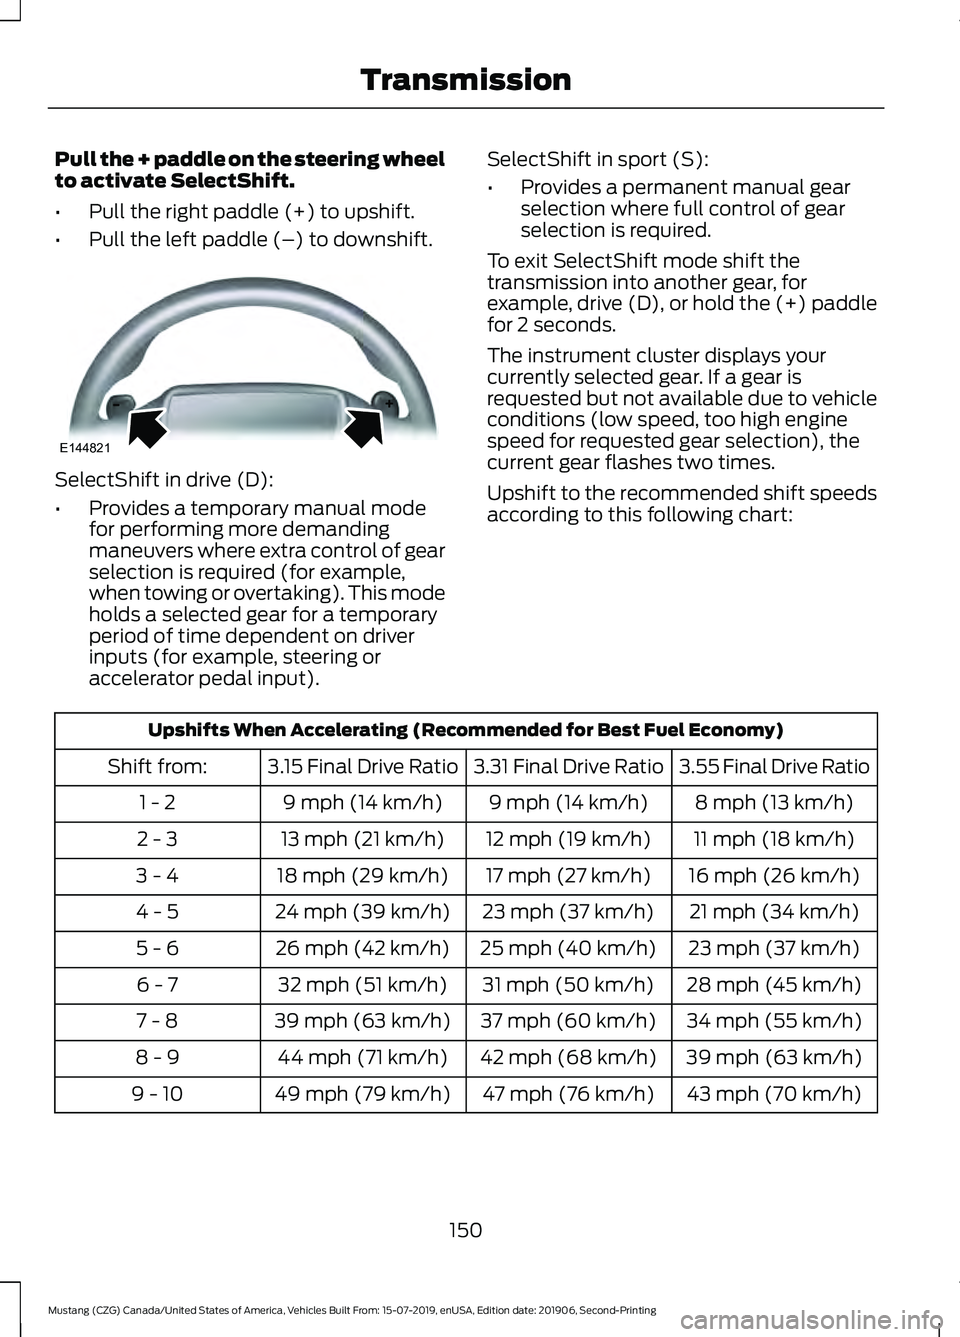
Pull the + paddle on the steering wheel
to activate SelectShift.
•
Pull the right paddle (+) to upshift.
• Pull the left paddle (–) to downshift. SelectShift in drive (D):
•
Provides a temporary manual mode
for performing more demanding
maneuvers where extra control of gear
selection is required (for example,
when towing or overtaking). This mode
holds a selected gear for a temporary
period of time dependent on driver
inputs (for example, steering or
accelerator pedal input). SelectShift in sport (S):
•
Provides a permanent manual gear
selection where full control of gear
selection is required.
To exit SelectShift mode shift the
transmission into another gear, for
example, drive (D), or hold the (+) paddle
for 2 seconds.
The instrument cluster displays your
currently selected gear. If a gear is
requested but not available due to vehicle
conditions (low speed, too high engine
speed for requested gear selection), the
current gear flashes two times.
Upshift to the recommended shift speeds
according to this following chart: Upshifts When Accelerating (Recommended for Best Fuel Economy)
3.55 Final Drive Ratio
3.31 Final Drive Ratio
3.15 Final Drive Ratio
Shift from:
8 mph (13 km/h)
9 mph (14 km/h)
9 mph (14 km/h)
1 - 2
11 mph (18 km/h)
12 mph (19 km/h)
13 mph (21 km/h)
2 - 3
16 mph (26 km/h)
17 mph (27 km/h)
18 mph (29 km/h)
3 - 4
21 mph (34 km/h)
23 mph (37 km/h)
24 mph (39 km/h)
4 - 5
23 mph (37 km/h)
25 mph (40 km/h)
26 mph (42 km/h)
5 - 6
28 mph (45 km/h)
31 mph (50 km/h)
32 mph (51 km/h)
6 - 7
34 mph (55 km/h)
37 mph (60 km/h)
39 mph (63 km/h)
7 - 8
39 mph (63 km/h)
42 mph (68 km/h)
44 mph (71 km/h)
8 - 9
43 mph (70 km/h)
47 mph (76 km/h)
49 mph (79 km/h)
9 - 10
150
Mustang (CZG) Canada/United States of America, Vehicles Built From: 15-07-2019, enUSA, Edition date: 201906, Second-Printing TransmissionE144821
Page 154 of 464

Brake-Shift Interlock
WARNING: Do not drive your
vehicle until you verify that the
stoplamps are working. WARNING:
When doing this
procedure, you need to take the
transmission out of park (P) which
means your vehicle can roll freely. To
avoid unwanted vehicle movement,
always fully apply the parking brake prior
to doing this procedure. Use wheels
chocks if appropriate. WARNING:
If the parking brake is
fully released, but the brake warning
lamp remains illuminated, the brakes
may not be working properly. Have your
vehicle checked as soon as possible.
Note: Contact an authorized dealer as soon
as possible if this procedure is used.
Note: For some markets, this feature is
disabled.
Use the brake shift interlock lever to move
the gearshift lever from the park position
in the event of an electrical malfunction or
if your vehicle has a dead battery.
Apply the parking brake and switch the
ignition off before performing this
procedure. 1.
Using a flat head screwdriver or similar
tool, remove the chrome bezel and
gearshift bracket at the base of the
gearshift lever. 2.
Locate the white release lever and slide
the lever forward when pulling the
gearshift lever out of the park (P)
position and into the neutral (N)
position.
3. Reinstall the chrome bezel and the gearshift bracket.
4. Start your vehicle and release the parking brake.
Automatic Transmission Adaptive
Learning
This feature is designed to increase
durability and provide consistent shift feel
over the life of your vehicle. A new vehicle
or transmission may have firm or soft
shifts. This operation is normal and does
not affect function or durability of the
transmission. Over time, the adaptive
learning process fully updates transmission
operation.
If Your Vehicle Gets Stuck In Mud
or Snow
Note: Do not rock your vehicle if the engine
is not at normal operating temperature or
damage to the transmission may occur.
151
Mustang (CZG) Canada/United States of America, Vehicles Built From: 15-07-2019, enUSA, Edition date: 201906, Second-Printing TransmissionE184747 E174501
Page 156 of 464

LIMITED SLIP DIFFERENTIAL
(IF EQUIPPED)
Traction-Lok
™ and TORSEN™
Axles
These axles provide improved traction on
slippery and loose surfaces, particularly
when one wheel is on a poor traction
surface. Under normal conditions, these
axles function like a standard rear axle.
Extended use of tire sizes other than the
manufacturer ’s specified tire size on these
axles could result in a permanent reduction
in effectiveness. This loss does not affect
your normal driving and should not be
noticeable.
153
Mustang (CZG) Canada/United States of America, Vehicles Built From: 15-07-2019, enUSA, Edition date: 201906, Second-Printing Rear Axle
Page 157 of 464

GENERAL INFORMATION
Note:
Occasional brake noise is normal. If
a metal-to-metal, continuous grinding or
continuous squeal sound is present, the
brake linings may be worn-out and an
authorized dealer should check them. If the
vehicle has continuous vibration or shudder
in the steering wheel while braking, an
authorized dealer should check your vehicle.
Note: Brake dust may accumulate on the
wheels, even under normal driving
conditions. Some dust is inevitable as the
brakes wear and does not contribute to
brake noise. See Cleaning the Wheels
(page 260).
Wet brakes result in reduced braking
efficiency. Gently press the brake pedal a
few times when driving from a car wash or
standing water to dry the brakes.
Brake Over Accelerator
In the event the accelerator pedal
becomes stuck or entrapped, apply steady
and firm pressure to the brake pedal to
slow the vehicle and reduce engine power.
If you experience this condition, apply the
brakes and bring your vehicle to a safe
stop. Switch the engine off, move the
transmission to park (P) and apply the
parking brake. Inspect the accelerator
pedal and the area around it for any items
or debris that may be obstructing its
movement. If none are found and the
condition persists, have your vehicle towed
to the nearest authorized dealer.
Emergency Brake Assist
Emergency brake assist detects when you
brake heavily by measuring the rate at
which you press the brake pedal. It
provides maximum braking efficiency as
long as you press the pedal. Emergency
brake assist can reduce stopping distances
in critical situations. Note:
Depending on applicable laws and
regulations in the country for which your
vehicle was originally built, your brake lamps
could flash during heavy braking. Following
this, your hazard lights may also flash when
your vehicle comes to a stop.
Anti-lock Brake System
This system helps you maintain steering
control during emergency stops by keeping
the brakes from locking. This lamp momentarily
illuminates when you switch the
ignition on. If the light does not
illuminate during start up, remains on or
flashes, the anti-lock braking system may
be disabled. Have the system checked by
an authorized dealer. If the anti-lock brake
system is disabled, normal braking is still
effective.
See
Warning Lamps and Indicators
(page 85).
Note: Indicators vary depending on region. This lamp also illuminates
momentarily when you switch
the ignition on to confirm the
lamp is functional. If it does not
illuminate when you switch the
ignition on, or begins to flash at
any time, have the system checked by an
authorized dealer. If the brake warning
lamp illuminates with the parking brake
released, have the system checked
immediately.
HINTS ON DRIVING WITH
ANTI-LOCK BRAKES
The anti-lock braking system does not
eliminate the risks when:
• You drive too closely to the vehicle in
front of you.
• Your vehicle is hydroplaning.
154
Mustang (CZG) Canada/United States of America, Vehicles Built From: 15-07-2019, enUSA, Edition date: 201906, Second-Printing Brakes E270480