2020 FORD F250 SUPER DUTY turn signal
[x] Cancel search: turn signalPage 112 of 633
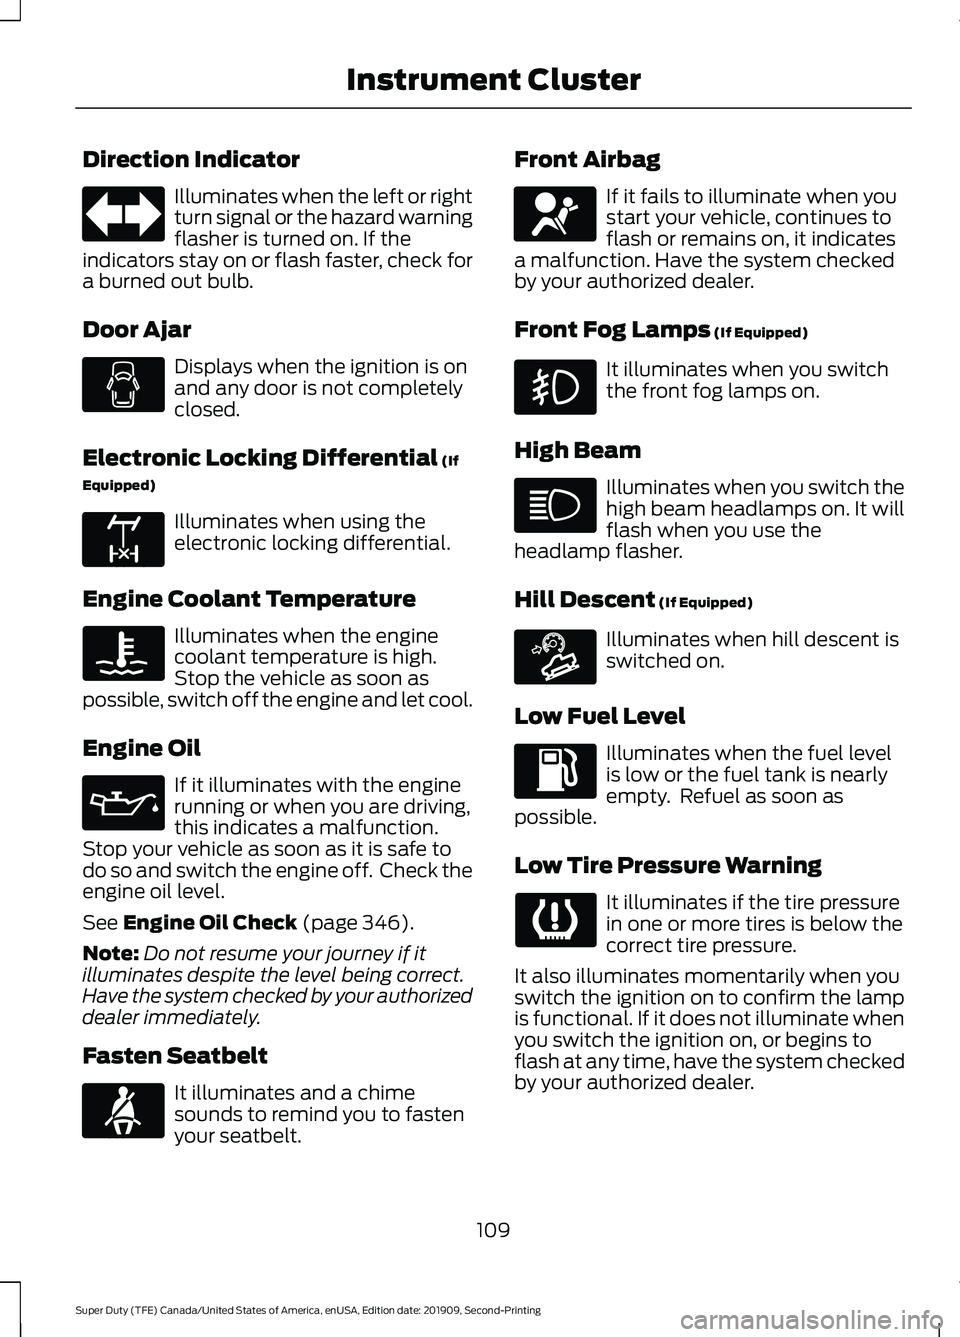
Direction Indicator
Illuminates when the left or right
turn signal or the hazard warning
flasher is turned on. If the
indicators stay on or flash faster, check for
a burned out bulb.
Door Ajar Displays when the ignition is on
and any door is not completely
closed.
Electronic Locking Differential (If
Equipped) Illuminates when using the
electronic locking differential.
Engine Coolant Temperature Illuminates when the engine
coolant temperature is high.
Stop the vehicle as soon as
possible, switch off the engine and let cool.
Engine Oil If it illuminates with the engine
running or when you are driving,
this indicates a malfunction.
Stop your vehicle as soon as it is safe to
do so and switch the engine off. Check the
engine oil level.
See
Engine Oil Check (page 346).
Note: Do not resume your journey if it
illuminates despite the level being correct.
Have the system checked by your authorized
dealer immediately.
Fasten Seatbelt It illuminates and a chime
sounds to remind you to fasten
your seatbelt. Front Airbag If it fails to illuminate when you
start your vehicle, continues to
flash or remains on, it indicates
a malfunction. Have the system checked
by your authorized dealer.
Front Fog Lamps
(If Equipped) It illuminates when you switch
the front fog lamps on.
High Beam Illuminates when you switch the
high beam headlamps on. It will
flash when you use the
headlamp flasher.
Hill Descent
(If Equipped) Illuminates when hill descent is
switched on.
Low Fuel Level Illuminates when the fuel level
is low or the fuel tank is nearly
empty. Refuel as soon as
possible.
Low Tire Pressure Warning It illuminates if the tire pressure
in one or more tires is below the
correct tire pressure.
It also illuminates momentarily when you
switch the ignition on to confirm the lamp
is functional. If it does not illuminate when
you switch the ignition on, or begins to
flash at any time, have the system checked
by your authorized dealer.
109
Super Duty (TFE) Canada/United States of America, enUSA, Edition date: 201909, Second-Printing Instrument Cluster E163170 E71880 E67017 E163171
Page 257 of 633
Note:
The Blind Spot Information System
does not prevent contact with other vehicles
or objects; nor detect parked vehicles,
people, animals or infrastructure (fences,
guardrails, trees). It is only designed to alert
you to moving vehicles in the blind spot
zones.
Note: When a vehicle passes quickly
through the blind spot zone, typically fewer
than two seconds, the system does not
trigger.
Using the System
The Blind Spot Information System turns
on when you start the engine and you drive
your vehicle forward above 5 mph
(8 km/h).
For automatic transmissions, the Blind
Spot Information System remains on while
the transmission is in drive (D). If shifted
into reverse (R) or park (P) the Blind Spot
Information System turns off. Once shifted
back into drive (D), the Blind Spot
Information System turns back on when
you drive your vehicle above
5 mph
(8 km/h).
Note: For automatic transmissions, the
Blind Spot Information System does not
function in reverse (R) or park (P).
For manual transmissions, the Blind Spot
Information System is on for all gears
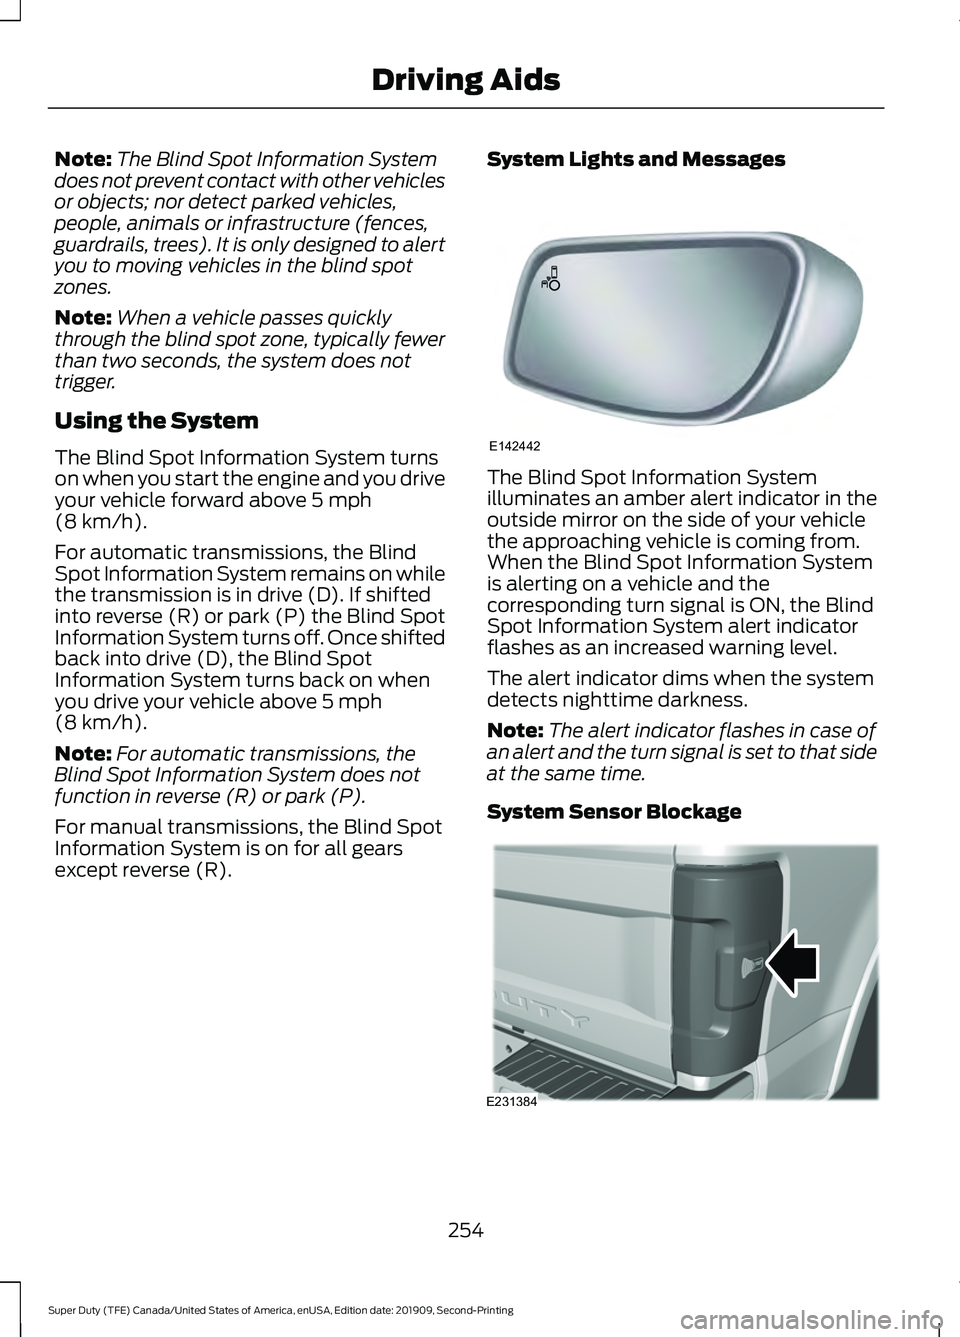
except reverse (R). System Lights and Messages The Blind Spot Information System
illuminates an amber alert indicator in the
outside mirror on the side of your vehicle
the approaching vehicle is coming from.
When the Blind Spot Information System
is alerting on a vehicle and the
corresponding turn signal is ON, the Blind
Spot Information System alert indicator
flashes as an increased warning level.
The alert indicator dims when the system
detects nighttime darkness.
Note:
The alert indicator flashes in case of
an alert and the turn signal is set to that side
at the same time.
System Sensor Blockage 254
Super Duty (TFE) Canada/United States of America, enUSA, Edition date: 201909, Second-Printing Driving AidsE142442 E231384
Page 304 of 633
Function
Color
Left turn signal and stop lamp
Yellow
Ground (-)
White
Electric brakes
Blue
Right turn signal and stop
lamp
Green
Battery (+)
Orange
Running lights
Brown
Reverse lights
Grey
Note: If your vehicle is equipped with a
factory brake controller, the Battery (+)
Orange wire is powered when you start the
engine and you apply the brakes at least
once when a trailer with brake lamps is
connected. If your vehicle is not equipped
with a factory brake controller, relays control
the system and it becomes active when you
power on your vehicle.
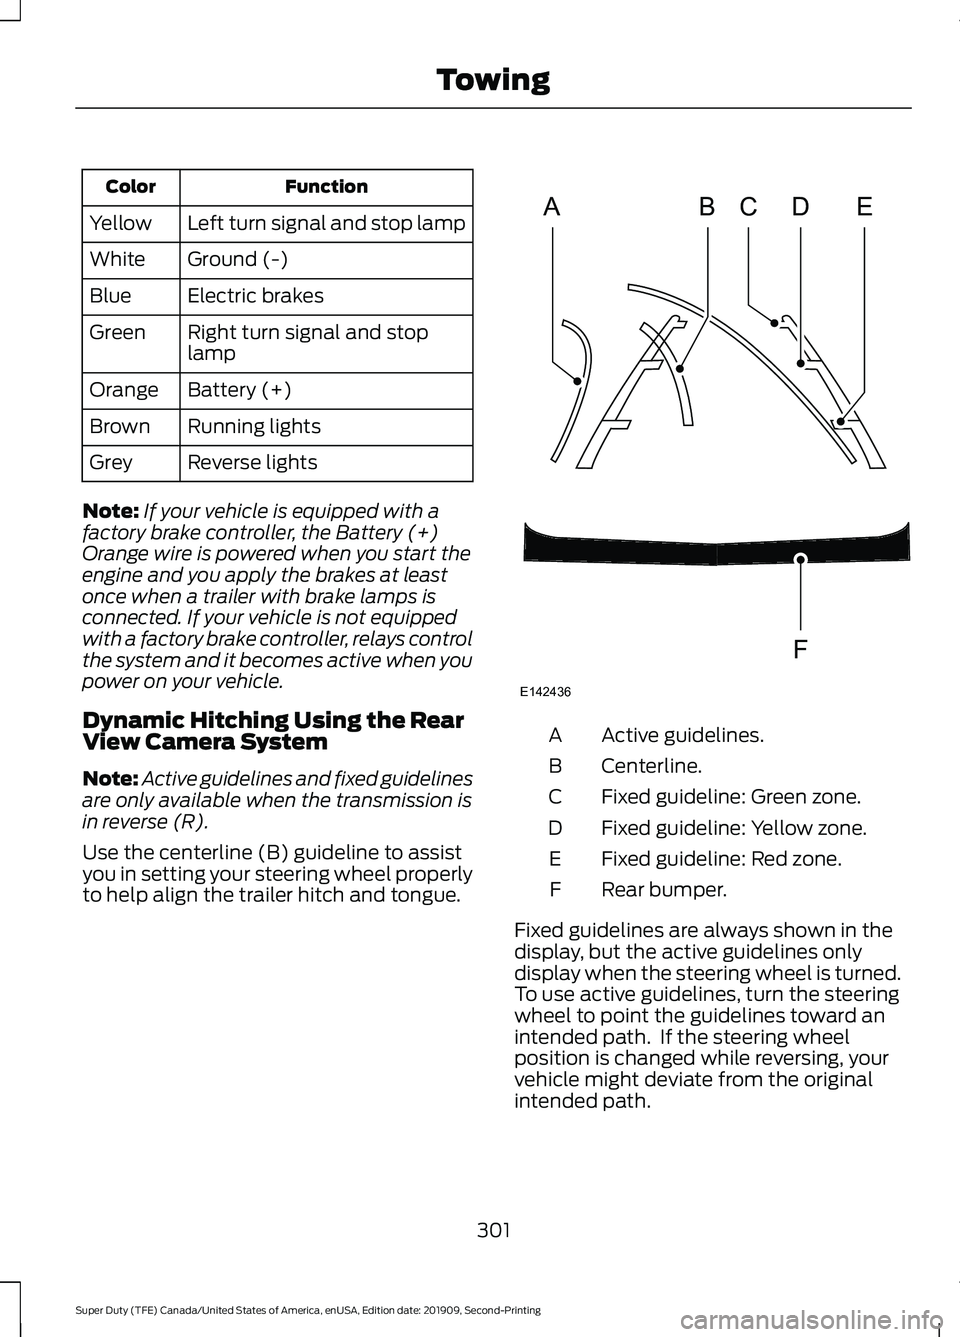
Dynamic Hitching Using the Rear
View Camera System
Note: Active guidelines and fixed guidelines
are only available when the transmission is
in reverse (R).
Use the centerline (B) guideline to assist
you in setting your steering wheel properly
to help align the trailer hitch and tongue. Active guidelines.
A
Centerline.
B
Fixed guideline: Green zone.
C
Fixed guideline: Yellow zone.
D
Fixed guideline: Red zone.
E
Rear bumper.
F
Fixed guidelines are always shown in the
display, but the active guidelines only
display when the steering wheel is turned.
To use active guidelines, turn the steering
wheel to point the guidelines toward an
intended path. If the steering wheel
position is changed while reversing, your
vehicle might deviate from the original
intended path.
301
Super Duty (TFE) Canada/United States of America, enUSA, Edition date: 201909, Second-Printing TowingABCD
F
E
E142436
Page 311 of 633
•
Your vehicle's brake system and the
trailer brake system work
independently of each other. Changing
the gain setting on the controller does
not affect the operation of your
vehicle's brakes.
• When you switch the engine off, the
controller output is disabled and the
display and module shut down.
Trailer Lamps WARNING: Never connect any
trailer lamp wiring to the vehicle's tail
lamp wiring; this may damage the
electrical system resulting in fire. Contact
your authorized dealer as soon as
possible for assistance in proper trailer
tow wiring installation. Additional
electrical equipment may be required.
Trailer lamps are required on most towed
vehicles. Make sure all running lights, brake
lights, turn signals and hazard lights are
working.
Before Towing a Trailer
Practice turning, stopping and backing up
to get the feel of your vehicle-trailer
combination before starting on a trip.
When turning, make wider turns so the
trailer wheels clear curbs and other
obstacles.
When Towing a Trailer
• Check your hitch, electrical connections
and trailer wheel lug nuts thoroughly
after you have traveled 50 mi (80 km).
• Do not drive faster than
70 mph
(113 km/h) during the first 500 mi
(800 km).
• Do not make full-throttle starts. •
When stopped in congested or heavy
traffic during hot weather, place the
gearshift in park (P) to aid engine and
transmission cooling and to help A/C
performance.
• Turn off the speed control with heavy
loads or in hilly terrain. The speed
control may turn off automatically
when you are towing on long, steep
grades.
• Shift to a lower gear when driving down
a long or steep hill. Do not apply the
brakes continuously, as they may
overheat and become less effective.
• If your transmission is equipped with a
Grade Assist or Tow/Haul feature, use
this feature when towing. This provides
engine braking and helps eliminate
excessive transmission shifting for
optimum fuel economy and
transmission cooling.
• If your vehicle is equipped with
Adaptive Steering and you have
enabled Tow/Haul, the Adaptive
Steering system adjusts the steering
response to match your vehicle ’s load.
The system reduces vehicle sensitivity
to steering inputs at higher vehicle
speeds while it maintains the ease of
parking and maneuverability at low
speeds.
• If your vehicle is equipped with
AdvanceTrac with RSC, this system
may turn on during typical cornering
maneuvers with a heavily loaded trailer.
This is normal. Turning the corner at a
slower speed while towing may reduce
this tendency.
• If you are towing a trailer frequently in
hot weather, hilly conditions, at the
gross combined weight rating (or any
combination of these factors), consider
refilling your rear axle with synthetic
gear lubricant (if the axle is not already
filled with it). See
Capacities and
Specifications (page 433).
308
Super Duty (TFE) Canada/United States of America, enUSA, Edition date: 201909, Second-Printing Towing
Page 485 of 633
Using the Display Control
Use the up and down arrow buttons to
select the various settings. When you make
your selection, press the left and right
arrow buttons to change the settings.
Press and release to confirm a
selection.
Press and release the function buttons
below the display to select different
functions of the audio system depending
on which mode you are in.
Using the Number Block
In radio mode, store and recall your favorite
radio stations. To store a favorite station,
press and hold until the sound returns. In
phone mode, enter a phone number.
Using Seek, Fast Forward and
Reverse In radio mode, select a frequency band and
press and release either button. The
system stops at the first station it finds in
that direction.
In satellite radio mode, press and release
to select the next or previous satellite radio
station. If you select a specific category,
such as jazz, rock or news, press to find the
next or previous station in that category.
DIGITAL RADIO (IF EQUIPPED)
Note: HD Radio broadcasts are not
available in all markets. HD Radio technology is the digital
evolution of analog AM/FM radio. Your
system has a special receiver that allows
it to receive digital broadcasts, where
available, in addition to the analog
broadcasts, it already receives. Digital
broadcasts provide a better sound quality
than analog broadcasts with free,
crystal-clear audio and no static or
distortion. For more information, and a
guide to available stations and
programming, please visit
www.hdradio.com.
When HD Radio is on and you tune to a
station broadcasting HD Radio technology,
you may notice the HD Radio logo on your
screen. When this logo is available, you
may also see Title and Artist fields
on-screen.
The multicast indicator appears in FM
mode, only, if the current station is
broadcasting multiple digital broadcasts.
The highlighted numbers signify available
digital channels where new or different
content is available. HD1 signifies the main
programming status and is available in
analog and digital broadcasts. Other
multicast stations, HD2 through HD7, are
only available digitally.
When HD Radio broadcasts are active, you
can access the following functions:
•
Memory presets
allow you to save an
active channel as a memory preset.
Touch and hold a memory preset slot
until the sound returns. There is a brief
mute while the radio saves the station.
Sound returns when finished. When
switching to an HD2 or HD3 memory
preset, the sound mutes before the
digital audio plays, because the system
has to reacquire the digital signal.
Note: As with any saved radio station, you
cannot access the saved station if your
vehicle is outside the station ’s reception
area.
482
Super Duty (TFE) Canada/United States of America, enUSA, Edition date: 201909, Second-Printing Audio SystemE265041 E265045 E265044
Page 489 of 633
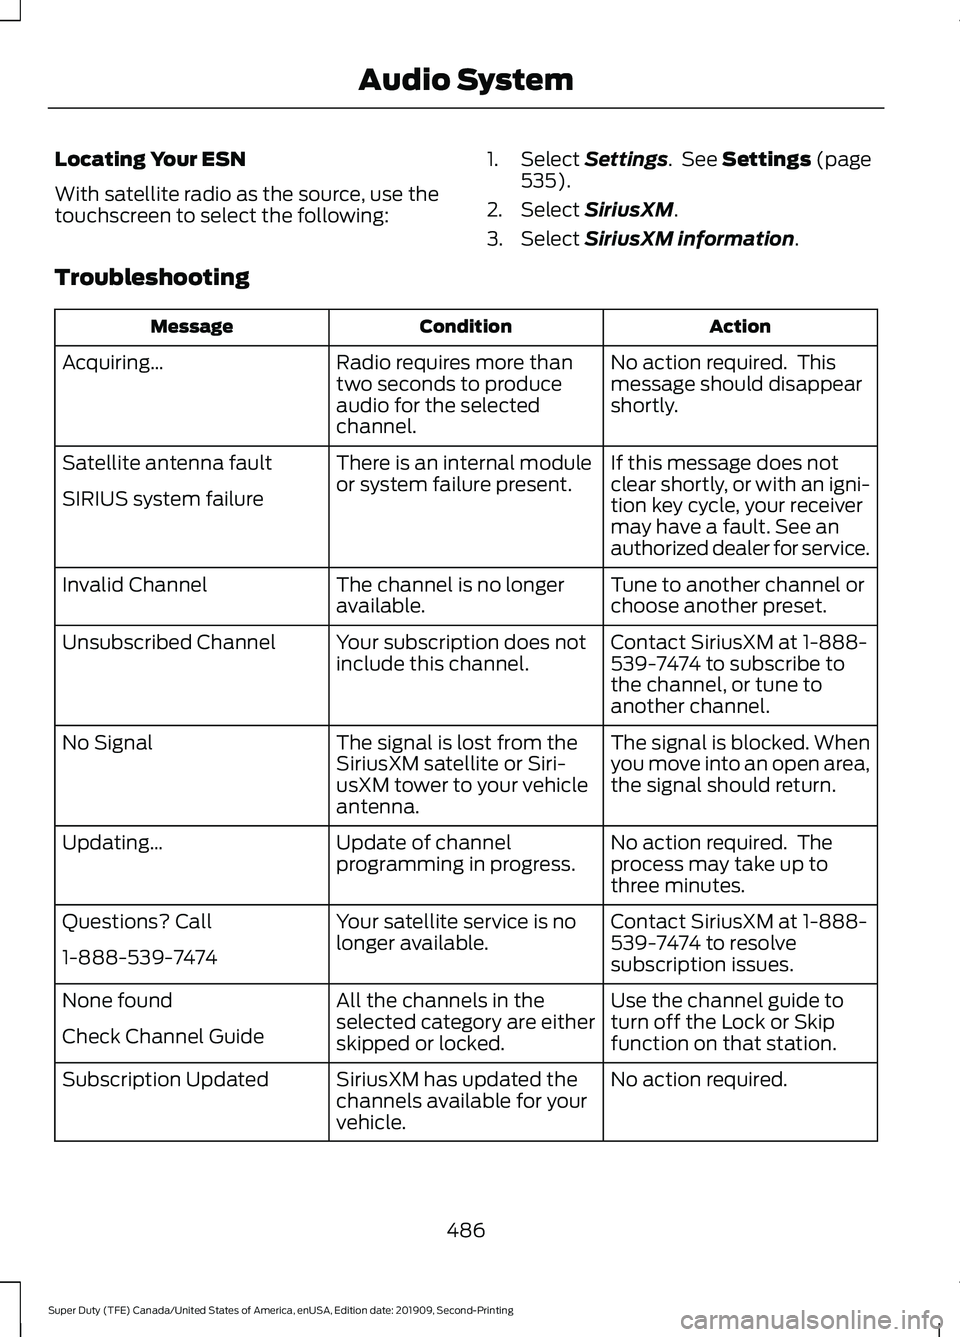
Locating Your ESN
With satellite radio as the source, use the
touchscreen to select the following:
1. Select Settings. See Settings (page
535).
2. Select
SiriusXM.
3. Select
SiriusXM information.
Troubleshooting Action
Condition
Message
No action required. This
message should disappear
shortly.
Radio requires more than
two seconds to produce
audio for the selected
channel.
Acquiring\b
If this message does not
clear shortly, or with an igni-
tion key cycle, your receiver
may have a fault. See an
authorized dealer for service.
There is an internal module
or system failure present.
Satellite antenna fault
SIRIUS system failure
Tune to another channel or
choose another preset.
The channel is no longer
available.
Invalid Channel
Contact SiriusXM at 1-888-
539-7474 to subscribe to
the channel, or tune to
another channel.
Your subscription does not
include this channel.
Unsubscribed Channel
The signal is blocked. When
you move into an open area,
the signal should return.
The signal is lost from the
SiriusXM satellite or Siri-
usXM tower to your vehicle
antenna.
No Signal
No action required. The
process may take up to
three minutes.
Update of channel
programming in progress.
Updating\b
Contact SiriusXM at 1-888-
539-7474 to resolve
subscription issues.
Your satellite service is no
longer available.
Questions? Call
1-888-539-7474
Use the channel guide to
turn off the Lock or Skip
function on that station.
All the channels in the
selected category are either
skipped or locked.
None found
Check Channel Guide
No action required.
SiriusXM has updated the
channels available for your
vehicle.
Subscription Updated
486
Super Duty (TFE) Canada/United States of America, enUSA, Edition date: 201909, Second-Printing Audio System
Page 519 of 633
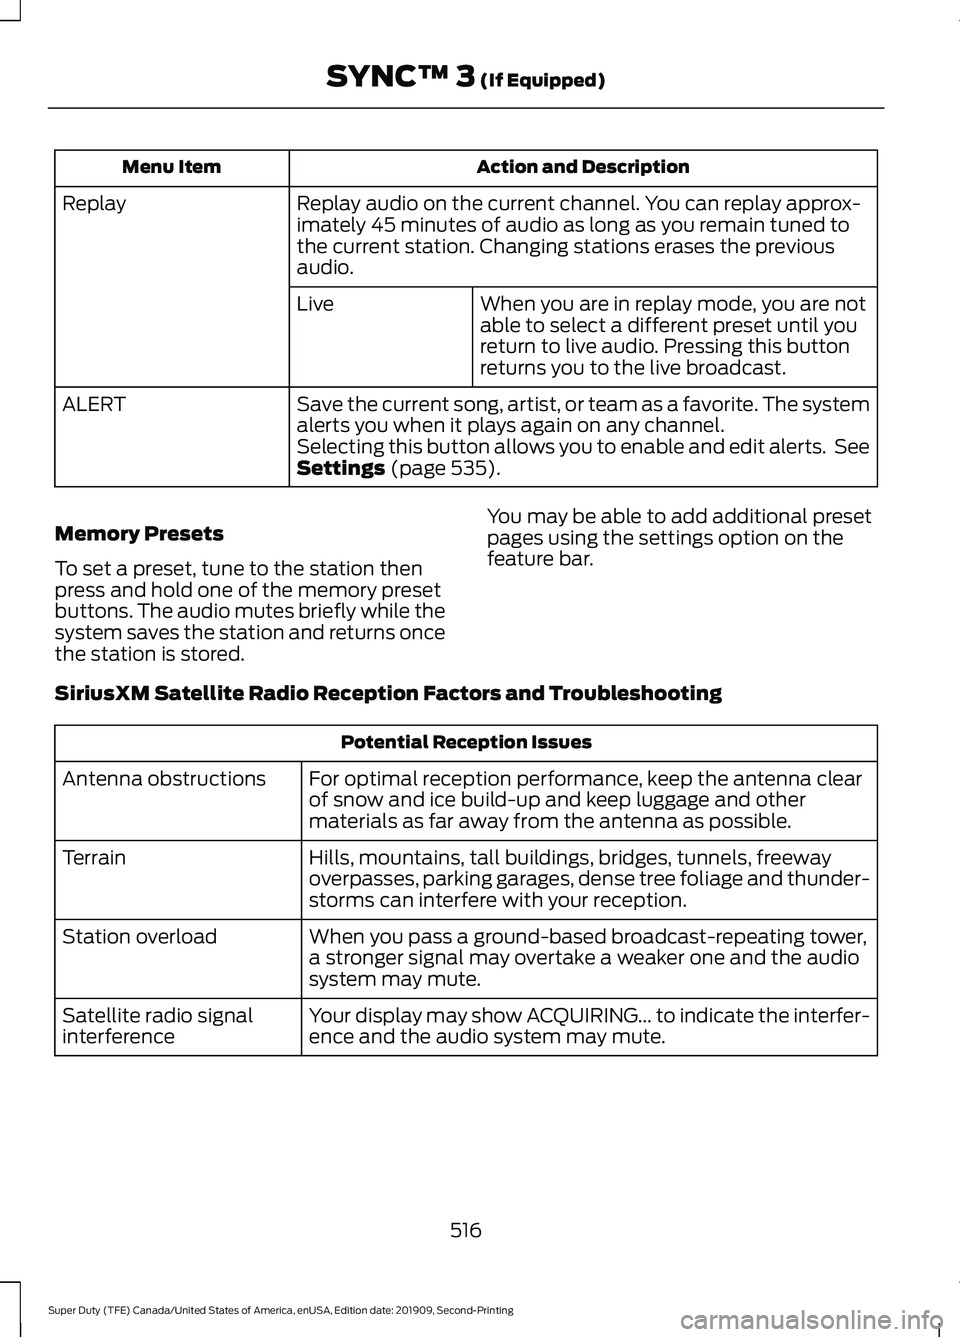
Action and Description
Menu Item
Replay audio on the current channel. You can replay approx-
imately 45 minutes of audio as long as you remain tuned to
the current station. Changing stations erases the previous
audio.
Replay
When you are in replay mode, you are not
able to select a different preset until you
return to live audio. Pressing this button
returns you to the live broadcast.
Live
Save the current song, artist, or team as a favorite. The system
alerts you when it plays again on any channel.
ALERT
Selecting this button allows you to enable and edit alerts. See
Settings (page 535).
Memory Presets
To set a preset, tune to the station then
press and hold one of the memory preset
buttons. The audio mutes briefly while the
system saves the station and returns once
the station is stored. You may be able to add additional preset
pages using the settings option on the
feature bar.
SiriusXM Satellite Radio Reception Factors and Troubleshooting Potential Reception Issues
For optimal reception performance, keep the antenna clear
of snow and ice build-up and keep luggage and other
materials as far away from the antenna as possible.
Antenna obstructions
Hills, mountains, tall buildings, bridges, tunnels, freeway
overpasses, parking garages, dense tree foliage and thunder-
storms can interfere with your reception.
Terrain
When you pass a ground-based broadcast-repeating tower,
a stronger signal may overtake a weaker one and the audio
system may mute.
Station overload
Your display may show ACQUIRING... to indicate the interfer-
ence and the audio system may mute.
Satellite radio signal
interference
516
Super Duty (TFE) Canada/United States of America, enUSA, Edition date: 201909, Second-Printing SYNC™ 3
(If Equipped)
Page 520 of 633
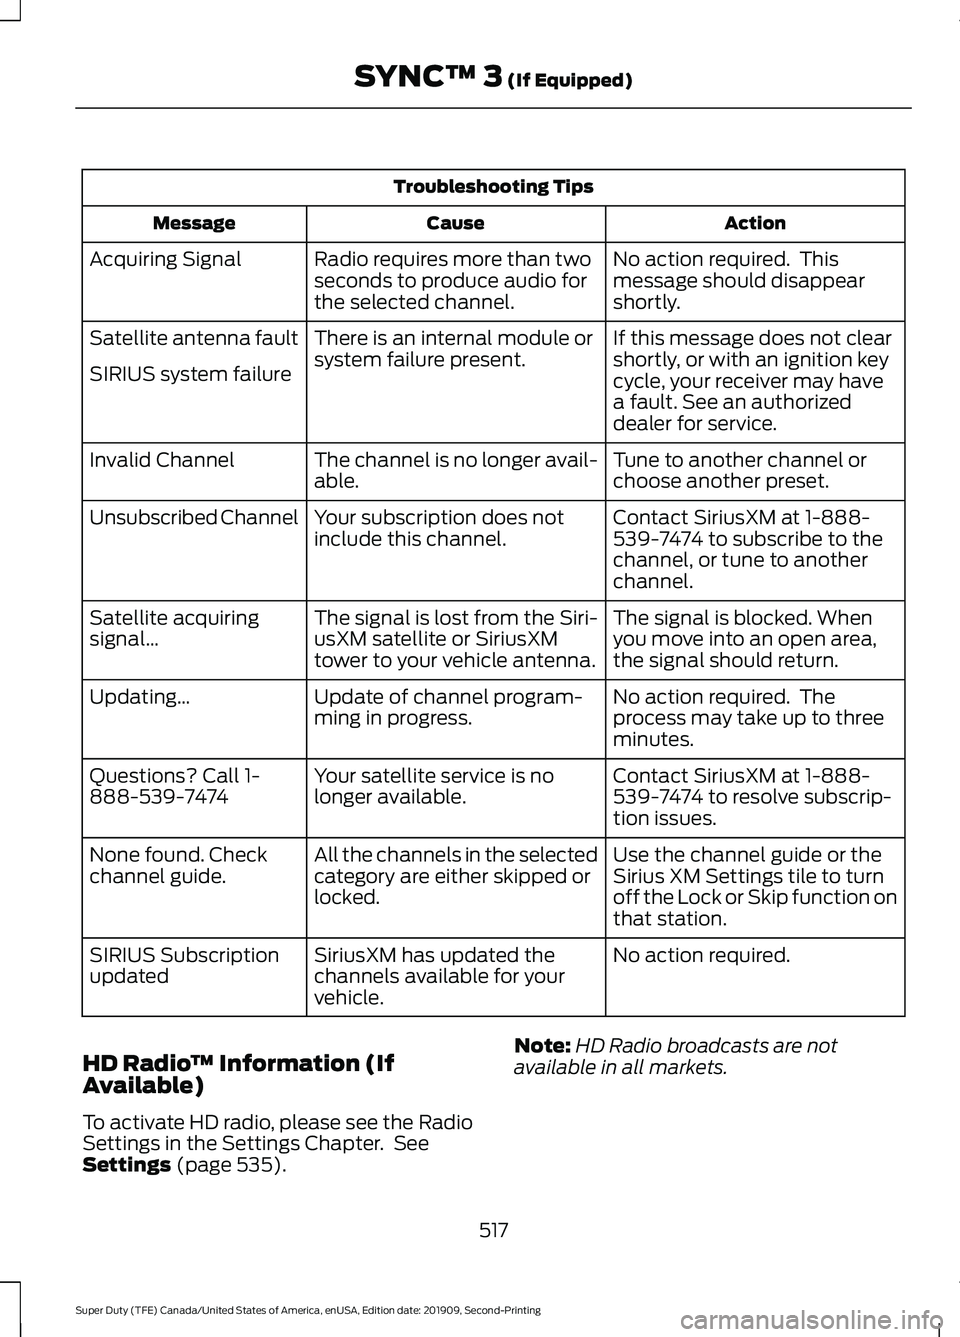
Troubleshooting Tips
Action
Cause
Message
No action required. This
message should disappear
shortly.
Radio requires more than two
seconds to produce audio for
the selected channel.
Acquiring Signal
If this message does not clear
shortly, or with an ignition key
cycle, your receiver may have
a fault. See an authorized
dealer for service.
There is an internal module or
system failure present.
Satellite antenna fault
SIRIUS system failure
Tune to another channel or
choose another preset.
The channel is no longer avail-
able.
Invalid Channel
Contact SiriusXM at 1-888-
539-7474 to subscribe to the
channel, or tune to another
channel.
Your subscription does not
include this channel.
Unsubscribed Channel
The signal is blocked. When
you move into an open area,
the signal should return.
The signal is lost from the Siri-
usXM satellite or SiriusXM
tower to your vehicle antenna.
Satellite acquiring
signal\b
No action required. The
process may take up to three
minutes.
Update of channel program-
ming in progress.
Updating\b
Contact SiriusXM at 1-888-
539-7474 to resolve subscrip-
tion issues.
Your satellite service is no
longer available.
Questions? Call 1-
888-539-7474
Use the channel guide or the
Sirius XM Settings tile to turn
off the Lock or Skip function on
that station.
All the channels in the selected
category are either skipped or
locked.
None found. Check
channel guide.
No action required.
SiriusXM has updated the
channels available for your
vehicle.
SIRIUS Subscription
updated
HD Radio ™ Information (If
Available)
To activate HD radio, please see the Radio
Settings in the Settings Chapter. See
Settings (page 535). Note:
HD Radio broadcasts are not
available in all markets.
517
Super Duty (TFE) Canada/United States of America, enUSA, Edition date: 201909, Second-Printing SYNC™ 3
(If Equipped)