2020 FORD F250 SUPER DUTY check engine
[x] Cancel search: check enginePage 311 of 633
•
Your vehicle's brake system and the
trailer brake system work
independently of each other. Changing
the gain setting on the controller does
not affect the operation of your
vehicle's brakes.
• When you switch the engine off, the
controller output is disabled and the
display and module shut down.
Trailer Lamps WARNING: Never connect any
trailer lamp wiring to the vehicle's tail
lamp wiring; this may damage the
electrical system resulting in fire. Contact
your authorized dealer as soon as
possible for assistance in proper trailer
tow wiring installation. Additional
electrical equipment may be required.
Trailer lamps are required on most towed
vehicles. Make sure all running lights, brake
lights, turn signals and hazard lights are
working.
Before Towing a Trailer
Practice turning, stopping and backing up
to get the feel of your vehicle-trailer
combination before starting on a trip.
When turning, make wider turns so the
trailer wheels clear curbs and other
obstacles.
When Towing a Trailer
• Check your hitch, electrical connections
and trailer wheel lug nuts thoroughly
after you have traveled 50 mi (80 km).
• Do not drive faster than
70 mph
(113 km/h) during the first 500 mi
(800 km).
• Do not make full-throttle starts. •
When stopped in congested or heavy
traffic during hot weather, place the
gearshift in park (P) to aid engine and
transmission cooling and to help A/C
performance.
• Turn off the speed control with heavy
loads or in hilly terrain. The speed
control may turn off automatically
when you are towing on long, steep
grades.
• Shift to a lower gear when driving down
a long or steep hill. Do not apply the
brakes continuously, as they may
overheat and become less effective.
• If your transmission is equipped with a
Grade Assist or Tow/Haul feature, use
this feature when towing. This provides
engine braking and helps eliminate
excessive transmission shifting for
optimum fuel economy and
transmission cooling.
• If your vehicle is equipped with
Adaptive Steering and you have
enabled Tow/Haul, the Adaptive
Steering system adjusts the steering
response to match your vehicle ’s load.
The system reduces vehicle sensitivity
to steering inputs at higher vehicle
speeds while it maintains the ease of
parking and maneuverability at low
speeds.
• If your vehicle is equipped with
AdvanceTrac with RSC, this system
may turn on during typical cornering
maneuvers with a heavily loaded trailer.
This is normal. Turning the corner at a
slower speed while towing may reduce
this tendency.
• If you are towing a trailer frequently in
hot weather, hilly conditions, at the
gross combined weight rating (or any
combination of these factors), consider
refilling your rear axle with synthetic
gear lubricant (if the axle is not already
filled with it). See
Capacities and
Specifications (page 433).
308
Super Duty (TFE) Canada/United States of America, enUSA, Edition date: 201909, Second-Printing Towing
Page 314 of 633
Note:
Failing to put the transfer case in its
neutral position while towing with all four
wheels on the ground will damage vehicle
components.
Note: You can check four-wheel-down
towing status at any time by opening the
driver's door or turning the ignition to the
accessory or on position. A message
displays in the information display
confirming your vehicle is in neutral tow.
To exit four-wheel-down towing and return
the transfer case to its 2H position:
1. With your vehicle still properly secured
to the tow vehicle, put the ignition in
the on position, but do not start the
engine. If your vehicle has an ignition
key, switch the key to on. If your vehicle
has intelligent access, press the engine
START/STOP
button once without
pressing the brake pedal.
2. Press and hold the brake pedal.
3. Shift the transmission out of neutral (N) and into any other gear.
4. Release the brake pedal.
Note: If completed successfully, the
instrument cluster displays 2H and Neutral
Tow Disabled
.
Note: If the indicator light and message do
not display, you must perform the procedure
again from the beginning.
Note: You may hear an audible noise as the
transfer case shifts out of its neutral
position. This is normal.
Note: If
Shift Delayed Pull Forward
displays in the instrument cluster, transfer
case gear tooth blockage is present. See
resolving the shift delayed pull forward
message instructions after this section.
5. Apply the parking brake and disconnect
the vehicle from the tow vehicle. 6. Release the parking brake, start the
engine and shift the transmission to
drive (D) to make sure the transfer
case is out of neutral (N).
7. If the transfer case does not successfully shift out of neutral (N),
set the parking brake until you can have
your vehicle serviced.
Resolving the Shift Delay Pull Forward
Message
If the instrument cluster displays
Shift
Delayed Pull Forward. You need to
perform the following steps:
1. Press and hold the brake pedal.
2. Put the transmission into neutral (N), and then start the engine.
3. With the engine running, shift the transmission to drive (D) and let the
vehicle roll forward, up to
3 ft (1 m).
You may hear an audible noise as the
transfer case shifts out of its neutral
position. This is normal.
4. Make sure the instrument cluster displays
Neutral Tow Disabled.
311
Super Duty (TFE) Canada/United States of America, enUSA, Edition date: 201909, Second-Printing Towing
Page 318 of 633
•
Inspect exhaust system for damage or
looseness.
• Inspect undercarriage fasteners. If any
are loose or damaged, tighten or
replace ensuring that the proper torque
specification is used.
• Inspect the tires for any cuts in the
tread or sidewall area. Also inspect the
sidewall for any bulge indicating
damage to the tire.
• Inspect the wheels for dents, cracks,
or other damage.
• Refit the front license plate if removed
previously.
BREAKING-IN
You need to break in new tires for
approximately 300 mi (480 km). During
this time, your vehicle may exhibit some
unusual driving characteristics.
Avoid driving too fast during the first
1,000 mi (1,600 km)
. Vary your speed
frequently and change up through the
gears early. Do not labor the engine.
Drive your new vehicle at least
1,000 mi
(1,600 km) before towing a trailer. Make
sure you use the specified engine oil. See
Capacities and Specifications
(page
441).
Do not add friction modifier compounds
or special break-in oils during the first few
thousand miles (kilometers) of operation.
These additives may prevent piston ring
seating.
DRIVING THROUGH WATER WARNING:
Do not drive through
flowing or deep water as you may lose
control of your vehicle. Note:
Engine damage can occur if water
enters the air filter.
For Vehicles without Tremor Off-
Road Package
Note: Driving through standing water can
cause vehicle damage.
Note: Drive through water in an emergency
only and not as part of normal driving.
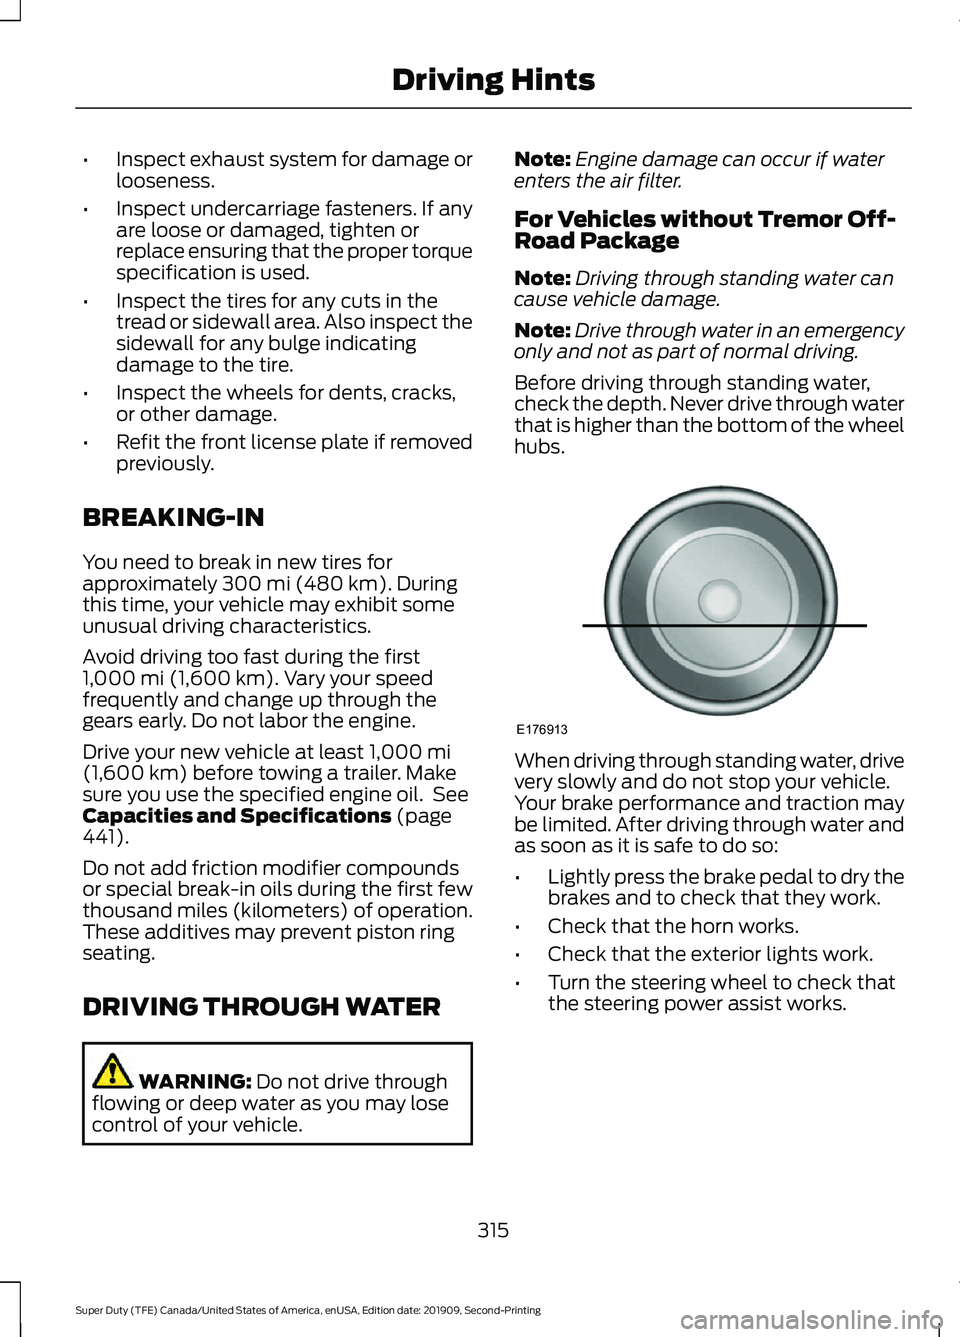
Before driving through standing water,
check the depth. Never drive through water
that is higher than the bottom of the wheel
hubs. When driving through standing water, drive
very slowly and do not stop your vehicle.
Your brake performance and traction may
be limited. After driving through water and
as soon as it is safe to do so:
•
Lightly press the brake pedal to dry the
brakes and to check that they work.
• Check that the horn works.
• Check that the exterior lights work.
• Turn the steering wheel to check that
the steering power assist works.
315
Super Duty (TFE) Canada/United States of America, enUSA, Edition date: 201909, Second-Printing Driving HintsE176913
Page 345 of 633

GENERAL INFORMATION
Have your vehicle serviced regularly to help
maintain its roadworthiness and resale
value. There is a large network of
authorized dealers that are there to help
you with their professional servicing
expertise. We believe that their specially
trained technicians are best qualified to
service your vehicle properly and expertly.
They are supported by a wide range of
highly specialized tools developed
specifically for servicing your vehicle.
If your vehicle requires professional service,
an authorized dealer can provide the
necessary parts and service. Check your
warranty information to find out which
parts and services are covered.
Use only recommended fuels, lubricants,
fluids and service parts conforming to
specifications. Motorcraft® parts are
designed and built to provide the best
performance in your vehicle.
Precautions
•
Do not work on a hot engine.
• Make sure that nothing gets caught in
moving parts.
• Do not work on a vehicle with the
engine running in an enclosed space,
unless you are sure you have enough
ventilation.
• Keep all open flames and other burning
material (such as cigarettes) away
from the battery and all fuel related
parts.
Working with the Engine Off
1. Set the parking brake and shift the transmission to park (P).
2. Switch off the engine.
3. Block the wheels. Working with the Engine On WARNING: To reduce the risk of
vehicle damage and personal burn
injuries, do not start your engine with the
air cleaner removed and do not remove
it while the engine is running.
1. Set the parking brake and shift the transmission to park (P).
2. Block the wheels.
OPENING AND CLOSING THE
HOOD
1. Inside the vehicle, pull the hood release
handle located under the left hand side
of the instrument panel. 2. Go to the front of your vehicle and
locate the secondary release lever
under the front of the hood near the
center of your vehicle.
342
Super Duty (TFE) Canada/United States of America, enUSA, Edition date: 201909, Second-Printing MaintenanceE166491
Page 346 of 633
3. Raise the hood until the lift cylinders
hold it open.
4. To close, lower the hood and make sure that it is closed properly and fully
latched.
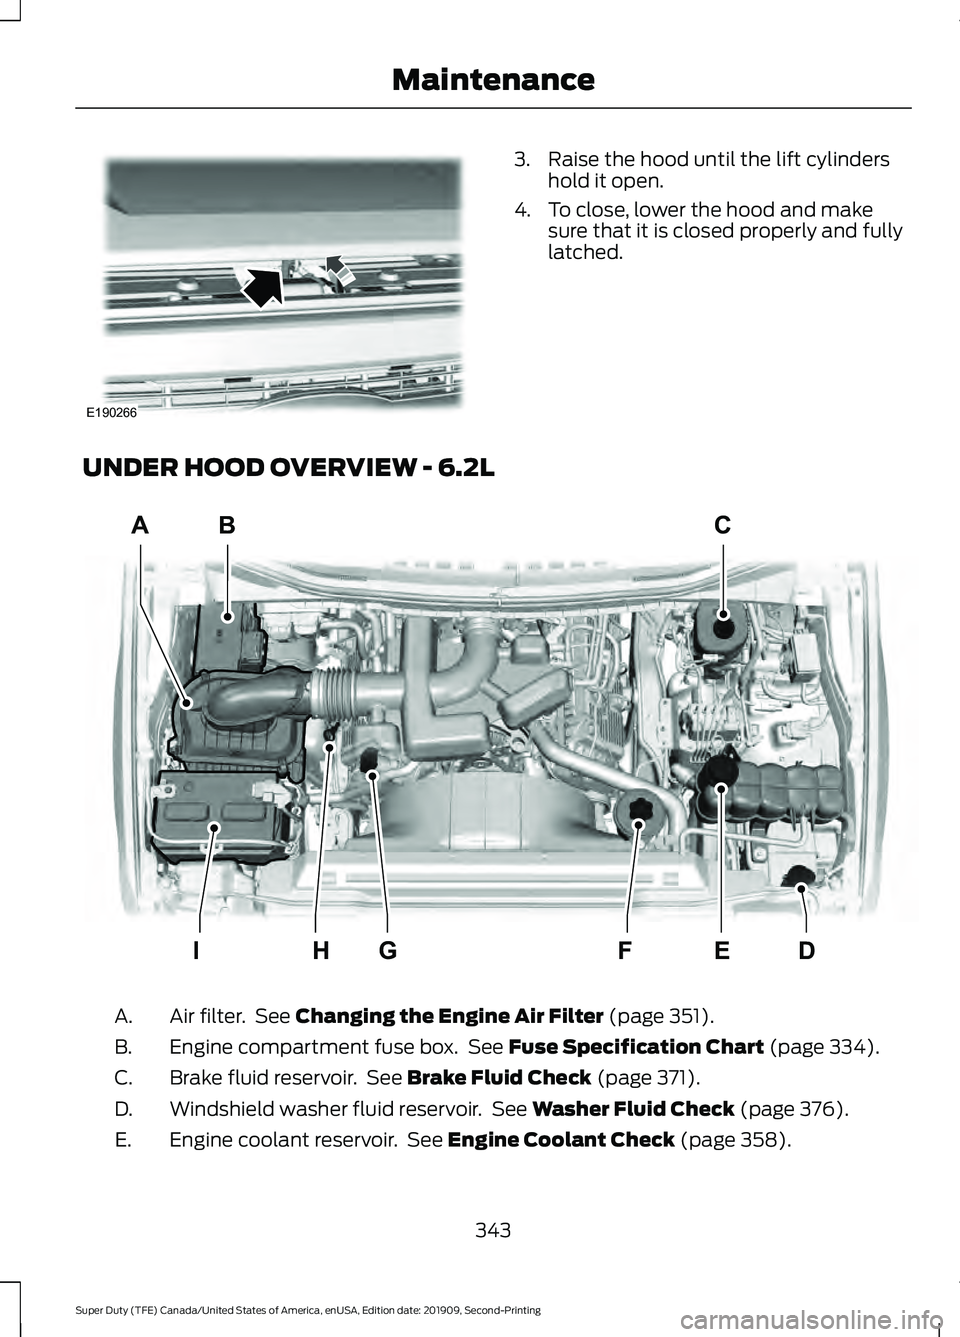
UNDER HOOD OVERVIEW - 6.2L Air filter. See Changing the Engine Air Filter (page 351).
A.
Engine compartment fuse box. See
Fuse Specification Chart (page 334).
B.
Brake fluid reservoir. See
Brake Fluid Check (page 371).
C.
Windshield washer fluid reservoir. See
Washer Fluid Check (page 376).
D.
Engine coolant reservoir. See
Engine Coolant Check (page 358).
E.
343
Super Duty (TFE) Canada/United States of America, enUSA, Edition date: 201909, Second-Printing MaintenanceE190266 AB
IDEGH
C
FE314770
Page 347 of 633
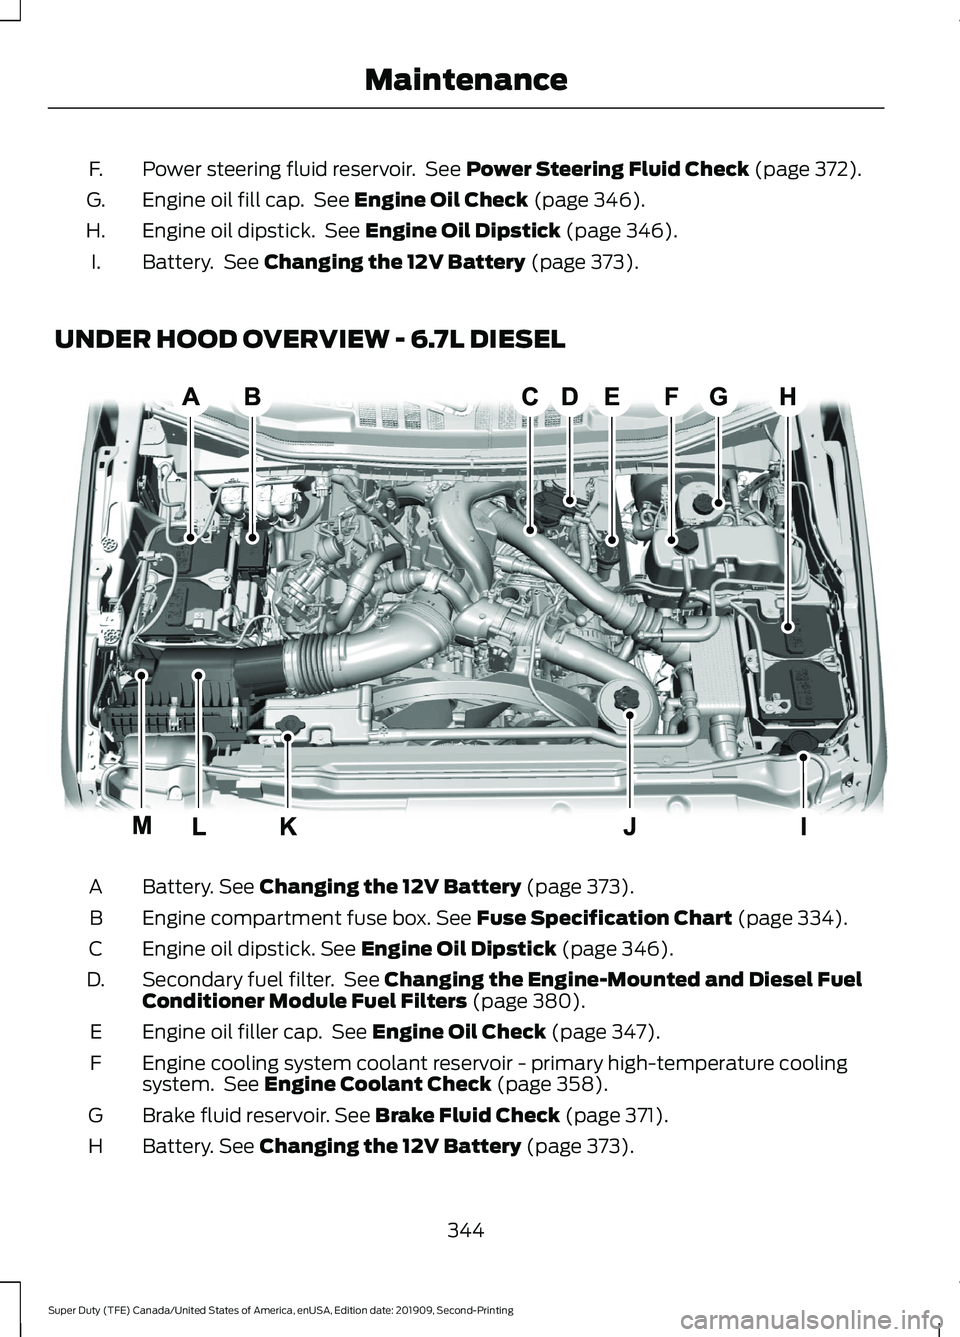
Power steering fluid reservoir. See Power Steering Fluid Check (page 372).
F.
Engine oil fill cap. See
Engine Oil Check (page 346).
G.
Engine oil dipstick. See
Engine Oil Dipstick (page 346).
H.
Battery. See
Changing the 12V Battery (page 373).
I.
UNDER HOOD OVERVIEW - 6.7L DIESEL Battery.
See Changing the 12V Battery (page 373).
A
Engine compartment fuse box.
See Fuse Specification Chart (page 334).
B
Engine oil dipstick.
See Engine Oil Dipstick (page 346).
C
Secondary fuel filter. See
Changing the Engine-Mounted and Diesel Fuel
Conditioner Module Fuel Filters (page 380).
D.
Engine oil filler cap. See
Engine Oil Check (page 347).
E
Engine cooling system coolant reservoir - primary high-temperature cooling
system. See
Engine Coolant Check (page 358).
F
Brake fluid reservoir.
See Brake Fluid Check (page 371).
G
Battery.
See Changing the 12V Battery (page 373).
H
344
Super Duty (TFE) Canada/United States of America, enUSA, Edition date: 201909, Second-Printing MaintenanceE310091
Page 348 of 633
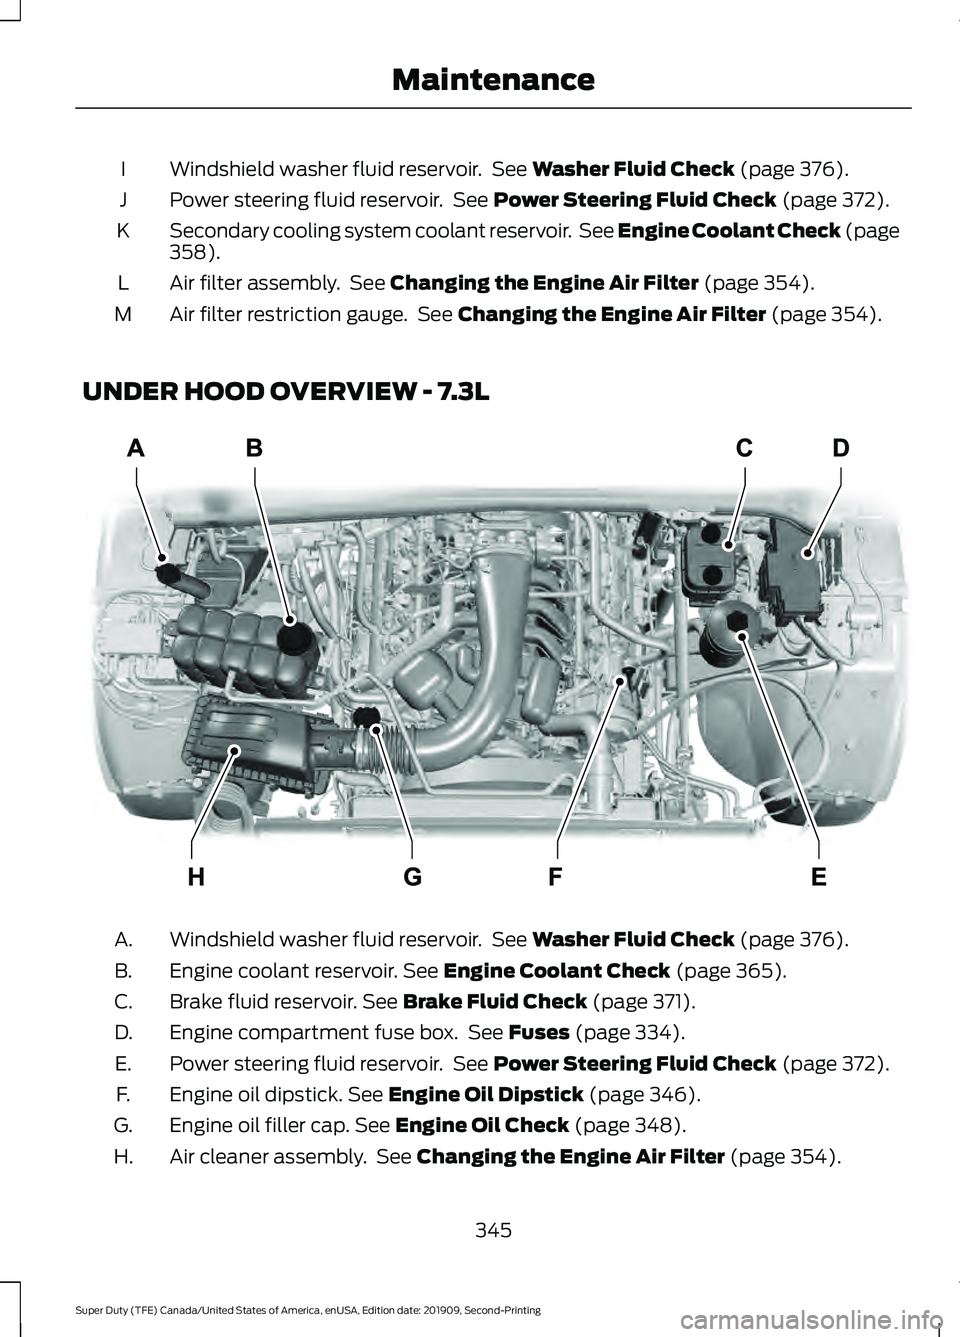
Windshield washer fluid reservoir. See Washer Fluid Check (page 376).
I
Power steering fluid reservoir. See
Power Steering Fluid Check (page 372).
J
Secondary cooling system coolant reservoir. See Engine Coolant Check
(page
358).
K
Air filter assembly. See
Changing the Engine Air Filter (page 354).
L
Air filter restriction gauge. See
Changing the Engine Air Filter (page 354).
M
UNDER HOOD OVERVIEW - 7.3L Windshield washer fluid reservoir. See
Washer Fluid Check (page 376).
A.
Engine coolant reservoir.
See Engine Coolant Check (page 365).
B.
Brake fluid reservoir.
See Brake Fluid Check (page 371).
C.
Engine compartment fuse box. See
Fuses (page 334).
D.
Power steering fluid reservoir. See
Power Steering Fluid Check (page 372).
E.
Engine oil dipstick.
See Engine Oil Dipstick (page 346).
F.
Engine oil filler cap.
See Engine Oil Check (page 348).
G.
Air cleaner assembly. See
Changing the Engine Air Filter (page 354).
H.
345
Super Duty (TFE) Canada/United States of America, enUSA, Edition date: 201909, Second-Printing MaintenanceE314803
Page 349 of 633
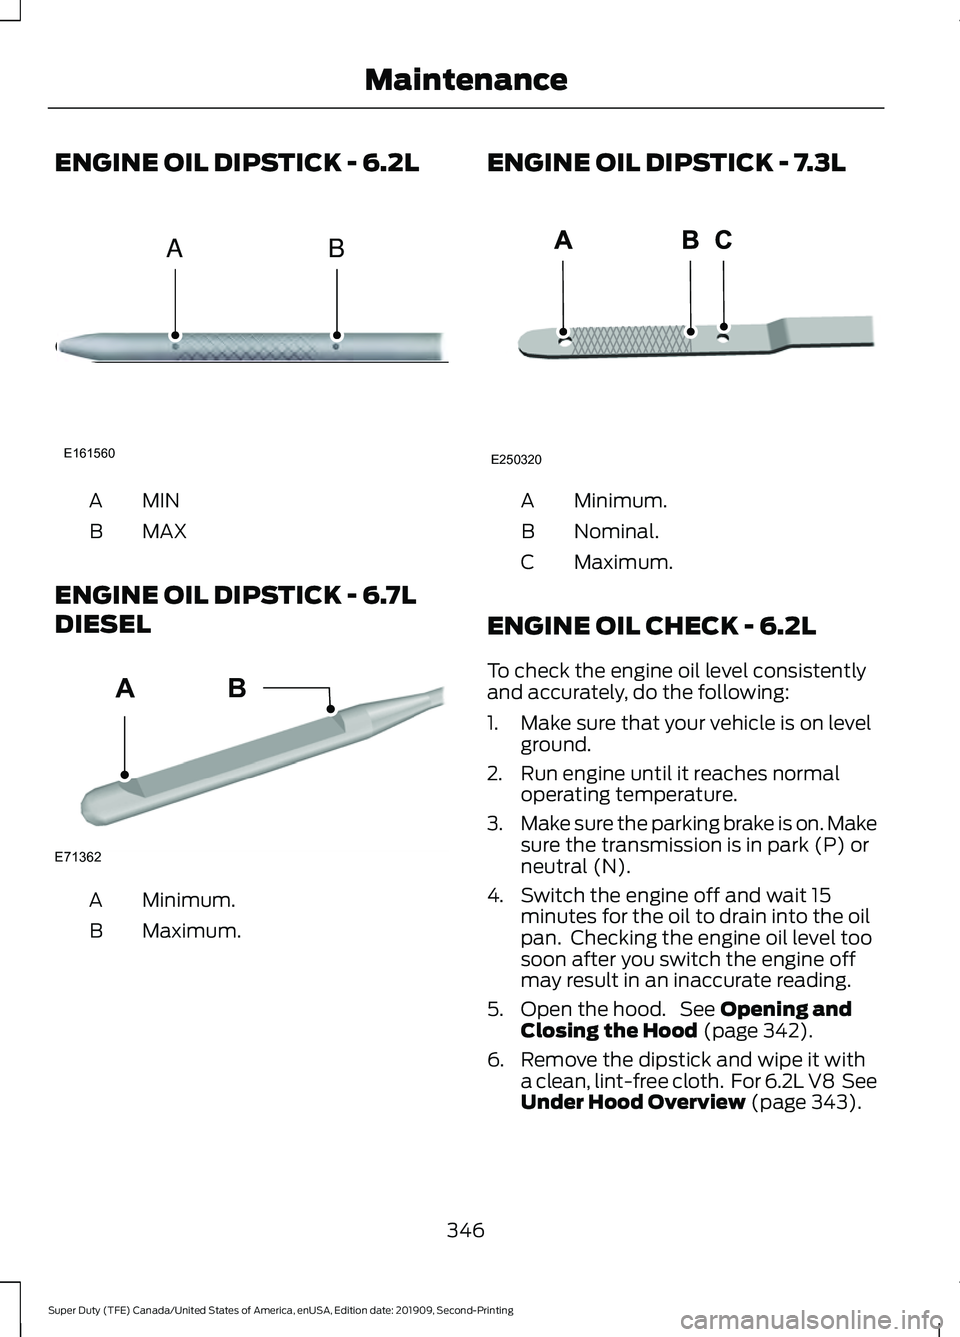
ENGINE OIL DIPSTICK - 6.2L
MINA
MAX
B
ENGINE OIL DIPSTICK - 6.7L
DIESEL Minimum.
A
Maximum.
B ENGINE OIL DIPSTICK - 7.3L Minimum.
A
Nominal.
B
Maximum.
C
ENGINE OIL CHECK - 6.2L
To check the engine oil level consistently
and accurately, do the following:
1. Make sure that your vehicle is on level ground.
2. Run engine until it reaches normal operating temperature.
3. Make sure the parking brake is on. Make
sure the transmission is in park (P) or
neutral (N).
4. Switch the engine off and wait 15 minutes for the oil to drain into the oil
pan. Checking the engine oil level too
soon after you switch the engine off
may result in an inaccurate reading.
5. Open the hood. See Opening and
Closing the Hood (page 342).
6. Remove the dipstick and wipe it with a clean, lint-free cloth. For 6.2L V8 See
Under Hood Overview
(page 343).
346
Super Duty (TFE) Canada/United States of America, enUSA, Edition date: 201909, Second-Printing MaintenanceE161560
AB E71362
AB E250320