2020 FORD F250 SUPER DUTY instrument cluster
[x] Cancel search: instrument clusterPage 211 of 633
Understanding Your SelectShift
Automatic
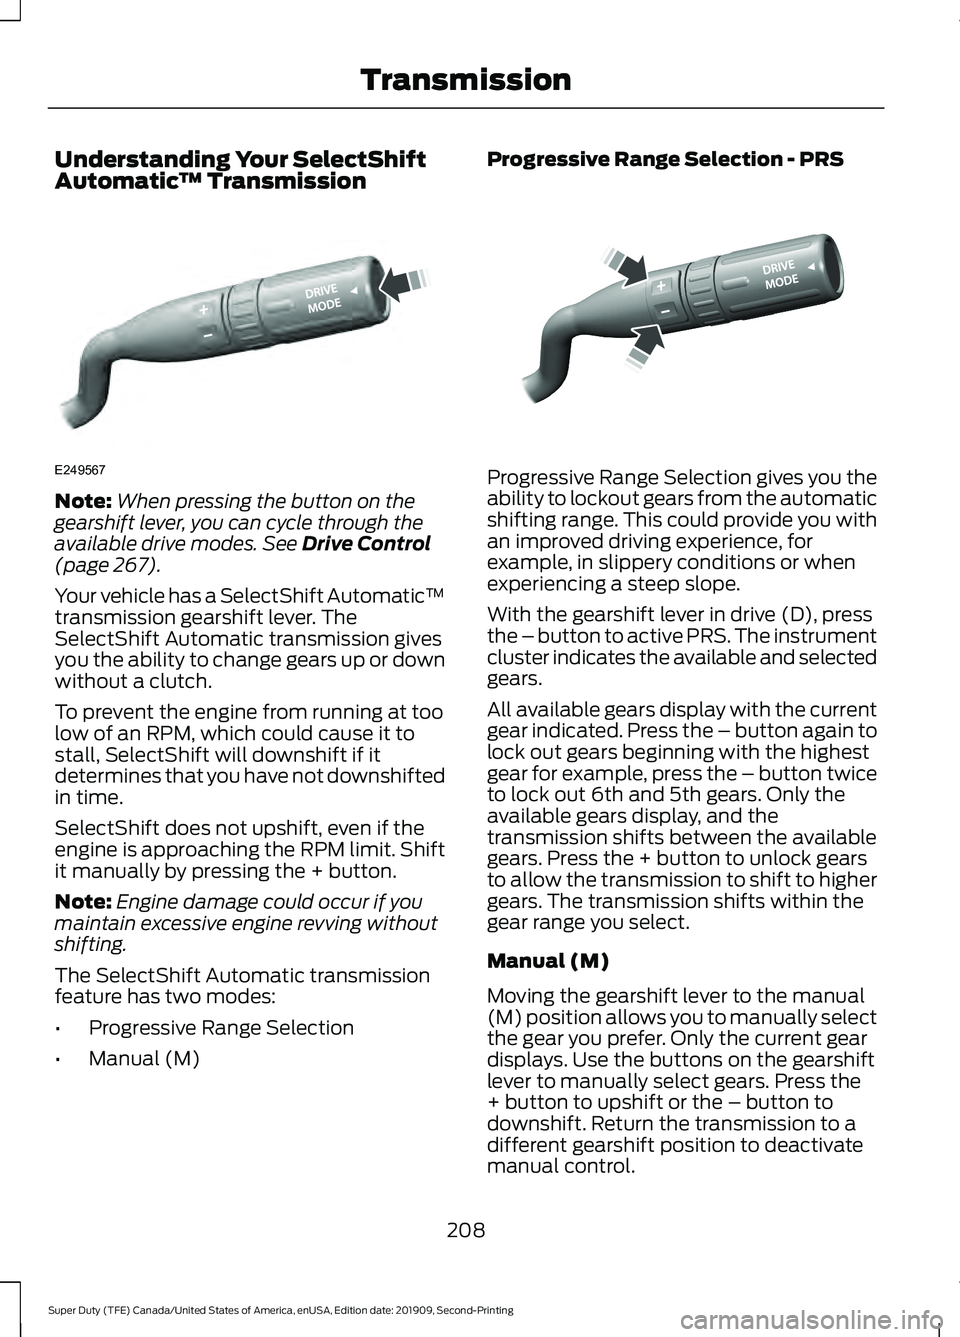
™ TransmissionNote:
When pressing the button on the
gearshift lever, you can cycle through the
available drive modes. See Drive Control
(page 267).
Your vehicle has a SelectShift Automatic ™
transmission gearshift lever. The
SelectShift Automatic transmission gives
you the ability to change gears up or down
without a clutch.
To prevent the engine from running at too
low of an RPM, which could cause it to
stall, SelectShift will downshift if it
determines that you have not downshifted
in time.
SelectShift does not upshift, even if the
engine is approaching the RPM limit. Shift
it manually by pressing the + button.
Note: Engine damage could occur if you
maintain excessive engine revving without
shifting.
The SelectShift Automatic transmission
feature has two modes:
• Progressive Range Selection
• Manual (M) Progressive Range Selection - PRS
Progressive Range Selection gives you the
ability to lockout gears from the automatic
shifting range. This could provide you with
an improved driving experience, for
example, in slippery conditions or when
experiencing a steep slope.
With the gearshift lever in drive (D), press
the – button to active PRS. The instrument
cluster indicates the available and selected
gears.
All available gears display with the current
gear indicated. Press the – button again to
lock out gears beginning with the highest
gear for example, press the – button twice
to lock out 6th and 5th gears. Only the
available gears display, and the
transmission shifts between the available
gears. Press the + button to unlock gears
to allow the transmission to shift to higher
gears. The transmission shifts within the
gear range you select.
Manual (M)
Moving the gearshift lever to the manual
(M) position allows you to manually select
the gear you prefer. Only the current gear
displays. Use the buttons on the gearshift
lever to manually select gears. Press the
+ button to upshift or the – button to
downshift. Return the transmission to a
different gearshift position to deactivate
manual control.
208
Super Duty (TFE) Canada/United States of America, enUSA, Edition date: 201909, Second-Printing TransmissionE249567 E312894
Page 223 of 633
LIMITED SLIP DIFFERENTIAL
(IF EQUIPPED)
This axle provides added traction on
slippery surfaces, particularly when one
wheel is on a poor traction surface. Under
normal conditions, the limited-slip axle
functions like a standard rear axle. The axle
may exhibit a slight noise or vibration
during tight turns with low vehicle speed.
This is normal behavior and indicates the
axle is working.
ELECTRONIC LOCKING
DIFFERENTIAL (IF EQUIPPED)
Note: The electronic locking differential is
for off-road use only and is not for use on
dry pavement. Using the electronic locking
differential on dry pavement will result in
increased tire wear, noise and vibration.
The electronic locking differential is a
device housed in the rear axle that allows
both rear wheels to turn at the same
speed. The electronic locking differential
can provide additional traction should your
vehicle become stuck. You can activate
the differential electronically and shift it
on the fly within the differential operating
speed range. The differential is for use in
mud, rocks, sand, or any off-road condition
where you need maximum traction. It is
not for use on dry pavement.
The following conditions will affect the
electronic locking differential:
• The electronic locking differential will
not engage if your vehicle speed is
above 20 mph (32 km/h) in 4x2, or 4x4
High modes.
• The electronic locking differential will
not engage if your vehicle speed is
above or
56 mph (90 km/h) in 4X4
Low. •
The electronic locking differential may
not engage if you press your
accelerator pedal during an
engagement attempt. A message may
display in the instrument display
guiding you to release the accelerator
pedal.
• In 4x2, and 4x4 High modes, the
electronic locking differential will
automatically disengage at speeds
above
25 mph (41 km/h) and will
automatically reengage at speeds
below
20 mph (32 km/h).
• In 4L (4X4 low), the electronic locking
differential will automatically
disengage at speeds above
62 mph
(100 km/h) and will automatically
reengage at speeds below 56 mph
(90 km/h).
• The AdvanceTrac system has the
ability to take over control of the
electronic locking differential and
disable it during driving maneuvers
when necessary.
When you switch the system on, if you do
not meet the required conditions for
electronic locking differential activation,
the instrument cluster will display the
appropriate information guiding you
through the proper activation process.
Activating the Electronic Locking
Differential
Note: Do not use electronic locking
differential on dry, hard surfaced roads.
Doing so will produce excessive noise,
vibration and increase tire wear.
Note: If the electronic locking differential
has difficulty disengaging, release the
accelerator pedal and turn the steering
wheel in the opposite direction while rolling.
220
Super Duty (TFE) Canada/United States of America, enUSA, Edition date: 201909, Second-Printing Rear Axle
Page 227 of 633
You can use this feature with tow/haul or
progressive range selection to provide
further increased engine braking. The
transmission automatically upshifts to
prevent the engine from entering the red
zone on the tachometer. See Automatic
Transmission (page 207).
HINTS ON DRIVING WITH
ANTI-LOCK BRAKES
The anti-lock braking system does not
eliminate the risks when:
• You drive too closely to the vehicle in
front of you.
• Your vehicle is hydroplaning.
• You take corners too fast.
• The road surface is poor.
Note: If the system activates, the brake
pedal may pulse and may travel further.
Maintain pressure on the brake pedal. You
may also hear a noise from the system. This
is normal.
PARKING BRAKE WARNING:
Always set the parking
brake fully and make sure the
transmission is placed in park (P). Failure
to set the parking brake and engage park
could result in vehicle roll-away, property
damage or bodily injury. Turn the ignition
to the lock position and remove the key
whenever you leave your vehicle.
Apply the parking brake whenever your
vehicle is parked. Press the pedal
downward to set the parking brake. The
brake warning lamp in the instrument
cluster will illuminate and remains
illuminated until the parking brake is
released. To release, pull the brake release lever
located at the lower left side of the
instrument panel.
If you are parking your vehicle on a grade
or with a trailer, press and hold the brake
pedal down, then set the parking brake.
There may be a little vehicle movement as
the parking brake sets to hold the vehicle's
weight. This is normal and should be no
reason for concern. If needed, press and
hold the service brake pedal down, then
try reapplying the parking brake. Chock the
wheels if required. If the parking brake
cannot hold the weight of the vehicle, the
parking brake may need to be serviced or
the vehicle may be overloaded.
HILL START ASSIST
WARNING:
The system does not
replace the parking brake. When you
leave your vehicle, always apply the
parking brake. WARNING:
You must remain in
your vehicle when the system turns on.
At all times, you are responsible for
controlling your vehicle, supervising the
system and intervening, if required.
Failure to take care may result in the loss
of control of your vehicle, serious
personal injury or death. WARNING:
The system will turn
off if a malfunction is apparent or if you
rev the engine excessively. Failure to take
care may result in the loss of control of
your vehicle, serious personal injury or
death.
The system makes it easier to pull away
when your vehicle is on a slope without the
need to use the parking brake.
224
Super Duty (TFE) Canada/United States of America, enUSA, Edition date: 201909, Second-Printing Brakes
Page 234 of 633
PRINCIPLE OF OPERATION
WARNING: Hill descent control
cannot control descent in all surface
conditions and circumstances, such as
ice or extremely steep grades. Hill
descent control is a driver assist system
and cannot substitute for good judgment
by the driver. Failure to do so may result
in loss of vehicle control, crash or serious
injury. WARNING:
Hill descent control
does not provide hill hold at zero miles
per hour (0 kilometers per hour). When
stopped, the parking brake must be
applied or the vehicle must be placed in
P
(Park) or it may roll away.
Hill descent control allows the driver to set
and maintain vehicle speed while
descending steep grades in various surface
conditions.
Hill descent control can maintain vehicle
speeds on downhill grades between 2 mph
(3 km/h) and 12 mph (20 km/h). Above 20
mph (32 km/h), the system remains
armed, but descent speed cannot be set
or maintained.
Hill descent control requires a cooling
down interval after a period of sustained
use. The amount of time that the feature
can remain active before cooling varies
with conditions. The system will provide a
warning in the message center and a chime
will sound when the system is about to
disengage for cooling. At this time,
manually apply the brakes as needed to
maintain descent speed. USING HILL DESCENT
CONTROL Press and release the hill
descent button located on the
instrument panel. A light in the
cluster will illuminate and a chime will
sound when this feature is activated.
To increase descent speed, press the
accelerator pedal until the desired speed
is reached. To decrease descent speed,
press the brake pedal until the desired
speed is reached.
Whether accelerating or decelerating, once
the desired descent speed is reached,
remove your feet from the pedals and the
chosen vehicle speed will be maintained.
Note: Noise from the ABS pump motor may
be observed during hill descent control
operation. This is a normal characteristic of
the ABS and should be no reason for
concern.
Hill descent modes
• At speeds below 20 mph (32 km/h):
When the Hill Descent Control switch
is pressed and Hill Descent Control is
active, the Hill Descent Control telltale
will flash.
• At speeds below 20 mph (32 km/h):
When the Hill Descent Control switch
is pressed and conditions are not
correct for hill descent activation, the
Hill Descent Control system will be
enabled, the Hill Descent Control
telltale will be solid and a message will
display in the information display.
• At speeds above 20 mph (32 km/h):
When the Hill Descent Control switch
is pressed, the Hill Descent Control
system will be enabled, the telltale in
the cluster will not be illuminated and
a message will be displayed in the
information display.
231
Super Duty (TFE) Canada/United States of America, enUSA, Edition date: 201909, Second-Printing Terrain Control
(If Equipped)E163957
Page 247 of 633
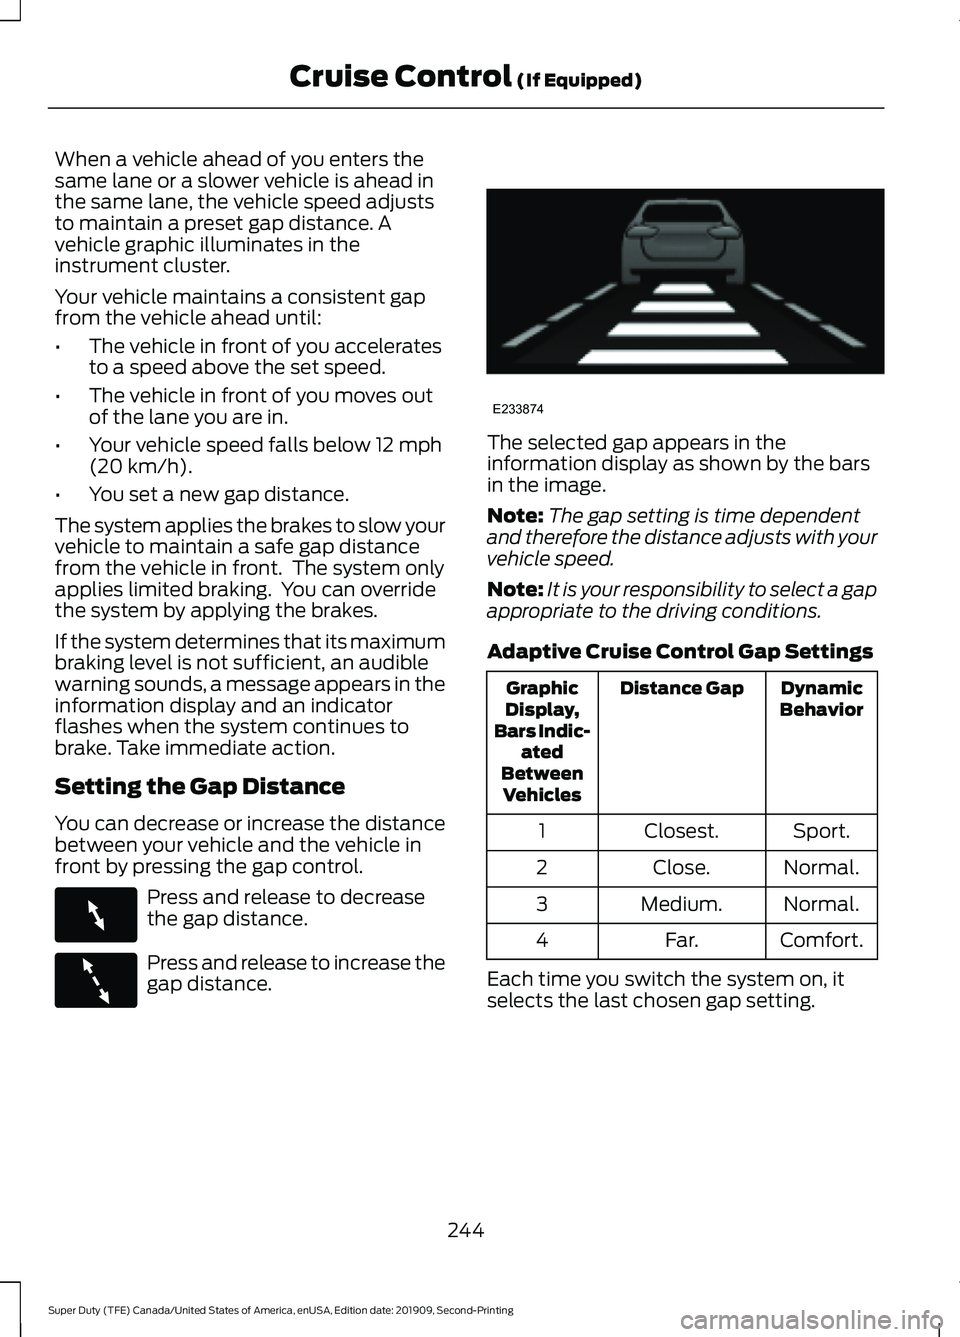
When a vehicle ahead of you enters the
same lane or a slower vehicle is ahead in
the same lane, the vehicle speed adjusts
to maintain a preset gap distance. A
vehicle graphic illuminates in the
instrument cluster.
Your vehicle maintains a consistent gap
from the vehicle ahead until:
•
The vehicle in front of you accelerates
to a speed above the set speed.
• The vehicle in front of you moves out
of the lane you are in.
• Your vehicle speed falls below 12 mph
(20 km/h).
• You set a new gap distance.
The system applies the brakes to slow your
vehicle to maintain a safe gap distance
from the vehicle in front. The system only
applies limited braking. You can override
the system by applying the brakes.
If the system determines that its maximum
braking level is not sufficient, an audible
warning sounds, a message appears in the
information display and an indicator
flashes when the system continues to
brake. Take immediate action.
Setting the Gap Distance
You can decrease or increase the distance
between your vehicle and the vehicle in
front by pressing the gap control. Press and release to decrease
the gap distance.
Press and release to increase the
gap distance. The selected gap appears in the
information display as shown by the bars
in the image.
Note:
The gap setting is time dependent
and therefore the distance adjusts with your
vehicle speed.
Note: It is your responsibility to select a gap
appropriate to the driving conditions.
Adaptive Cruise Control Gap Settings Dynamic
Behavior
Distance Gap
Graphic
Display,
Bars Indic- ated
Between Vehicles
Sport.
Closest.
1
Normal.
Close.
2
Normal.
Medium.
3
Comfort.
Far.
4
Each time you switch the system on, it
selects the last chosen gap setting.
244
Super Duty (TFE) Canada/United States of America, enUSA, Edition date: 201909, Second-Printing Cruise Control
(If Equipped)E263697 E263696 E233874
Page 258 of 633
The system uses radar sensors that are
located inside the tail lamp on each side
of your vehicle. Any dirt, mud and snow in
front of the sensors or driving in heavy rain
can cause system degradation. Also, other
types of obstructions in front of the sensor
can cause system degradation. This is
referred to as a
‘blocked ’ condition.
Note: Do not apply bumper stickers and/or
repair compound to these areas, this can
cause degraded system performance.
If the system detects a degraded
performance condition, a message warning
appears in the display screen. The alert
indicators remain ON and the system no
longer provides any warnings. You can
clear the warning but the alert indicators
remain illuminated.
A "blocked" condition can be cleared in
two ways:
• After the blockage in front of the
sensors is removed or the
rainfall/snowfall rate decreases or
stops, drive for a few minutes in traffic
to allow the sensors to detect passing
vehicles.
• By cycling the ignition from ON to OFF
and then back ON.
Note: If your vehicle has a tow bar with a
factory equipped trailer tow module and it
is towing a trailer, the sensors will
automatically turn the Blind Spot
Information System off. If your vehicle has
a tow bar but no factory equipped trailer
tow module, it is recommended to turn the
Blind Spot Information System off
manually. Operating the Blind Spot
Information System without the Blind Spot
Trailer Tow package and a trailer attached
will cause poor system performance. Blind Spot Information System
with Trailer Tow (If Equipped)
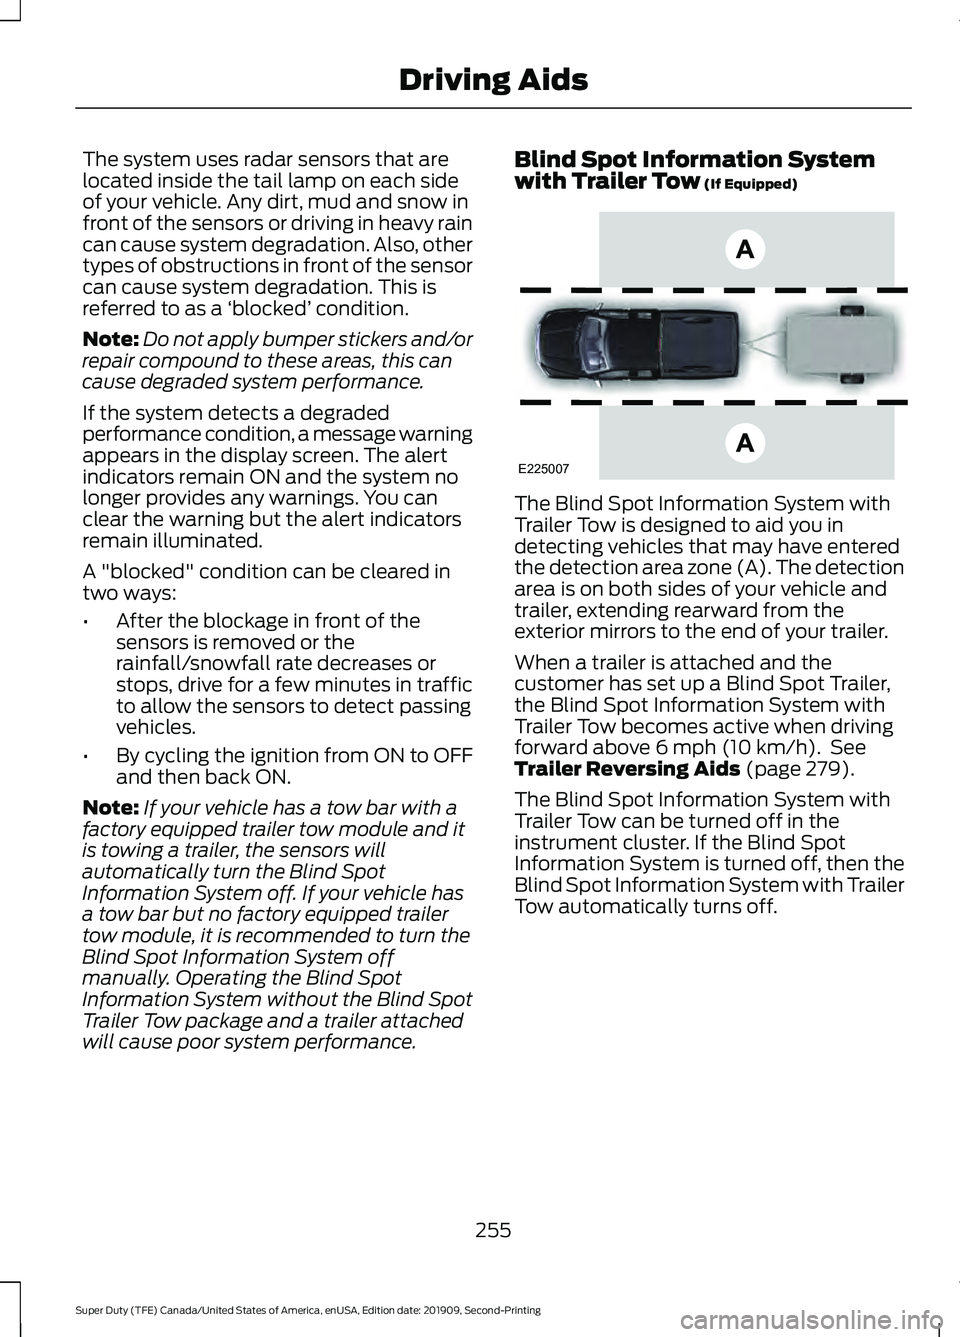
The Blind Spot Information System with
Trailer Tow is designed to aid you in
detecting vehicles that may have entered
the detection area zone (A). The detection
area is on both sides of your vehicle and
trailer, extending rearward from the
exterior mirrors to the end of your trailer.
When a trailer is attached and the
customer has set up a Blind Spot Trailer,
the Blind Spot Information System with
Trailer Tow becomes active when driving
forward above
6 mph (10 km/h). See
Trailer Reversing Aids (page 279).
The Blind Spot Information System with
Trailer Tow can be turned off in the
instrument cluster. If the Blind Spot
Information System is turned off, then the
Blind Spot Information System with Trailer
Tow automatically turns off.
255
Super Duty (TFE) Canada/United States of America, enUSA, Edition date: 201909, Second-Printing Driving AidsE225007
Page 259 of 633
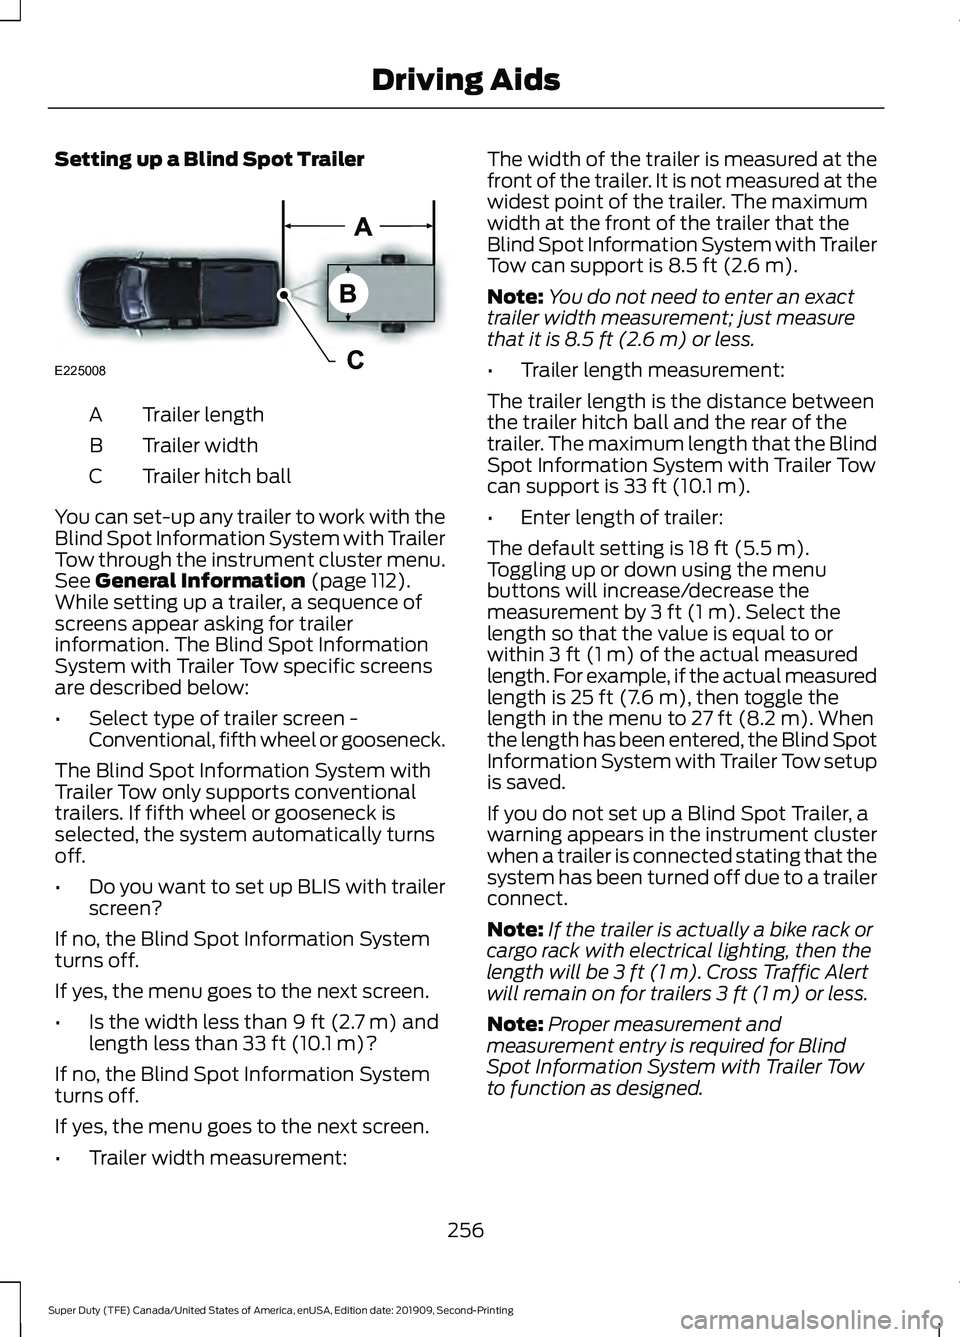
Setting up a Blind Spot Trailer
Trailer length
A
Trailer width
B
Trailer hitch ball
C
You can set-up any trailer to work with the
Blind Spot Information System with Trailer
Tow through the instrument cluster menu.
See General Information (page 112).
While setting up a trailer, a sequence of
screens appear asking for trailer
information. The Blind Spot Information
System with Trailer Tow specific screens
are described below:
• Select type of trailer screen -
Conventional, fifth wheel or gooseneck.
The Blind Spot Information System with
Trailer Tow only supports conventional
trailers. If fifth wheel or gooseneck is
selected, the system automatically turns
off.
• Do you want to set up BLIS with trailer
screen?
If no, the Blind Spot Information System
turns off.
If yes, the menu goes to the next screen.
• Is the width less than
9 ft (2.7 m) and
length less than 33 ft (10.1 m)?
If no, the Blind Spot Information System
turns off.
If yes, the menu goes to the next screen.
• Trailer width measurement: The width of the trailer is measured at the
front of the trailer. It is not measured at the
widest point of the trailer. The maximum
width at the front of the trailer that the
Blind Spot Information System with Trailer
Tow can support is
8.5 ft (2.6 m).
Note: You do not need to enter an exact
trailer width measurement; just measure
that it is
8.5 ft (2.6 m) or less.
• Trailer length measurement:
The trailer length is the distance between
the trailer hitch ball and the rear of the
trailer. The maximum length that the Blind
Spot Information System with Trailer Tow
can support is
33 ft (10.1 m).
• Enter length of trailer:
The default setting is
18 ft (5.5 m).
Toggling up or down using the menu
buttons will increase/decrease the
measurement by
3 ft (1 m). Select the
length so that the value is equal to or
within
3 ft (1 m) of the actual measured
length. For example, if the actual measured
length is
25 ft (7.6 m), then toggle the
length in the menu to 27 ft (8.2 m). When
the length has been entered, the Blind Spot
Information System with Trailer Tow setup
is saved.
If you do not set up a Blind Spot Trailer, a
warning appears in the instrument cluster
when a trailer is connected stating that the
system has been turned off due to a trailer
connect.
Note: If the trailer is actually a bike rack or
cargo rack with electrical lighting, then the
length will be
3 ft (1 m). Cross Traffic Alert
will remain on for trailers 3 ft (1 m) or less.
Note: Proper measurement and
measurement entry is required for Blind
Spot Information System with Trailer Tow
to function as designed.
256
Super Duty (TFE) Canada/United States of America, enUSA, Edition date: 201909, Second-Printing Driving AidsE225008
Page 260 of 633
System Operation
If you select a trailer in the display screen
prior to connecting the trailer, the system
will load that configuration and the
information cluster displays a message
when the trailer is connected. A second
message appears stating Cross Traffic
Alert has been turned off; the Blind Spot
Information System with Trailer Tow still
functions normally when driving forward.
If no trailer has been set up and a trailer is
connected, the instrument cluster provides
a message indicating a trailer is connected
followed by a message asking to select a
trailer from the existing list of trailers or to
add a trailer. In order for the Blind Spot
Information System with Trailer Tow to
function, an existing trailer must be
selected or a new trailer must be added. If
the request is ignored or if you exit the
screen, a message appears prompting you
that the system has been turned off due
to a trailer connect. This message may not
appear until your vehicle speed reaches
22 mph (35 km/h).
The Blind Spot Information System with
Trailer Tow activates when driving forward
for that particular trailer set up. If the
ignition is cycled, the Blind Spot
Information System with Trailer Tow
continues to function using the last trailer
selected.
Trailer Considerations
The Blind Spot Information System with
Trailer Tow is designed to work with any
trailer whose front width is
8.5 ft (2.6 m)
or less and total length from the trailer
hitch ball to the rear of the trailer is
33 ft
(10.1 m) or less. Different trailers may
cause a slight change in performance as
outlined below. Large box trailers may cause false alerts
to trigger when driving next to buildings or
near parking cars. A false alert may also
occur while making a 90-degree turn.
Trailers that are
8.5 ft (2.6 m) wide at the
front and have a total length greater than
20 ft (6 m)
may have delayed alerts from
passing vehicles when the vehicle is
passing at high speed.
A box trailer whose front width is
8.5 ft
(2.6 m) may cause early alerts when you
are over taking a vehicle.
When towing a clam shell or V-Nose box
trailer with a front width of
8.5 ft (2.6 m),
delayed alerts on merging vehicles that are
traveling the same speed as your vehicle
may occur.
System Errors
If the system senses a problem with the
left or right sensor, the telltale illuminates
and a message appears in the display
screen. See
Information Messages
(page 123).
Switching the System Off and On
You can temporarily switch the Blind Spot
Information System off in the display
screen. See
General Information (page
112). When the Blind Spot Information
System switches off, you do not receive
alerts and the display screen shows a
system off message. The telltale in the
cluster also illuminates. When you switch
the Blind Spot Information System on or
off, the alert indicators flash twice.
Note: The Blind Spot Information System
remembers the last selected on or off
setting.
You can also have the Blind Spot
Information System switched off
permanently at an authorized dealer. Once
switched off permanently, the system can
only be switched back on at an authorized
dealer.
257
Super Duty (TFE) Canada/United States of America, enUSA, Edition date: 201909, Second-Printing Driving Aids