Page 346 of 633
3. Raise the hood until the lift cylinders
hold it open.
4. To close, lower the hood and make sure that it is closed properly and fully
latched.
UNDER HOOD OVERVIEW - 6.2L Air filter. See Changing the Engine Air Filter (page 351).
A.
Engine compartment fuse box. See
Fuse Specification Chart (page 334).
B.
Brake fluid reservoir. See
Brake Fluid Check (page 371).
C.
Windshield washer fluid reservoir. See
Washer Fluid Check (page 376).
D.
Engine coolant reservoir. See
Engine Coolant Check (page 358).
E.
343
Super Duty (TFE) Canada/United States of America, enUSA, Edition date: 201909, Second-Printing MaintenanceE190266 AB
IDEGH
C
FE314770
Page 348 of 633
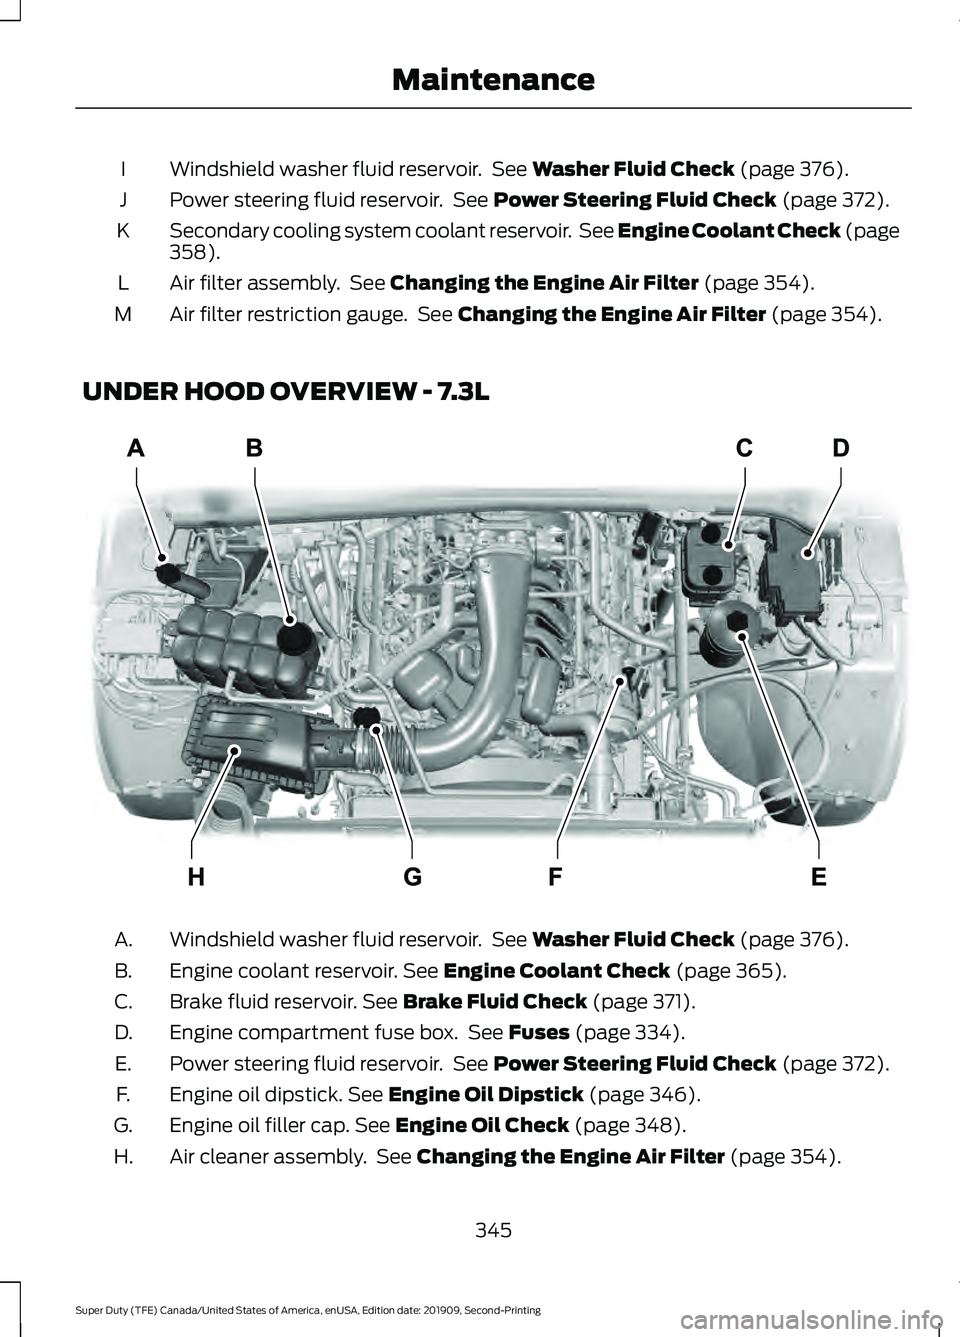
Windshield washer fluid reservoir. See Washer Fluid Check (page 376).
I
Power steering fluid reservoir. See
Power Steering Fluid Check (page 372).
J
Secondary cooling system coolant reservoir. See Engine Coolant Check
(page
358).
K
Air filter assembly. See
Changing the Engine Air Filter (page 354).
L
Air filter restriction gauge. See
Changing the Engine Air Filter (page 354).
M
UNDER HOOD OVERVIEW - 7.3L Windshield washer fluid reservoir. See
Washer Fluid Check (page 376).
A.
Engine coolant reservoir.
See Engine Coolant Check (page 365).
B.
Brake fluid reservoir.
See Brake Fluid Check (page 371).
C.
Engine compartment fuse box. See
Fuses (page 334).
D.
Power steering fluid reservoir. See
Power Steering Fluid Check (page 372).
E.
Engine oil dipstick.
See Engine Oil Dipstick (page 346).
F.
Engine oil filler cap.
See Engine Oil Check (page 348).
G.
Air cleaner assembly. See
Changing the Engine Air Filter (page 354).
H.
345
Super Duty (TFE) Canada/United States of America, enUSA, Edition date: 201909, Second-Printing MaintenanceE314803
Page 354 of 633

From the main menu scroll to:
Action and description
Message
Press the down arrow
button, then from this menu
scroll to the following
message.
Truck Info
Press the OK button.
Mainten-
ance
Monitor
Press the down arrow
button, then from this menu
scroll to the following
message.
Oil Life:
xxx%
Press the
OK button.
Oil Life
Press and hold the
OK
button until the instrument
cluster displays the
following message.
Oil Life
Hold OK to
Reset
Oil Life: 100%
When the oil change indic-
ator resets the instrument
cluster displays 100%.
Repeat the process if the oil
change indicator does not
reset.
CHANGING THE ENGINE AIR
FILTER - 6.2L WARNING:
To reduce the risk of
vehicle damage and personal burn
injuries, do not start your engine with the
air cleaner removed and do not remove
it while the engine is running.
Use the correct specification air filter
element. See
Motorcraft Parts (page
435). Note:
Failure to use the correct air filter
element may result in severe engine
damage. Resulting component damage
may not be covered by the vehicle Warranty.
Change the air filter element at the correct
service interval. See
Scheduled
Maintenance (page 557). 1. Disconnect the mass air flow sensor
electrical connector, if required.
2. Remove the air intake tube securing clamp.
3. Pull the air intake tube away from the air filter housing.
4. Remove the clips that secure the air filter housing cover. Remove the air
filter housing cover.
351
Super Duty (TFE) Canada/United States of America, enUSA, Edition date: 201909, Second-Printing MaintenanceE226426
x4
1
2
4
3
Page 355 of 633
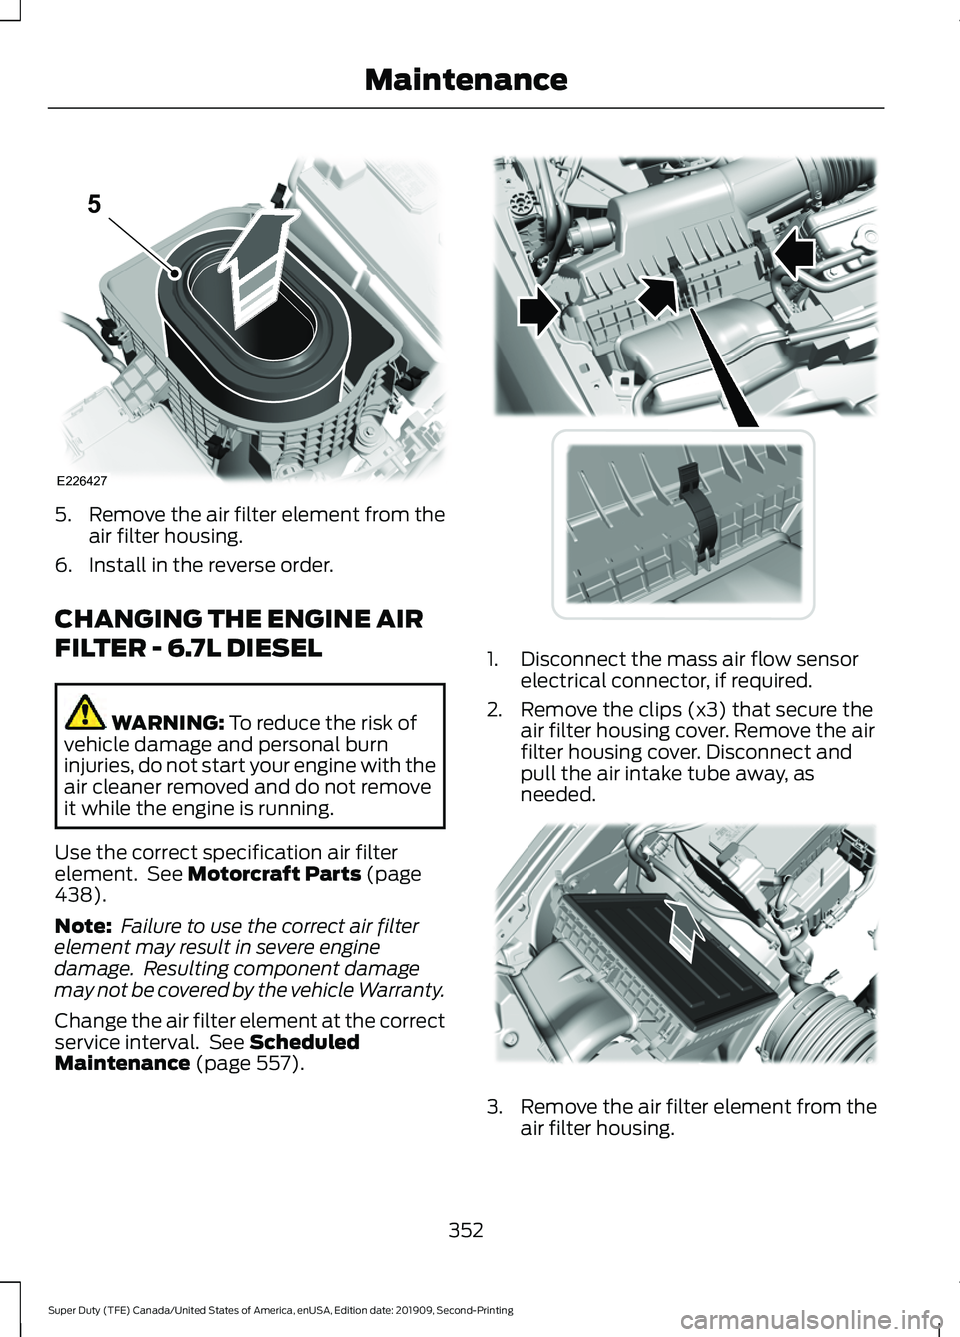
5.
Remove the air filter element from the
air filter housing.
6. Install in the reverse order.
CHANGING THE ENGINE AIR
FILTER - 6.7L DIESEL WARNING: To reduce the risk of
vehicle damage and personal burn
injuries, do not start your engine with the
air cleaner removed and do not remove
it while the engine is running.
Use the correct specification air filter
element. See
Motorcraft Parts (page
438).
Note: Failure to use the correct air filter
element may result in severe engine
damage. Resulting component damage
may not be covered by the vehicle Warranty.
Change the air filter element at the correct
service interval. See
Scheduled
Maintenance (page 557). 1. Disconnect the mass air flow sensor
electrical connector, if required.
2. Remove the clips (x3) that secure the air filter housing cover. Remove the air
filter housing cover. Disconnect and
pull the air intake tube away, as
needed. 3.
Remove the air filter element from the
air filter housing.
352
Super Duty (TFE) Canada/United States of America, enUSA, Edition date: 201909, Second-Printing MaintenanceE226427
5 E310318 E310319
Page 356 of 633
4. Remove the auxiliary foam filter from
the air filter housing.
5. To install, reverse the removal procedure. The housing cover can be
oscillated slightly left to right to assist
with installation as needed, until
positioned such that all three clips can
be re-engaged.
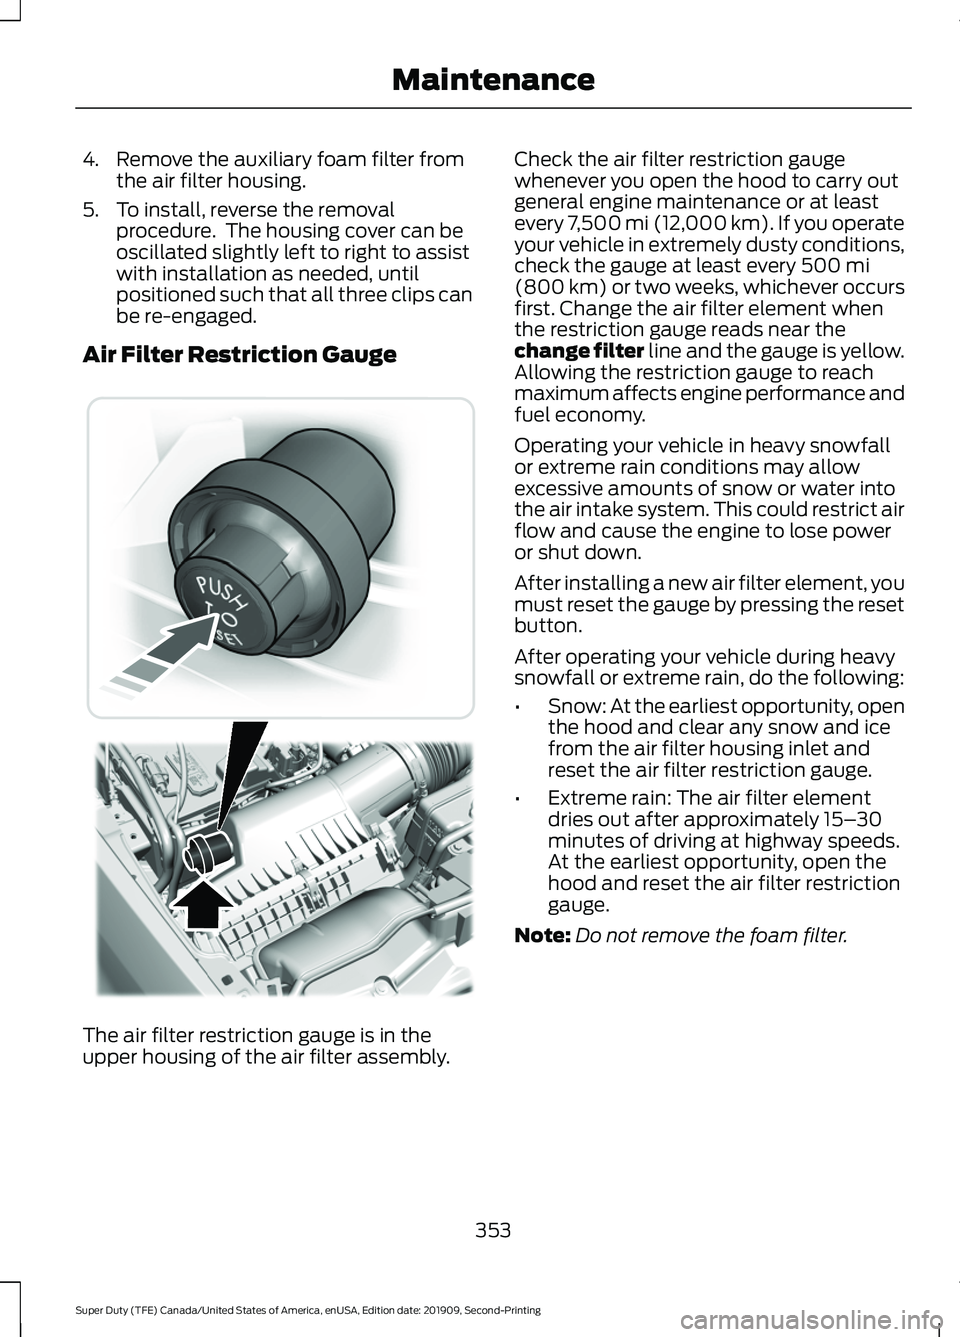
Air Filter Restriction Gauge The air filter restriction gauge is in the
upper housing of the air filter assembly. Check the air filter restriction gauge
whenever you open the hood to carry out
general engine maintenance or at least
every 7,500 mi (12,000 km). If you operate
your vehicle in extremely dusty conditions,
check the gauge at least every 500 mi
(800 km) or two weeks, whichever occurs
first. Change the air filter element when
the restriction gauge reads near the
change filter line and the gauge is yellow.
Allowing the restriction gauge to reach
maximum affects engine performance and
fuel economy.
Operating your vehicle in heavy snowfall
or extreme rain conditions may allow
excessive amounts of snow or water into
the air intake system. This could restrict air
flow and cause the engine to lose power
or shut down.
After installing a new air filter element, you
must reset the gauge by pressing the reset
button.
After operating your vehicle during heavy
snowfall or extreme rain, do the following:
• Snow: At the earliest opportunity, open
the hood and clear any snow and ice
from the air filter housing inlet and
reset the air filter restriction gauge.
• Extreme rain: The air filter element
dries out after approximately 15– 30
minutes of driving at highway speeds.
At the earliest opportunity, open the
hood and reset the air filter restriction
gauge.
Note: Do not remove the foam filter.
353
Super Duty (TFE) Canada/United States of America, enUSA, Edition date: 201909, Second-Printing Maintenance E310420
Page 357 of 633
CHANGING THE ENGINE AIR
FILTER - 7.3L
WARNING: To reduce the risk of
vehicle damage and personal burn
injuries, do not start your engine with the
air cleaner removed and do not remove
it while the engine is running.
Note: Operating your vehicle in heavy
snowfall or extreme rain conditions may
allow excessive amounts of snow or water
into the air intake system. This could plug
or soak the air filter that could cause the
engine to lose power or shut down.
When replacing the air filter element, use
a Motorcraft® air filter element. See
Motorcraft Parts
(page 438).
Note: Failure to use the correct air filter
element may result in severe engine
damage. Resulting component damage
may not be covered by the vehicle Warranty.
Change the air filter element at the correct
interval. See
Scheduled Maintenance
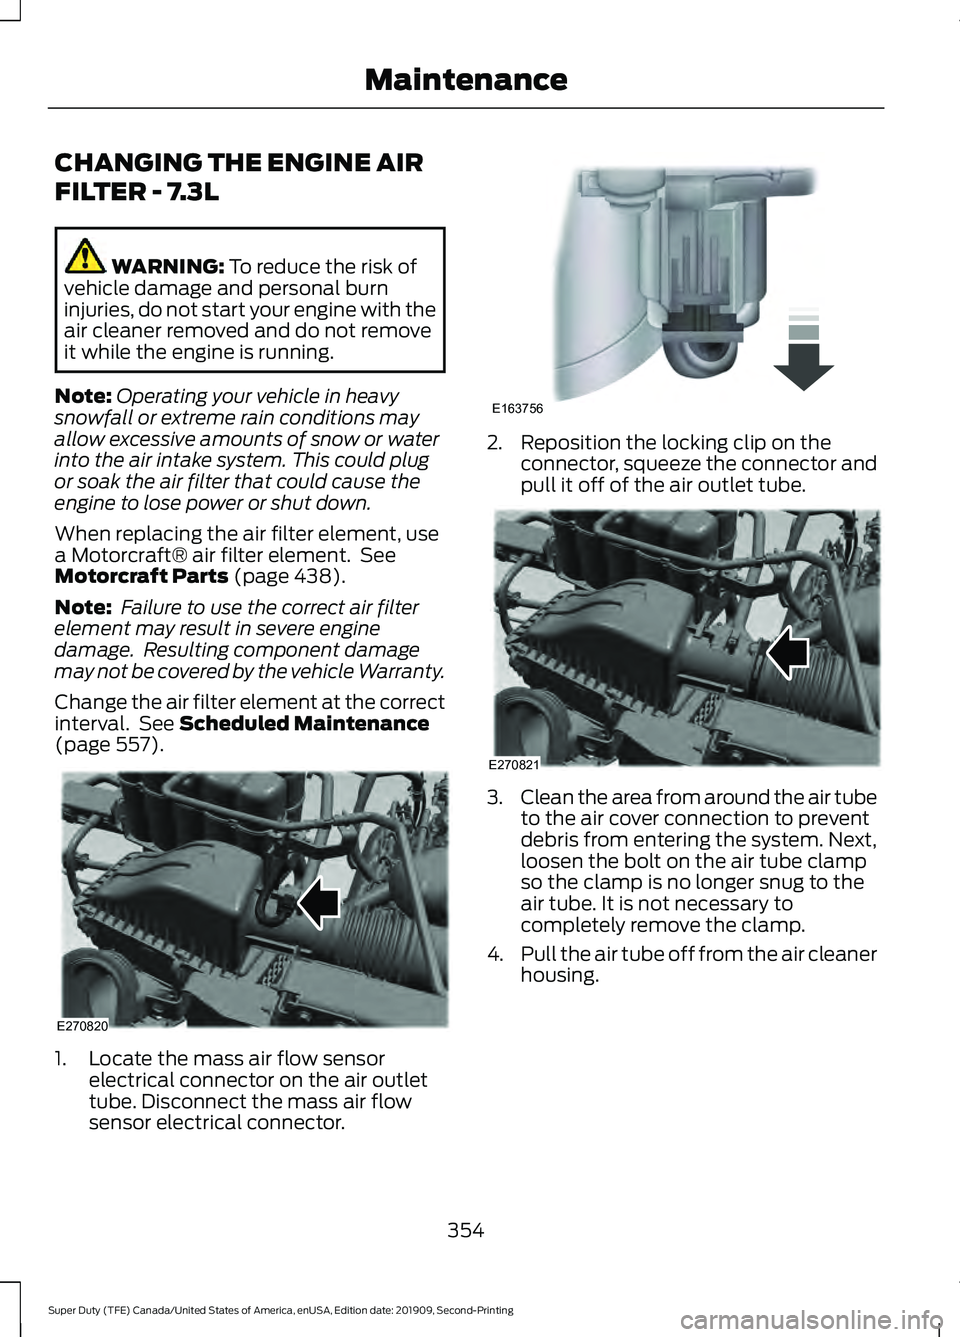
(page 557). 1. Locate the mass air flow sensor
electrical connector on the air outlet
tube. Disconnect the mass air flow
sensor electrical connector. 2. Reposition the locking clip on the
connector, squeeze the connector and
pull it off of the air outlet tube. 3.
Clean the area from around the air tube
to the air cover connection to prevent
debris from entering the system. Next,
loosen the bolt on the air tube clamp
so the clamp is no longer snug to the
air tube. It is not necessary to
completely remove the clamp.
4. Pull the air tube off from the air cleaner
housing.
354
Super Duty (TFE) Canada/United States of America, enUSA, Edition date: 201909, Second-Printing MaintenanceE270820 E163756 E270821
Page 358 of 633
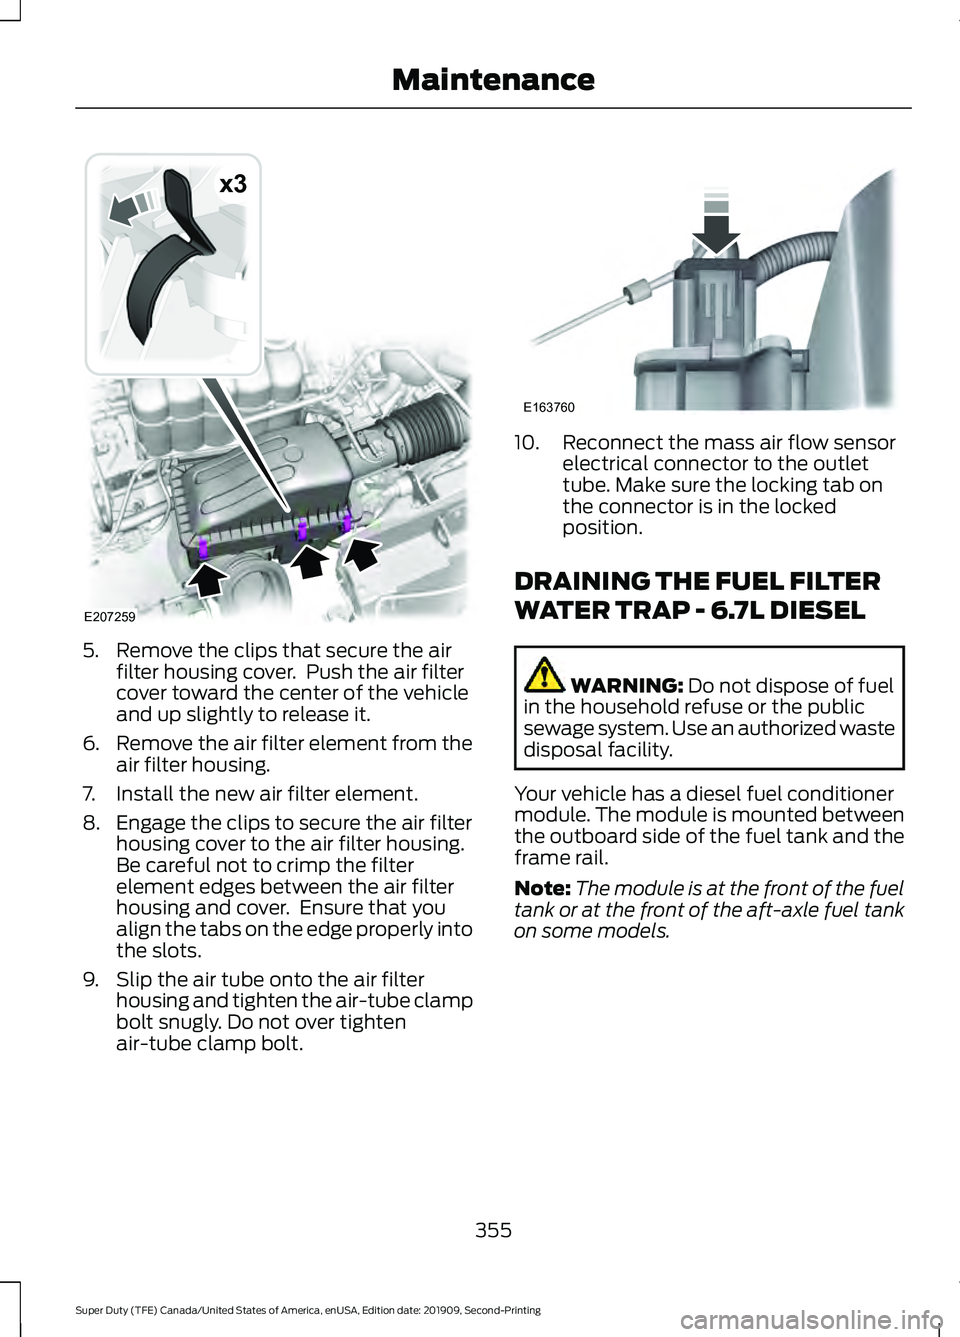
5. Remove the clips that secure the air
filter housing cover. Push the air filter
cover toward the center of the vehicle
and up slightly to release it.
6. Remove the air filter element from the
air filter housing.
7. Install the new air filter element.
8. Engage the clips to secure the air filter housing cover to the air filter housing.
Be careful not to crimp the filter
element edges between the air filter
housing and cover. Ensure that you
align the tabs on the edge properly into
the slots.
9. Slip the air tube onto the air filter housing and tighten the air-tube clamp
bolt snugly. Do not over tighten
air-tube clamp bolt. 10. Reconnect the mass air flow sensor
electrical connector to the outlet
tube. Make sure the locking tab on
the connector is in the locked
position.
DRAINING THE FUEL FILTER
WATER TRAP - 6.7L DIESEL WARNING: Do not dispose of fuel
in the household refuse or the public
sewage system. Use an authorized waste
disposal facility.
Your vehicle has a diesel fuel conditioner
module. The module is mounted between
the outboard side of the fuel tank and the
frame rail.
Note: The module is at the front of the fuel
tank or at the front of the aft-axle fuel tank
on some models.
355
Super Duty (TFE) Canada/United States of America, enUSA, Edition date: 201909, Second-Printing MaintenanceE207259
x3 E163760
Page 379 of 633
B. Halogen headlamp.
6. Repeat steps 3 thru 5 to adjust the
other headlamp.
7. Close the hood and turn off the lamps.
Horizontal Aim Adjustment
Horizontal aim is not required for this
vehicle and is not adjustable.
WASHER FLUID CHECK WARNING: If you operate your
vehicle in temperatures below 40°F
(5°C), use washer fluid with antifreeze
protection. Failure to use washer fluid
with antifreeze protection in cold
weather could result in impaired
windshield vision and increase the risk
of injury or accident.
Add fluid to fill the reservoir if the level is
low. Only use a washer fluid that meets
Ford specifications. See
Capacities and
Specifications (page 433).
State or local regulations on volatile
organic compounds may restrict the use
of methanol, a common windshield washer
antifreeze additive. Washer fluids
containing non-methanol antifreeze
agents should be used only if they provide
cold weather protection without damaging
the vehicle ’s paint finish, wiper blades or
washer system.
FUEL FILTER - 6.2L
Your vehicle is equipped with a lifetime
fuel filter that is integrated with the fuel
tank. Regular maintenance or replacement
is not needed. CHECKING THE WIPER
BLADES
Run the tip of your fingers over the edge of
the blade to check for roughness.
Clean the wiper blades with washer fluid
or water applied with a soft sponge or
cloth.
CHANGING THE WIPER
BLADES
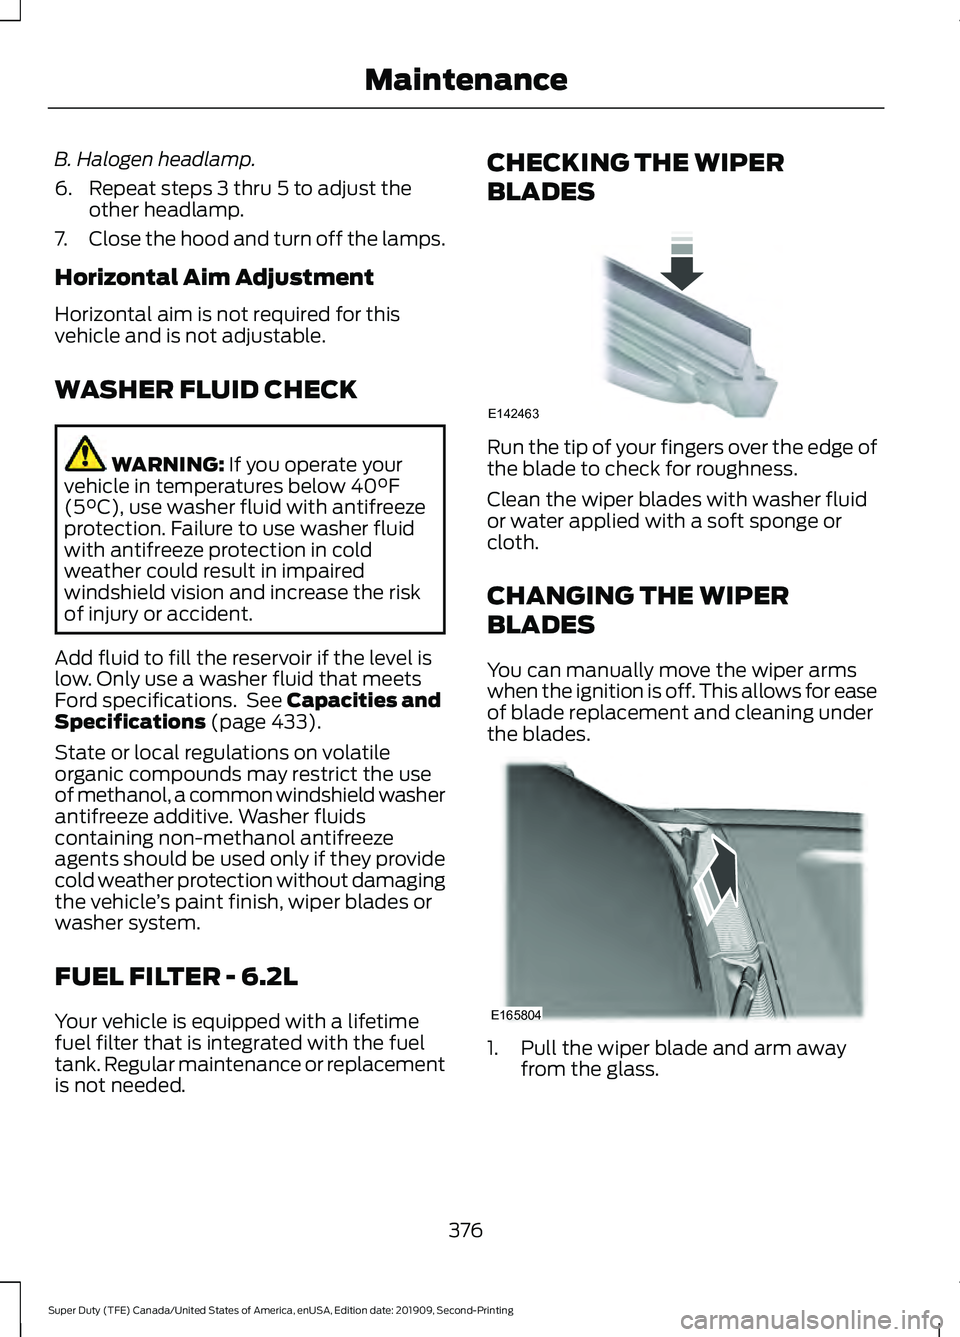
You can manually move the wiper arms
when the ignition is off. This allows for ease
of blade replacement and cleaning under
the blades.
1. Pull the wiper blade and arm away
from the glass.
376
Super Duty (TFE) Canada/United States of America, enUSA, Edition date: 201909, Second-Printing MaintenanceE142463 E165804