Page 381 of 555

WARNING: Do not work on your
vehicle when the jack is the only support
as your vehicle could slip off the jack.
Failure to follow this instruction could
result in personal injury or death. WARNING:
Use only the specified
jacking points. If you use other positions,
you may damage the body, steering,
suspension, engine, braking system or
the fuel lines. WARNING:
Never place anything
between the vehicle jack and your
vehicle. WARNING:
Never place anything
between the vehicle jack and the ground. WARNING:
Park your vehicle so
that you do not obstruct the flow of
traffic or place yourself in any danger and
set up a warning triangle. WARNING:
Do not attempt to
change a tire on the side of the vehicle
close to moving traffic. Pull far enough
off the road to avoid the danger of being
hit when operating the jack or changing
the wheel.
Note: Passengers should not remain in your
vehicle when the vehicle is being jacked.
Note: Jack at the specified locations to
avoid damage to the vehicle. Note:
No maintenance or additional
lubrication of your jack is required over the
service life of your vehicle.
1. Park on a level surface, set the parking
brake and switch on the hazard
flashers.
2. Apply the parking brake, place the transmission in park (P) or reverse (R)
for manual transmission. Turn the
engine off.
3. If your vehicle has air suspension, use the touch screen to switch on the Air
Suspension Service Mode prior to
jacking. 4. Block the wheel diagonally opposite
the flat tire. For example, if the left
front tire is flat, block the right rear
wheel.
378
Explorer (CTW) Canada/United States of America, enUSA, Edition date: 201902, Third-Printing- Wheels and TiresE166722 E142551
Page 382 of 555
5. Unfold the third row seat if it is in the
stowed position, then remove the
carpeted cargo area to access the
spare tire and jack storage
compartment.
6. Turn the wing nut securing the spare tire counterclockwise, remove the wing
nut.
7. Remove the spare tire, jack and wrench
from the spare tire storage
compartment. 8. Turn the hex nut on the jack
counterclockwise to remove the lug
wrench from jack. This lowers the jack
and loosens the mechanical lock. 9. Unfold the wrench for use.
10. Remove the strap from the jack.
379
Explorer (CTW) Canada/United States of America, enUSA, Edition date: 201902, Third-Printing- Wheels and TiresE288598 E175694 E181744 E288597
Page 383 of 555
11. Loosen each wheel lug nut one-half
turn counterclockwise, but do not
remove them until the flat tire is
raised off the ground.12. Find the jacking points shown here,
small arrow-shaped marks on the
sills show the location of the jacking
points. 13. Place the jack at the jacking point
next to the tire which you are
changing. Turn the lug wrench handle
clockwise until the flat tire is
completely off the ground. 14. Remove the lug nuts with the lug
wrench.
15. Replace the flat tire with the spare tire, making sure the valve stem is
facing outward.
16. Install the lug nuts snug against the hub. Do not fully tighten the lug nuts
until the vehicle is lowered.
17. Turn the wrench handle counterclockwise to lower the vehicle
completely.
380
Explorer (CTW) Canada/United States of America, enUSA, Edition date: 201902, Third-Printing- Wheels and Tires1
E181745
2 E145908 E307859 E201156
Page 384 of 555

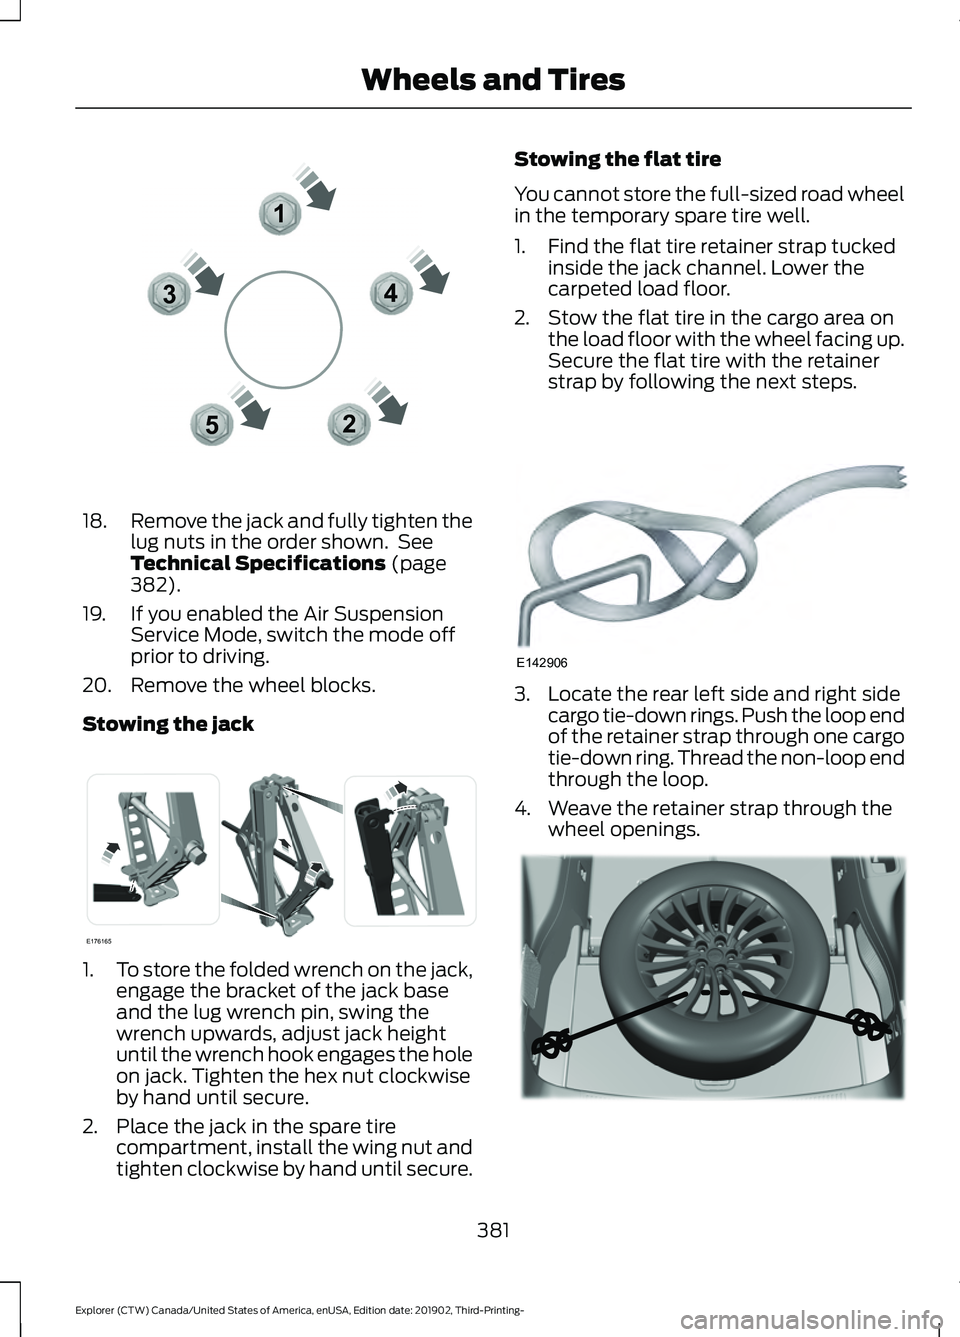
18.
Remove the jack and fully tighten the
lug nuts in the order shown. See
Technical Specifications (page
382).
19. If you enabled the Air Suspension Service Mode, switch the mode off
prior to driving.
20. Remove the wheel blocks.
Stowing the jack 1.
To store the folded wrench on the jack,
engage the bracket of the jack base
and the lug wrench pin, swing the
wrench upwards, adjust jack height
until the wrench hook engages the hole
on jack. Tighten the hex nut clockwise
by hand until secure.
2. Place the jack in the spare tire compartment, install the wing nut and
tighten clockwise by hand until secure. Stowing the flat tire
You cannot store the full-sized road wheel
in the temporary spare tire well.
1. Find the flat tire retainer strap tucked
inside the jack channel. Lower the
carpeted load floor.
2. Stow the flat tire in the cargo area on the load floor with the wheel facing up.
Secure the flat tire with the retainer
strap by following the next steps. 3. Locate the rear left side and right side
cargo tie-down rings. Push the loop end
of the retainer strap through one cargo
tie-down ring. Thread the non-loop end
through the loop.
4. Weave the retainer strap through the wheel openings. 381
Explorer (CTW) Canada/United States of America, enUSA, Edition date: 201902, Third-Printing- Wheels and Tires12
3
4
5E306781 E176165 E142906 E294325
Page 402 of 555

Materials
Specification
Name
ESA-M1C75-B
Motorcraft® Premium Long-Life Grease(U.S.)
Motorcraft® Premium Long-Life Grease / Graisse
longue durée de qualité première Motor-
craft®(Canada)
XG-1-E1(U.S. & Canada)
ESB-M1C93-B
Motorcraft® Multi-Purpose Grease Spray(U.S.)
Motorcraft® Multi-Purpose Grease Spray / Graisse
tout usage en aérosol Motorcraft®(Canada)
XL-5-A(U.S. & Canada)
Hydraulic Brake System
Materials Specification
Name
WSS-M6C65-A2
Motorcraft® DOT 4 LV High Performance Motor
Vehicle Brake Fluid(U.S.)
Motorcraft® DOT 4 LV High Performance Motor
Vehicle Brake Fluid / Liquide de frein automobile
haute performance DOT 4 LV Motorcraft®(Canada)
PM-20(U.S. & Canada)
Note: We recommend using DOT 4 Low
Viscosity (LV) High Performance Brake Fluid
or equivalent meeting WSS-M6C65-A2. Use
of any fluid other than the recommended
fluid may cause reduced brake performance
and not meet our performance standards.
Keep brake fluid clean and dry.
Contamination with dirt, water, petroleum
products or other materials may result in
brake system damage and possible failure. Locks
399
Explorer (CTW) Canada/United States of America, enUSA, Edition date: 201902, Third-Printing- Capacities and Specifications
Page 403 of 555
Materials
Specification
Name
-
Motorcraft® Penetrating and Lock Lubricant(U.S.)
Motorcraft® Penetrating Fluid / Liquide dégrippant
Motorcraft®(Canada)
XL-1(U.S.)
CXC-51-A(Canada)
Transfer Case
Capacities Quantity
Variant
1.1 qt (1 L)
All.
Materials Specification
Name
WSS-M2C938-AMERCON® LV,
Motorcraft® MERCON® LV Automatic Transmission
Fluid(U.S.)
Motorcraft® MERCON® LV Automatic Transmission
Fluid / Huile pour boîte automatique MERCON® LV
Motorcraft®(Canada)
XT-10-QLVC(U.S.)
CXT-10-LV6(Canada)
Front Axle
Capacities Quantity
Variant
0.6 qt (0.6 L)
Four wheel drive.
400
Explorer (CTW) Canada/United States of America, enUSA, Edition date: 201902, Third-Printing- Capacities and Specifications
Page 410 of 555

Materials
Specification
Name
WSS-M6C65-A2
Motorcraft® DOT 4 LV High Performance Motor
Vehicle Brake Fluid(U.S.)
Motorcraft® DOT 4 LV High Performance Motor
Vehicle Brake Fluid / Liquide de frein automobile
haute performance DOT 4 LV Motorcraft®(Canada)
PM-20(U.S. & Canada)
Note: We recommend using DOT 4 Low
Viscosity (LV) High Performance Brake Fluid
or equivalent meeting WSS-M6C65-A2. Use
of any fluid other than the recommended
fluid may cause reduced brake performance
and not meet our performance standards.
Keep brake fluid clean and dry.
Contamination with dirt, water, petroleum
products or other materials may result in
brake system damage and possible failure. Locks
Materials Specification
Name
-
Motorcraft® Penetrating and Lock Lubricant(U.S.)
Motorcraft® Penetrating Fluid / Liquide dégrippant
Motorcraft®(Canada)
XL-1(U.S.)
CXC-51-A(Canada)
Transfer Case
Capacities Quantity
Variant
1.1 qt (1 L)
All.
407
Explorer (CTW) Canada/United States of America, enUSA, Edition date: 201902, Third-Printing- Capacities and Specifications
Page 417 of 555

Materials
Specification
Name
WSS-M6C65-A2
Motorcraft® DOT 4 LV High Performance Motor
Vehicle Brake Fluid(U.S.)
Motorcraft® DOT 4 LV High Performance Motor
Vehicle Brake Fluid / Liquide de frein automobile
haute performance DOT 4 LV Motorcraft®(Canada)
PM-20(U.S. & Canada)
Note: We recommend using DOT 4 Low
Viscosity (LV) High Performance Brake Fluid
or equivalent meeting WSS-M6C65-A2. Use
of any fluid other than the recommended
fluid may cause reduced brake performance
and not meet our performance standards.
Keep brake fluid clean and dry.
Contamination with dirt, water, petroleum
products or other materials may result in
brake system damage and possible failure. Locks
Materials Specification
Name
-
Motorcraft® Penetrating and Lock Lubricant(U.S.)
Motorcraft® Penetrating Fluid / Liquide dégrippant
Motorcraft®(Canada)
XL-1(U.S.)
CXC-51-A(Canada)
Transfer Case
Capacities Quantity
Variant
1.1 qt (1 L)
All.
414
Explorer (CTW) Canada/United States of America, enUSA, Edition date: 201902, Third-Printing- Capacities and Specifications